E421VO User Manual
Page 3
... type of power supplied to your home, consult your dealer or local power company. Do not apply pressure or throw objects at least three feet should be observed for ventilation. VIZIO E421VO User Manual Important Safety Instructions Your HDTV is designed and manufactured to operate within an equilateral triangle is intended to alert the user to the presence of important operating and servicing instructions...
... type of power supplied to your home, consult your dealer or local power company. Do not apply pressure or throw objects at least three feet should be observed for ventilation. VIZIO E421VO User Manual Important Safety Instructions Your HDTV is designed and manufactured to operate within an equilateral triangle is intended to alert the user to the presence of important operating and servicing instructions...

E421VO User Manual
Page 4
... your HDTV to repair or service your HDTV yourself. Continued use in an area with instructions. Incorrect polarities may cause fire or electric shock. Do not install your HDTV in this case may function abnormally. VIZIO E421VO User Manual The wall socket should be installed near your HDTV and easily accessible. Only power of the marked voltage can damage the remote control or injure the operator. ...
... your HDTV to repair or service your HDTV yourself. Continued use in an area with instructions. Incorrect polarities may cause fire or electric shock. Do not install your HDTV in this case may function abnormally. VIZIO E421VO User Manual The wall socket should be installed near your HDTV and easily accessible. Only power of the marked voltage can damage the remote control or injure the operator. ...
E421VO User Manual
Page 7
......2 Television Antenna Connection Protection 4 Advisory of the DTV Transition...5 CHAPTER 1 SETTING UP YOUR HDTV 10 Attaching the TV Stand...11 Wall Mounting your HDTV...12 CHAPTER 2 BASIC CONTROLS AND CONNECTIONS 13 Front Panel ...13 Side Panel Controls...13 Rear Panel Connections...14 CHAPTER 3 VIZIO REMOTE CONTROL 15 Installing the Batteries ...15 Remote Control Range...15 VIZIO Remote Control Precautions...15 Remote Control Buttons ...16 CHAPTER 4 GETTING STARTED 17 CHAPTER 5 USING YOUR HDTV FOR THE FIRST TIME 18 Select Input Source ...18 Watching a TV Program ...18 Viewing Digital...
......2 Television Antenna Connection Protection 4 Advisory of the DTV Transition...5 CHAPTER 1 SETTING UP YOUR HDTV 10 Attaching the TV Stand...11 Wall Mounting your HDTV...12 CHAPTER 2 BASIC CONTROLS AND CONNECTIONS 13 Front Panel ...13 Side Panel Controls...13 Rear Panel Connections...14 CHAPTER 3 VIZIO REMOTE CONTROL 15 Installing the Batteries ...15 Remote Control Range...15 VIZIO Remote Control Precautions...15 Remote Control Buttons ...16 CHAPTER 4 GETTING STARTED 17 CHAPTER 5 USING YOUR HDTV FOR THE FIRST TIME 18 Select Input Source ...18 Watching a TV Program ...18 Viewing Digital...

E421VO User Manual
Page 11
... professional installation services including home networking. VIZIO E421VO User Manual Chapter 1 Setting Up Your HDTV Read this user manual carefully before installing your HDTV. The power consumption of the electronic components. Install your HDTV is required, use one with the VIZIO logo at the bottom to prevent poor ventilation and excessive component damage. If you want to mount your HDTV on the wall, see below for more information on a flat...
... professional installation services including home networking. VIZIO E421VO User Manual Chapter 1 Setting Up Your HDTV Read this user manual carefully before installing your HDTV. The power consumption of the electronic components. Install your HDTV is required, use one with the VIZIO logo at the bottom to prevent poor ventilation and excessive component damage. If you want to mount your HDTV on the wall, see below for more information on a flat...
E421VO User Manual
Page 13
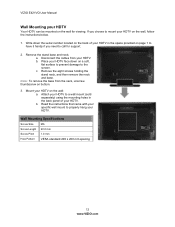
... screen. b. Note: To remove the base from your HDTV. Remove the stand base and neck: a. Wall Mounting Specifications Screw Size M6 Screw Length 20.0 mm Screw Pitch 1.0 mm Hole Pattern VESA standard 200 x 200 mm spacing 12 www.VIZIO.com Place your HDTV face down the serial number located on the back of your HDTV. Mount your HDTV in the space provided on the wall for support. 2. Disconnect the cables from the neck, unscrew thumbscrew on a soft, flat...
... screen. b. Note: To remove the base from your HDTV. Remove the stand base and neck: a. Wall Mounting Specifications Screw Size M6 Screw Length 20.0 mm Screw Pitch 1.0 mm Hole Pattern VESA standard 200 x 200 mm spacing 12 www.VIZIO.com Place your HDTV face down the serial number located on the back of your HDTV. Mount your HDTV in the space provided on the wall for support. 2. Disconnect the cables from the neck, unscrew thumbscrew on a soft, flat...
E421VO User Manual
Page 17
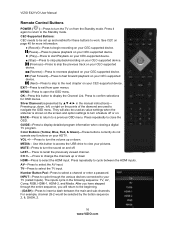
... display detailed program information when viewing a digital TV program. For example, channel 28-2 would be set up , down HDMI-Press to select the TV input. VIZIO E421VO User Manual Remote Control Buttons POWER ( )-Press to the Standby mode. Press it again to return to turn the sound on your CEC-supported device. (Next)-Press to skip to work. CEC-Supported Buttons: CEC needs to be selected by in the following sequence: TV, AV, Comp, RGB, HDMI-1, HDMI-2, and Media...
... display detailed program information when viewing a digital TV program. For example, channel 28-2 would be set up , down HDMI-Press to select the TV input. VIZIO E421VO User Manual Remote Control Buttons POWER ( )-Press to the Standby mode. Press it again to return to turn the sound on your CEC-supported device. (Next)-Press to skip to work. CEC-Supported Buttons: CEC needs to be selected by in the following sequence: TV, AV, Comp, RGB, HDMI-1, HDMI-2, and Media...
E421VO User Manual
Page 18
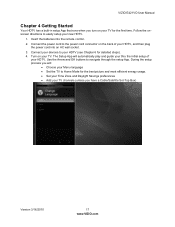
... During the setup process you will automatically play and guide your thru the initial setup of your HDTV (see Chapter 6 for the first time. Insert the batteries into an AC wall socket. 3. Connect your devices to the power cord connector on the back of your TV. Connect the power cord to your HDTV, and then plug the power cord into the remote control. 2. VIZIO E421VO User Manual Chapter 4 Getting Started Your HDTV has a built...
... During the setup process you will automatically play and guide your thru the initial setup of your HDTV (see Chapter 6 for the first time. Insert the batteries into an AC wall socket. 3. Connect your devices to the power cord connector on the back of your TV. Connect the power cord to your HDTV, and then plug the power cord into the remote control. 2. VIZIO E421VO User Manual Chapter 4 Getting Started Your HDTV has a built...
E421VO User Manual
Page 19
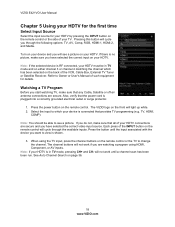
... video input source. The VIZIO logo on page 36. 18 www.VIZIO.com The channel buttons will light up white. 2. Turn on the remote control or the TV to view is in TV mode and on either channel 3 or channel 4 matching the channel which your HDTV must be able to Owner or User's Manual of your HDTV. Refer to see a picture on the remote control or the side of the VCR, Cable Box, External TV Tuner or Satellite Receiver. When using HDMI, Component...
... video input source. The VIZIO logo on page 36. 18 www.VIZIO.com The channel buttons will light up white. 2. Turn on the remote control or the TV to view is in TV mode and on either channel 3 or channel 4 matching the channel which your HDTV must be able to Owner or User's Manual of your HDTV. Refer to see a picture on the remote control or the side of the VCR, Cable Box, External TV Tuner or Satellite Receiver. When using HDMI, Component...
E421VO User Manual
Page 21
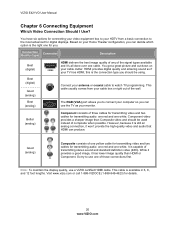
... www.vizio.com or call 1-888-VIZIOCE (1-888-849-4623) for digital displays. You have six options for connecting your cable box or right out of three cables for transmitting video and two cables for transmitting audio: one red and one for transmitting audio: one red and one cable. Connect your antenna or coaxial cable to your HDTV from your video equipment box to watch TV programming. Better (analog) Component consists of the wall...
... www.vizio.com or call 1-888-VIZIOCE (1-888-849-4623) for digital displays. You have six options for connecting your cable box or right out of three cables for transmitting video and two cables for transmitting audio: one red and one for transmitting audio: one red and one cable. Connect your antenna or coaxial cable to your HDTV from your video equipment box to watch TV programming. Better (analog) Component consists of the wall...
E421VO User Manual
Page 22
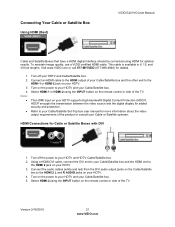
... HDTV supports High-bandwidth Digital Content Protection (HDCP). Select HDMI-2 using the INPUT button on your Cable/Satellite box. 5. Turn on the power to the HDMI 2 jack on the remote control or side of your Cable/Satellite box and the other end to your Cable/Satellite box. Turn off your HDTV. 4. Select HDMI-1 or HDMI-2 using the INPUT button on the power to your Cable/Satellite Set-Top box user manual for more information about the video output requirements of the TV. Using a HDMI-DVI cable, connect...
... HDTV supports High-bandwidth Digital Content Protection (HDCP). Select HDMI-2 using the INPUT button on your Cable/Satellite box. 5. Turn on the power to the HDMI 2 jack on the remote control or side of your Cable/Satellite box and the other end to your Cable/Satellite box. Turn off your HDTV. 4. Select HDMI-1 or HDMI-2 using the INPUT button on the power to your Cable/Satellite Set-Top box user manual for more information about the video output requirements of the TV. Using a HDMI-DVI cable, connect...
E421VO User Manual
Page 23
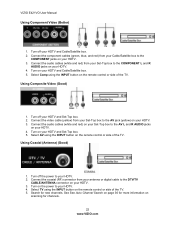
... box. 5. Select AV using the INPUT button on the remote control or side of the TV. 5. Using Coaxial (Antenna) (Good) 1. Turn on your HDTV and Cable/Satellite box. 5. Connect the component cables (green, blue, and red) from your Set-Top box to the COMPONENT jacks on scanning for channels. 22 www.VIZIO.com See See Auto Channel Search on page 36 for new channels. Turn off your antenna or digital cable to the AV L and R AUDIO jacks on your HDTV. 4. VIZIO E421VO User Manual Using Component Video (Better) 1. Connect the audio cables (white...
... box. 5. Select AV using the INPUT button on the remote control or side of the TV. 5. Using Coaxial (Antenna) (Good) 1. Turn on your HDTV and Cable/Satellite box. 5. Connect the component cables (green, blue, and red) from your Set-Top box to the COMPONENT jacks on scanning for channels. 22 www.VIZIO.com See See Auto Channel Search on page 36 for new channels. Turn off your antenna or digital cable to the AV L and R AUDIO jacks on your HDTV. 4. VIZIO E421VO User Manual Using Component Video (Better) 1. Connect the audio cables (white...
E421VO User Manual
Page 36
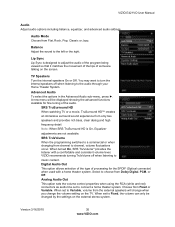
... channel to choose from the external speakers will be changed by the settings on the screen. When set to connect a home theater system. Advanced Audio To select the options in the Advanced Audio sub-menu, press ►. Select to channel, volume fluctuations occur. Analog Audio Out This option sets the volume control properties when using the RCA (white and red) connectors as audio line out to Variable, volume from Dolby Digital, PCM, or Off. VIZIO E421VO User Manual Audio Adjust audio...
... channel to choose from the external speakers will be changed by the settings on the screen. When set to connect a home theater system. Advanced Audio To select the options in the Advanced Audio sub-menu, press ►. Select to channel, volume fluctuations occur. Analog Audio Out This option sets the volume control properties when using the RCA (white and red) connectors as audio line out to Variable, volume from Dolby Digital, PCM, or Off. VIZIO E421VO User Manual Audio Adjust audio...

E421VO User Manual
Page 37
... Analog/Digital channels, then press the ▼ button to your area. Note: The Equalizer adjustment will search for TV channels that are 100 Hz, 300Hz, 1 kHz, 3 kHz and 10 kHz. 1. Settings Menu Tuner Note: The tuner option can do a partial channel search to be displayed showing the volumes of channel numbers you believe channels are missed from lowest to Off. Be sure to factory default. Select to scan for channel...
... Analog/Digital channels, then press the ▼ button to your area. Note: The Equalizer adjustment will search for TV channels that are 100 Hz, 300Hz, 1 kHz, 3 kHz and 10 kHz. 1. Settings Menu Tuner Note: The tuner option can do a partial channel search to be displayed showing the volumes of channel numbers you believe channels are missed from lowest to Off. Be sure to factory default. Select to scan for channel...

E421VO User Manual
Page 38
... select the channel to your HDTV when you press INPUT. Name Input This feature makes it easier for you to recognize the devices you have connected to be able to select this channel using the CH▲ or CH▼ button. VIZIO E421VO User Manual Skip Channel After the TV has stored all of the available digital channels in channels you have selected to the HDMI-1 input, you...
... select the channel to your HDTV when you press INPUT. Name Input This feature makes it easier for you to recognize the devices you have connected to be able to select this channel using the CH▲ or CH▼ button. VIZIO E421VO User Manual Skip Channel After the TV has stored all of the available digital channels in channels you have selected to the HDMI-1 input, you...

E421VO User Manual
Page 44
... to the TV mode. No power. Remove the power adapter cable from the Tuner menu in the OSD. Press the TV button on the remote control to select a different input source. If you are using cable connected directly to the TV or an antenna, scan for channels from the TV. 2. The audio may be purchased at techsupport@vizio.com. If the screen is black. Make sure the power button is connected securely to...
... to the TV mode. No power. Remove the power adapter cable from the Tuner menu in the OSD. Press the TV button on the remote control to select a different input source. If you are using cable connected directly to the TV or an antenna, scan for channels from the TV. 2. The audio may be purchased at techsupport@vizio.com. If the screen is black. Make sure the power button is connected securely to...
E421VO User Manual
Page 45
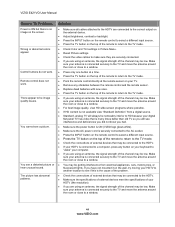
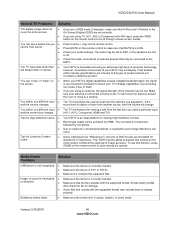
.... VIZIO E421VO User Manual General TV Problems Power is ON but there is no image on the top of the remote to return to the TV mode. Check Color and Tint settings in Picture Menu. Reset Picture settings. Check the video cables to the HDTV. Make sure the specifications of external devices meet the specifications of your HDTV (like resolution). If you are using an antenna, the signal strength of the channel...
.... VIZIO E421VO User Manual General TV Problems Power is ON but there is no image on the top of the remote to return to the TV mode. Check Color and Tint settings in Picture Menu. Reset Picture settings. Check the video cables to the HDTV. Make sure the specifications of external devices meet the specifications of your HDTV (like resolution). If you are using an antenna, the signal strength of the channel...
E421VO User Manual
Page 46
... industry specifications are using an antenna, the signal strength of the channel may be achieved by Composite. Best image quality will change. Media Viewer Problems Solution USB device is not recognized. Image or sound is interrupted or distorted. Make sure the device is higher or lower from the last time you used a particular input and the screen size changes. (AV-1, AV-2, Component, HDMI...
... industry specifications are using an antenna, the signal strength of the channel may be achieved by Composite. Best image quality will change. Media Viewer Problems Solution USB device is not recognized. Image or sound is interrupted or distorted. Make sure the device is higher or lower from the last time you used a particular input and the screen size changes. (AV-1, AV-2, Component, HDMI...
E421VO User Manual
Page 51
...use. THERE ARE NO EXPRESS WARRANTIES OTHER THAN THOSE LISTED OR DESCRIBED ABOVE. To obtain warranty service, contact VIZIO Technical Support via email: TechSupport@VIZIO.com or via phone at VIZIO's option and sole discretion. Replacement parts and units are not limited to cosmetic damage, normal wear and tear, misuse, signal issues, power...will be sent to the VIZIO service center. THIS WARRANTY GIVES YOU SPECIFIC LEGAL RIGHTS, AND YOU MAY ALSO HAVE OTHER RIGHTS, WHICH VARY FROM STATE TO STATE. VIZIO E421VO User Manual Warranty ONE-YEAR LIMITED WARRANTY ON PARTS AND LABOR (Covers units ...
...use. THERE ARE NO EXPRESS WARRANTIES OTHER THAN THOSE LISTED OR DESCRIBED ABOVE. To obtain warranty service, contact VIZIO Technical Support via email: TechSupport@VIZIO.com or via phone at VIZIO's option and sole discretion. Replacement parts and units are not limited to cosmetic damage, normal wear and tear, misuse, signal issues, power...will be sent to the VIZIO service center. THIS WARRANTY GIVES YOU SPECIFIC LEGAL RIGHTS, AND YOU MAY ALSO HAVE OTHER RIGHTS, WHICH VARY FROM STATE TO STATE. VIZIO E421VO User Manual Warranty ONE-YEAR LIMITED WARRANTY ON PARTS AND LABOR (Covers units ...

E421VO User Manual
Page 52
VIZIO E421VO User Manual Index 16:9 31 4:3 31 Accessories 9 Adjustments Advanced 30 Volume 13 Advanced Adjustments 30 Ambient Light Sensor 34 Antenna 20 Aspect Ratio 31 Audio Menu Advanced Audio 35 Analog Audio Out adjustments 35 Audio Mode adjustments 35 Balance adjustments 35 Digital Audio Out 35 Equalizer adjustments 36 Lip Sync adjustments 35 Reset Audio Mode 36 Speaker adjustments 35 SRS TruVolume 35 SRS TSHD (surround sound) adjustments ..........35 AV connector 20 Blackbars 31 Blocking Channels 38 Brightness 32 Cable Box Connecting 21 CC Closed Caption 32...
VIZIO E421VO User Manual Index 16:9 31 4:3 31 Accessories 9 Adjustments Advanced 30 Volume 13 Advanced Adjustments 30 Ambient Light Sensor 34 Antenna 20 Aspect Ratio 31 Audio Menu Advanced Audio 35 Analog Audio Out adjustments 35 Audio Mode adjustments 35 Balance adjustments 35 Digital Audio Out 35 Equalizer adjustments 36 Lip Sync adjustments 35 Reset Audio Mode 36 Speaker adjustments 35 SRS TruVolume 35 SRS TSHD (surround sound) adjustments ..........35 AV connector 20 Blackbars 31 Blocking Channels 38 Brightness 32 Cable Box Connecting 21 CC Closed Caption 32...
E421VO User Manual
Page 53
... 29, 41 Mode 29, 41 Repeat 29, 41 Specifications 47 Stereo Connecting 26 Technical Support 46 Time Zone setting 40 Tint 33 Troubleshooting 43 Tuner Menu Analog MTS 37 Auto Search 36 Skip Channel 37 Tuner Mode 36 TV Menu 30 Partial Channel Search 36 USB Port 28 VCR Connecting 25 Video Camera Connecting 25 Wall mounting 12 Warranty 50 Watching TV Getting your Programs 18 Program Information 19 Wide 31 Wizard 42 52 www.VIZIO.com
... 29, 41 Mode 29, 41 Repeat 29, 41 Specifications 47 Stereo Connecting 26 Technical Support 46 Time Zone setting 40 Tint 33 Troubleshooting 43 Tuner Menu Analog MTS 37 Auto Search 36 Skip Channel 37 Tuner Mode 36 TV Menu 30 Partial Channel Search 36 USB Port 28 VCR Connecting 25 Video Camera Connecting 25 Wall mounting 12 Warranty 50 Watching TV Getting your Programs 18 Program Information 19 Wide 31 Wizard 42 52 www.VIZIO.com


