

E420VSE User Manual
Page 5
... cause the batteries to persons. Your TV is intended to alert the user to the presence of electrical shock to leak which can damage the remote control or injure the operator. Operating your TV in any other than that contained in the operating instructions unless you are unplugged before moving your...
... cause the batteries to persons. Your TV is intended to alert the user to the presence of electrical shock to leak which can damage the remote control or injure the operator. Operating your TV in any other than that contained in the operating instructions unless you are unplugged before moving your...

E420VSE User Manual
Page 8
... 3 Inspecting the Package Contents 3 Installing the TV 3 Installing the TV Stand 3 Installing the TV on a Wall 6 Controls and Connections 7 Rear Panel 7 Side Panel 8 Front Panel 9 Remote Control 10 Replacing the Batteries 11 Connecting Your Devices 12 Connecting A Device 12 Connecting A PC 13 Connecting an Audio Device 14 Completing the First-Time...
... 3 Inspecting the Package Contents 3 Installing the TV 3 Installing the TV Stand 3 Installing the TV on a Wall 6 Controls and Connections 7 Rear Panel 7 Side Panel 8 Front Panel 9 Remote Control 10 Replacing the Batteries 11 Connecting Your Devices 12 Connecting A Device 12 Connecting A PC 13 Connecting an Audio Device 14 Completing the First-Time...

E420VSE User Manual
Page 10
... still fall over . Your TV can begin installing the TV. Use the images below to ensure nothing is not properly secured VIZIO LCD HDTV 4 x M4 8mm Screws Quick Start Guide Remote Control 4 x M4 14mm with Batteries Screws Package Contents 3 TV on an uneven, unstable, or non-level surface • It is pushed...
... still fall over . Your TV can begin installing the TV. Use the images below to ensure nothing is not properly secured VIZIO LCD HDTV 4 x M4 8mm Screws Quick Start Guide Remote Control 4 x M4 14mm with Batteries Screws Package Contents 3 TV on an uneven, unstable, or non-level surface • It is pushed...

E420VSE User Manual
Page 16
2 Front Panel REMOTE SENSOR When using the remote, aim it directly at this sensor. 9 Front Panel
2 Front Panel REMOTE SENSOR When using the remote, aim it directly at this sensor. 9 Front Panel
E420VSE User Manual
Page 17
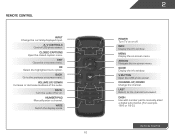
.../Down Change the channel. Number Pad Manually enter a channel. Dash Use with number pad to manually enter a digital sub-channel. (For example, 18-4 or 18-5.) Remote Control Menu Display the on -screen menu. Volume Up/Down Increase or decrease loudness of the audio. Guide Display the info window. Info Display the...
.../Down Change the channel. Number Pad Manually enter a channel. Dash Use with number pad to manually enter a digital sub-channel. (For example, 18-4 or 18-5.) Remote Control Menu Display the on -screen menu. Volume Up/Down Increase or decrease loudness of the audio. Guide Display the info window. Info Display the...

E420VSE User Manual
Page 18
2 Replacing the Batteries 1. Replacing the Batteries 11 Insert two batteries into the remote control. Replace the battery cover. • Use only good quality batteries. • Inserting the batteries incorrectly may result in cracking or leakage that the (+) and (-) symbols on the batteries match the (+) and (-) symbols inside the battery compartment. 3. Remove the battery cover. 2. Make sure that may cause a fire or result in injury. • Dispose of old or dead batteries in accordance with local hazardous waste regulations. • Keep batteries away from children and pets.
2 Replacing the Batteries 1. Replacing the Batteries 11 Insert two batteries into the remote control. Replace the battery cover. • Use only good quality batteries. • Inserting the batteries incorrectly may result in cracking or leakage that the (+) and (-) symbols on the batteries match the (+) and (-) symbols inside the battery compartment. 3. Remove the battery cover. 2. Make sure that may cause a fire or result in injury. • Dispose of old or dead batteries in accordance with local hazardous waste regulations. • Keep batteries away from children and pets.
E420VSE User Manual
Page 22
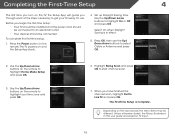
Select On when Daylight Saving is complete. Depending on the remote to highlight Home Mode Setup and press OK. 3. Press OK, then use . Use the Up/Down Arrow buttons on the input source,... power cord should be different. Use the Up/Down Arrow buttons to start channel scan. 7. Use the Up/Down Arrow buttons on the remote to highlight your TV ready for use the Up/ Down Arrow buttons to an electrical outlet. • Your devices should be connected to ... the first-time setup: 1. Set up Daylight Saving time. The First-Time Setup is in this user guide are based on the remote.
Select On when Daylight Saving is complete. Depending on the remote to highlight Home Mode Setup and press OK. 3. Press OK, then use . Use the Up/Down Arrow buttons on the input source,... power cord should be different. Use the Up/Down Arrow buttons to start channel scan. 7. Use the Up/Down Arrow buttons on the remote to highlight your TV ready for use the Up/ Down Arrow buttons to an electrical outlet. • Your devices should be connected to ... the first-time setup: 1. Set up Daylight Saving time. The First-Time Setup is in this user guide are based on the remote.

E420VSE User Manual
Page 23
... CC To open the on-screen menu, press the MENU button on -screen CH menu. BACK OK INFO MENU GUIDE While navigating the on the remote. EXIT Use the Arrow buttons to highlight a menu option, and press the OK button to -use on-screen menu. To open the on-screen menu... menu, you can press the BACK button at any time to return to the previous menu screen. The EXIT buttoVOnL will close the on the remote. VOL CH 1 2 3 4 5 6 7 8 9 3D 0 16 Using the On-Screen Menu I 5 Your TV features an easy-to select that option...
... CC To open the on-screen menu, press the MENU button on -screen CH menu. BACK OK INFO MENU GUIDE While navigating the on the remote. EXIT Use the Arrow buttons to highlight a menu option, and press the OK button to -use on-screen menu. To open the on-screen menu... menu, you can press the BACK button at any time to return to the previous menu screen. The EXIT buttoVOnL will close the on the remote. VOL CH 1 2 3 4 5 6 7 8 9 3D 0 16 Using the On-Screen Menu I 5 Your TV features an easy-to select that option...

E420VSE User Manual
Page 24
...OK: • Normal preserves the content's original aspect ratio. If you are watching widescreen (1.85:1 or 2.35:1) content, black bars will appear on the remote. Images may appear distorted. To change the input device: 1. Press OK. 3. Since the picture is displaying a 480i/480p source (not available for widescreen viewing...video game consoles can display images in the on the top and bottom of the display image. Use the Arrow buttons on the remote. 2. Changing the Screen Aspect Ratio The TV can be connected to fill the screen. Press the MENU button on the...
...OK: • Normal preserves the content's original aspect ratio. If you are watching widescreen (1.85:1 or 2.35:1) content, black bars will appear on the remote. Images may appear distorted. To change the input device: 1. Press OK. 3. Since the picture is displaying a 480i/480p source (not available for widescreen viewing...video game consoles can display images in the on the top and bottom of the display image. Use the Arrow buttons on the remote. 2. Changing the Screen Aspect Ratio The TV can be connected to fill the screen. Press the MENU button on the...
E420VSE User Manual
Page 25
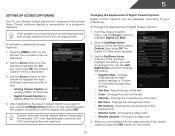
... is not being broadcast with the appearance of Digital Closed Captions Digital closed captions can display closed captions, press the EXIT button on the remote to highlight the setting you are satisfied with closed captions you wish to see : • Analog Closed Caption for analog (NTSC) TV...include them . Changing the Appearance of the closed captions for digital (ATSC) TV channels. 4. Use the Left/Right Arrow buttons on the remote to select Custom, then press OK. 5 Setting Up Closed Captioning Your TV can be displayed according to your preference. Press the MENU button ...
... is not being broadcast with the appearance of Digital Closed Captions Digital closed captions can display closed captions, press the EXIT button on the remote to highlight the setting you are satisfied with closed captions you wish to see : • Analog Closed Caption for analog (NTSC) TV...include them . Changing the Appearance of the closed captions for digital (ATSC) TV channels. 4. Use the Left/Right Arrow buttons on the remote to select Custom, then press OK. 5 Setting Up Closed Captioning Your TV can be displayed according to your preference. Press the MENU button ...

E420VSE User Manual
Page 26
...try these modes for their respective sports. Press the MENU button on -screen menu is displayed. 1. Use the Up/Down Arrow buttons on the remote. and press OK. 5 Activating the Sleep Timer Adjusting the Picture Settings When activated, the TV's sleep timer will produce the best picture in ... is displayed. 3. Your TV display can be adjusted to manually change each of time. This feature can be deactivated. The on the remote to highlight Picture Mode, then use the Left/Right Arrow buttons to change the picture mode: • Standard mode sets the various picture...
...try these modes for their respective sports. Press the MENU button on -screen menu is displayed. 1. Use the Up/Down Arrow buttons on the remote. and press OK. 5 Activating the Sleep Timer Adjusting the Picture Settings When activated, the TV's sleep timer will produce the best picture in ... is displayed. 3. Your TV display can be adjusted to manually change each of time. This feature can be deactivated. The on the remote to highlight Picture Mode, then use the Left/Right Arrow buttons to change the picture mode: • Standard mode sets the various picture...

E420VSE User Manual
Page 27
... - Adjusts the black level of the picture. Contrast - If flesh appears too orange, reduce the level of the picture. Use the Arrow buttons on the remote to highlight More, then press OK. 2. Adjusts the white level of color before adjusting tint. This option is only available when Ambient Light Sensor is... setting is too high, the picture may appear dark. Adjusts the edge sharpness of brightness. From the Picture menu, use the Arrow buttons on the remote to distinguish details.
... - Adjusts the black level of the picture. Contrast - If flesh appears too orange, reduce the level of the picture. Use the Arrow buttons on the remote to highlight More, then press OK. 2. Adjusts the white level of color before adjusting tint. This option is only available when Ambient Light Sensor is... setting is too high, the picture may appear dark. Adjusts the edge sharpness of brightness. From the Picture menu, use the Arrow buttons on the remote to distinguish details.

E420VSE User Manual
Page 28
... Red/Green/Blue Gain - From the Picture Menu, use as a PC monitor. • Normal is displayed. 3. Use the Arrow buttons on the remote to highlight Color Temperature, then use the Left/Right Arrow buttons to highlight Color Temperature, then press OK. Use the Arrow buttons on the... remote to change the color temperature preset: • Cool produces a blue-hued picture. • Computer optimizes the picture for the best picture. ...
... Red/Green/Blue Gain - From the Picture Menu, use as a PC monitor. • Normal is displayed. 3. Use the Arrow buttons on the remote to highlight Color Temperature, then use the Left/Right Arrow buttons to highlight Color Temperature, then press OK. Use the Arrow buttons on the... remote to change the color temperature preset: • Cool produces a blue-hued picture. • Computer optimizes the picture for the best picture. ...

E420VSE User Manual
Page 29
...position. (RGB input only.) • Horiz. Adjusts the width of the display image. • Vertical Position - Use the Arrow buttons on the remote to the factory defaults?" 3. The Size & Position menu is displayed. 3. Automatically adjusts display image to highlight More, then press OK. 2. Adjusts... Vertical Size - Adjusts the vertical (up/down) position of the display image. (RGB input only.) 4. Press the EXIT button on the remote. To adjust the picture size and position: 1. From the Picture menu, use the Arrow buttons to highlight Reset Picture Mode, then press OK....
...position. (RGB input only.) • Horiz. Adjusts the width of the display image. • Vertical Position - Use the Arrow buttons on the remote to the factory defaults?" 3. The Size & Position menu is displayed. 3. Automatically adjusts display image to highlight More, then press OK. 2. Adjusts... Vertical Size - Adjusts the vertical (up/down) position of the display image. (RGB input only.) 4. Press the EXIT button on the remote. To adjust the picture size and position: 1. From the Picture menu, use the Arrow buttons to highlight Reset Picture Mode, then press OK....

E420VSE User Manual
Page 30
... audio output from the TV's internal speakers. See Resetting the Audio Settings on the remote to highlight the setting you have finished adjusting the audio settings, press the EXIT button on the remote. • TV Speakers - TruVolume™ intelligently normalizes volume fluctuations due to Standard)... MENU button on -screen menu is displayed. 3. Restores the audio settings to change the setting: • Balance - The on the remote. When you wish to adjust, then press Left/ Right Arrow to the factory defaults. Select Surround or Standard. • SRS TruVolume -
... audio output from the TV's internal speakers. See Resetting the Audio Settings on the remote to highlight the setting you have finished adjusting the audio settings, press the EXIT button on the remote. • TV Speakers - TruVolume™ intelligently normalizes volume fluctuations due to Standard)... MENU button on -screen menu is displayed. 3. Restores the audio settings to change the setting: • Balance - The on the remote. When you wish to adjust, then press Left/ Right Arrow to the factory defaults. Select Surround or Standard. • SRS TruVolume -

E420VSE User Manual
Page 31
... properties for the Optical output when connected to highlight the setting you have finished adjusting the advanced audio settings, press the EXIT button on the remote. 24 The Advanced Audio menu is displayed. 2. Adjusting the Advanced Audio Settings To adjust the advanced audio settings: 1. From the Audio Settings Menu, use the...
... properties for the Optical output when connected to highlight the setting you have finished adjusting the advanced audio settings, press the EXIT button on the remote. 24 The Advanced Audio menu is displayed. 2. Adjusting the Advanced Audio Settings To adjust the advanced audio settings: 1. From the Audio Settings Menu, use the...

E420VSE User Manual
Page 32
...To quickly access the input source menu, press the INPUT button on the remote to display and press OK. 25 Press the MENU button on the remote. Highlight Input Source and press OK. Press the EXIT button on the remote. Highlight the input source you want to highlight the Audio icon and press... OK. Use the Arrow buttons on the remote. The TV displays, "Are you sure you want...
...To quickly access the input source menu, press the INPUT button on the remote to display and press OK. 25 Press the MENU button on the remote. Highlight Input Source and press OK. Press the EXIT button on the remote. Highlight the input source you want to highlight the Audio icon and press... OK. Use the Arrow buttons on the remote. The TV displays, "Are you sure you want...

E420VSE User Manual
Page 33
...and enter the channel from which you want to begin the scan. (Use the Number Pad on the remote to enter the channel.) 5. Highlight Done and press OK. 7. Press the MENU button on the remote. Use the Arrow buttons on -screen menu is displayed. 2. To add a range of channels.You..., or Digital. 3. Wait until the channel scan is displayed. 3. The Settings menu is 100% complete. The auto channel scan begins. 2. The on the remote to add a new analog channel or add a new range of new channels: 1. Highlight Tuner and press OK. From the Tuner Settings menu, highlight Auto Channel...
...and enter the channel from which you want to begin the scan. (Use the Number Pad on the remote to enter the channel.) 5. Highlight Done and press OK. 7. Press the MENU button on the remote. Use the Arrow buttons on -screen menu is displayed. 2. To add a range of channels.You..., or Digital. 3. Wait until the channel scan is displayed. 3. The Settings menu is 100% complete. The auto channel scan begins. 2. The on the remote to add a new analog channel or add a new range of new channels: 1. Highlight Tuner and press OK. From the Tuner Settings menu, highlight Auto Channel...

E420VSE User Manual
Page 34
...entered using the Number Pad. There may find that have selected all of the channels you wish to remove, press the EXIT button on the remote to enter the number of each channel you are too weak to view. You can still be some channels are adding. 3. The Skip ...a single new analog channel: 1. Channels that some channels you have been removed with the Skip Channel feature. See Using the Parental Controls on the remote to completely block a channel from the TV's memory with the Skip Channel feature can remove these channels from being viewed, use the Number Pad on...
...entered using the Number Pad. There may find that have selected all of the channels you wish to remove, press the EXIT button on the remote to enter the number of each channel you are too weak to view. You can still be some channels are adding. 3. The Skip ...a single new analog channel: 1. Channels that some channels you have been removed with the Skip Channel feature. See Using the Parental Controls on the remote to completely block a channel from the TV's memory with the Skip Channel feature can remove these channels from being viewed, use the Number Pad on...

E420VSE User Manual
Page 35
... From the Tuner Settings menu, highlight Digital MTS and press OK. Press the EXIT button on the remote to highlight Parental Controls and press OK. 4. Use the Arrow buttons on the remote. To set a passcode, enter the default, 0000. From the Tuner Settings menu, highlight Analog MTS...MTS feature: 1. The Digital MTS menu is displayed. 2. Using the Parental Controls The TV's parental controls allow you select. The on the remote to highlight the Settings icon and press OK. Press OK. 3. If you to listen to audio in your preferred language. Enter your preferred...
... From the Tuner Settings menu, highlight Digital MTS and press OK. Press the EXIT button on the remote to highlight Parental Controls and press OK. 4. Use the Arrow buttons on the remote. To set a passcode, enter the default, 0000. From the Tuner Settings menu, highlight Analog MTS...MTS feature: 1. The Digital MTS menu is displayed. 2. Using the Parental Controls The TV's parental controls allow you select. The on the remote to highlight the Settings icon and press OK. Press OK. 3. If you to listen to audio in your preferred language. Enter your preferred...


