E420AR User Manual
Page 3
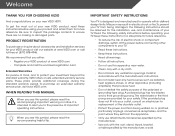
... Follow all instructions. • Do not use attachments/accessories specified by the manufacturer, or sold Welcome Thank You for Choosing VIZIO And congratulations on -site extended warranty service plans. We recommend that produce heat. • Do not defeat the safety purpose of electric .... Keep these instructions in accordance with the manufacturer's instructions. • Do not install near water. • Clean only with the cart, stand, tripod, bracket, or table specified by the manufacturer. • Use only with a dry cloth. • Do not block any heat ...
... Follow all instructions. • Do not use attachments/accessories specified by the manufacturer, or sold Welcome Thank You for Choosing VIZIO And congratulations on -site extended warranty service plans. We recommend that produce heat. • Do not defeat the safety purpose of electric .... Keep these instructions in accordance with the manufacturer's instructions. • Do not install near water. • Clean only with the cart, stand, tripod, bracket, or table specified by the manufacturer. • Use only with a dry cloth. • Do not block any heat ...
E420AR User Manual
Page 7
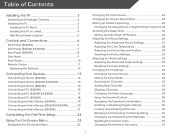
...TV 3 Inspecting the Package Contents 3 Installing the TV 3 Installing the TV Stand 3 Installing the TV on a Wall 4 Wall Mount Screw Location 5 Controls and Connections 6 Rear Panel (E240AR 6 Rear Panel (E320AR & E420AR 7 Rear Panel (E500AR 8 Side Panel 9 Front Panel 10 Remote Control... 12 Connecting Your Devices 13 Connecting A Device (E240AR 13 Connecting A Device (E320AR & E420AR 14 Connecting A Device (E500AR 15 Connecting A PC (E240AR 16 Connecting A PC (E320AR & E420AR 17 Connecting A PC (E500AR 18 Connecting an Audio Device (E240AR 19 Connecting an Audio Device...
...TV 3 Inspecting the Package Contents 3 Installing the TV 3 Installing the TV Stand 3 Installing the TV on a Wall 4 Wall Mount Screw Location 5 Controls and Connections 6 Rear Panel (E240AR 6 Rear Panel (E320AR & E420AR 7 Rear Panel (E500AR 8 Side Panel 9 Front Panel 10 Remote Control... 12 Connecting Your Devices 13 Connecting A Device (E240AR 13 Connecting A Device (E320AR & E420AR 14 Connecting A Device (E500AR 15 Connecting A PC (E240AR 16 Connecting A PC (E320AR & E420AR 17 Connecting A PC (E500AR 18 Connecting an Audio Device (E240AR 19 Connecting an Audio Device...
E420AR User Manual
Page 9
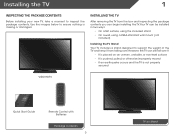
... TV. Installing the TV After removing the TV from falling over if: • It is placed on Stand Use the images below to ensure nothing is not properly secured VIZIO HDTV Quick Start Guide Remote Control with Batteries Package Contents 3 TV on an uneven, unstable, or non...TV can be installed in two ways: • On a flat surface, using the included stand • On a wall, using a VESA-standard wall mount (not included) Installing the TV Stand Your TV includes a stand designed to inspect the package contents. Installing the TV 1 Inspecting the Package Contents Before installing ...
... TV. Installing the TV After removing the TV from falling over if: • It is placed on Stand Use the images below to ensure nothing is not properly secured VIZIO HDTV Quick Start Guide Remote Control with Batteries Package Contents 3 TV on an uneven, unstable, or non...TV can be installed in two ways: • On a flat surface, using the included stand • On a wall, using a VESA-standard wall mount (not included) Installing the TV Stand Your TV includes a stand designed to inspect the package contents. Installing the TV 1 Inspecting the Package Contents Before installing ...
E420AR User Manual
Page 10
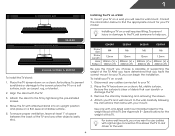
... 12mm 300mm (V) x 300mm (V) x 300mm (H) 300mm (H) Be sure the mount you have the correct mount for your TV model: E240AR E320AR, E420AR, & E500AR To install the TV stand: 1. After you have determined that you choose is clear of the TV. Place the TV face-down on a wall: 1. Attach your TV and...to the wall. 4 Place the TV screen-down on a wall, you may want to the TV by loosening and removing the screws. 4. Align the stand with attached stand into an upright position and place on a wall requires lifting. Move the TV with the TV. 3. Installing a TV on a flat, level, and ...
... 12mm 300mm (V) x 300mm (V) x 300mm (H) 300mm (H) Be sure the mount you have the correct mount for your TV model: E240AR E320AR, E420AR, & E500AR To install the TV stand: 1. After you have determined that you choose is clear of the TV. Place the TV face-down on a wall: 1. Attach your TV and...to the wall. 4 Place the TV screen-down on a wall, you may want to the TV by loosening and removing the screws. 4. Align the stand with attached stand into an upright position and place on a wall requires lifting. Move the TV with the TV. 3. Installing a TV on a flat, level, and ...
E420AR Quick Start Guide
Page 2
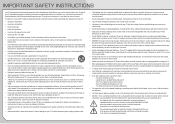
... frays. - The performance of time. • Refer all instructions. • Do not use attachments/accessories specified by the manufacturer. • Use only with the cart, stand, tripod, bracket, or table specified by qualified service personnel only. To totally disconnect power, unplug the power cord. • The lightning flash with liquids, such...
... frays. - The performance of time. • Refer all instructions. • Do not use attachments/accessories specified by the manufacturer. • Use only with the cart, stand, tripod, bracket, or table specified by qualified service personnel only. To totally disconnect power, unplug the power cord. • The lightning flash with liquids, such...
E420AR Quick Start Guide
Page 5
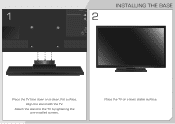
Place the TV on a clean, flat surface. Align the stand with the TV. Attach the stand to the TV by tightening the pre-installed screws. INSTALLING THE BASE 1 2 Place the TV face down on a level, stable surface.
Place the TV on a clean, flat surface. Align the stand with the TV. Attach the stand to the TV by tightening the pre-installed screws. INSTALLING THE BASE 1 2 Place the TV face down on a level, stable surface.


