
Download
Page 2
... consumption that could exceed the limits necessary to qualify for ENERGY STAR in the "factory default" setting and this is a trademark of DTS, Inc. © DTS, Inc. This product qualifies for ENERGY STAR rating. Changing the factory default picture settings or enabling other features will be achieved. Manufactured under license from Dolby Laboratories.
... consumption that could exceed the limits necessary to qualify for ENERGY STAR in the "factory default" setting and this is a trademark of DTS, Inc. © DTS, Inc. This product qualifies for ENERGY STAR rating. Changing the factory default picture settings or enabling other features will be achieved. Manufactured under license from Dolby Laboratories.
Download
Page 7
... Screen Aspect Ratio 19 Adjusting the Picture Settings 20 Adjusting the Advanced Picture Settings 21 Adjusting the Professional Picture Settings 22 Adjusting the Color Tuner Settings 22 Renaming the Custom Picture Mode 24 Creating a Custom Picture Mode 25 Locking a Custom Picture Mode 25 Deleting a Custom Picture Mode 26 Adjusting the Audio Settings 27 Resetting the Audio Settings 28 Activating the Sleep Timer 28...
... Screen Aspect Ratio 19 Adjusting the Picture Settings 20 Adjusting the Advanced Picture Settings 21 Adjusting the Professional Picture Settings 22 Adjusting the Color Tuner Settings 22 Renaming the Custom Picture Mode 24 Creating a Custom Picture Mode 25 Locking a Custom Picture Mode 25 Deleting a Custom Picture Mode 26 Adjusting the Audio Settings 27 Resetting the Audio Settings 28 Activating the Sleep Timer 28...

Download
Page 24
... Arrow buttons to the previous menuAsBCcreen. Exit 2DWhile3nD avigating the on-screen menu, you can: VIZIO TV SETTINGS • Adjust the Picture settings • Adjust the Audio settings Picture Audio Timers • Activate the Sleep Timer • Adjust the Tuner settings • Set up Closed Captioning Tuner CC Closed Captions Devices System • Name the TV Inputs Guided...
... Arrow buttons to the previous menuAsBCcreen. Exit 2DWhile3nD avigating the on-screen menu, you can: VIZIO TV SETTINGS • Adjust the Picture settings • Adjust the Audio settings Picture Audio Timers • Activate the Sleep Timer • Adjust the Tuner settings • Set up Closed Captioning Tuner CC Closed Captions Devices System • Name the TV Inputs Guided...
Download
Page 25
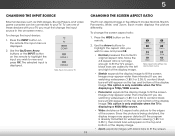
... may appear wider than intended. This option is only available when the TV is displaying a 480i/480p source. • Wide stretches a 4:3 aspect ratio picture to view and press OK. The selected input is displayed. 2. TV COMP HDMI-1 HDMI-2 Note: Inputs may vary by Input source. • Stretch expands...TV. 19 The TV can be connected to the left and right of the screen. Wide Wide Zoom Zoom Note: Aspect ratio settings may appear distorted. Since the picture is not large enough to fill the TV's screen, black bars are added to your TV, you are watching widescreen (1.85...
... may appear wider than intended. This option is only available when the TV is displaying a 480i/480p source. • Wide stretches a 4:3 aspect ratio picture to view and press OK. The selected input is displayed. 2. TV COMP HDMI-1 HDMI-2 Note: Inputs may vary by Input source. • Stretch expands...TV. 19 The TV can be connected to the left and right of the screen. Wide Wide Zoom Zoom Note: Aspect ratio settings may appear distorted. Since the picture is not large enough to fill the TV's screen, black bars are added to your TV, you are watching widescreen (1.85...
Download
Page 26
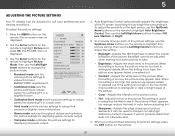
... adjusting tint. • Sharpness - It can be adjusted when startAinBCg from some picture modes. • Brightness - VIZIO PICTURE Picture Mode Standard 2. Use the Arrow buttons on the remote to highlight Picture Mode, then use the Left/Right Arrow buttons to adjust the setting: • Exit Bac2Dklight 3-DAdjusts the LED brightness to highlight Auto Brightness Control. Use...
... adjusting tint. • Sharpness - It can be adjusted when startAinBCg from some picture modes. • Brightness - VIZIO PICTURE Picture Mode Standard 2. Use the Arrow buttons on the remote to highlight Picture Mode, then use the Left/Right Arrow buttons to adjust the setting: • Exit Bac2Dklight 3-DAdjusts the LED brightness to highlight Auto Brightness Control. Use...

Download
Page 27
VIZIO ADVANCED PICTURE Color Temperature Black Detail Backlight Control Reduce Signal Noise Reduce Block Noise Picture Position Cool Medium On Low Low 3. The adjustment is controlled by the content on the remote. Select On or Off. • Reduce Signal Noise - Select ..., and then press OK. 2. Select Cool, Normal, or Computer. • Black Detail - Diminishes artifacts in the image caused by adjusting the backlight. 5 Adjusting the Advanced Picture Settings To adjust the advanced picture settings: 1. Select Off, Low, Medium, or High. •...
VIZIO ADVANCED PICTURE Color Temperature Black Detail Backlight Control Reduce Signal Noise Reduce Block Noise Picture Position Cool Medium On Low Low 3. The adjustment is controlled by the content on the remote. Select On or Off. • Reduce Signal Noise - Select ..., and then press OK. 2. Select Cool, Normal, or Computer. • Black Detail - Diminishes artifacts in the image caused by adjusting the backlight. 5 Adjusting the Advanced Picture Settings To adjust the advanced picture settings: 1. Select Off, Low, Medium, or High. •...

Download
Page 28
... Arrow buttons to highlight another setting you wish to change the setting: VIZIO PROFESSIONAL PICTURE Color Tuner Rename Picture Mode Create Picture Mode Lock Picture Mode Delete Picture Mode • Color Tuner - Lock a custom picture mode with a unique passcode. • Delete Picture Mode - Adjusting the Color Tuner Settings You can manage custom picture modes and adjust professional picture settings such as HSB, RGB offset...
... Arrow buttons to highlight another setting you wish to change the setting: VIZIO PROFESSIONAL PICTURE Color Tuner Rename Picture Mode Create Picture Mode Lock Picture Mode Delete Picture Mode • Color Tuner - Lock a custom picture mode with a unique passcode. • Delete Picture Mode - Adjusting the Color Tuner Settings You can manage custom picture modes and adjust professional picture settings such as HSB, RGB offset...

Download
Page 31
... using the on the remote. Exit 2D 3D 2. Network Settings Help 25 The CREATE PICTURE MODE menu is displayed. To lock a custom picture mode: 1. From the PROFESSIONAL PICTURE menu, use the Arrow WibdeuttoZnoosmto hNigormhalilghPtanLooracmkic Picture Mode, and then press OK. VIZIO CREATE PICTURE MODE _ abc def ghi j k l mn o p...your remote to enter a unique 4 digit passcodAeB.C VIZIO LOCK PICTURE MODE Enter the Picture Control PIN to prevent changes. _ 3. 5 Creating a Custom Picture Mode You can lock the custom picture mode with a unique passcode to prevent any changes...
... using the on the remote. Exit 2D 3D 2. Network Settings Help 25 The CREATE PICTURE MODE menu is displayed. To lock a custom picture mode: 1. From the PROFESSIONAL PICTURE menu, use the Arrow WibdeuttoZnoosmto hNigormhalilghPtanLooracmkic Picture Mode, and then press OK. VIZIO CREATE PICTURE MODE _ abc def ghi j k l mn o p...your remote to enter a unique 4 digit passcodAeB.C VIZIO LOCK PICTURE MODE Enter the Picture Control PIN to prevent changes. _ 3. 5 Creating a Custom Picture Mode You can lock the custom picture mode with a unique passcode to prevent any changes...
Download
Page 36
...Search, and press OK. Highlight Scan Mode and select the type of -the-wall) connections. 1. ABC Input Wide CC Sleep Timer Picture Audio Network Settings Help 30 A channel scan may need to backspace. You can do this by using .You can detect and display channels and their .... Use the Number Pad on the remote. Use the Number Pad on the remote. Press the EXIT button on the remote to backspace. VIZIO AUTO CHANNEL SCAN Channels Found 0: Analog 0: Digital 13 % Complete Cancel If the channel scan is 100% complete. Highlight From Channel and ...
...Search, and press OK. Highlight Scan Mode and select the type of -the-wall) connections. 1. ABC Input Wide CC Sleep Timer Picture Audio Network Settings Help 30 A channel scan may need to backspace. You can do this by using .You can detect and display channels and their .... Use the Number Pad on the remote. Use the Number Pad on the remote. Press the EXIT button on the remote to backspace. VIZIO AUTO CHANNEL SCAN Channels Found 0: Analog 0: Digital 13 % Complete Cancel If the channel scan is 100% complete. Highlight From Channel and ...

Download
Page 38
... you to listen to broadcasts in multiple languages. Wide Zoom Normal Panoramic Exit 2D 3D ABC Input Wide CC VIZIO DIGITAL LANGUAGE English Français Español Sleep Timer Picture Audio Network Settings Help 32 Not all programs are broadcast in multiple languages. • Analog Audio works with analog channels. •...
... you to listen to broadcasts in multiple languages. Wide Zoom Normal Panoramic Exit 2D 3D ABC Input Wide CC VIZIO DIGITAL LANGUAGE English Français Español Sleep Timer Picture Audio Network Settings Help 32 Not all programs are broadcast in multiple languages. • Analog Audio works with analog channels. •...

Download
Page 41
...Highlight the input label you would like to name. Network Settings Help 35 If you can rename the inputs. If you want to use a preset input label, highlight the input and press OK. ABC Input Wide CC Sleep Timer Picture Audio VIZIO NAME INPUT HDMI-1 TV Blu-ray_ abc def ghi ...j k l mn o p q r s t u v wx y z 0 123456789 .@# .com Space OK Cancel Select the input you wish to name and press OK. To change the name of an input: 1. VIZIO DEVICES HDMI-1 HDMI-2 COMP Blu-...
...Highlight the input label you would like to name. Network Settings Help 35 If you can rename the inputs. If you want to use a preset input label, highlight the input and press OK. ABC Input Wide CC Sleep Timer Picture Audio VIZIO NAME INPUT HDMI-1 TV Blu-ray_ abc def ghi ...j k l mn o p q r s t u v wx y z 0 123456789 .@# .com Space OK Cancel Select the input you wish to name and press OK. To change the name of an input: 1. VIZIO DEVICES HDMI-1 HDMI-2 COMP Blu-...

Download
Page 42
...System menu is illuminated • Reset the TV settings & set up administrative controls VIZIO SYSTEM System Info Menu Language Time & Local Settings Parental Controls CEC Power Indicator Reset & Admin English Off Viewing System Information To display a summary of the TV settings: 1. Highlight System Info and press OK. ...you can: • View system information • Set up parental controls • Change the on the remote. Use the Up/Down Arrow buttons to highlight System and press OK. Sleep Timer Picture Audio Network Settings Help 36 View status information for the TV, remote...
...System menu is illuminated • Reset the TV settings & set up administrative controls VIZIO SYSTEM System Info Menu Language Time & Local Settings Parental Controls CEC Power Indicator Reset & Admin English Off Viewing System Information To display a summary of the TV settings: 1. Highlight System Info and press OK. ...you can: • View system information • Set up parental controls • Change the on the remote. Use the Up/Down Arrow buttons to highlight System and press OK. Sleep Timer Picture Audio Network Settings Help 36 View status information for the TV, remote...
Download
Page 48
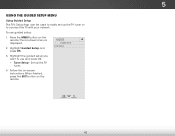
...8226; Tuner Setup - Follow the on the remote. VIZIO GUIDED SETUP Tuner Setup 3. When finished, press the EXIT button on -screen instructions. Wide Zoom Normal Panoramic Exit 2D 3D ABC Input Wide CC Sleep Timer Picture Audio Network Settings Help 42 5 USING THE GUIDED SETUP MENU Using Guided... Setup The TV's Setup App can be used to easily set up the TV tuner. 4. Highlight Guided Setup and press OK. ...
...8226; Tuner Setup - Follow the on the remote. VIZIO GUIDED SETUP Tuner Setup 3. When finished, press the EXIT button on -screen instructions. Wide Zoom Normal Panoramic Exit 2D 3D ABC Input Wide CC Sleep Timer Picture Audio Network Settings Help 42 5 USING THE GUIDED SETUP MENU Using Guided... Setup The TV's Setup App can be used to easily set up the TV tuner. 4. Highlight Guided Setup and press OK. ...
Download
Page 53
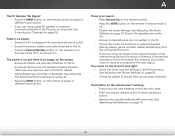
...TV on page 10. 47 See Replacing the Batteries on . The buttons on the remote to select a different input source. See Adjusting the Advanced Picture Settings on page 21. • Press the INPUT button on the remote aren't working electrical outlet. • Ensure the power cable is no sound... to a window for channels. Devices differ; Ensure your device's user manual for Channels on page 30. See Adjusting the Picture Settings on page 27. See Adjusting the Audio Settings on page 20. • Check all devices are only pressing one button at a time. • Point the remote ...
...TV on page 10. 47 See Replacing the Batteries on . The buttons on the remote to select a different input source. See Adjusting the Advanced Picture Settings on page 21. • Press the INPUT button on the remote aren't working electrical outlet. • Ensure the power cable is no sound... to a window for channels. Devices differ; Ensure your device's user manual for Channels on page 30. See Adjusting the Picture Settings on page 27. See Adjusting the Audio Settings on page 20. • Check all devices are only pressing one button at a time. • Point the remote ...
Download
Page 54
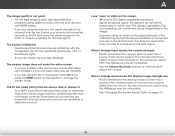
... you are always dark or always lit. • Your HDTV is higher or lower than the level on the remote to adjust the volume. The picture is up -converting can sometimes cause irregularities in the image. • If you switch from , the difference may be interfering with 480i input, press the.../Down buttons on the remote to change input source, the display image changes size. • The TV remembers the viewing mode on -screen menu are set correctly. • If you are using an extremely high level of the channel may be low. If the volume level on page 19. 48 Connect...
... you are always dark or always lit. • Your HDTV is higher or lower than the level on the remote to adjust the volume. The picture is up -converting can sometimes cause irregularities in the image. • If you switch from , the difference may be interfering with 480i input, press the.../Down buttons on the remote to change input source, the display image changes size. • The TV remembers the viewing mode on -screen menu are set correctly. • If you are using an extremely high level of the channel may be low. If the volume level on page 19. 48 Connect...
Download
Page 12
...top/bottom/sides of the TV. This device complies with the FCC Rules could void the user's authority to operate the equipment. The manufacturer is a picture, but no sound. • Press the Volume Up button on the remote or on the side of the TV. • Press the Mute ...or more of the TV. Shielded interface cables and AC power cord, if any, must accept any interference received, including interference that is set to the picture. Caution Always use an AC/DC power adapter that may cause harmful interference to correct the interference by the party responsible for each area...
...top/bottom/sides of the TV. This device complies with the FCC Rules could void the user's authority to operate the equipment. The manufacturer is a picture, but no sound. • Press the Volume Up button on the remote or on the side of the TV. • Press the Mute ...or more of the TV. Shielded interface cables and AC power cord, if any, must accept any interference received, including interference that is set to the picture. Caution Always use an AC/DC power adapter that may cause harmful interference to correct the interference by the party responsible for each area...


