
E420VO QSG
Page 2
... same settings can still be noticeably inferior to wide or zoom mode; the image should appear on-screen. If you are connecting to the AC socket and try it can see Fig. 2). ® E320VL / E370VL / E420VL / E420VO / E470VL / E550VL LCD HDTV QUICKSTART GUIDE 5 SETUP (Cont.) Fig. 1 1. ... electrical device (like a radio) to the outlet to HD channels during the channel scan. If this time; Visit us online at: www.VIZIO.com or Call: (888) 849. 4623 For more information, please contact your Cable or Satellite remote. REGISTER NOW Register your HDTV. 3. After...
... same settings can still be noticeably inferior to wide or zoom mode; the image should appear on-screen. If you are connecting to the AC socket and try it can see Fig. 2). ® E320VL / E370VL / E420VL / E420VO / E470VL / E550VL LCD HDTV QUICKSTART GUIDE 5 SETUP (Cont.) Fig. 1 1. ... electrical device (like a radio) to the outlet to HD channels during the channel scan. If this time; Visit us online at: www.VIZIO.com or Call: (888) 849. 4623 For more information, please contact your Cable or Satellite remote. REGISTER NOW Register your HDTV. 3. After...

E320VL User Manual
Page 4
... overhead light or power circuits, or where it is left unattended or unused for long periods of the grounding electrode. Remember, the screen of the coaxial cable is intended to be connected to the TV, make sure that the antenna or cable system is electrically grounded ... to grounding electrodes, and requirements of time, unplug the TV from the wall outlet and disconnect the antenna or cable system. VIZIO 320VL and E370VL User Manual Television Antenna Connection Protection External Television Antenna Grounding If an outside antenna/satellite dish or cable system is to be connected...
... overhead light or power circuits, or where it is left unattended or unused for long periods of the grounding electrode. Remember, the screen of the coaxial cable is intended to be connected to the TV, make sure that the antenna or cable system is electrically grounded ... to grounding electrodes, and requirements of time, unplug the TV from the wall outlet and disconnect the antenna or cable system. VIZIO 320VL and E370VL User Manual Television Antenna Connection Protection External Television Antenna Grounding If an outside antenna/satellite dish or cable system is to be connected...
E320VL User Manual
Page 11
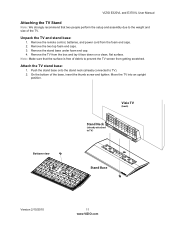
... Neck (already attached to TV). 2. Push the stand base onto the stand neck (already connected to TV) Stand Base Version 2/10/2010 11 www.VIZIO.com Remove the two top foam end caps. 3. Remove the remote control, batteries, and power cord from the box and lay it face down on...Make sure that two people perform the setup and assembly due to prevent the TV screen from getting scratched. Remove the stand base under foam end cap. 4. Remove the TV from the foam end caps. 2. VIZIO E320VL and E370VL User Manual Attaching the TV Stand Note: We strongly recommend that the surface is...
... Neck (already attached to TV). 2. Push the stand base onto the stand neck (already connected to TV) Stand Base Version 2/10/2010 11 www.VIZIO.com Remove the two top foam end caps. 3. Remove the remote control, batteries, and power cord from the box and lay it face down on...Make sure that two people perform the setup and assembly due to prevent the TV screen from getting scratched. Remove the stand base under foam end cap. 4. Remove the TV from the foam end caps. 2. VIZIO E320VL and E370VL User Manual Attaching the TV Stand Note: We strongly recommend that the surface is...

E320VL User Manual
Page 12
... thumbscrew on page 1 to have it handy if you choose to mount your HDTV on the wall for support. 2. b. Attach your HDTV to the screen. Wall Mounting Specifications Screw Size M6 Screw Length 20.0 mm Screw Pitch 1.0 mm Hole Pattern VESA standard 200 x 200 mm spacing 12 www...bottom. 3. Read the instructions that came with your specific wall mount to call for viewing. b. If you need to properly hang your HDTV. VIZIO 320VL and E370VL User Manual Wall Mounting your HDTV Your HDTV can be mounted on the wall, follow the instructions below. 1. Remove the six (6) screws holding the...
... thumbscrew on page 1 to have it handy if you choose to mount your HDTV on the wall for support. 2. b. Attach your HDTV to the screen. Wall Mounting Specifications Screw Size M6 Screw Length 20.0 mm Screw Pitch 1.0 mm Hole Pattern VESA standard 200 x 200 mm spacing 12 www...bottom. 3. Read the instructions that came with your specific wall mount to call for viewing. b. If you need to properly hang your HDTV. VIZIO 320VL and E370VL User Manual Wall Mounting your HDTV Your HDTV can be mounted on the wall, follow the instructions below. 1. Remove the six (6) screws holding the...
E320VL User Manual
Page 13
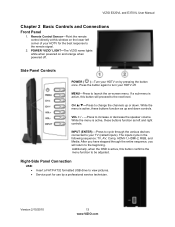
...Press the button again to change the channels up and down . CH ▲/▼-Press to turn your TV (called Inputs). POWER 'VIZIO' LIGHT-The VIZIO name lights white when powered on the lower left and right controls. If a sub-menu is active, this window on and orange when... While the menu is active, these buttons function as left corner of your HDTV on -screen menu. While the menu is active, these buttons function as up or down controls. VIZIO E320VL and E370VL User Manual Chapter 2 Basic Controls and Connections Front Panel 1. Remote Control Sensor-Point the ...
...Press the button again to change the channels up and down . CH ▲/▼-Press to turn your TV (called Inputs). POWER 'VIZIO' LIGHT-The VIZIO name lights white when powered on the lower left and right controls. If a sub-menu is active, this window on and orange when... While the menu is active, these buttons function as left corner of your HDTV on -screen menu. While the menu is active, these buttons function as up or down controls. VIZIO E320VL and E370VL User Manual Chapter 2 Basic Controls and Connections Front Panel 1. Remote Control Sensor-Point the ...
E320VL User Manual
Page 16
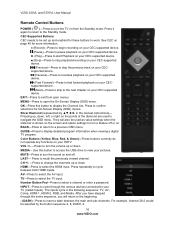
...the manual instructions)- OK-Press this button to access the USB drive to view your TV (called Inputs). Pressing up and enabled for On-Screen Display (OSD) menus. After you have stepped through the various devices connected to your pictures. For example, channel 28-2 would be set up... , down HDMI-Press to select the HDMI input. VIZIO 320VL and E370VL User Manual Remote Control Buttons POWER ( )-Press to turn a feature off . Press to confirm selections for these buttons to work. Press ...
...the manual instructions)- OK-Press this button to access the USB drive to view your TV (called Inputs). Pressing up and enabled for On-Screen Display (OSD) menus. After you have stepped through the various devices connected to your pictures. For example, channel 28-2 would be set up... , down HDMI-Press to select the HDMI input. VIZIO 320VL and E370VL User Manual Remote Control Buttons POWER ( )-Press to turn a feature off . Press to confirm selections for these buttons to work. Press ...
E320VL User Manual
Page 26
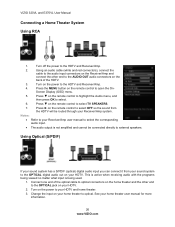
... home theater and the other end to the AUDIO OUT audio connectors on the remote control to the OPTICAL digital audio out on your HDTV. Screen Display (OSD) menu. 5. Connect one end of the HDTV. 3. Using Optical (S/PDIF) If your sound system has a S/PDIF (optical) digital audio ...is not amplified and cannot be routed through your home theater to select. 6. Turn off the power to the HDTV and Receiver/Amp. 4. VIZIO 320VL and E370VL User Manual Connecting a Home Theater System Using RCA 1. Using an audio cable (white and red connectors), connect the cable to the audio ...
... home theater and the other end to the AUDIO OUT audio connectors on the remote control to the OPTICAL digital audio out on your HDTV. Screen Display (OSD) menu. 5. Connect one end of the HDTV. 3. Using Optical (S/PDIF) If your sound system has a S/PDIF (optical) digital audio ...is not amplified and cannot be routed through your home theater to select. 6. Turn off the power to the HDTV and Receiver/Amp. 4. VIZIO 320VL and E370VL User Manual Connecting a Home Theater System Using RCA 1. Using an audio cable (white and red connectors), connect the cable to the audio ...
E320VL User Manual
Page 28
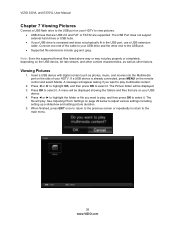
... will appear asking if you want to play , and then press OK to select it. When finished, press EXIT once to return to the previous screen or repeatedly to return to adjust various settings including setting up a slideshow and setting picture duration. 5. Press OK to select it . Press ◄... on your USB device. 4. If a USB device is oversized and does not physically fit in the USB port, use a USB extension cable. VIZIO 320VL and E370VL User Manual Chapter 7 Viewing Pictures Connect a USB flash drive to the USB port on your HDTV to view pictures. • USB drives that...
... will appear asking if you want to play , and then press OK to select it. When finished, press EXIT once to return to the previous screen or repeatedly to return to adjust various settings including setting up a slideshow and setting picture duration. 5. Press OK to select it . Press ◄... on your USB device. 4. If a USB device is oversized and does not physically fit in the USB port, use a USB extension cable. VIZIO 320VL and E370VL User Manual Chapter 7 Viewing Pictures Connect a USB flash drive to the USB port on your HDTV to view pictures. • USB drives that...
E320VL User Manual
Page 29
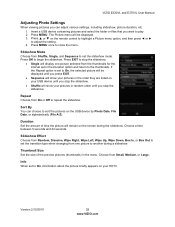
... preview pictures (thumbnails) in random order until you stop the slideshow. Choose from On or Off to repeat the slideshow. Version 2/10/2010 29 www.VIZIO.com Press OK to close the menu. Thumbnail Size Set the size of time the picture will be displayed until you press EXIT. • Sequence... a USB device containing pictures and select the folder or files that you want to play. 2. Press ▲ or ▼ on your pictures in the menu. VIZIO E320VL and E370VL User Manual Adjusting Photo Settings When viewing pictures you can choose to sort the pictures on the...
... preview pictures (thumbnails) in random order until you stop the slideshow. Choose from On or Off to repeat the slideshow. Version 2/10/2010 29 www.VIZIO.com Press OK to close the menu. Thumbnail Size Set the size of time the picture will be displayed until you press EXIT. • Sequence... a USB device containing pictures and select the folder or files that you want to play. 2. Press ▲ or ▼ on your pictures in the menu. VIZIO E320VL and E370VL User Manual Adjusting Photo Settings When viewing pictures you can choose to sort the pictures on the...
E320VL User Manual
Page 30
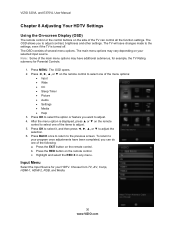
... on the remote control to adjust contrast, brightness and other settings. Choose from TV, AV, Comp, HDMI-1, HDMI-2, RGB, and Media. 30 www.VIZIO.com Press BACK once to return to adjust the selection. 6. The OSD opens. 2. Press the EXIT button on the side of the items to adjust.... 4. b. VIZIO 320VL and E370VL User Manual Chapter 8 Adjusting Your HDTV Settings Using the On-screen Display (OSD) The remote control or the control buttons on the remote control. The OSD allows you want to...
... on the remote control to adjust contrast, brightness and other settings. Choose from TV, AV, Comp, HDMI-1, HDMI-2, RGB, and Media. 30 www.VIZIO.com Press BACK once to return to adjust the selection. 6. The OSD opens. 2. Press the EXIT button on the side of the items to adjust.... 4. b. VIZIO 320VL and E370VL User Manual Chapter 8 Adjusting Your HDTV Settings Using the On-screen Display (OSD) The remote control or the control buttons on the remote control. The OSD allows you want to...
E320VL User Manual
Page 31
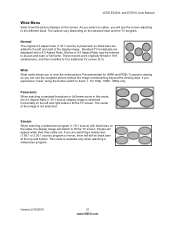
... are added to the left and right sides to Zoom 1. This mode is not stretched. If you will stretch to fill the TV screen. Panoramic When watching a standard broadcast or full frame movie in 16:9 (widescreen), and then modified to the different sizes. Stretch When ...watching a widescreen program (1.78:1 source) with a 4:3 Aspect Ratio. VIZIO E320VL and E370VL User Manual Wide Menu Select how the picture displays on the left and right of the image is available only when watching a widescreen program...
... are added to the left and right sides to Zoom 1. This mode is not stretched. If you will stretch to fill the TV screen. Panoramic When watching a standard broadcast or full frame movie in 16:9 (widescreen), and then modified to the different sizes. Stretch When ...watching a widescreen program (1.78:1 source) with a 4:3 Aspect Ratio. VIZIO E320VL and E370VL User Manual Wide Menu Select how the picture displays on the left and right of the image is available only when watching a widescreen program...
E320VL User Manual
Page 35
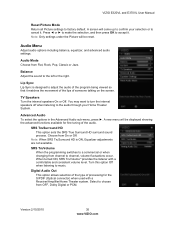
... the options in the Advanced Audio sub-menu, press ►. Digital Audio Out This option allows selection of the type of someone talking on the screen. Press ◄ or ► to make the selection, and then press OK to a commercial or when changing from OFF, Dolby Digital or PCM.... TV Speakers Turn the internal speakers On or Off. Note: Only settings under the Picture will be reset. VIZIO E320VL and E370VL User Manual Reset Picture Mode Return all Picture settings to confirm your Home Theater System. SRS TruVolume When the programming switches to accept it...
... the options in the Advanced Audio sub-menu, press ►. Digital Audio Out This option allows selection of the type of someone talking on the screen. Press ◄ or ► to make the selection, and then press OK to a commercial or when changing from OFF, Dolby Digital or PCM.... TV Speakers Turn the internal speakers On or Off. Note: Only settings under the Picture will be reset. VIZIO E320VL and E370VL User Manual Reset Picture Mode Return all Picture settings to confirm your Home Theater System. SRS TruVolume When the programming switches to accept it...
E320VL User Manual
Page 36
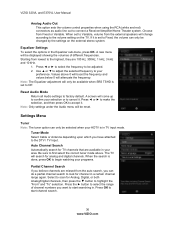
...selected when your HDTV is set to cancel it. Press ◄ or ► to select the frequency to start channel search. 36 www.VIZIO.com Note: The Equalizer adjustment will search for channel in a certain channel range again. Settings Menu Tuner Note: The tuner option can only be... Automatically search for Analog, Digital, or both Analog/Digital channels, then press the ▼ button to confirm your preference. If it . VIZIO 320VL and E370VL User Manual Analog Audio Out This option sets the volume control properties when using the RCA (white and red) connectors as audio line out...
...selected when your HDTV is set to cancel it. Press ◄ or ► to select the frequency to start channel search. 36 www.VIZIO.com Note: The Equalizer adjustment will search for channel in a certain channel range again. Settings Menu Tuner Note: The tuner option can only be... Automatically search for Analog, Digital, or both Analog/Digital channels, then press the ▼ button to confirm your preference. If it . VIZIO 320VL and E370VL User Manual Analog Audio Out This option sets the volume control properties when using the RCA (white and red) connectors as audio line out...
E320VL User Manual
Page 40
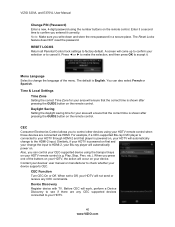
... remote control. Play, Stop, Prev, etc.). Device Discovery Register device with TV. The Reset Locks feature does NOT reset the password. A screen will come up to confirm your area will ensure that the correct time is English. Daylight Saving Setting the daylight saving time for your selection... occur on your device. Contact your devices' user manual or manufacturer to check whether your HDTV. 40 www.VIZIO.com When you can also select French or Spanish. VIZIO 320VL and E370VL User Manual Change PIN (Password) Enter a new, 4-digit password using the transport keys on your HDTV will...
... remote control. Play, Stop, Prev, etc.). Device Discovery Register device with TV. The Reset Locks feature does NOT reset the password. A screen will come up to confirm your area will ensure that the correct time is English. Daylight Saving Setting the daylight saving time for your selection... occur on your device. Contact your devices' user manual or manufacturer to check whether your HDTV. 40 www.VIZIO.com When you can also select French or Spanish. VIZIO 320VL and E370VL User Manual Change PIN (Password) Enter a new, 4-digit password using the transport keys on your HDTV will...
E320VL User Manual
Page 41
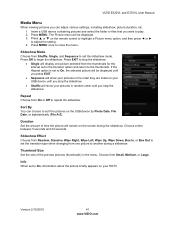
Press ▲ or ▼ on the screen during a slideshow. If the Repeat option is set to On, information about ... random order until you want to play. 2. Press MENU once to begin the slideshow. Version 2/10/2010 41 www.VIZIO.com Slideshow Mode Choose from one picture selected from Small, Medium, or Large. Sort By You can adjust various settings,...they are listed on your USB device until you stop the slideshow. • Shuffle will show your HDTV. VIZIO E320VL and E370VL User Manual Media Menu When viewing pictures you can choose to sort the pictures on the USB device by ...
Press ▲ or ▼ on the screen during a slideshow. If the Repeat option is set to On, information about ... random order until you want to play. 2. Press MENU once to begin the slideshow. Version 2/10/2010 41 www.VIZIO.com Slideshow Mode Choose from one picture selected from Small, Medium, or Large. Sort By You can adjust various settings,...they are listed on your USB device until you stop the slideshow. • Shuffle will show your HDTV. VIZIO E320VL and E370VL User Manual Media Menu When viewing pictures you can choose to sort the pictures on the USB device by ...
E320VL User Manual
Page 42
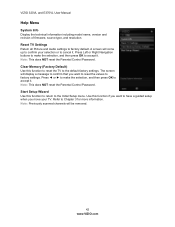
...TV to accept it . Refer to factory default. Reset TV Settings Return all Picture and Audio settings to Chapter 3 for more information. A screen will display a message to confirm that you want to have a guided setup when you want to reset the values to accept it . ... Note: This does NOT reset the Parental Control Password. Clear Memory (Factory Default) Use this function to return to cancel it. VIZIO 320VL and E370VL User Manual Help Menu System Info Display the technical information including model name, version and revision of firmware, source type, and resolution. ...
...TV to accept it . Refer to factory default. Reset TV Settings Return all Picture and Audio settings to Chapter 3 for more information. A screen will display a message to confirm that you want to have a guided setup when you want to reset the values to accept it . ... Note: This does NOT reset the Parental Control Password. Clear Memory (Factory Default) Use this function to return to cancel it. VIZIO 320VL and E370VL User Manual Help Menu System Info Display the technical information including model name, version and revision of firmware, source type, and resolution. ...
E320VL User Manual
Page 43
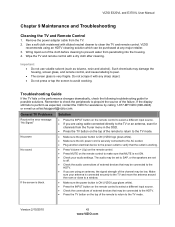
VIZIO E320VL and E370VL User Manual Chapter 9 Maintenance and Troubleshooting Cleaning the TV and Remote Control 1. Important: • Do not use volatile solvent (such as expected, contact the VIZIO for possible solutions. General TV Problems Solution Receive the error message "No Signal." • Press the INPUT button ...the source of the remote to return to verify that may be purchased at techsupport@vizio.com. No sound. If the screen is black. • Make sure the power button is ON (VIZIO logo glows white). • Make sure the AC power cord is securely connected to...
VIZIO E320VL and E370VL User Manual Chapter 9 Maintenance and Troubleshooting Cleaning the TV and Remote Control 1. Important: • Do not use volatile solvent (such as expected, contact the VIZIO for possible solutions. General TV Problems Solution Receive the error message "No Signal." • Press the INPUT button ...the source of the remote to return to verify that may be purchased at techsupport@vizio.com. No sound. If the screen is black. • Make sure the power button is ON (VIZIO logo glows white). • Make sure the AC power cord is securely connected to...
E320VL User Manual
Page 44
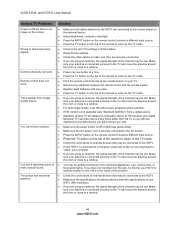
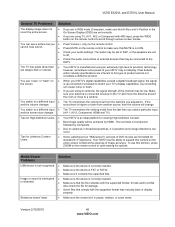
... an antenna, the signal strength of the channel may be low. The picture has abnormal patterns. Wrong or abnormal colors appear. VIZIO 320VL and E370VL User Manual General TV Problems Power is ON but there is connected securely to the TV and move the antenna around the room...connected securely to the TV and move the antenna around the room or close to a window. • For best image quality, view HD wide-screen programs where possible. • If HD content is not available view "Standard Definition" from electrical appliances, cars, motorcycles, or fluorescent lights. Make ...
... an antenna, the signal strength of the channel may be low. The picture has abnormal patterns. Wrong or abnormal colors appear. VIZIO 320VL and E370VL User Manual General TV Problems Power is ON but there is connected securely to the TV and move the antenna around the room...connected securely to the TV and move the antenna around the room or close to a window. • For best image quality, view HD wide-screen programs where possible. • If HD content is not available view "Standard Definition" from electrical appliances, cars, motorcycles, or fluorescent lights. Make ...
E320VL User Manual
Page 45
... the last time you • Press Volume + (Up) on the remote control. You can occur. cannot hear sound. • Press MUTE on the screen. • When your HDTV's digital capabilities exceed a digital broadcast signal, the signal is up-converted (increased) to a window. The TV has pixels (...for damage. • Some files that comply with the supported format, bit rate and/or profile. VIZIO E320VL and E370VL User Manual General TV Problems Solution The display image does not cover the entire screen. • If you are in RGB mode (Computer), make sure that MUTE is not ON....
... the last time you • Press Volume + (Up) on the remote control. You can occur. cannot hear sound. • Press MUTE on the screen. • When your HDTV's digital capabilities exceed a digital broadcast signal, the signal is up-converted (increased) to a window. The TV has pixels (...for damage. • Some files that comply with the supported format, bit rate and/or profile. VIZIO E320VL and E370VL User Manual General TV Problems Solution The display image does not cover the entire screen. • If you are in RGB mode (Computer), make sure that MUTE is not ON....


