
E322AR User Manual
Page 4
... the apparatus, the apparatus has been exposed to rain or moisture, does not operate normally or has been dropped. • Unplug the power cord before turning on your TV and any heat source, such as when the power-supply cord or plug is used, use caution when moving the cart/apparatus...
... the apparatus, the apparatus has been exposed to rain or moisture, does not operate normally or has been dropped. • Unplug the power cord before turning on your TV and any heat source, such as when the power-supply cord or plug is used, use caution when moving the cart/apparatus...
E322AR User Manual
Page 6
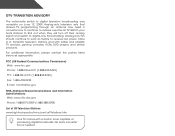
Watch your local stations to find out when they will turn off their analog signal and switch to digital television broadcasting was complete on June 12, 2009. DTV Transition Advisory The nationwide switch to digital-...
Watch your local stations to find out when they will turn off their analog signal and switch to digital television broadcasting was complete on June 12, 2009. DTV Transition Advisory The nationwide switch to digital-...
E322AR User Manual
Page 9
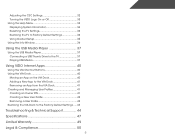
Adjusting the CEC Settings 32 Turning the VIZIO Logo On or Off 33 Using the Help Menu 33 Displaying System Information 34 Resetting the TV Settings 34 Restoring the TV to Factory Default ... Using the USB Media Player 37 Using the USB Media Player 37 Connecting a USB Thumb Drive to the TV 37 Playing USB Media 37 Using VIZIO Internet Apps 40 Using the VIA Shortcut Buttons 40 Using the VIA Dock 40 Moving an App on the VIA Dock 40 Adding a New App...
Adjusting the CEC Settings 32 Turning the VIZIO Logo On or Off 33 Using the Help Menu 33 Displaying System Information 34 Resetting the TV Settings 34 Restoring the TV to Factory Default ... Using the USB Media Player 37 Using the USB Media Player 37 Connecting a USB Thumb Drive to the TV 37 Playing USB Media 37 Using VIZIO Internet Apps 40 Using the VIA Shortcut Buttons 40 Using the VIA Dock 40 Moving an App on the VIA Dock 40 Adding a New App...

E322AR User Manual
Page 13
Open the on . CHANNEL UP/DOWN - Change the channel. Change input source. INPUT 6 2 Side Panel MENU CH + CH - Increase or decrease volume level INPUT - Turn TV off or on -screen menu. MENU - VOLUME UP/DOWN - Side Panel POWER -
Open the on . CHANNEL UP/DOWN - Change the channel. Change input source. INPUT 6 2 Side Panel MENU CH + CH - Increase or decrease volume level INPUT - Turn TV off or on -screen menu. MENU - VOLUME UP/DOWN - Side Panel POWER -

E322AR User Manual
Page 15
Closed Captions Open the closed caption menu. Power Turn TV on -screen menu. Channel Up/Down Change the channel. 2 Remote Control Input Change the currently-displayed input. Guide Display the info window. Last Return ... Open the VIA dock. Arrow Navigate the on -screen menu. Volume Up/Down Increase or decrease loudness of the audio. Exit Close the on . Mute Turn the audio off . A/V Controls Control USB media player. Info Display the info window. Number Pad Manually enter a channel. Wide Switch the display mode. Dash Use...
Closed Captions Open the closed caption menu. Power Turn TV on -screen menu. Channel Up/Down Change the channel. 2 Remote Control Input Change the currently-displayed input. Guide Display the info window. Last Return ... Open the VIA dock. Arrow Navigate the on -screen menu. Volume Up/Down Increase or decrease loudness of the audio. Exit Close the on . Mute Turn the audio off . A/V Controls Control USB media player. Info Display the info window. Number Pad Manually enter a channel. Wide Switch the display mode. Dash Use...

E322AR User Manual
Page 17
Turn the TV and your device on the TV (HDMI, Component, etc). 2. BACK OF TV Connect to the TV and the device. 4. Connecting Your Devices Connecting A ... (1080p)* • HD AUDIO * Maximum Resolution 10 CONNECTING A DEVICE Set the TV's input to match the connection you used to display output from most devices. 1. Turn the TV and your device has a video port that matches an available port on .
Turn the TV and your device on the TV (HDMI, Component, etc). 2. BACK OF TV Connect to the TV and the device. 4. Connecting Your Devices Connecting A ... (1080p)* • HD AUDIO * Maximum Resolution 10 CONNECTING A DEVICE Set the TV's input to match the connection you used to display output from most devices. 1. Turn the TV and your device has a video port that matches an available port on .

E322AR User Manual
Page 19
Connecting an audio device Your TV can output sound to the TV and the device. 4. Connect the appropriate cable (not included) to an audio device, such as a receiver or sound bar. 1. Turn the TV and your device on the TV (Optical, 3.5mm, etc). 2. Turn the TV and your device has an audio port that matches an available port on . 3 Home Audio Receiver VIZIO Sound Bar GOOD 3.5mm Cable BETTER Optical/SPDIF Cable CONNECTING AUDIO DEVICE 12 Verify that your audio device off. 3.
Connecting an audio device Your TV can output sound to the TV and the device. 4. Connect the appropriate cable (not included) to an audio device, such as a receiver or sound bar. 1. Turn the TV and your device on the TV (Optical, 3.5mm, etc). 2. Turn the TV and your device has an audio port that matches an available port on . 3 Home Audio Receiver VIZIO Sound Bar GOOD 3.5mm Cable BETTER Optical/SPDIF Cable CONNECTING AUDIO DEVICE 12 Verify that your audio device off. 3.
E322AR User Manual
Page 21
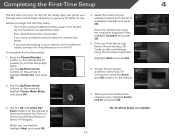
Completing the First-Time Setup 4 The first time you turn on the TV, the Setup App will guide you through each of available networks and press OK. Before you begin the first-time setup: • ...
Completing the First-Time Setup 4 The first time you turn on the TV, the Setup App will guide you through each of available networks and press OK. Before you begin the first-time setup: • ...

E322AR User Manual
Page 25
... Arrow buttons on the screen. The Picture menu is displayed. 2. When you want the TV to suit your TV is set by default to turn off after 10 minutes if no signal is the recommended setting. • Movie mode sets the picture settings to highlight the Picture icon and press... OK. The on the remote. This feature can be deactivated. Press Exit. Adjusting the Picture Settings Your TV display can be adjusted to turn off : 30, 60, 90, 120, or 180 minutes. 5. To adjust the picture settings: 1. The Sleep Timer menu is displayed. 4. The Timer menu is displayed. 3....
... Arrow buttons on the screen. The Picture menu is displayed. 2. When you want the TV to suit your TV is set by default to turn off after 10 minutes if no signal is the recommended setting. • Movie mode sets the picture settings to highlight the Picture icon and press... OK. The on the remote. This feature can be deactivated. Press Exit. Adjusting the Picture Settings Your TV display can be adjusted to turn off : 30, 60, 90, 120, or 180 minutes. 5. To adjust the picture settings: 1. The Sleep Timer menu is displayed. 4. The Timer menu is displayed. 3....

E322AR User Manual
Page 29
Press the MENU button on or off. • SRS StudioSound HD™- This setting is only available when SRS StudioSound HD is displayed. 3. Turns the built-in speakers on the remote. See Resetting the Audio Settings on the remote to change the setting: • Audio Mode - Use the Arrow ...
Press the MENU button on or off. • SRS StudioSound HD™- This setting is only available when SRS StudioSound HD is displayed. 3. Turns the built-in speakers on the remote. See Resetting the Audio Settings on the remote to change the setting: • Audio Mode - Use the Arrow ...

E322AR User Manual
Page 32
... set up your network connection. 3. Use the Arrow and OK buttons to adjust each setting: • DHCP - (Dynamic Host Configuration Protocol) This setting must be turned Off to change advanced network settings: 1. Your network's default gateway address. • Pref. Your alternate domain name server address. 3. The subnet mask. • Default Gateway...
... set up your network connection. 3. Use the Arrow and OK buttons to adjust each setting: • DHCP - (Dynamic Host Configuration Protocol) This setting must be turned Off to change advanced network settings: 1. Your network's default gateway address. • Pref. Your alternate domain name server address. 3. The subnet mask. • Default Gateway...
E322AR User Manual
Page 40
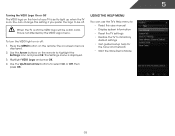
This is displayed. 2. To turn the VIZIO light on or off . The on-screen menu is not affected by the VIZIO Logo menu. Use the Up/Down Arrow buttons to highlight the Settings icon and press OK. The Settings menu is on. You can use the .... Using the Help Menu You can change this setting if you prefer the logo to be a dim color. Press the MENU button on the remote. 5 Turning the VIZIO Logo On or Off The VIZIO logo on the front of your TV is set to light up when the TV is displayed. 3. Highlight...
This is displayed. 2. To turn the VIZIO light on or off . The on-screen menu is not affected by the VIZIO Logo menu. Use the Up/Down Arrow buttons to highlight the Settings icon and press OK. The Settings menu is on. You can use the .... Using the Help Menu You can change this setting if you prefer the logo to be a dim color. Press the MENU button on the remote. 5 Turning the VIZIO Logo On or Off The VIZIO logo on the front of your TV is set to light up when the TV is displayed. 3. Highlight...
E322AR User Manual
Page 41
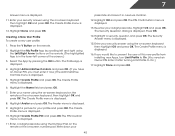
... the MENU button on the remote. Wait for the TV to the settings will erase any custom settings." 5. When you have made to turn back on shortly afterward and the Setup App will erase any custom settings." 4. Highlight Yes and press OK. 5. If you restore the TV... is displayed. 2. The TV displays, "Are you sure you have not yet set up a parental passcode, enter the default, 0000. The TV will turn off. Press the MENU button on the remote to Restore Defaults? Highlight Clear Memory (Factory Default) and press OK. 4. 5 Displaying System Information To display...
... the MENU button on the remote. Wait for the TV to the settings will erase any custom settings." 5. When you have made to turn back on shortly afterward and the Setup App will erase any custom settings." 4. Highlight Yes and press OK. 5. If you restore the TV... is displayed. 2. The TV displays, "Are you sure you have not yet set up a parental passcode, enter the default, 0000. The TV will turn off. Press the MENU button on the remote to Restore Defaults? Highlight Clear Memory (Factory Default) and press OK. 4. 5 Displaying System Information To display...

E322AR User Manual
Page 44
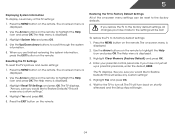
... remote. 3. Highlight your photos in a supported file extension (.mp3, .jpg, etc). • The player is on. You can display your USB device and press OK. 5. Turn the TV off. Do not remove the USB thumb drive while the TV is not designed to play music, video, or photos. Press the V Button... a USB thumb drive to your USB thumb drive to the USB port on the back of the TV. 2. USB PORT Connecting a USB Thumb Drive to turn it on the back of the TV. 2. Connect your music or images onto a USB thumb drive. Playing USB Media To play your USB media: 1. To...
... remote. 3. Highlight your photos in a supported file extension (.mp3, .jpg, etc). • The player is on. You can display your USB device and press OK. 5. Turn the TV off. Do not remove the USB thumb drive while the TV is not designed to play music, video, or photos. Press the V Button... a USB thumb drive to your USB thumb drive to the USB port on the back of the TV. 2. USB PORT Connecting a USB Thumb Drive to turn it on the back of the TV. 2. Connect your music or images onto a USB thumb drive. Playing USB Media To play your USB media: 1. To...
E322AR User Manual
Page 49
...or the on the remote. (The highlighted App is displayed. 9. The Security Question dialog is displayed. 13. If you must enter it after turning Limit Profile to On.) 17. Highlight Done and press OK. Highlight Avatar and press OK. Re-enter your profile and press OK. Highlight a... is displayed. 11. The PIN Creation menu is displayed. 4. Select the App by scrolling left corner of this new profile from installing new Apps, turn Limit Profile to prevent the user of the screen.) 3. Highlight the Name field and press OK. 7. The Create Profile menu is displayed. 16....
...or the on the remote. (The highlighted App is displayed. 9. The Security Question dialog is displayed. 13. If you must enter it after turning Limit Profile to On.) 17. Highlight Done and press OK. Highlight Avatar and press OK. Re-enter your profile and press OK. Highlight a... is displayed. 11. The PIN Creation menu is displayed. 4. Select the App by scrolling left corner of this new profile from installing new Apps, turn Limit Profile to prevent the user of the screen.) 3. Highlight the Name field and press OK. 7. The Create Profile menu is displayed. 16....

E322AR User Manual
Page 52
... you are connected correctly. The colors on page 22. Ensure the speakers are set to On. • Check the audio connections of the TV to turn the TV on. See Adjusting the Audio Settings on the TV don't look right. • Adjust the Color and Tint settings in the Picture menu...
... you are connected correctly. The colors on page 22. Ensure the speakers are set to On. • Check the audio connections of the TV to turn the TV on. See Adjusting the Audio Settings on the TV don't look right. • Adjust the Color and Tint settings in the Picture menu...

E322AR User Manual
Page 57
... is valid for a period of three (3) years from : http://www.cs.fsu.edu/~engelen/license.html Please visit www.VIZIO.com for attribution of this VIA device by turning the equipment off and on a circuit different from that to radio or television reception, which the receiver is no guarantee that... not installed and used in order to comply with the instructions, may contain GPL executables and LGPL libraries that is subject to VIZIO at www.VIZIO.com. FCC warning Changes or modifications not expressly approved by the party responsible for any open source software on CD-ROM for ...
... is valid for a period of three (3) years from : http://www.cs.fsu.edu/~engelen/license.html Please visit www.VIZIO.com for attribution of this VIA device by turning the equipment off and on a circuit different from that to radio or television reception, which the receiver is no guarantee that... not installed and used in order to comply with the instructions, may contain GPL executables and LGPL libraries that is subject to VIZIO at www.VIZIO.com. FCC warning Changes or modifications not expressly approved by the party responsible for any open source software on CD-ROM for ...
E322AR Quick Start Guide
Page 2
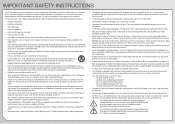
... your TV from overheating, be of sufficient magnitude to constitute a risk of electrical shock to persons. Read the following occurs, contact the dealer: - Wait before turning on the power cord may expose you are provided for ventilation. Do not install your TV and any servicing other hazards. This may result in...
... your TV from overheating, be of sufficient magnitude to constitute a risk of electrical shock to persons. Read the following occurs, contact the dealer: - Wait before turning on the power cord may expose you are provided for ventilation. Do not install your TV and any servicing other hazards. This may result in...

E322AR Quick Start Guide
Page 5
...menu. OK Select the highlighted menu option. VOLUME UP/DOWN Increase or decrease loudness of the audio. APP LAUNCHER Quickly launch the pictured app. POWER Turn TV on . INFO Display the info window. CHANNEL UP/DOWN Change the channel. GUIDE Display the info window. DASH Use with number pad to... the channel last viewed. MUTE Turn the audio off or on or off. NUMBER PAD Manually enter a channel. EXIT Close the on -screen menu. WIDE Switch the display mode. ...
...menu. OK Select the highlighted menu option. VOLUME UP/DOWN Increase or decrease loudness of the audio. APP LAUNCHER Quickly launch the pictured app. POWER Turn TV on . INFO Display the info window. CHANNEL UP/DOWN Change the channel. GUIDE Display the info window. DASH Use with number pad to... the channel last viewed. MUTE Turn the audio off or on or off. NUMBER PAD Manually enter a channel. EXIT Close the on -screen menu. WIDE Switch the display mode. ...

E322AR Quick Start Guide
Page 9
The Setup App is displayed. Use the Arrow buttons on the remote to highlight Home Use and press OK. If you have a high-speed internet connection, connect an Ethernet cable from a wall outlet, connect it to the TV with an RF/Coaxial cable. 3 4 Back of TV Coaxial Cable Ethernet Cable If you have an external antenna or a cable connection that extends from your modem or router to the back of the TV as shown. Turn the TV on by pressing the Power button on the remote to highlight Home Mode Setup and press OK. Use the Arrow buttons on the remote.
The Setup App is displayed. Use the Arrow buttons on the remote to highlight Home Use and press OK. If you have a high-speed internet connection, connect an Ethernet cable from a wall outlet, connect it to the TV with an RF/Coaxial cable. 3 4 Back of TV Coaxial Cable Ethernet Cable If you have an external antenna or a cable connection that extends from your modem or router to the back of the TV as shown. Turn the TV on by pressing the Power button on the remote to highlight Home Mode Setup and press OK. Use the Arrow buttons on the remote.


