Download
Page 10
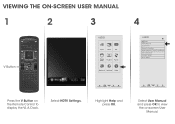
Select User Manual and press OK to display the V.I.A. Select HDTV Settings. Highlight Help and press OK. Dock. VIEWING THE ON-SCREEN USER MANUAL 1 2 3 4 V Button VIZIO ABC Input Wide CC Sleep Timer Picture Audio Network Settings Help Wide Exit VIZIO Zoom 2D Help User Manual System Info Reset TV Settings CNleoarmr MalemPoaryno(rFaamcticory Default) Service Check Guided Setup Store Demo 3D Wi Ex In Sl Tim Net Press the V Button on the Remote Control to view the on-screen User Manual.
Select User Manual and press OK to display the V.I.A. Select HDTV Settings. Highlight Help and press OK. Dock. VIEWING THE ON-SCREEN USER MANUAL 1 2 3 4 V Button VIZIO ABC Input Wide CC Sleep Timer Picture Audio Network Settings Help Wide Exit VIZIO Zoom 2D Help User Manual System Info Reset TV Settings CNleoarmr MalemPoaryno(rFaamcticory Default) Service Check Guided Setup Store Demo 3D Wi Ex In Sl Tim Net Press the V Button on the Remote Control to view the on-screen User Manual.
Download
Page 17
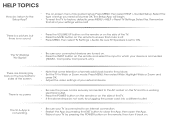
... the screen. • Note that some television channels add black bars to the picture. • Set the TV to Wide or Zoom mode. Remember that mute is set to factory defaults, press MENU > HELP > Reset TV Settings. Select Yes. Press MENU, then select Wide. The TV displays "No Signal." • Be...; Press the MUTE button on . Press MENU, then select HELP > Guided Setup. Be sure TV Speakers is off. • Press MENU, then select TV Settings > Audio. There are turned on. • Press the INPUT button on the remote and select the input to which your TV by pressing the POWER...
... the screen. • Note that some television channels add black bars to the picture. • Set the TV to Wide or Zoom mode. Remember that mute is set to factory defaults, press MENU > HELP > Reset TV Settings. Select Yes. Press MENU, then select Wide. The TV displays "No Signal." • Be...; Press the MUTE button on . Press MENU, then select HELP > Guided Setup. Be sure TV Speakers is off. • Press MENU, then select TV Settings > Audio. There are turned on. • Press the INPUT button on the remote and select the input to which your TV by pressing the POWER...
Download
Page 19
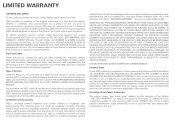
..., INCLUDING ANY IMPLIED WARRANTY OF MERCHANTABILITY AND FITNESS FOR A PARTICULAR PURPOSE, SHALL BE LIMITED IN DURATION TO THE PERIOD OF TIME SET FORTH ABOVE. CHECK WWW.VIZIO.COM FOR THE MOST CURRENT VERSION. Proof of purchase in the form of a purchase receipt or copy thereof is required to...LABOR Covers units purchased as installation and set-up issues or any type of customer misuse, modifications or adjustments, as well as new in United States and Puerto Rico Only. To determine if this warranty is determined to be sent to a VIZIO service center to the customer. THIS...
..., INCLUDING ANY IMPLIED WARRANTY OF MERCHANTABILITY AND FITNESS FOR A PARTICULAR PURPOSE, SHALL BE LIMITED IN DURATION TO THE PERIOD OF TIME SET FORTH ABOVE. CHECK WWW.VIZIO.COM FOR THE MOST CURRENT VERSION. Proof of purchase in the form of a purchase receipt or copy thereof is required to...LABOR Covers units purchased as installation and set-up issues or any type of customer misuse, modifications or adjustments, as well as new in United States and Puerto Rico Only. To determine if this warranty is determined to be sent to a VIZIO service center to the customer. THIS...

Download
Page 2
This product qualifies for ENERGY STAR in the "factory default" setting and this is the setting in which power savings will increase power consumption that could exceed the limits necessary to qualify for ENERGY STAR rating. StudioSound HD and TruVolume technologies ... of Dolby Laboratories. HDMI, the HDMI logo and High-Definition Multimedia Interface are incorporated under license from SRS Labs, Inc. Changing the factory default picture settings or enabling other features will be achieved.
This product qualifies for ENERGY STAR in the "factory default" setting and this is the setting in which power savings will increase power consumption that could exceed the limits necessary to qualify for ENERGY STAR rating. StudioSound HD and TruVolume technologies ... of Dolby Laboratories. HDMI, the HDMI logo and High-Definition Multimedia Interface are incorporated under license from SRS Labs, Inc. Changing the factory default picture settings or enabling other features will be achieved.
Download
Page 7
... Using the Network Connection Menu 28 Connecting to a Wireless Network 28 Changing the Advanced Network Settings 29 Testing Your Network Connection 29 Changing the TV Settings 30 Changing the Input Source 30 Setting the Tuner Mode 31 Scanning for Channels 31 Adding New Channels 32 Skipping Channels 33 Changing the Audio Language 33...
... Using the Network Connection Menu 28 Connecting to a Wireless Network 28 Changing the Advanced Network Settings 29 Testing Your Network Connection 29 Changing the TV Settings 30 Changing the Input Source 30 Setting the Tuner Mode 31 Scanning for Channels 31 Adding New Channels 32 Skipping Channels 33 Changing the Audio Language 33...
Download
Page 8
... Turning the Power Indicator Light On or Off 38 Using the Help Menu 39 Displaying System Information 39 Resetting the TV Settings 40 Restoring the TV to Factory Default Settings 40 Using Guided Setup 41 Using the Info Window 42 Using the USB Media Player 43 Using the USB Media Player 43... Connecting a USB Thumb Drive to the TV 43 Playing USB Media 43 Using VIZIO Internet Apps 45 Using the VIA Shortcut Buttons 45...
... Turning the Power Indicator Light On or Off 38 Using the Help Menu 39 Displaying System Information 39 Resetting the TV Settings 40 Restoring the TV to Factory Default Settings 40 Using Guided Setup 41 Using the Info Window 42 Using the USB Media Player 43 Using the USB Media Player 43... Connecting a USB Thumb Drive to the TV 43 Playing USB Media 43 Using VIZIO Internet Apps 45 Using the VIA Shortcut Buttons 45...
Download
Page 17
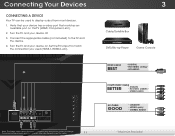
... used to the TV and the device. 4. Verify that your device has a video port that matches an available port on the model. 11 * Maximum Resolution Set the TV's input to match the connection you used (HDMI-1, HDMI-2, etc). 3 Cable/Satellite Box DVD/Blu-ray Player Game Console HDMI CABLE BEST •...
... used to the TV and the device. 4. Verify that your device has a video port that matches an available port on the model. 11 * Maximum Resolution Set the TV's input to match the connection you used (HDMI-1, HDMI-2, etc). 3 Cable/Satellite Box DVD/Blu-ray Player Game Console HDMI CABLE BEST •...

Download
Page 24
...Change the screen aspect ratio • Set up closed captioning • Activate the sleep timer • Adjust the picture settings • Adjust the audio settings • Adjust the network settings • Change TV settings • Access the help menu VIZIO ABC Input Wide CC Sleep Timer ...Picture Audio Network Settings Help Navigating the On-Screen Menu To open...
...Change the screen aspect ratio • Set up closed captioning • Activate the sleep timer • Adjust the picture settings • Adjust the audio settings • Adjust the network settings • Change TV settings • Access the help menu VIZIO ABC Input Wide CC Sleep Timer ...Picture Audio Network Settings Help Navigating the On-Screen Menu To open...

Download
Page 25
... highlight the Wide icon. This option is only available when the TV is displayed. VIZIO Input Source Selection TV AV Component RGB HDMI 4. If the program Input is displayed. 2. Images may appear wider than intended. Note: E291i-A1 has two HDMI inputs Changing the Screen Aspect Ratio The TV can be connected to... Source External devices such as DVD players, Blu-Ray Players, and video game consoles can display images in the on the remote to highlight the Settings icon and press OK. To change the screen aspect ratio: 5. Use the Arrow buttons on -screen menu. The TV...
... highlight the Wide icon. This option is only available when the TV is displayed. VIZIO Input Source Selection TV AV Component RGB HDMI 4. If the program Input is displayed. 2. Images may appear wider than intended. Note: E291i-A1 has two HDMI inputs Changing the Screen Aspect Ratio The TV can be connected to... Source External devices such as DVD players, Blu-Ray Players, and video game consoles can display images in the on the remote to highlight the Settings icon and press OK. To change the screen aspect ratio: 5. Use the Arrow buttons on -screen menu. The TV...

Download
Page 26
... (ATSC) TV channels. 4. The Digital CC Style menu appears. VIZIO Digital CC Style Caption Style Custom Text Size As Broadcast Color As Broadcast Opacity As Broadcast 3. Choose Auto to keeABpC default settings or Custom to manually change , then use the Arrow buttons to... different languages. When you wish to change each Input settWinidge . Use the Up/Down Arrow WibdeuttoZnoosmon tNhoremarel mPaontoeramtoic highlight the setting you are viewing is displayed. 3. Change the transparency of the background. • Window Color - Change the transparency of the text...
... (ATSC) TV channels. 4. The Digital CC Style menu appears. VIZIO Digital CC Style Caption Style Custom Text Size As Broadcast Color As Broadcast Opacity As Broadcast 3. Choose Auto to keeABpC default settings or Custom to manually change , then use the Arrow buttons to... different languages. When you wish to change each Input settWinidge . Use the Up/Down Arrow WibdeuttoZnoosmon tNhoremarel mPaontoeramtoic highlight the setting you are viewing is displayed. 3. Change the transparency of the background. • Window Color - Change the transparency of the text...
Download
Page 27
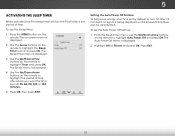
The on-screen menu is displayed. 3. The Sleep Timer menu is VIZIO displayed. Use the Up/Down Arrow buttons on the Timer Off remote to highlight Timer and press OK. Press Exit. Use the Arrow buttons on ... MENU button on the remote to turn off after which you want the TV to highlight Auto Power Off and press OK. To set period of time after a set the Auto Power Off feature: 1. From the Sleep Timer menu, use the sleep timer: 1. Sleep Timer 2. The WiAdeuto ZPooomwer-NOorfmf aml ePnaunoriasmdicisplayed. 2. Use...
The on-screen menu is displayed. 3. The Sleep Timer menu is VIZIO displayed. Use the Up/Down Arrow buttons on the Timer Off remote to highlight Timer and press OK. Press Exit. Use the Arrow buttons on ... MENU button on the remote to turn off after which you want the TV to highlight Auto Power Off and press OK. To set period of time after a set the Auto Power Off feature: 1. From the Sleep Timer menu, use the sleep timer: 1. Sleep Timer 2. The WiAdeuto ZPooomwer-NOorfmf aml ePnaunoriasmdicisplayed. 2. Use...

Download
Page 28
...picture may appear faded oABrCwashed out. When this setting is too high or too low, detail may appear dark. If the setting is too high, the picture may be too dark to values that does not otherwise exist. VIZIO Picture Picture Mode Backlight Brightness Contrast Color Tint... Sharpness Custom - + 50 - + 50 - + 50 - + 50 - +0 - +0 More 4. To adjust the picture settings: 1. When 2D 3D...
...picture may appear faded oABrCwashed out. When this setting is too high or too low, detail may appear dark. If the setting is too high, the picture may be too dark to values that does not otherwise exist. VIZIO Picture Picture Mode Backlight Brightness Contrast Color Tint... Sharpness Custom - + 50 - + 50 - + 50 - + 50 - +0 - +0 More 4. To adjust the picture settings: 1. When 2D 3D...

Download
Page 29
... Normal, Rich Color, Green/Flesh, or Green/Blue. • Adaptive Luma - Adjusts the average brightness of the picture to change the setting: • Noise Reduction Diminishes artifacts in the image caused by the digitizing of some colors and improves flesh tones. Wide Zoom Normal Panoramic... Exit 2D 3D ABC Input Wide CC Sleep Timer Picture Audio Network Settings Help 23 Select Off, Low, Medium, Strong, or Extend. • Film Mode - Select Off or OPC. 4. VIZIO Advanced Picture Noise Reduction Low MPEG NR Low Color Enhancement Normal Adaptive Luma ...
... Normal, Rich Color, Green/Flesh, or Green/Blue. • Adaptive Luma - Adjusts the average brightness of the picture to change the setting: • Noise Reduction Diminishes artifacts in the image caused by the digitizing of some colors and improves flesh tones. Wide Zoom Normal Panoramic... Exit 2D 3D ABC Input Wide CC Sleep Timer Picture Audio Network Settings Help 23 Select Off, Low, Medium, Strong, or Extend. • Film Mode - Select Off or OPC. 4. VIZIO Advanced Picture Noise Reduction Low MPEG NR Low Color Enhancement Normal Adaptive Luma ...

Download
Page 30
...color temperature, press the EXIT button on the Exit 2D 3D remote to HDMI. 2. Blue Offset - From the Picture Settings menu, Wiudese thZoeomArroNwormbaluttPoannosraominc the remote to highlight Color Temperature, then press OK. Position - - Adjusts the width of the...- Ne•tworkVeSrettiticngasl PoHesliption - 5 Adjusting the Color Temperature Adjusting the color temperature will change each of the color temperature settings: VIZIO Color Temperature Color Temperature Red Gain - To adjust the color temperature: 1. Red Offset - Green Offset - When you ...
...color temperature, press the EXIT button on the Exit 2D 3D remote to HDMI. 2. Blue Offset - From the Picture Settings menu, Wiudese thZoeomArroNwormbaluttPoannosraominc the remote to highlight Color Temperature, then press OK. Position - - Adjusts the width of the...- Ne•tworkVeSrettiticngasl PoHesliption - 5 Adjusting the Color Temperature Adjusting the color temperature will change each of the color temperature settings: VIZIO Color Temperature Color Temperature Red Gain - To adjust the color temperature: 1. Red Offset - Green Offset - When you ...

Download
Page 31
Use the Arrow buttons on the remote. 25 The TV displays, "Are you sure you want to RESET Picture Settings to the factory default settings: 1. Highlight Yes and press OK. 4. 5 Resetting the Picture Settings To reset the picture settings to the factory defaults?" 3. From the Picture Settings menu, use the Arrow buttons to highlight Reset Picture Mode, then press OK. Press the EXIT button on the remote to highlight More, then press OK. 2.
Use the Arrow buttons on the remote. 25 The TV displays, "Are you sure you want to RESET Picture Settings to the factory default settings: 1. Highlight Yes and press OK. 4. 5 Resetting the Picture Settings To reset the picture settings to the factory defaults?" 3. From the Picture Settings menu, use the Arrow buttons to highlight Reset Picture Mode, then press OK. Press the EXIT button on the remote to highlight More, then press OK. 2.
Download
Page 32
... - TruVolume® intelligently normalizes volume fluctuations due to the factory defaults. See Adjusting the Advanced Audio Settings on the remote to change the setting: • Balance - Adjusts the boost or attenuation of the audio output from the TV's internal speakers..., and delivering crisp details and clear, intelligible dialog. VIZIO Audio Settings Audio Mode Balance - See Resetting the Audio Settings on or off. • SRS StudioSound HD - 5 Adjusting the Audio Settings To adjust the audio settings: 1. Press the MENU button on -screen menu is...
... - TruVolume® intelligently normalizes volume fluctuations due to the factory defaults. See Adjusting the Advanced Audio Settings on the remote to change the setting: • Balance - Adjusts the boost or attenuation of the audio output from the TV's internal speakers..., and delivering crisp details and clear, intelligible dialog. VIZIO Audio Settings Audio Mode Balance - See Resetting the Audio Settings on or off. • SRS StudioSound HD - 5 Adjusting the Audio Settings To adjust the audio settings: 1. Press the MENU button on -screen menu is...
Download
Page 33
...to the factory defaults?" 4. InPpruet ss thWeideEXIT CbCutton on the remote. When you have finished adjusting the advanced audio settings, press the EXIT button on -screen menu is displayed. 2. WiUdese thZoeomArroNwormbaul ttPoannosraomnic the remote to highlight Reset Audio Mode...From the Audio Settings Menu, use the Arrow buttons to the factory default settings: 1. Select Off, Dolby Digital, or PCM. 3. The Advanced Audio menu is displayed. 3. Resetting the Audio Settings To reset the audio settings to highlight Advanced Audio, then press OK. VIZIO Advanced Audio Digital...
...to the factory defaults?" 4. InPpruet ss thWeideEXIT CbCutton on the remote. When you have finished adjusting the advanced audio settings, press the EXIT button on -screen menu is displayed. 2. WiUdese thZoeomArroNwormbaul ttPoannosraomnic the remote to highlight Reset Audio Mode...From the Audio Settings Menu, use the Arrow buttons to the factory default settings: 1. Select Off, Dolby Digital, or PCM. 3. The Advanced Audio menu is displayed. 3. Resetting the Audio Settings To reset the audio settings to highlight Advanced Audio, then press OK. VIZIO Advanced Audio Digital...

Download
Page 34
... will not see your TV is not being broadcast: If your wireless network displayed, highlight More Access Points and press OK. VIZIO Network connection Wired Connection Disconnected Wireless Access Points More Access Points Manual Setup Enter Access Point Name Test Connection 6. Input Wide CC... Sleep Timer Picture Audio Network Settings Help 28 Highlight the name of available wireless networks, is used for locating an Access Point with an Ethernet cable, you ...
... will not see your TV is not being broadcast: If your wireless network displayed, highlight More Access Points and press OK. VIZIO Network connection Wired Connection Disconnected Wireless Access Points More Access Points Manual Setup Enter Access Point Name Test Connection 6. Input Wide CC... Sleep Timer Picture Audio Network Settings Help 28 Highlight the name of available wireless networks, is used for locating an Access Point with an Ethernet cable, you ...

Download
Page 35
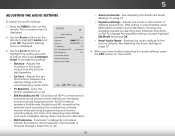
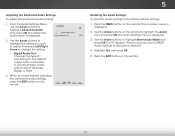
... name, signal strength, and download speed of your network, these are displayed at the bottom of the other settings. • IP Address - VIZIO IP Setting DHCP Off IP Address Subnet Mask Default Gateway Pref. Press the EXIT button on the remote. Use the Arrow... and OK buttons to adjust each setting: • DHCP - (Dynamic Host Configuration Protocol) This setting must be turned Off to the TV. ...
... name, signal strength, and download speed of your network, these are displayed at the bottom of the other settings. • IP Address - VIZIO IP Setting DHCP Off IP Address Subnet Mask Default Gateway Pref. Press the EXIT button on the remote. Use the Arrow... and OK buttons to adjust each setting: • DHCP - (Dynamic Host Configuration Protocol) This setting must be turned Off to the TV. ...
Download
Page 36
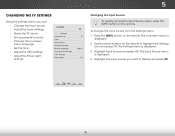
... source • Adjust the Tuner settings • Name the TV inputs • Set up parental controls • Change the on-screen menu language • Set the time • Adjust the CEC settings • Adjust the Power Light settings VIZIO Settings Input Source Tuner Name Input Parental Controls... Menu Language Time & Local Settings CEC Settings Power Light TV English On Changing the Input Source...
... source • Adjust the Tuner settings • Name the TV inputs • Set up parental controls • Change the on-screen menu language • Set the time • Adjust the CEC settings • Adjust the Power Light settings VIZIO Settings Input Source Tuner Name Input Parental Controls... Menu Language Time & Local Settings CEC Settings Power Light TV English On Changing the Input Source...


