
E190VA User Manual
Page 4
...including amplifiers) that may result in a bookcase or cabinet unless proper ventilation is provided. • Never push any objects on your TV. • Your TV should be sure these instructions. • Heed all warnings. • Follow all servicing to the presence of un-isolated, dangerous ... • Do not apply pressure or throw objects at your TV. Do not place any object into the apparatus, the apparatus has been exposed 4 E190VA / E220VA / E260VA to persons. This plug will fit only into your TV safely. Do not defeat the safety purpose of time. •...
...including amplifiers) that may result in a bookcase or cabinet unless proper ventilation is provided. • Never push any objects on your TV. • Your TV should be sure these instructions. • Heed all warnings. • Follow all servicing to the presence of un-isolated, dangerous ... • Do not apply pressure or throw objects at your TV. Do not place any object into the apparatus, the apparatus has been exposed 4 E190VA / E220VA / E260VA to persons. This plug will fit only into your TV safely. Do not defeat the safety purpose of time. •...
E190VA User Manual
Page 5
...damage the wires inside the cord and cause fire or electric shock. Do not expose batteries to repair or service your TV. - Your TV is intended to alert the user to the presence of uninsulated DANGEROUS VOLTAGE within an equilateral triangle is exposed to do...the operator. Liquid sprays or any other cables are unplugged before moving your TV from moisture. E190VA / E220VA / E260VA • Do not overload power strips and extension cords. This will protect your TV. These servicing instructions are qualified to rain or other hazards. To reduce ...
...damage the wires inside the cord and cause fire or electric shock. Do not expose batteries to repair or service your TV. - Your TV is intended to alert the user to the presence of uninsulated DANGEROUS VOLTAGE within an equilateral triangle is exposed to do...the operator. Liquid sprays or any other cables are unplugged before moving your TV from moisture. E190VA / E220VA / E260VA • Do not overload power strips and extension cords. This will protect your TV. These servicing instructions are qualified to rain or other hazards. To reduce ...
E190VA User Manual
Page 6
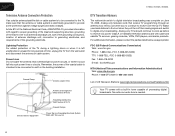
... discharge unit, connection to receive low power, Class A or translator television stations and with a built-in the building installation. Analog-only TVs should continue to work as appropriate: FCC (US Federal Communications Commission) Web: www.fcc.gov Phone: 1-888-CALL-FCC (1-888-225-5322... antenna or cable system is intended to be connected to the TV, make sure that receive TV programming through an antenna now need a converter box to continue to digital-only broadcasting. E190VA / E220VA / E260VA Television Antenna Connection Protection If an outside antenna/satellite ...
... discharge unit, connection to receive low power, Class A or translator television stations and with a built-in the building installation. Analog-only TVs should continue to work as appropriate: FCC (US Federal Communications Commission) Web: www.fcc.gov Phone: 1-888-CALL-FCC (1-888-225-5322... antenna or cable system is intended to be connected to the TV, make sure that receive TV programming through an antenna now need a converter box to continue to digital-only broadcasting. E190VA / E220VA / E260VA Television Antenna Connection Protection If an outside antenna/satellite ...
E190VA User Manual
Page 7
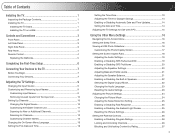
... 11 Scanning for New or Additional Channels 11 Scanning for Channels 12 Customizing Channel Names 12 Changing the On-Screen Menu Language 13 Setting the TV's Date and Time 13 Setting the Time Zone 13 Adjusting the Time for Daylight Savings 14 Enabling or Disabling Automatic Date and Time ...Updates 14 Setting the Date and Time 14 Adjusting the TV Settings for Use with A PC 15 Using the Other Menu Settings 16 Navigating the On-Screen Menu 16 Setting the Sleep Timer 16 Viewing a ...
... 11 Scanning for New or Additional Channels 11 Scanning for Channels 12 Customizing Channel Names 12 Changing the On-Screen Menu Language 13 Setting the TV's Date and Time 13 Setting the Time Zone 13 Adjusting the Time for Daylight Savings 14 Enabling or Disabling Automatic Date and Time ...Updates 14 Setting the Date and Time 14 Adjusting the TV Settings for Use with A PC 15 Using the Other Menu Settings 16 Navigating the On-Screen Menu 16 Setting the Sleep Timer 16 Viewing a ...
E190VA User Manual
Page 8
...Control Passcode 27 Resetting the Content Locks 27 Viewing System Info and Resetting to Factory Defaults 28 Displaying System Information 28 Restoring the TV to the Factory Default Settingss 28 Restarting the Setup App 28 Setting Up Closed Captioning 29 Changing the Appearance of Digital Closed Captions...and Labor 34 Type of Service 34 Limitations and Exclusions 34 Personal Data 34 Zero Bright Pixel Defect Guarantee 34 8 E190VA / E220VA / E260VA Legal & Compliance 35 FCC Class B Radio Interference Statement 35 Notice...35 FCC warning 35 Caution 35 Open Source Software Notice 35
...Control Passcode 27 Resetting the Content Locks 27 Viewing System Info and Resetting to Factory Defaults 28 Displaying System Information 28 Restoring the TV to the Factory Default Settingss 28 Restarting the Setup App 28 Setting Up Closed Captioning 29 Changing the Appearance of Digital Closed Captions...and Labor 34 Type of Service 34 Limitations and Exclusions 34 Personal Data 34 Zero Bright Pixel Defect Guarantee 34 8 E190VA / E220VA / E260VA Legal & Compliance 35 FCC Class B Radio Interference Statement 35 Notice...35 FCC warning 35 Caution 35 Open Source Software Notice 35
E190VA User Manual
Page 9
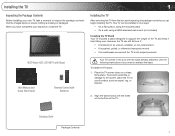
... Cloth Package Contents 1 When you have completed your new TV, take a moment to ensure nothing is not properly secured VIZIO Razor LED LCD HDTV with Stand User Manual and Quick Start Guide Remote Control with Batteries Your TV comes in two ways: • On a flat surface, using the included stand • On a wall...
... Cloth Package Contents 1 When you have completed your new TV, take a moment to ensure nothing is not properly secured VIZIO Razor LED LCD HDTV with Stand User Manual and Quick Start Guide Remote Control with Batteries Your TV comes in two ways: • On a flat surface, using the included stand • On a wall...
E190VA User Manual
Page 10
...base plate into an upright position and place on the locking clip, then release it away from the TV. 4. E190VA / E220VA / E260VA Be sure the mount you will need a wall mount. To install your TV on a wall, you choose is clear of debris that can begin the installation. Installing the...: Screw Pitch: Hole Pattern: E190VA M4 10mm 0.7mm 75mm x 75mm E220VA M4 10mm 0.7mm 75mm x 75mm E260VA M4 10mm 0.7mm 100mm x 100mm Installing a TV on a wall: 1. Use only with your TV, you have the correct mount for your TV. 5. To ensure proper ventilation, leave 1" of space between the back of...
...base plate into an upright position and place on the locking clip, then release it away from the TV. 4. E190VA / E220VA / E260VA Be sure the mount you will need a wall mount. To install your TV on a wall, you choose is clear of debris that can begin the installation. Installing the...: Screw Pitch: Hole Pattern: E190VA M4 10mm 0.7mm 75mm x 75mm E220VA M4 10mm 0.7mm 75mm x 75mm E260VA M4 10mm 0.7mm 100mm x 100mm Installing a TV on a wall: 1. Use only with your TV, you have the correct mount for your TV. 5. To ensure proper ventilation, leave 1" of space between the back of...

E190VA User Manual
Page 11
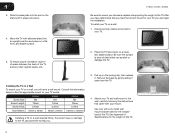
... (DVD player, game console, etc) with a composite AV cable. When activated, Sensor: the sensor adjusts the brightness of the TV based on the light level in the room. (On E220VA and E260VA, the sensor is located on right side panel.) Left Side Panel 3.5mm Audio Composite AV USB 2 Right Side Panel... Ambient Light Sensor Power Menu Channel Up/Down Volume Up/Down Input Right Side Panel Ambient Light Activate through the on the front of the button, the TV will...
... (DVD player, game console, etc) with a composite AV cable. When activated, Sensor: the sensor adjusts the brightness of the TV based on the light level in the room. (On E220VA and E260VA, the sensor is located on right side panel.) Left Side Panel 3.5mm Audio Composite AV USB 2 Right Side Panel... Ambient Light Sensor Power Menu Channel Up/Down Volume Up/Down Input Right Side Panel Ambient Light Activate through the on the front of the button, the TV will...
E190VA User Manual
Page 12
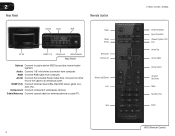
... the other end of the cable to audio device (VIZIO sound bar, home theater system). HDMI (1,2): Connect external device (Blu-Ray/DVD player, game console, etc). Cable/Antenna: Connect coaxial cable for external antenna or cable TV. Audio: Connect 1/8" mini stereo connector from computer. ...2 Rear Panel Remote Control Optical Audio RGB AC IN HDMI (1,2) Component Cable/Antenna Rear Panel Optical: Connect to an electrical outlet. Input Wide Sleep Menu/OK Arrow Left Volume Up/Down Last Info 4 E190VA / E220VA ...
... the other end of the cable to audio device (VIZIO sound bar, home theater system). HDMI (1,2): Connect external device (Blu-Ray/DVD player, game console, etc). Cable/Antenna: Connect coaxial cable for external antenna or cable TV. Audio: Connect 1/8" mini stereo connector from computer. ...2 Rear Panel Remote Control Optical Audio RGB AC IN HDMI (1,2) Component Cable/Antenna Rear Panel Optical: Connect to an electrical outlet. Input Wide Sleep Menu/OK Arrow Left Volume Up/Down Last Info 4 E190VA / E220VA ...
E190VA User Manual
Page 13
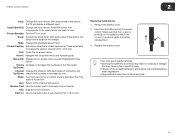
...the sleep timer. Menu/OK: Display the on -screen menu and episode guide. Mute: Turn the sound off . When mute is activated, the TV's audio is turned off or on the batteries match the (+) and (-) symbols inside the battery compartment. 3. Input (Specific): Change the input device... with local hazardous waste regulations. • Keep batteries away from children and pets. 5 Last: Return to manually enter a channel. E190VA / E220VA / E260VA 2 Input: Change the input device. Number Pad: Use the number pad to the channel last viewed. Insert two AA batteries into ...
...the sleep timer. Menu/OK: Display the on -screen menu and episode guide. Mute: Turn the sound off . When mute is activated, the TV's audio is turned off or on the batteries match the (+) and (-) symbols inside the battery compartment. 3. Input (Specific): Change the input device... with local hazardous waste regulations. • Keep batteries away from children and pets. 5 Last: Return to manually enter a channel. E190VA / E220VA / E260VA 2 Input: Change the input device. Number Pad: Use the number pad to the channel last viewed. Insert two AA batteries into ...
E190VA User Manual
Page 14
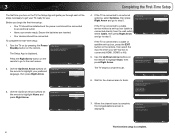
To complete the first-time setup: 1. Initial Setup Allow the VIZIO setup Wizard to help you tune your input location: Mode Setting Home ...Complete Back Next The first-time setup is displayed. Before you begin the first-time setup: • Your TV should be installed and the power cord should be connected to an electrical outlet. • Have your input source: ...Tuner Antenna Cable If the TV is connected to a cable service without a set -top box is connected directly from the wall outlet) select...
To complete the first-time setup: 1. Initial Setup Allow the VIZIO setup Wizard to help you tune your input location: Mode Setting Home ...Complete Back Next The first-time setup is displayed. Before you begin the first-time setup: • Your TV should be installed and the power cord should be connected to an electrical outlet. • Have your input source: ...Tuner Antenna Cable If the TV is connected to a cable service without a set -top box is connected directly from the wall outlet) select...
E190VA User Manual
Page 15
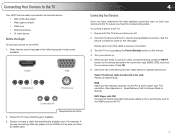
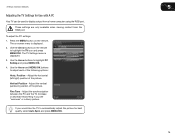
... scan. Ensure each end of the cable is set to use your device on the next page. Specifications.) Set the Screen Mode to the TV: 1. Turn the TV on by pressing the Power/Standby button on -screen menu. To connect a device to Normal. RGB Make sure the desktop resolution on the PC... is securely connected. 3. For example, if you are ready to match your device and the TV, ensure you are connecting a Blu-ray player with DVI Connect left (white) and right (red) audio cables to the L and R ports next to the HDTV...
... scan. Ensure each end of the cable is set to use your device on the next page. Specifications.) Set the Screen Mode to the TV: 1. Turn the TV on by pressing the Power/Standby button on -screen menu. To connect a device to Normal. RGB Make sure the desktop resolution on the PC... is securely connected. 3. For example, if you are ready to match your device and the TV, ensure you are connecting a Blu-ray player with DVI Connect left (white) and right (red) audio cables to the L and R ports next to the HDTV...
E190VA User Manual
Page 16
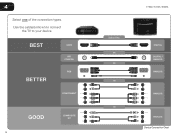
BEST BETTER HDMI RF/ COAXIAL RGB COMPONENT GOOD COMPOSITE AV 8 E190VA / E220VA / E260VA Select One: OR OR OR OR DIGITAL DIGITAL / ANALOG ANALOG ANALOG ANALOG Device Connection Chart 4 Select one of the connection types. Use the cable(s) shown to connect the TV to your device.
BEST BETTER HDMI RF/ COAXIAL RGB COMPONENT GOOD COMPOSITE AV 8 E190VA / E220VA / E260VA Select One: OR OR OR OR DIGITAL DIGITAL / ANALOG ANALOG ANALOG ANALOG Device Connection Chart 4 Select one of the connection types. Use the cable(s) shown to connect the TV to your device.
E190VA User Manual
Page 17
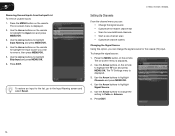
... menu is displayed. 2. Use the Arrow buttons to highlight Input Source and press MENU/OK. 4. Use the Arrow buttons on the remote to highlight the TV icon and press MENU/OK. 3. To change the input device: 1. Press EXIT. Customizing and Removing Input Names When you have a 10-character limit.) For ...example, HDMI 1 could be renamed as DVD players, Blu-Ray Players, and video game consoles can be connected to your TV. Press EXIT.x 9 Use the Arrow buttons on the remote to highlight the input source you wish to rename, then press MENU/OK. 6. Use the ...
... menu is displayed. 2. Use the Arrow buttons to highlight Input Source and press MENU/OK. 4. Use the Arrow buttons on the remote to highlight the TV icon and press MENU/OK. 3. To change the input device: 1. Press EXIT. Customizing and Removing Input Names When you have a 10-character limit.) For ...example, HDMI 1 could be renamed as DVD players, Blu-Ray Players, and video game consoles can be connected to your TV. Press EXIT.x 9 Use the Arrow buttons on the remote to highlight the input source you wish to rename, then press MENU/OK. 6. Use the ...
E190VA User Manual
Page 18
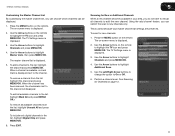
... Input Naming screen and select Reset. Press EXIT. The TV Settings menu is displayed. 2. To change the setting to Cable or Antenna. 6. To restore an input to the list, go to highlight Skip Input and press MENU/OK. 6. E190VA / E220VA / E260VA Setting Up Channels From the channel menu you ...can change the signal source for the coaxial (TV) input. Use the Arrow buttons on the remote. Use the Arrow buttons to highlight Channels and ...
... Input Naming screen and select Reset. Press EXIT. The TV Settings menu is displayed. 2. To change the setting to Cable or Antenna. 6. To restore an input to the list, go to highlight Skip Input and press MENU/OK. 6. E190VA / E220VA / E260VA Setting Up Channels From the channel menu you ...can change the signal source for the coaxial (TV) input. Use the Arrow buttons on the remote. Use the Arrow buttons to highlight Channels and ...
E190VA User Manual
Page 19
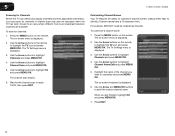
... 2. Use the Arrow buttons to the list, highlight the channel and press MENU/OK. Perform a channel scan. The on the remote. The TV Settings menu is displayed. 5. To include only digital channels in your master channel list settings are preserved. This is displayed next to add the new..., highlight Mark All and press MENU/ OK.v To remove all available channels from the list, highlight the channel and press MENU/OK. E190VA / E220VA / E260VA 5 Customizing the Master Channel List By customizing the master channel list, you do not have to rescan all channels to the channel. Press...
... 2. Use the Arrow buttons to the list, highlight the channel and press MENU/OK. Perform a channel scan. The on the remote. The TV Settings menu is displayed. 5. To include only digital channels in your master channel list settings are preserved. This is displayed next to add the new..., highlight Mark All and press MENU/ OK.v To remove all available channels from the list, highlight the channel and press MENU/OK. E190VA / E220VA / E260VA 5 Customizing the Master Channel List By customizing the master channel list, you do not have to rescan all channels to the channel. Press...
E190VA User Manual
Page 20
...buttons to highlight On and press MENU/OK. Use the Arrow buttons to highlight Channel Scan and press MENU/OK. 5. Customizing Channel Names Your TV features the ability to customize channel names, making them easy to identify. (Custom names have a 10-character limit.) For example, KBOT-DT ... and press MENU/OK. 7. Use the Arrow buttons on the remote to highlight Channels and press MENU/OK. 4. 5 E190VA / E220VA / E260VA Scanning for Channels Before the TV can detect and display channels and their associated information, you must scan for the channel scan to reach 100%, then press EXIT...
...buttons to highlight On and press MENU/OK. Use the Arrow buttons to highlight Channel Scan and press MENU/OK. 5. Customizing Channel Names Your TV features the ability to customize channel names, making them easy to identify. (Custom names have a 10-character limit.) For example, KBOT-DT ... and press MENU/OK. 7. Use the Arrow buttons on the remote to highlight Channels and press MENU/OK. 4. 5 E190VA / E220VA / E260VA Scanning for Channels Before the TV can detect and display channels and their associated information, you must scan for the channel scan to reach 100%, then press EXIT...
E190VA User Manual
Page 21
...is displayed. 2. The on -screen menu language: 1. Use the Arrow buttons on the remote to highlight Time Zone and press MENU/OK. 5. The TV Settings menu is displayed. 3. Use the Arrow buttons to highlight your time zone and press MENU/OK. 6. To change the on -screen menu is... press MENU/OK. 5. Press EXIT. 13 Press the MENU button on -screen menu in different languages. The TV Settings menu is displayed. 3. E190VA / E220VA / E260VA Changing the On-Screen Menu Language Your TV can : • Set the time zone • Adjust the time for daylight savings • Enable or ...
...is displayed. 2. The on -screen menu language: 1. Use the Arrow buttons on the remote to highlight Time Zone and press MENU/OK. 5. The TV Settings menu is displayed. 3. Use the Arrow buttons to highlight your time zone and press MENU/OK. 6. To change the on -screen menu is... press MENU/OK. 5. Press EXIT. 13 Press the MENU button on -screen menu in different languages. The TV Settings menu is displayed. 3. E190VA / E220VA / E260VA Changing the On-Screen Menu Language Your TV can : • Set the time zone • Adjust the time for daylight savings • Enable or ...

E190VA User Manual
Page 22
... manually set the TV's date and time. Press EXIT. Use the Arrow buttons on the remote to highlight Date & Time and press MENU/OK. 4. 5 E190VA / E220VA / E260VA Adjusting the Time for Daylight Savings This setting will automatically adjust the time for zones which recognize daylight...The on -screen menu is displayed. 2. Use the Arrow buttons to highlight Current Tiime. 5. The on -screen menu is displayed. 2. The TV Settings menu is displayed. 3. Use the Arrow buttons to highlight individual numbers in many areas. Use the Number Pad to highlight Daylight Saving. 5. ...
... manually set the TV's date and time. Press EXIT. Use the Arrow buttons on the remote to highlight Date & Time and press MENU/OK. 4. 5 E190VA / E220VA / E260VA Adjusting the Time for Daylight Savings This setting will automatically adjust the time for zones which recognize daylight...The on -screen menu is displayed. 2. Use the Arrow buttons to highlight Current Tiime. 5. The on -screen menu is displayed. 2. The TV Settings menu is displayed. 3. Use the Arrow buttons to highlight individual numbers in many areas. Use the Number Pad to highlight Daylight Saving. 5. ...
E190VA User Manual
Page 23
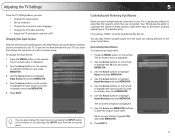
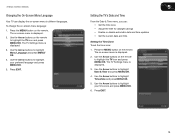
... following options: Horiz. Vertical Position - To adjust the PC settings: 1. Adjust the synchronization between the PC and the TV. Use the Arrow buttons to highlight the TV icon and press MENU/OK. Press the MENU button on the remote to highlight PC Setting and press MENU/OK. ...of the picture. Use the Arrow buttons on the remote. Position - If you see "waviness" or a blurry picture. E190VA / E220VA / E260VA 5 Adjusting the TV Settings for best quality, select Auto Sync and press MENU/OK. 15 These settings are only available when viewing content from a home computer...
... following options: Horiz. Vertical Position - To adjust the PC settings: 1. Adjust the synchronization between the PC and the TV. Use the Arrow buttons to highlight the TV icon and press MENU/OK. Press the MENU button on the remote to highlight PC Setting and press MENU/OK. ...of the picture. Use the Arrow buttons on the remote. Position - If you see "waviness" or a blurry picture. E190VA / E220VA / E260VA 5 Adjusting the TV Settings for best quality, select Auto Sync and press MENU/OK. 15 These settings are only available when viewing content from a home computer...


