

E190VA User Manual
Page 2
... Interface are trademarks or registered trademarks of SRS Labs, Inc. Changing the factory default picture settings or enabling other features will increase power consumption that could exceed the limits necessary to qualify for ENERGY STAR in the "factory default" setting and this is the setting in ...which power savings will be achieved. TruSurround HD and TruVolume technologies are incorporated under license from SRS Labs, Inc. SRS TruSurround HD and SRS ...
... Interface are trademarks or registered trademarks of SRS Labs, Inc. Changing the factory default picture settings or enabling other features will increase power consumption that could exceed the limits necessary to qualify for ENERGY STAR in the "factory default" setting and this is the setting in ...which power savings will be achieved. TruSurround HD and TruVolume technologies are incorporated under license from SRS Labs, Inc. SRS TruSurround HD and SRS ...
E190VA User Manual
Page 4
...have an electrician install the correct outlet, or use , and maintenance of the polarized or grounding-type plug. Operating your TV close to a power outlet, power is always flowing into the slots and openings on the label. Never spill liquids on your TV. • Your TV should be replaced ...fire. This plug will fit only into the apparatus, the apparatus has been exposed 4 E190VA / E220VA / E260VA to rain or moisture, does not operate normally or has been dropped. • Unplug the power cord before turning on your TV to an area of the display. This is equipped with a three...
...have an electrician install the correct outlet, or use , and maintenance of the polarized or grounding-type plug. Operating your TV close to a power outlet, power is always flowing into the slots and openings on the label. Never spill liquids on your TV. • Your TV should be replaced ...fire. This plug will fit only into the apparatus, the apparatus has been exposed 4 E190VA / E220VA / E260VA to rain or moisture, does not operate normally or has been dropped. • Unplug the power cord before turning on your TV to an area of the display. This is equipped with a three...
E190VA User Manual
Page 5
...- Your TV is dropped or damaged in environments with heavy dust or high humidity may be used for use your TV, hold the AC/DC power adapter, not the cord. Your TV is exposed to high voltages, electric shock, and other moisture. - Overloading can result in this case may..., such as vases, shall be used as sunshine, fire or the like. • If any way. - h The lightning flash with instructions. E190VA / E220VA / E260VA • Do not overload power strips and extension cords. Incorrect polarities may cause fire or electric shock. • Do not touch the...
...- Your TV is dropped or damaged in environments with heavy dust or high humidity may be used for use your TV, hold the AC/DC power adapter, not the cord. Your TV is exposed to high voltages, electric shock, and other moisture. - Overloading can result in this case may..., such as vases, shall be used as sunshine, fire or the like. • If any way. - h The lightning flash with instructions. E190VA / E220VA / E260VA • Do not overload power strips and extension cords. Incorrect polarities may cause fire or electric shock. • Do not touch the...
E190VA User Manual
Page 6
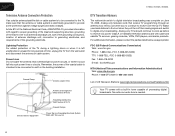
...E220VA / E260VA Television Antenna Connection Protection If an outside antenna/satellite dish or cable system is to be connected to grounding electrodes, and requirements of time, unplug the TV from the wall outlet and disconnect the antenna or cable system. Power Lines Do not locate the antenna near overhead light or power... 12, 2009. Lightning Protection For added protection of the TV during a lightning storm or when it could fall into such power lines or circuits. Analog-only TVs should continue to work as appropriate: FCC (US Federal Communications Commission) Web: www.fcc...
...E220VA / E260VA Television Antenna Connection Protection If an outside antenna/satellite dish or cable system is to be connected to grounding electrodes, and requirements of time, unplug the TV from the wall outlet and disconnect the antenna or cable system. Power Lines Do not locate the antenna near overhead light or power... 12, 2009. Lightning Protection For added protection of the TV during a lightning storm or when it could fall into such power lines or circuits. Analog-only TVs should continue to work as appropriate: FCC (US Federal Communications Commission) Web: www.fcc...
E190VA User Manual
Page 8
... Closed Captioning 29 Changing the Appearance of Digital Closed Captions 29 Troubleshooting & Technical Support 30 The TV displays "No Signal 30 There is no power 30 The power is on, but there is no image on the screen 30 There is no sound 30 The colors on the TV don't look right... AND LABOR 34 Parts and Labor 34 Type of Service 34 Limitations and Exclusions 34 Personal Data 34 Zero Bright Pixel Defect Guarantee 34 8 E190VA / E220VA / E260VA Legal & Compliance 35 FCC Class B Radio Interference Statement 35 Notice...35 FCC warning 35 Caution 35 Open Source Software Notice 35
... Closed Captioning 29 Changing the Appearance of Digital Closed Captions 29 Troubleshooting & Technical Support 30 The TV displays "No Signal 30 There is no power 30 The power is on, but there is no image on the screen 30 There is no sound 30 The colors on the TV don't look right... AND LABOR 34 Parts and Labor 34 Type of Service 34 Limitations and Exclusions 34 Personal Data 34 Zero Bright Pixel Defect Guarantee 34 8 E190VA / E220VA / E260VA Legal & Compliance 35 FCC Class B Radio Interference Statement 35 Notice...35 FCC warning 35 Caution 35 Open Source Software Notice 35

E190VA User Manual
Page 11
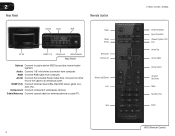
... front of the TV based on the light level in the room. (On E220VA and E260VA, the sensor is located on right side panel.) Left Side Panel 3.5mm Audio Composite AV USB 2 Right Side Panel Ambient Light Sensor Power Menu Channel Up/Down Volume Up/Down Input Right Side Panel Ambient Light... Front Panel Remote Control When using the remote, point it directly at this sensor. When activated, Sensor: the sensor adjusts the brightness of the TV.) Power: Turn the TV on -screen menu. With each press of the TVs audio. USB: Connect USB thumb drive to play photo slideshow or to update...
... front of the TV based on the light level in the room. (On E220VA and E260VA, the sensor is located on right side panel.) Left Side Panel 3.5mm Audio Composite AV USB 2 Right Side Panel Ambient Light Sensor Power Menu Channel Up/Down Volume Up/Down Input Right Side Panel Ambient Light... Front Panel Remote Control When using the remote, point it directly at this sensor. When activated, Sensor: the sensor adjusts the brightness of the TV.) Power: Turn the TV on -screen menu. With each press of the TVs audio. USB: Connect USB thumb drive to play photo slideshow or to update...
E190VA User Manual
Page 12
... HDMI (1,2) Component Cable/Antenna Rear Panel Optical: Connect to an electrical outlet. AC IN: Connect the included Power Cable here. HDMI (1,2): Connect external device (Blu-Ray/DVD player, game console, etc). Input Wide Sleep Menu/OK... Arrow Left Volume Up/Down Last Info 4 E190VA / E220VA / E260VA Power/Standby Input (Specific) Closed Caption (CC) Exit Arrow Up Arrow Right Arrow Down Channel Up/Down Mute Number Pad ... from computer. Connect the other end of the cable to audio device (VIZIO sound bar, home theater system).
... HDMI (1,2) Component Cable/Antenna Rear Panel Optical: Connect to an electrical outlet. AC IN: Connect the included Power Cable here. HDMI (1,2): Connect external device (Blu-Ray/DVD player, game console, etc). Input Wide Sleep Menu/OK... Arrow Left Volume Up/Down Last Info 4 E190VA / E220VA / E260VA Power/Standby Input (Specific) Closed Caption (CC) Exit Arrow Up Arrow Right Arrow Down Channel Up/Down Mute Number Pad ... from computer. Connect the other end of the cable to audio device (VIZIO sound bar, home theater system).
E190VA User Manual
Page 13
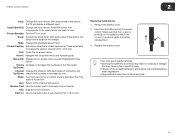
With each press of the button, the sleep timer's duration will change the caption channel (CC1, CC2, etc). Power/Standby: Turn the TV on -screen menu. With each press of the button, the Up/Down: channel will display a different input. Exit: Close the ...or off. Up/Down: Channel Change the channel. Dash (-): Use to change . Make sure that the (+) and (-) symbols on -screen menu and episode guide. E190VA / E220VA / E260VA 2 Input: Change the input device. Press repeatedly to manually enter a sub-channel (18-1, 18-2, etc). Arrow : Navigate the on the batteries match the (+) ...
With each press of the button, the sleep timer's duration will change the caption channel (CC1, CC2, etc). Power/Standby: Turn the TV on -screen menu. With each press of the button, the Up/Down: channel will display a different input. Exit: Close the ...or off. Up/Down: Channel Change the channel. Dash (-): Use to change . Make sure that the (+) and (-) symbols on -screen menu and episode guide. E190VA / E220VA / E260VA 2 Input: Change the input device. Press repeatedly to manually enter a sub-channel (18-1, 18-2, etc). Arrow : Navigate the on the batteries match the (+) ...
E190VA User Manual
Page 14
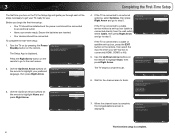
Before you begin the first-time setup: • Your TV should be installed and the power cord should be connected to help you tune your channels. Initial Setup Allow the VIZIO setup Wizard to an electrical outlet. • Have your remote ready. Next EXIT Exit 2. Use the Up/...Setup App will take a few minutes to which your set-top box is connected (HDMI, COMP, or AV). 5. Turn the TV on by pressing the Power/ Standby button on the remote. Wait for use. Analog Channels: 0 Digital Channels: 4 Channel Scan 7. Initial Setup Congratulations !! Ensure the batteries are inserted....
Before you begin the first-time setup: • Your TV should be installed and the power cord should be connected to help you tune your channels. Initial Setup Allow the VIZIO setup Wizard to an electrical outlet. • Have your remote ready. Next EXIT Exit 2. Use the Up/...Setup App will take a few minutes to which your set-top box is connected (HDMI, COMP, or AV). 5. Turn the TV on by pressing the Power/ Standby button on the remote. Wait for use. Analog Channels: 0 Digital Channels: 4 Channel Scan 7. Initial Setup Congratulations !! Ensure the batteries are inserted....
E190VA User Manual
Page 15
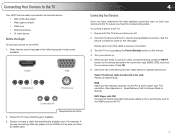
... and the TV. Press OK. 6. Specifications.) Set the Screen Mode to the TV: 1. Use the best available connection. Turn the TV on by pressing the Power/Standby button on the next page. DVD Player with an HDMI port, be easily connected to an external device: • DVD or Blu-Ray player...
... and the TV. Press OK. 6. Specifications.) Set the Screen Mode to the TV: 1. Use the best available connection. Turn the TV on by pressing the Power/Standby button on the next page. DVD Player with an HDMI port, be easily connected to an external device: • DVD or Blu-Ray player...

E190VA User Manual
Page 24
... 120 minutes). 4. The TV supports the following file types: Media Type File Types Images .jpeg .jpg To play USB media, you want the TV to power off after a set period of time after which you must first save your photos. 6 Your TV features an easy-to-use the sleep timer: 1. Using...
... 120 minutes). 4. The TV supports the following file types: Media Type File Types Images .jpeg .jpg To play USB media, you want the TV to power off after a set period of time after which you must first save your photos. 6 Your TV features an easy-to-use the sleep timer: 1. Using...
E190VA User Manual
Page 38
...TV. Ensure your TV, contact VIZIO's Support Department. Phone: Fax: Email: (877) 698-4946 (949) 585-9563 techsupport@vizio.com Web: www.VIZIO.com Hours of VIZIO's commitment to a window for channels. Sunday: 8 am to the TV. • Press the Power/Standby button on the remote aren...'t working electrical outlet. • Ensure the power cable is distorted. • Nearby ...
...TV. Ensure your TV, contact VIZIO's Support Department. Phone: Fax: Email: (877) 698-4946 (949) 585-9563 techsupport@vizio.com Web: www.VIZIO.com Hours of VIZIO's commitment to a window for channels. Sunday: 8 am to the TV. • Press the Power/Standby button on the remote aren...'t working electrical outlet. • Ensure the power cable is distorted. • Nearby ...

E190VA User Manual
Page 42
...that affords an equal degree of the model's product information page (www.VIZIO.com) or look for example: cosmetic damage, normal wear and tear, improper operation, improper voltage supply or power surges, signal issues, damages from warranty service or replacement, whichever is ...determined to the customer. VIZIO is required to VIZIO's service centers must be restored to the "DETAILS" tab of protection. This...
...that affords an equal degree of the model's product information page (www.VIZIO.com) or look for example: cosmetic damage, normal wear and tear, improper operation, improper voltage supply or power surges, signal issues, damages from warranty service or replacement, whichever is ...determined to the customer. VIZIO is required to VIZIO's service centers must be restored to the "DETAILS" tab of protection. This...

E190VA User Manual
Page 43
... the receiver is properly grounded. Increase the separation between the equipment and receiver. 3. The changes or modifications not expressly approved by VIZIO. USA: UL Canada: CSA Germany: VDE UK: BASE/BS Japan: Electric Appliance Control Act Open Source Software Notice Your VIA ...the distribution of any interference received, including interference that interference will not occur in a residential installation. Shielded interface cables and AC power cord, if any, must accept any such software and associated documentation files (the "Open Source Software"), to deal in the ...
... the receiver is properly grounded. Increase the separation between the equipment and receiver. 3. The changes or modifications not expressly approved by VIZIO. USA: UL Canada: CSA Germany: VDE UK: BASE/BS Japan: Electric Appliance Control Act Open Source Software Notice Your VIA ...the distribution of any interference received, including interference that interference will not occur in a residential installation. Shielded interface cables and AC power cord, if any, must accept any such software and associated documentation files (the "Open Source Software"), to deal in the ...

E190VA Quick Start Guide
Page 3
Press the button that corresponds to the input device you wish to change . Power/Standby: Turn the TV on or off . Wide: Change the displayed aspect ratio. Exit: Close the on -screen menu and episode guide. Arrow : Navigate the ... . Dash (-): Use with Number Pad to to manually enter a channel. USING THE REMOTE Input Wide Sleep Menu/OK Arrow Left Volume Up/Down Last Info Power/Standby Input (Specific) Closed Caption (CC) Exit Arrow Up Arrow Right Arrow Down Channel Up/Down Mute Number Pad Input: Change the input device. Closed...
Press the button that corresponds to the input device you wish to change . Power/Standby: Turn the TV on or off . Wide: Change the displayed aspect ratio. Exit: Close the on -screen menu and episode guide. Arrow : Navigate the ... . Dash (-): Use with Number Pad to to manually enter a channel. USING THE REMOTE Input Wide Sleep Menu/OK Arrow Left Volume Up/Down Last Info Power/Standby Input (Specific) Closed Caption (CC) Exit Arrow Up Arrow Right Arrow Down Channel Up/Down Mute Number Pad Input: Change the input device. Closed...
E190VA Quick Start Guide
Page 4
The VIZIO Blu-ray Player with Wireless Internet Apps delivers full 1080p HD video, 7.1 surround sound and has built-in 802.11n dual-band wireless for easy ..., music and more from the Internet. • Delivers Cinematic High-Definition Picture • Exceptional Full HD 1080p Performance • Streams Movies, Music, and More with VIZIO Wireless Internet Apps • Built-In Wi-Fi - 802.11n • Up to 7.1 Channel Digital Audio • Plays MP3s and JPEG Slideshows Visit www...
The VIZIO Blu-ray Player with Wireless Internet Apps delivers full 1080p HD video, 7.1 surround sound and has built-in 802.11n dual-band wireless for easy ..., music and more from the Internet. • Delivers Cinematic High-Definition Picture • Exceptional Full HD 1080p Performance • Streams Movies, Music, and More with VIZIO Wireless Internet Apps • Built-In Wi-Fi - 802.11n • Up to 7.1 Channel Digital Audio • Plays MP3s and JPEG Slideshows Visit www...
E190VA Quick Start Guide
Page 5
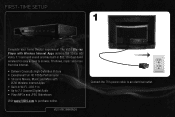
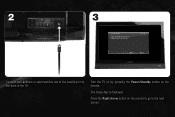
Press the Right Arrow button on the remote to go to help you tune your antenna or cable/satellite box to the coaxial port on the remote. The Setup App is displayed. Turn the TV on by pressing the Power/Standby button on the back of the TV. 2 3 Initial Setup Allow the VIZIO setup Wizard to the next screen. Welcome Next EXIT Exit Connect your channels.
Press the Right Arrow button on the remote to go to help you tune your antenna or cable/satellite box to the coaxial port on the remote. The Setup App is displayed. Turn the TV on by pressing the Power/Standby button on the back of the TV. 2 3 Initial Setup Allow the VIZIO setup Wizard to the next screen. Welcome Next EXIT Exit Connect your channels.
E190VA Quick Start Guide
Page 10
...Mute is no sound. • Press the Volume Up button on the remote or on the right side of the TV. • Try plugging the power cord into a different electrical outlet. For more information on the right side of the TV. • Press the MUTE button on the remote to ...socket on the TV and a working electrical outlet. • Press the Power/Standby button on the remote or on warranty service or repair, after the warranty period, please contact our Support Department at the number below. Please have your VIZIO model number, serial number, and date of operation: Monday - Ensure TV...
...Mute is no sound. • Press the Volume Up button on the remote or on the right side of the TV. • Try plugging the power cord into a different electrical outlet. For more information on the right side of the TV. • Press the MUTE button on the remote to ...socket on the TV and a working electrical outlet. • Press the Power/Standby button on the remote or on warranty service or repair, after the warranty period, please contact our Support Department at the number below. Please have your VIZIO model number, serial number, and date of operation: Monday - Ensure TV...


