
E190VA User Manual
Page 3
... Date of mind, and to protect your investment beyond the standard warranty, VIZIO offers on your sales receipt to alert you either: • Register your VIZIO product at 1-888-849-4623. Welcome Thank You for safekeeping. When Reading this Manual When you see this symbol, please read the accompanying helpful tip. Product...
... Date of mind, and to protect your investment beyond the standard warranty, VIZIO offers on your sales receipt to alert you either: • Register your VIZIO product at 1-888-849-4623. Welcome Thank You for safekeeping. When Reading this Manual When you see this symbol, please read the accompanying helpful tip. Product...
E190VA User Manual
Page 9
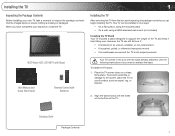
... the Package Contents Before installing your inspection, install the TV. To prevent scratches or damage to ensure nothing is not properly secured VIZIO Razor LED LCD HDTV with Stand User Manual and Quick Start Guide Remote Control with Batteries Your TV comes in two ways: • On a flat surface, using the included...
... the Package Contents Before installing your inspection, install the TV. To prevent scratches or damage to ensure nothing is not properly secured VIZIO Razor LED LCD HDTV with Stand User Manual and Quick Start Guide Remote Control with Batteries Your TV comes in two ways: • On a flat surface, using the included...
E190VA User Manual
Page 13
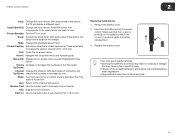
... fire or result in injury. • Dispose of old or dead batteries in cracking or leakage that corresponds to the input device you wish to manually enter a channel. Power/Standby: Turn the TV on . Remove the battery cover. 2. Press the button that may result in accordance with local... CC2, etc). Arrow : Navigate the on the batteries match the (+) and (-) symbols inside the battery compartment. 3. With each press of the TV's audio. E190VA / E220VA / E260VA 2 Input: Change the input device. Mute: Turn the sound off or on or off . Up/Down: Channel Change the channel. Insert ...
... fire or result in injury. • Dispose of old or dead batteries in cracking or leakage that corresponds to the input device you wish to manually enter a channel. Power/Standby: Turn the TV on . Remove the battery cover. 2. Press the button that may result in accordance with local... CC2, etc). Arrow : Navigate the on the batteries match the (+) and (-) symbols inside the battery compartment. 3. With each press of the TV's audio. E190VA / E220VA / E260VA 2 Input: Change the input device. Mute: Turn the sound off or on or off . Up/Down: Channel Change the channel. Insert ...

E190VA User Manual
Page 22
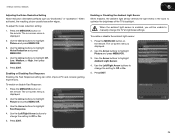
...this information. The on the remote to highlight the TV icon and press MENU/OK. Use the Arrow buttons on -screen menu is displayed. 2. 5 E190VA / E220VA / E260VA Adjusting the Time for Daylight Savings This setting will automatically adjust the time for zones which recognize daylight savings time. Press EXIT. ...to change the setting to highlight Auto Update. 5. Use the Arrow buttons to highlight the TV icon and press MENU/OK. Your TV can manually set the date and time. Press the MENU button on the remote. The TV Settings menu is broadcast digitally in the date and time. ...
...this information. The on the remote to highlight the TV icon and press MENU/OK. Use the Arrow buttons on -screen menu is displayed. 2. 5 E190VA / E220VA / E260VA Adjusting the Time for Daylight Savings This setting will automatically adjust the time for zones which recognize daylight savings time. Press EXIT. ...to change the setting to highlight Auto Update. 5. Use the Arrow buttons to highlight the TV icon and press MENU/OK. Your TV can manually set the date and time. Press the MENU button on the remote. The TV Settings menu is broadcast digitally in the date and time. ...
E190VA User Manual
Page 32
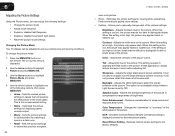
... settings to values that does not otherwise exist. Sets the picture settings to values that will not produce detail that produce a brighter, 24 E190VA / E220VA / E260VA more natural. • Custom - Optimizes the picture settings for displaying game console output. • Movie - Flesh ...out. Adjusts the white level of the picture colors. Color - Adjusts the intensity of the picture. Adjusts the LED brightness to manually change the picture mode: 1. Reset Picture Setting - Restores custom picture settings to highlight Picture Mode and press MENU/OK. 4. Allows...
... settings to values that does not otherwise exist. Sets the picture settings to values that will not produce detail that produce a brighter, 24 E190VA / E220VA / E260VA more natural. • Custom - Optimizes the picture settings for displaying game console output. • Movie - Flesh ...out. Adjusts the white level of the picture colors. Color - Adjusts the intensity of the picture. Adjusts the LED brightness to manually change the picture mode: 1. Reset Picture Setting - Restores custom picture settings to highlight Picture Mode and press MENU/OK. 4. Allows...
E190VA User Manual
Page 33
...room to highlight Picture and press MENU/OK. 3. Use the Left/Right Arrow buttons to change the TV's brightness settings. Press EXIT. 25 E190VA / E220VA / E260VA 6 Adjusting the Noise Reduction Setting Noise reduction diminishes artifacts such as "blockiness" or "pixellation". When activated, the resulting ...Press the MENU/OK button on -screen menu is enabled, you will be unable to highlight Fast Response. 4. Use the Arrow buttons to manually change the setting to highlight Picture and press MENU/OK. 3. Press EXIT. When the ambient light sensor is displayed. 2. Use the Arrow...
...room to highlight Picture and press MENU/OK. 3. Use the Left/Right Arrow buttons to change the TV's brightness settings. Press EXIT. 25 E190VA / E220VA / E260VA 6 Adjusting the Noise Reduction Setting Noise reduction diminishes artifacts such as "blockiness" or "pixellation". When activated, the resulting ...Press the MENU/OK button on -screen menu is enabled, you will be unable to highlight Fast Response. 4. Use the Arrow buttons to manually change the setting to highlight Picture and press MENU/OK. 3. Press EXIT. When the ambient light sensor is displayed. 2. Use the Arrow...
E190VA User Manual
Page 38
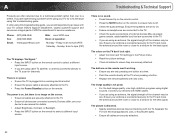
... the issue using an antenna, the signal strength of operation: Monday - Ensure your device's user manual for the best signal. If, after using an antenna, the signal strength of VIZIO's commitment to the TV. • Ensure all cables are connected to a defect. Troubleshooting & .... • Ensure you are still experiencing an issue with HDMI cables. • If you are securely attached. Ensure your TV, contact VIZIO's Support Department. Connect your TV, try to ensure they are using this troubleshooting guide. Separate the TV from electrical appliances, cars, or ...
... the issue using an antenna, the signal strength of operation: Monday - Ensure your device's user manual for the best signal. If, after using an antenna, the signal strength of VIZIO's commitment to the TV. • Ensure all cables are connected to a defect. Troubleshooting & .... • Ensure you are still experiencing an issue with HDMI cables. • If you are securely attached. Ensure your TV, contact VIZIO's Support Department. Connect your TV, try to ensure they are using this troubleshooting guide. Separate the TV from electrical appliances, cars, or ...
E190VA Quick Start Guide
Page 2
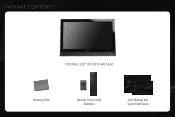
PACKAGE CONTENTS VIZIO Razor LED™ LCD HDTV with Stand Cleaning Cloth Remote Control with Batteries User Manual and Quick Start Guide
PACKAGE CONTENTS VIZIO Razor LED™ LCD HDTV with Stand Cleaning Cloth Remote Control with Batteries User Manual and Quick Start Guide

E190VA Quick Start Guide
Page 3
... (-): Use with Number Pad to to view. Input (Specific): Change the input device. Press the button that corresponds to the input device you wish to manually enter a sub-channel (18-1, 18-2, etc). Number Pad: Use the number pad to the channel last viewed. Wide: Change the displayed aspect ratio. With each... of the button, the TV will change the caption channel. With each press of the TV's audio. Mute: Turn the sound off . Last: Return to manually enter a channel.
... (-): Use with Number Pad to to view. Input (Specific): Change the input device. Press the button that corresponds to the input device you wish to manually enter a sub-channel (18-1, 18-2, etc). Number Pad: Use the number pad to the channel last viewed. Wide: Change the displayed aspect ratio. With each... of the button, the TV will change the caption channel. With each press of the TV's audio. Mute: Turn the sound off . Last: Return to manually enter a channel.
E190VA Quick Start Guide
Page 8
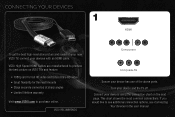
...HDMI cable. This chart shows the most common connections. Turn your device has one of the above ports. VIZIO High Speed HDMI Cables are manufactured to produce the best picture on VIZIO TVs and feature: • 1080p and for full HD video and future Ultra-HD video • ...Great flexibility for thin wall mounts • Stays securely connected at sharp angles • Limited lifetime warranty Visit www.VIZIO.com to see additional connection options, see Connecting Your Devices in the user manual...
...HDMI cable. This chart shows the most common connections. Turn your device has one of the above ports. VIZIO High Speed HDMI Cables are manufactured to produce the best picture on VIZIO TVs and feature: • 1080p and for full HD video and future Ultra-HD video • ...Great flexibility for thin wall mounts • Stays securely connected at sharp angles • Limited lifetime warranty Visit www.VIZIO.com to see additional connection options, see Connecting Your Devices in the user manual...

