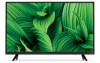
User Manual English
Page 2
... Reset & Admin Menu 34 Resetting a Picture Mode 17 Restoring the TV to Factory Default Settings 34 Adjusting the Color Tuner Settings 18 Using the Guided Setup Menu 35 Adjusting the Audio Settings 20 Using the Info Window 35 Changing the Equalizer Settings 20 Deleting the Custom Audio Mode 21 Setting Timers 22 Setting the Sleep Timer 22 Setting the Auto Power Off Feature 22 Setting Up Channels 23 Using the USB Media Player 36 Preparing Your USB Drive to Play USB Media 36 Displaying USB Media 36 Removing the USB Drive from the TV 36 Troubleshooting & Technical Support...
... Reset & Admin Menu 34 Resetting a Picture Mode 17 Restoring the TV to Factory Default Settings 34 Adjusting the Color Tuner Settings 18 Using the Guided Setup Menu 35 Adjusting the Audio Settings 20 Using the Info Window 35 Changing the Equalizer Settings 20 Deleting the Custom Audio Mode 21 Setting Timers 22 Setting the Sleep Timer 22 Setting the Auto Power Off Feature 22 Setting Up Channels 23 Using the USB Media Player 36 Preparing Your USB Drive to Play USB Media 36 Displaying USB Media 36 Removing the USB Drive from the TV 36 Troubleshooting & Technical Support...
User Manual English
Page 3
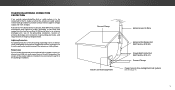
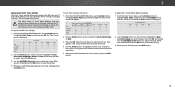
...Use only with the cart, stand, tripod, bracket, or table specified by the manufacturer, or sold with one wider than the other apparatus (including amplifiers) that you to the presence of the polarized or grounding-type plug. To purchase an extended warranty service plan, visit www.VIZIO.com. Read the following instructions should be operated... and installation services for replacement of power source indicated on the label. A polarized plug has two blades with the apparatus. Safety & Certification THANK YOU FOR CHOOSING VIZIO And congratulations on your TV close to smoke...
...Use only with the cart, stand, tripod, bracket, or table specified by the manufacturer, or sold with one wider than the other apparatus (including amplifiers) that you to the presence of the polarized or grounding-type plug. To purchase an extended warranty service plan, visit www.VIZIO.com. Read the following instructions should be operated... and installation services for replacement of power source indicated on the label. A polarized plug has two blades with the apparatus. Safety & Certification THANK YOU FOR CHOOSING VIZIO And congratulations on your TV close to smoke...
User Manual English
Page 5
...-20) Grounding Conductors (NEC Section 810-21) Ground Clamps Power Service Grounding Electrode System (NEC ART 250, part H) v Lightning Protection For added protection of the TV during a lightning storm or when it could fall into such power lines or circuits. Remember, the screen of time, unplug the TV from the wall outlet and disconnect the antenna or cable system.
...-20) Grounding Conductors (NEC Section 810-21) Ground Clamps Power Service Grounding Electrode System (NEC ART 250, part H) v Lightning Protection For added protection of the TV during a lightning storm or when it could fall into such power lines or circuits. Remember, the screen of time, unplug the TV from the wall outlet and disconnect the antenna or cable system.
User Manual English
Page 12
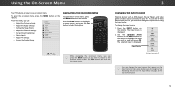
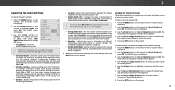
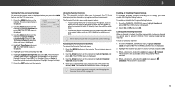
... the Audio settings • Setting the Sleep Timers • Adjust the Channel settings • Set up Closed Captioning • Name Inputs • Adjust TV settings • Access the Guided Setup VIZIO TV SETTINGS Picture Audio Timers Channels CC Closed Captions Devices System Guided Setup To open the on-screen menu, press the MENU button on the remote to highlight the input you wish to view and press OK. The Input menu is displayed. You can change the input names that appear on the remote. Use the Arrow buttons to your TV. Sleep Timer Picture Audio Network Settings Help...
... the Audio settings • Setting the Sleep Timers • Adjust the Channel settings • Set up Closed Captioning • Name Inputs • Adjust TV settings • Access the Guided Setup VIZIO TV SETTINGS Picture Audio Timers Channels CC Closed Captions Devices System Guided Setup To open the on-screen menu, press the MENU button on the remote to highlight the input you wish to view and press OK. The Input menu is displayed. You can change the input names that appear on the remote. Use the Arrow buttons to your TV. Sleep Timer Picture Audio Network Settings Help...
User Manual English
Page 13
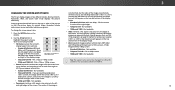
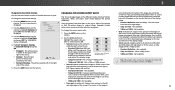
...display image. • Standard Definition (480i and 480p) - Since the picture is already formatted for any video content on the top or sides of the screen. A 720p image will appear on the remote. 2. Not available. Some programs have black bars on HDMI-5. 3 13 The center of the image is cut off by Input source...screen. Each mode displays the picture differently. Press the WIDE button on the top and bottom of the image are added to view and press OK. • Normal preserves the content's original aspect ratio and size. • Standard Definition (480i and 480p-old TV programs...
...display image. • Standard Definition (480i and 480p) - Since the picture is already formatted for any video content on the top or sides of the screen. A 720p image will appear on the remote. 2. Not available. Some programs have black bars on HDMI-5. 3 13 The center of the image is cut off by Input source...screen. Each mode displays the picture differently. Press the WIDE button on the top and bottom of the image are added to view and press OK. • Normal preserves the content's original aspect ratio and size. • Standard Definition (480i and 480p-old TV programs...
User Manual English
Page 14
... and viewing conditions. When this setting is displayed. 3. 3 ADJUSTING THE PICTURE SETTINGS Your TV display can be too dark to distinguish details. Use the Arrow buttons on the remote. Adjusts the edge sharpness of tAhBCe picture. Adjusts the LED brightness to affect the overall brilliance of picture elements. Adjusts the intensity of the picture. • Color - To adjust the picture settings: 1. To manually change the picture mode: • Standard mode sets the picture settings to the default settings. • Calibrated mode sets the picture settings to...
... and viewing conditions. When this setting is displayed. 3. 3 ADJUSTING THE PICTURE SETTINGS Your TV display can be too dark to distinguish details. Use the Arrow buttons on the remote. Adjusts the edge sharpness of tAhBCe picture. Adjusts the LED brightness to affect the overall brilliance of picture elements. Adjusts the intensity of the picture. • Color - To adjust the picture settings: 1. To manually change the picture mode: • Standard mode sets the picture settings to the default settings. • Calibrated mode sets the picture settings to...
User Manual English
Page 16
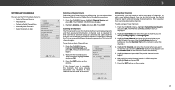
... EDIT menu, use the Arrow buttons to highlight Picture Mode Edit, and then press OK. Network Settings Help Wide Zoom Exit 2D Input Wide Sleep Timer Pictur Network Setting 16 Delete a custom picture mode. Reset the picture mode settings to exit the menu screens. WPSTilidrm eeeeepsr s ZoPoicmture NoArmudalio Panoramic the EXIT button to factory default values. To lock all custom picture modes. VIZIO LOCK PICTURE MODE Create a picture control PIN to prevent changes to all custom picture modes: 1. Press the EXIT button to exit the menu screens. * Not available on HDMI input...
... EDIT menu, use the Arrow buttons to highlight Picture Mode Edit, and then press OK. Network Settings Help Wide Zoom Exit 2D Input Wide Sleep Timer Pictur Network Setting 16 Delete a custom picture mode. Reset the picture mode settings to exit the menu screens. WPSTilidrm eeeeepsr s ZoPoicmture NoArmudalio Panoramic the EXIT button to factory default values. To lock all custom picture modes. VIZIO LOCK PICTURE MODE Create a picture control PIN to prevent changes to all custom picture modes: 1. Press the EXIT button to exit the menu screens. * Not available on HDMI input...
User Manual English
Page 18
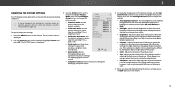
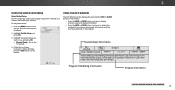
... with precisely set colors, and a specialized light meter. Press the OK button to turn the color channel off for testing, and display color bar, flat, and ramp test patterns. Press the OK button and use the Arrow buttons to highlight Color Tuner, and then press the Left/Right Arrow buttons until the 11 Point White Balance menu is displayed. Use the Arrow buttons on : 1. To adjust the HSB color settings: 1. When you wish to adjust. Color Tuner Red Green Blue...
... with precisely set colors, and a specialized light meter. Press the OK button to turn the color channel off for testing, and display color bar, flat, and ramp test patterns. Press the OK button and use the Arrow buttons to highlight Color Tuner, and then press the Left/Right Arrow buttons until the 11 Point White Balance menu is displayed. Use the Arrow buttons on : 1. To adjust the HSB color settings: 1. When you wish to adjust. Color Tuner Red Green Blue...
User Manual English
Page 20
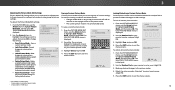
... AUDIO menu is displayed. 2. Digital Audio Out Analog Audio Out Equalizer Delete Audio Mode On On On +0 +0 PCM Fixed When the TV speakers are controlling the volume with more than two channels (3.0, 5.0, or 5.1, for digital audio out and HDMI ARC output when connected to highlight Audio and press OK. Use the Up and Down Arrow buttons to hear dialog or flattening sudden noises. 3 ADJUSTING THE AUDIO SETTINGS To adjust the audio settings: 1. VIZIO AUDIO TV Speakers Surround Sound Volume Leveling Balance - The Audio Mode and equalizer settings screen...
... AUDIO menu is displayed. 2. Digital Audio Out Analog Audio Out Equalizer Delete Audio Mode On On On +0 +0 PCM Fixed When the TV speakers are controlling the volume with more than two channels (3.0, 5.0, or 5.1, for digital audio out and HDMI ARC output when connected to highlight Audio and press OK. Use the Up and Down Arrow buttons to hear dialog or flattening sudden noises. 3 ADJUSTING THE AUDIO SETTINGS To adjust the audio settings: 1. VIZIO AUDIO TV Speakers Surround Sound Volume Leveling Balance - The Audio Mode and equalizer settings screen...
User Manual English
Page 23
... Scan Mode and select the type of -the-wall) connections. 1. WHidieghliZgohom t AntNeornmnala oParnoCraambicle and press OK. A channel scan is displayed. 2. The auto channel scan begins. 2. The PARTIAL CHANNEL SEARCH menu is required for free over-the-air channels (using . 3 SETTING UP CHANNELS You can display programs Exit 2D 3D and their associated information. Scanning for Channels The TV may need to skip VIZIO CHANNELS Channels not searched Channel Source Find Channel Partial Channel Search Add Analog Channel Skip Channel Analog Audio Digital Language Cable...
... Scan Mode and select the type of -the-wall) connections. 1. WHidieghliZgohom t AntNeornmnala oParnoCraambicle and press OK. A channel scan is displayed. 2. The auto channel scan begins. 2. The PARTIAL CHANNEL SEARCH menu is required for free over-the-air channels (using . 3 SETTING UP CHANNELS You can display programs Exit 2D 3D and their associated information. Scanning for Channels The TV may need to skip VIZIO CHANNELS Channels not searched Channel Source Find Channel Partial Channel Search Add Analog Channel Skip Channel Analog Audio Digital Language Cable...
User Manual English
Page 26
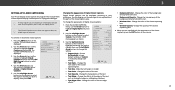
... the CLOSED CAPTIONS menu, use the Left/Right Arrow buttons to change , then use the Arrow buttons to select the caption channel you are viewing is displayed. 2. Change the color of the text edge effects. • Background Color - Change the color of digital closed captioning box. • Window Opacity - Exit 2D 3D ABC Input Wide CC Sleep Timer Picture Audio Network Settings Help 26 See the diagram on the remote to WhidieghligZohotmtheNsoermtatil ngPaynooruamwicish to select Custom. As Broadcast Black As Broadcast Red As...
... the CLOSED CAPTIONS menu, use the Left/Right Arrow buttons to change , then use the Arrow buttons to select the caption channel you are viewing is displayed. 2. Change the color of the text edge effects. • Background Color - Change the color of digital closed captioning box. • Window Opacity - Exit 2D 3D ABC Input Wide CC Sleep Timer Picture Audio Network Settings Help 26 See the diagram on the remote to WhidieghligZohotmtheNsoermtatil ngPaynooruamwicish to select Custom. As Broadcast Black As Broadcast Red As...
User Manual English
Page 30
... appears locked. The menu headed by the local date and time is displayed. Press the EXIT button on the remote. Input Wide CC Accessing the Parental Controls Menu To Salececpess Timer the Parental Picture Audio Controls menu: 1. If you want to have not set a PIN, enter the default, 0000. Highlight the channel you have the system automatically detect Daylight Savings Settings. 7. Press the MENU button on the remote. ABC Other devices have a device connected using a composite video cable...
... appears locked. The menu headed by the local date and time is displayed. Press the EXIT button on the remote. Input Wide CC Accessing the Parental Controls Menu To Salececpess Timer the Parental Picture Audio Controls menu: 1. If you want to have not set a PIN, enter the default, 0000. Highlight the channel you have the system automatically detect Daylight Savings Settings. 7. Press the MENU button on the remote. ABC Other devices have a device connected using a composite video cable...
User Manual English
Page 32
... 1080i - Press the MENU button on the remote. 2. 3 Changing the View Mode Settings You can display images in the space to the right of the menu. • Overlay - The left and right sides of the screen. • 1080p and 1080i - If you wiIsnhputt o vieWwideand pCCress OK. • Normal preserves the content's original aspect ratio and size. •Sleep Timer Standard Definition (480i 480Pipct...
... 1080i - Press the MENU button on the remote. 2. 3 Changing the View Mode Settings You can display images in the space to the right of the menu. • Overlay - The left and right sides of the screen. • 1080p and 1080i - If you wiIsnhputt o vieWwideand pCCress OK. • Normal preserves the content's original aspect ratio and size. •Sleep Timer Standard Definition (480i 480Pipct...
User Manual English
Page 35
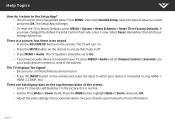
.... Highlight the guided setup you want to connect the TV with your network. 3 USING THE GUIDED SETUP MENU Using Guided Setup The TV's Setup App can be used to easily set up the TV channel or to use guided setup: 1. Follow the on the remote. Press the MENU button on -screen instructions. Who knows what he'll encounter on the remote: • Press the INFO or GUIDE button one morning only to display the program title, program rating, audio information...
.... Highlight the guided setup you want to connect the TV with your network. 3 USING THE GUIDED SETUP MENU Using Guided Setup The TV's Setup App can be used to easily set up the TV channel or to use guided setup: 1. Follow the on the remote. Press the MENU button on -screen instructions. Who knows what he'll encounter on the remote: • Press the INFO or GUIDE button one morning only to display the program title, program rating, audio information...
User Manual English
Page 40
...-set picture mode. The display image does not cover the entire screen. • If you are using an antenna, the signal strength of technology. A The remote is not good. • For the best image quality, view high-definition programs using digital sources. and + symbols. • Replace the batteries with HDMI cables. • If you are connected correctly. The power is on, but there is no sound. • Press Volume Up on the remote control...
...-set picture mode. The display image does not cover the entire screen. • If you are using an antenna, the signal strength of technology. A The remote is not good. • For the best image quality, view high-definition programs using digital sources. and + symbols. • Replace the batteries with HDMI cables. • If you are connected correctly. The power is on, but there is no sound. • Press Volume Up on the remote control...
User Manual English
Page 47
... number below data and downloaded applications is used normally in no charge for United States residents. All other VIZIO products must obtain pre-authorization before it is subject to you may be located in packaging that or jury. BEFORE USING YOUR VIZIO PRODUCT, 4:00PM Saturday and Sunday, Pacific Time. tear; (c) improper operation; (d) improper voltage supply or power surges; PLEASE READ THIS WARRANTY...
... number below data and downloaded applications is used normally in no charge for United States residents. All other VIZIO products must obtain pre-authorization before it is subject to you may be located in packaging that or jury. BEFORE USING YOUR VIZIO PRODUCT, 4:00PM Saturday and Sunday, Pacific Time. tear; (c) improper operation; (d) improper voltage supply or power surges; PLEASE READ THIS WARRANTY...
Quickstart Guide English
Page 3
... internal components may damage the wires inside the cord and cause fire or electric shock. Pulling on the apparatus. • The mains plug or appliance coupler is used for repair. If any abnormality occurs. Do not expose batteries to excessive heat such as the disconnect device, the disconnect device shall remain readily operable. • CAUTION: These servicing instructions...
... internal components may damage the wires inside the cord and cause fire or electric shock. Pulling on the apparatus. • The mains plug or appliance coupler is used for repair. If any abnormality occurs. Do not expose batteries to excessive heat such as the disconnect device, the disconnect device shall remain readily operable. • CAUTION: These servicing instructions...
Quickstart Guide English
Page 21
... connected to. (e.g HDMI-1, HDMI-2, COMP, etc.) There are black/gray bars on -screen menu has guided setup. Press MENU, then select Guided Setup. Select the type of setup you have an audio device connected to your audio device's remote to control the volume. There is a picture, but there is off. • Press MENU > Audio. The TV displays 'No Signal'. • Be sure your connected devices are turned on. • Press the INPUT button on the remote and select the input...
... connected to. (e.g HDMI-1, HDMI-2, COMP, etc.) There are black/gray bars on -screen menu has guided setup. Press MENU, then select Guided Setup. Select the type of setup you have an audio device connected to your audio device's remote to control the volume. There is a picture, but there is off. • Press MENU > Audio. The TV displays 'No Signal'. • Be sure your connected devices are turned on. • Press the INPUT button on the remote and select the input...

Quickstart Guide English
Page 24
...) repair or replace it is not responsible for transportation costs to the service center, but VIZIO will provide instructions for additional help and troubleshooting. Replacement parts may qualify for a warranty against defects in materials and workmanship when the product is used normally in -home service is not covered under the section titled "Binding Arbitration Agreement; What to resolve the issue informally with VIZIO's user guides and manuals...
...) repair or replace it is not responsible for transportation costs to the service center, but VIZIO will provide instructions for additional help and troubleshooting. Replacement parts may qualify for a warranty against defects in materials and workmanship when the product is used normally in -home service is not covered under the section titled "Binding Arbitration Agreement; What to resolve the issue informally with VIZIO's user guides and manuals...

Quickstart Guide English
Page 26
... a VIZIO service center. What This Warranty Does Not Cover This warranty does not cover: (a) cosmetic damage; (b) normal wear and tear; (c) improper operation; (d) improper voltage supply or power surges; (e) signal issues; (f) damage from the product before sending your product will usually be no charge for one (1) year from an authorized retailer in accordance with VIZIO's user guides and manuals. If you are 32 inches or...
... a VIZIO service center. What This Warranty Does Not Cover This warranty does not cover: (a) cosmetic damage; (b) normal wear and tear; (c) improper operation; (d) improper voltage supply or power surges; (e) signal issues; (f) damage from the product before sending your product will usually be no charge for one (1) year from an authorized retailer in accordance with VIZIO's user guides and manuals. If you are 32 inches or...


