User Manual (English)
Page 5
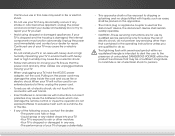
... can damage the remote control or injure the operator. Pulling on the apparatus. • The mains plug or appliance coupler is exposed to rain or other cables are for an extended period of time, unplug the power cord. • To reduce risk of your TV may cause fire or electric shock. • Do not install your TV changes substantially. •...
... can damage the remote control or injure the operator. Pulling on the apparatus. • The mains plug or appliance coupler is exposed to rain or other cables are for an extended period of time, unplug the power cord. • To reduce risk of your TV may cause fire or electric shock. • Do not install your TV changes substantially. •...
User Manual (English)
Page 6
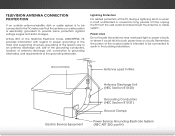
Remember, the screen of the coaxial cable is left unattended or unused for long periods of time, unplug the TV from the wall outlet and disconnect the antenna or cable system. Power Lines Do not locate the antenna near overhead light or power circuits, or where it is intended to be connected to the TV, make sure that the antenna or cable system is electrically...
Remember, the screen of the coaxial cable is left unattended or unused for long periods of time, unplug the TV from the wall outlet and disconnect the antenna or cable system. Power Lines Do not locate the antenna near overhead light or power circuits, or where it is intended to be connected to the TV, make sure that the antenna or cable system is electrically...

User Manual (English)
Page 7
...the Input Source 20 Changing the Screen Aspect Ratio 20 Viewing Video with the Menu Open 21 Adjusting the Picture Settings 22 Adjusting the More Picture Settings 23 Adjusting the Picture Mode Edit Settings 24 Adjusting the Color Calibration Settings 25 Adjusting the Color Tuner Settings 25 Creating a Custom Picture Mode 28 Locking and Unlocking the Custom Picture Modes........29 Deleting a Custom Picture Mode 29 Adjusting the Audio Settings 30 Changing the Equalizer Settings 31 Deleting the Custom Audio Mode 31 Setting Timers 32 Setting the Sleep Timer 32 Setting the Auto Power...
...the Input Source 20 Changing the Screen Aspect Ratio 20 Viewing Video with the Menu Open 21 Adjusting the Picture Settings 22 Adjusting the More Picture Settings 23 Adjusting the Picture Mode Edit Settings 24 Adjusting the Color Calibration Settings 25 Adjusting the Color Tuner Settings 25 Creating a Custom Picture Mode 28 Locking and Unlocking the Custom Picture Modes........29 Deleting a Custom Picture Mode 29 Adjusting the Audio Settings 30 Changing the Equalizer Settings 31 Deleting the Custom Audio Mode 31 Setting Timers 32 Setting the Sleep Timer 32 Setting the Auto Power...

User Manual (English)
Page 8
...; Changing the Parental Control Passcode 43 Resetting the Content Locks 43 Setting up View Mode 44 Changing the Wide Setting 44 Adjusting the CEC Settings 45 Turning the Power Indicator On or Off 45 Using the Reset & Admin Menu 46 Restoring the TV to Factory Default Settings 46 Using the Guided Setup Menu 46 Using the Info Window 47 Using the USB Media Player 48 Using the USB Media Player 48 Preparing your USB Drive to Play USB Media 48 Playing USB Media 48 Removing the USB Drive from the TV 48 Specifications...
...; Changing the Parental Control Passcode 43 Resetting the Content Locks 43 Setting up View Mode 44 Changing the Wide Setting 44 Adjusting the CEC Settings 45 Turning the Power Indicator On or Off 45 Using the Reset & Admin Menu 46 Restoring the TV to Factory Default Settings 46 Using the Guided Setup Menu 46 Using the Info Window 47 Using the USB Media Player 48 Using the USB Media Player 48 Preparing your USB Drive to Play USB Media 48 Playing USB Media 48 Removing the USB Drive from the TV 48 Specifications...
User Manual (English)
Page 12
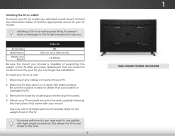
... closer to use cables with a UL-listed wall mount bracket rated for your TV on a clean, flat, stable surface. After you have determined that can begin the installation. To install your TV model: Installing a TV on a wall, you can scratch or damage the TV. 3. Be sure the surface is capable of supporting the weight of debris that you may want to the wall. 6 1 WALL MOUNT SCREW LOCATIONS D39h-C0 Screw Size: Hole Pattern: Weight w/o Stand: M4...
... closer to use cables with a UL-listed wall mount bracket rated for your TV on a clean, flat, stable surface. After you have determined that can begin the installation. To install your TV model: Installing a TV on a wall, you can scratch or damage the TV. 3. Be sure the surface is capable of supporting the weight of debris that you may want to the wall. 6 1 WALL MOUNT SCREW LOCATIONS D39h-C0 Screw Size: Hole Pattern: Weight w/o Stand: M4...
User Manual (English)
Page 25
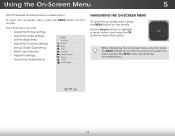
...; Adjust the Picture settings • Adjust the Audio settings • Set the Sleep Timer • Adjust the Channel settings • Set up Closed Captioning • Select input devices • Adjust TV settings • Access the Guided Setup VIZIO TV SETTINGS Picture Audio Timers Channels CC Closed Captions Devices System Guided Setup NAVIGATING THE ON-SCREEN MENU To open the on-screen menu, press the MENU button on the remote. Use the Arrow buttons to highlight a menu option, and press the OK button to the previous Exit 2Dmenu3Dscreen. The EXIT button will close the on -screen...
...; Adjust the Picture settings • Adjust the Audio settings • Set the Sleep Timer • Adjust the Channel settings • Set up Closed Captioning • Select input devices • Adjust TV settings • Access the Guided Setup VIZIO TV SETTINGS Picture Audio Timers Channels CC Closed Captions Devices System Guided Setup NAVIGATING THE ON-SCREEN MENU To open the on-screen menu, press the MENU button on the remote. Use the Arrow buttons to highlight a menu option, and press the OK button to the previous Exit 2Dmenu3Dscreen. The EXIT button will close the on -screen...

User Manual (English)
Page 26
... with black bars to fit the screen. 20 The TV can display images in five different modes: Normal, Stretch, Panoramic, Wide, and Zoom. If the program is being stretched, the display image may appear wider than intended. To use one of the display image. 5 CHANGING THE INPUT SOURCE CHANGING THE SCREEN ASPECT RATIO External devices such as DVD players, Blu-ray Players, and video game consoles can be connected to...
... with black bars to fit the screen. 20 The TV can display images in five different modes: Normal, Stretch, Panoramic, Wide, and Zoom. If the program is being stretched, the display image may appear wider than intended. To use one of the display image. 5 CHANGING THE INPUT SOURCE CHANGING THE SCREEN ASPECT RATIO External devices such as DVD players, Blu-ray Players, and video game consoles can be connected to...

User Manual (English)
Page 27
...PicModeName Color Calibration Select from preset picture modes. Wide Zoom Normal Panoramic Exit 2D 3D ABC Input Wide CC Sleep Timer Picture Audio Network Settings Help FULL-SIZED AND ALIGNED TO RIGHT OF MENU 21 5 PicModename Color Calibration Select from preset picture modes. Network Settings Help ABC RE-SIZED TO FIT Input Wide VIZIO CC Sleep Timer Network PICTURE Picture Mode Standard Auto Brightness Control Backlight - P i c t u reContrast Color Audio-- Standard picture mode meets ENERGY STAR® requirements. Use the Arrow buttons on the screen...
...PicModeName Color Calibration Select from preset picture modes. Wide Zoom Normal Panoramic Exit 2D 3D ABC Input Wide CC Sleep Timer Picture Audio Network Settings Help FULL-SIZED AND ALIGNED TO RIGHT OF MENU 21 5 PicModename Color Calibration Select from preset picture modes. Network Settings Help ABC RE-SIZED TO FIT Input Wide VIZIO CC Sleep Timer Network PICTURE Picture Mode Standard Auto Brightness Control Backlight - P i c t u reContrast Color Audio-- Standard picture mode meets ENERGY STAR® requirements. Use the Arrow buttons on the screen...

User Manual (English)
Page 28
... buttons to adjust additional settings or EXIT. 22 For the best picture, use Game mode. • Calibrated Dark sets the picture settings to adjust the setting: • Backlight - Network Settings Help 5. When this setting is displayed. 3. To adjust the picture settings: 1. To reduce video delay (lag) when gaming, use Calibrated mode. Color - If the setting is too high or too low, detail may appear faded or washed out. • Contrast - Adjusts the hue of the picture. • Input CoWloidre - Sleep • Timer Picture Audio Sharpness - When changes...
... buttons to adjust additional settings or EXIT. 22 For the best picture, use Game mode. • Calibrated Dark sets the picture settings to adjust the setting: • Backlight - Network Settings Help 5. When this setting is displayed. 3. To adjust the picture settings: 1. To reduce video delay (lag) when gaming, use Calibrated mode. Color - If the setting is too high or too low, detail may appear faded or washed out. • Contrast - Adjusts the hue of the picture. • Input CoWloidre - Sleep • Timer Picture Audio Sharpness - When changes...

User Manual (English)
Page 31
...). Changes to adjust the Hue, Saturation, and Brightness (HSB) color and 11 point white balance, turn color channels off for testing, and display color bar, flat, and ramp test patterns. Adjusting the Color Tuner Settings The Color Tuner settings allow you have finished adjusting the Color Tuner settings, press the BACK button to highlight the Hue, Saturation, Brightness, (these 3 adjust the color) Offset, or InGpuat in (Wthidee se twCCo adjust the color temperature) of picture settings. The COLOR CALIBRATION menu is displayed. 2. The Color Tuner menu...
...). Changes to adjust the Hue, Saturation, and Brightness (HSB) color and 11 point white balance, turn color channels off for testing, and display color bar, flat, and ramp test patterns. Adjusting the Color Tuner Settings The Color Tuner settings allow you have finished adjusting the Color Tuner settings, press the BACK button to highlight the Hue, Saturation, Brightness, (these 3 adjust the color) Offset, or InGpuat in (Wthidee se twCCo adjust the color temperature) of picture settings. The COLOR CALIBRATION menu is displayed. 2. The Color Tuner menu...

User Manual (English)
Page 36
... syZosotmem cNoorm natrl olPsa.n(oSraommic e external speakers can also be passed through digital audio outputs. • Surround Sound - VIZIO AUDIO TV Speakers Surround Sound Balance - Lip Sync - Select On or Off. • Balance - The on the remote to On, DTS signals cannot be connected to a home theater audio system. See Deleting the Custom Audio Mode on page 31. • Delete Audio Mode - Sets the volume control properties for HDYMoIuAmRCusot rseolpetcict aBlitosutrtepaumt...
... syZosotmem cNoorm natrl olPsa.n(oSraommic e external speakers can also be passed through digital audio outputs. • Surround Sound - VIZIO AUDIO TV Speakers Surround Sound Balance - Lip Sync - Select On or Off. • Balance - The on the remote to On, DTS signals cannot be connected to a home theater audio system. See Deleting the Custom Audio Mode on page 31. • Delete Audio Mode - Sets the volume control properties for HDYMoIuAmRCusot rseolpetcict aBlitosutrtepaumt...
User Manual (English)
Page 52
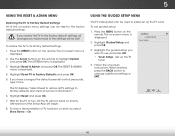
... to turn back on -screen menu settings can be used to factory defaults and clear all changes you want to change additional settings or EXIT. 46 To view a demonstration of the on shortly afterward and the Setup App will be reset to highlight System and press OK. To use and press OK: • Tuner Setup - The on the remote to the factory default settings. VIZIO GUIDED SETUP Tuner Setup 3. Highlight the guided setup you have changed the default parental control passcode, type...
... to turn back on -screen menu settings can be used to factory defaults and clear all changes you want to change additional settings or EXIT. 46 To view a demonstration of the on shortly afterward and the Setup App will be reset to highlight System and press OK. To use and press OK: • Tuner Setup - The on the remote to the factory default settings. VIZIO GUIDED SETUP Tuner Setup 3. Highlight the guided setup you have changed the default parental control passcode, type...

User Manual (English)
Page 57
... Tint settings in the Picture menu. See Adjusting the Picture Settings on page 22. • Press the INPUT button on the remote to the TV, scan for details. • Adjust Brightness, Contrast, or Backlight. Ensure your device's user manual for channels. A The TV displays "No Signal." • Press the INPUT button on the remote control to select a different input source. • If you are using an antenna or cable TV connected directly to select a different input source. The colors...
... Tint settings in the Picture menu. See Adjusting the Picture Settings on page 22. • Press the INPUT button on the remote to the TV, scan for details. • Adjust Brightness, Contrast, or Backlight. Ensure your device's user manual for channels. A The TV displays "No Signal." • Press the INPUT button on the remote control to select a different input source. • If you are using an antenna or cable TV connected directly to select a different input source. The colors...

User Manual (English)
Page 58
... HDMI cables. • If you are inherent to change input source, the display image changes size. • The TV remembers the viewing mode on the remote aren't working. • The Red and Yellow hot key buttons below the V button do not constitute a defective product. The picture is connected securely to the TV and move the antenna around the room or close to match your TV's digital capabilities exceed a digital broadcast signal, the signal...
... HDMI cables. • If you are inherent to change input source, the display image changes size. • The TV remembers the viewing mode on the remote aren't working. • The Red and Yellow hot key buttons below the V button do not constitute a defective product. The picture is connected securely to the TV and move the antenna around the room or close to match your TV's digital capabilities exceed a digital broadcast signal, the signal...

User Manual (English)
Page 61
... for example: cosmetic damage, normal wear and tear, improper operation, improper voltage supply or power surges, signal issues, damages from warranty service or replacement, whichever is greater. Type of customer misuse, modifications or adjustments, as well as originally purchased.You will be no charge for transportation costs to the service center, but VIZIO will be responsible for the duration of storing personal...
... for example: cosmetic damage, normal wear and tear, improper operation, improper voltage supply or power surges, signal issues, damages from warranty service or replacement, whichever is greater. Type of customer misuse, modifications or adjustments, as well as originally purchased.You will be no charge for transportation costs to the service center, but VIZIO will be responsible for the duration of storing personal...

Quickstart Guide (English)
Page 2
... apparatus has been exposed to rain or moisture, does not operate normally or has been dropped. • Unplug the power cord before connecting other cables are provided for the installation, use attachments/accessories specified by the manufacturer. • Use only with the cart, stand, tripod, bracket, or table specified by qualified service personnel only. For more information, contact your TV from tip...
... apparatus has been exposed to rain or moisture, does not operate normally or has been dropped. • Unplug the power cord before connecting other cables are provided for the installation, use attachments/accessories specified by the manufacturer. • Use only with the cart, stand, tripod, bracket, or table specified by qualified service personnel only. For more information, contact your TV from tip...
Quickstart Guide (English)
Page 3
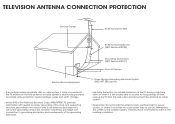
..., size of the grounding conductors, location of antenna discharge unit, connection to proper grounding of the mast and supporting structure, grounding of time, unplug the TV from the wall outlet and disconnect the antenna or cable system. • Power Lines: Do not locate the antenna near overhead light or power circuits, or where it could fall into such power lines or circuits. Remember, the screen of...
..., size of the grounding conductors, location of antenna discharge unit, connection to proper grounding of the mast and supporting structure, grounding of time, unplug the TV from the wall outlet and disconnect the antenna or cable system. • Power Lines: Do not locate the antenna near overhead light or power circuits, or where it could fall into such power lines or circuits. Remember, the screen of...
Quickstart Guide (English)
Page 17
... obtain warranty service,contactVIZIOTechnical Support via e-mail:TechSupport@VIZIO.com or via phone at its sole option and discretion. However, there is no charge for the duration of customer misuse, modifications or adjustments, as well as installation and set-up issues or any , must utilize either repair or replace the Product at 877 MY VIZIO (877.698.4946) from Shutterstock.com. Replacement parts...
... obtain warranty service,contactVIZIOTechnical Support via e-mail:TechSupport@VIZIO.com or via phone at its sole option and discretion. However, there is no charge for the duration of customer misuse, modifications or adjustments, as well as installation and set-up issues or any , must utilize either repair or replace the Product at 877 MY VIZIO (877.698.4946) from Shutterstock.com. Replacement parts...
Quickstart Guide (English)
Page 18
... Time, or www.vizio.ca. Types of customer misuse, installation, customer modifications, adjustments, and set -up issues. Pre-authorization is needed on the box. Items not covered include but VIZIO will repair, replace or refund the unit at its sole option and discretion. THERE ARE NO EXPRESS WARRANTIES OTHER THAN THOSE LISTED OR DESCRIBED ABOVE. THIS WARRANTY IS SUBJECT TO CHANGE WITHOUT NOTICE. In the event service...
... Time, or www.vizio.ca. Types of customer misuse, installation, customer modifications, adjustments, and set -up issues. Pre-authorization is needed on the box. Items not covered include but VIZIO will repair, replace or refund the unit at its sole option and discretion. THERE ARE NO EXPRESS WARRANTIES OTHER THAN THOSE LISTED OR DESCRIBED ABOVE. THIS WARRANTY IS SUBJECT TO CHANGE WITHOUT NOTICE. In the event service...
Quickstart Guide (English)
Page 19
... C.V. R.L. Replacement parts and units are warranted for the remaining portion of customer misuse, modifications or adjustments, as well as new in Mexico Only. de. is required before sending any type of the original warranty or for use . de. de. This warranty does not cover, for example: cosmetic damage, normal wear and tear, improper operation, improper voltage supply or power surges, signal issues...
... C.V. R.L. Replacement parts and units are warranted for the remaining portion of customer misuse, modifications or adjustments, as well as new in Mexico Only. de. is required before sending any type of the original warranty or for use . de. de. This warranty does not cover, for example: cosmetic damage, normal wear and tear, improper operation, improper voltage supply or power surges, signal issues...


