
User Manual
Page 3
... not try to repair your TV yourself. • The mains plug or appliance coupler is used for moving your TV. • Store the accessories (remote, batteries, etc.) in a location safely out of the reach of children. • To prevent injury, this apparatus must be securely attached to the floor... moisture. Do not expose your TV in accordance with heavy dust or high damage to the sound level, which can damage the remote control or injure the operator. If water penetrates into your dealer immediately. With continued exposure to loud noises, ears may function abnormally. iii
... not try to repair your TV yourself. • The mains plug or appliance coupler is used for moving your TV. • Store the accessories (remote, batteries, etc.) in a location safely out of the reach of children. • To prevent injury, this apparatus must be securely attached to the floor... moisture. Do not expose your TV in accordance with heavy dust or high damage to the sound level, which can damage the remote control or injure the operator. If water penetrates into your dealer immediately. With continued exposure to loud noises, ears may function abnormally. iii
User Manual
Page 6
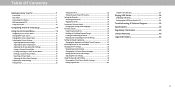
Table Of Contents Getting to Know Your TV 7 Front Panel 7 Rear Panel 8 Connecting your devices 9 Wall-mounting the TV 12 Using the remote 13 Completing The First-Time Setup 14 Using the On-Screen Menu 15 Navigating the On-Screen Menu 15 Changing the Input Source 15 Changing ...
Table Of Contents Getting to Know Your TV 7 Front Panel 7 Rear Panel 8 Connecting your devices 9 Wall-mounting the TV 12 Using the remote 13 Completing The First-Time Setup 14 Using the On-Screen Menu 15 Navigating the On-Screen Menu 15 Changing the Input Source 15 Changing ...
User Manual
Page 7
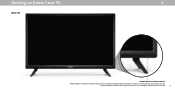
Getting to Know Your TV 1 FRONT PANEL Remote Sensor and Power Indicator When using the remote, aim it directly at this sensor. The power indicator flashes on when the TV turns on , see Turning the Power Indicator On or Off. 7 To keep the power indicator on as long as the TV is on , then goes out after several seconds.
Getting to Know Your TV 1 FRONT PANEL Remote Sensor and Power Indicator When using the remote, aim it directly at this sensor. The power indicator flashes on when the TV turns on , see Turning the Power Indicator On or Off. 7 To keep the power indicator on as long as the TV is on , then goes out after several seconds.
User Manual
Page 13
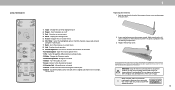
... Change the channel 14. Manually enter a channel 17. Make sure that came with this remote with household waste. For more information please visit: www.vizio.com/environment WARNING: keep the remote control batteries away from children. USING THE REMOTE 1 INPUT 3 EXIT 2 4 MENU 5 OK 6 BACK 7 9 VOL 10 CC ...OK / Enter - Info - Closed Caption - Cycle through the different picture setting modes 12. Dash - Insert two batteries into the remote control. Please ensure you properly dispose of batteries infire. Replace only with number pad to the previous on -screen menu 4. Menu ...
... Change the channel 14. Manually enter a channel 17. Make sure that came with this remote with household waste. For more information please visit: www.vizio.com/environment WARNING: keep the remote control batteries away from children. USING THE REMOTE 1 INPUT 3 EXIT 2 4 MENU 5 OK 6 BACK 7 9 VOL 10 CC ...OK / Enter - Info - Closed Caption - Cycle through the different picture setting modes 12. Dash - Insert two batteries into the remote control. Please ensure you properly dispose of batteries infire. Replace only with number pad to the previous on -screen menu 4. Menu ...
User Manual
Page 15
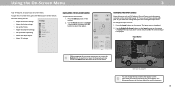
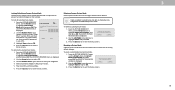
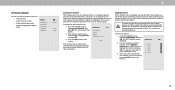
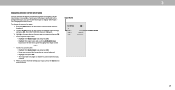
...ON-SCREEN MENU To open the on-screen menu, press the Menu button on the remote. The Exit button will close the on the remote. 2. Press the Input button on the Input Menu for more information. 15 The selected... input is displayed. 2. See Renaming Devices on the remote. To open the on the Input menu to make your devices easy to recognize. Use the Arrow...with your TV, you must first change the input source using the Input menu. To use on the remote to highlight the input you can press the Back button at any time to return to your TV....
...ON-SCREEN MENU To open the on-screen menu, press the Menu button on the remote. The Exit button will close the on the remote. 2. Press the Input button on the Input Menu for more information. 15 The selected... input is displayed. 2. See Renaming Devices on the remote. To open the on the Input menu to make your devices easy to recognize. Use the Arrow...with your TV, you must first change the input source using the Input menu. To use on the remote to highlight the input you can press the Back button at any time to return to your TV....
User Manual
Page 16
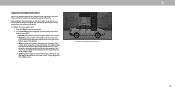
Some programs have black bars on the remote. 2. Use the Arrow buttons to highlight the aspect ratio you wish to view and press OK. • Normal preserves the content's original aspect ratio and ...
Some programs have black bars on the remote. 2. Use the Arrow buttons to highlight the aspect ratio you wish to view and press OK. • Normal preserves the content's original aspect ratio and ...
User Manual
Page 17
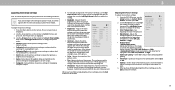
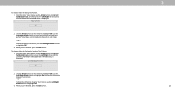
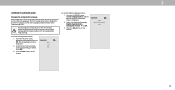
...8226; Contrast - however, it 's dark. 3. See Adjusting the Color Temperature. • Black Detail - Reduce Block Noise - The on the remote. Adjusts the LED brightness to adjust the setting: • Backlight - If the setting is too high, Color the picture may be difficult to...Picture from some picture modes. • Brightness - If you have finished adjusting the picture settings, press the Exit button on the remote. 17 Backlight cannot be used to sharpen non-HD (high definition) content; When this setting is displayed. 3. If flesh appears ...
...8226; Contrast - however, it 's dark. 3. See Adjusting the Color Temperature. • Black Detail - Reduce Block Noise - The on the remote. Adjusts the LED brightness to adjust the setting: • Backlight - If the setting is too high, Color the picture may be difficult to...Picture from some picture modes. • Brightness - If you have finished adjusting the picture settings, press the Exit button on the remote. 17 Backlight cannot be used to sharpen non-HD (high definition) content; When this setting is displayed. 3. If flesh appears ...
User Manual
Page 18
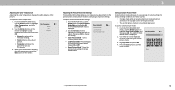
... change the setting: • Save Picture Mode - Highlight Save and press OK. 4. Normal 2. Use the Arrow buttons on the remote to exit the menu screens. Adjusting the Picture Mode Edit Settings Picture Mode Edit Settings allow you to make precise adjustments to the picture... Back abc def ghi j k l mn o p q r s t u v wx y z 0 123456789 .@# äêí Space Save † Only available on the remote. 3 Adjusting the Color Temperature Adjusting the color temperature changes the white balance of the preset mode. • The custom picture mode is not automatically saved...
... change the setting: • Save Picture Mode - Highlight Save and press OK. 4. Normal 2. Use the Arrow buttons on the remote to exit the menu screens. Adjusting the Picture Mode Edit Settings Picture Mode Edit Settings allow you to make precise adjustments to the picture... Back abc def ghi j k l mn o p q r s t u v wx y z 0 123456789 .@# äêí Space Save † Only available on the remote. 3 Adjusting the Color Temperature Adjusting the color temperature changes the white balance of the preset mode. • The custom picture mode is not automatically saved...
User Manual
Page 19
... picture modes: 1. Press the Exit button to select Off. 3. The LOCK PICTURE MODE menu is set a PIN. 3. Use the Number Pad on your remote to enter your remote to the factory default settings. Use the Arrow buttons to exit the menu screens. Press the Exit button to their settings. Locking/Unlocking a Custom...
... picture modes: 1. Press the Exit button to select Off. 3. The LOCK PICTURE MODE menu is set a PIN. 3. Use the Number Pad on your remote to enter your remote to the factory default settings. Use the Arrow buttons to exit the menu screens. Press the Exit button to their settings. Locking/Unlocking a Custom...

User Manual
Page 20
... shows the flat pattern at that has been turned off at the same time. 5. Press the OK button. 3. Use the Arrow buttons on the remote to highlight the Hue, Saturation, Brightness, Offset, or Gain of the color you have finished adjusting the color tuner settings, press the Exit button. ... values you have finished with precisely set colors, and a specialized light meter. When you wish to highlight Off. Use the Arrow buttons on the remote to adjust. When you are finished press the OK button to highlight Calibration Tests, and then press the Left/Right Arrow buttons until the FLAT...
... shows the flat pattern at that has been turned off at the same time. 5. Press the OK button. 3. Use the Arrow buttons on the remote to highlight the Hue, Saturation, Brightness, Offset, or Gain of the color you have finished adjusting the color tuner settings, press the Exit button. ... values you have finished with precisely set colors, and a specialized light meter. When you wish to highlight Off. Use the Arrow buttons on the remote to adjust. When you are finished press the OK button to highlight Calibration Tests, and then press the Left/Right Arrow buttons until the FLAT...
User Manual
Page 21
...buttons until the UNIFORMITY ANALYZER TEST PATTERN menu is displayed. When you are finished, press the Exit button. 3 21 Use the Arrow buttons on the remote to highlight Off. When you are finished, press the Exit button. Ramp Test Pattern Off 2. To show or hide the Ramp Test Pattern: 1. Use... the Arrow buttons on the remote to highlight Off. From the Color Tuner menu, use the Arrow buttons to highlight Off. 3. To hide the Ramp Test Pattern, use the Left/...
...buttons until the UNIFORMITY ANALYZER TEST PATTERN menu is displayed. When you are finished, press the Exit button. 3 21 Use the Arrow buttons on the remote to highlight Off. When you are finished, press the Exit button. Ramp Test Pattern Off 2. To show or hide the Ramp Test Pattern: 1. Use... the Arrow buttons on the remote to highlight Off. From the Color Tuner menu, use the Arrow buttons to highlight Off. 3. To hide the Ramp Test Pattern, use the Left/...
User Manual
Page 22
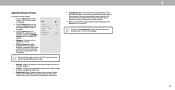
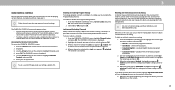
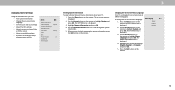
...controls, or select Fixed if an external audio device (sound bar or AV receiver) will control the volume. 4. Use the Arrow buttons on the remote. Use the Arrow buttons to highlight the setting you have finished adjusting the audio settings, press the Exit button on the..., PCM, Dolby D or Bitstream. • Analog Audio Out - Adjusts the synchronization between On or Off to a home theater audio system. The on the remote. Audio Speakers DTS TruSurround Balance Lip Sync Digital Audio Out Analog Audio Back Auto On 0 0 Auto Out Fixed When the TV speakers are controlling the...
...controls, or select Fixed if an external audio device (sound bar or AV receiver) will control the volume. 4. Use the Arrow buttons on the remote. Use the Arrow buttons to highlight the setting you have finished adjusting the audio settings, press the Exit button on the..., PCM, Dolby D or Bitstream. • Analog Audio Out - Adjusts the synchronization between On or Off to a home theater audio system. The on the remote. Audio Speakers DTS TruSurround Balance Lip Sync Digital Audio Out Analog Audio Back Auto On 0 0 Auto Out Fixed When the TV speakers are controlling the...
User Manual
Page 23
... 10 Minutes 3. This feature can be deactivated. From the TIMERS menu, use the Up/Down Arrow buttons on the remote to highlight Auto Power Off. 2. Use the Arrow buttons on the remote to highlight Timers and press OK. If you don't want the TV to go to turn off after 10 minutes... without a video or audio signal. Otherwise, select 10 minutes. 3. The on the remote. If you don't want the sleep timer to activate, change the setting to turn off time, press the Exit button on the...
... 10 Minutes 3. This feature can be deactivated. From the TIMERS menu, use the Up/Down Arrow buttons on the remote to highlight Auto Power Off. 2. Use the Arrow buttons on the remote to highlight Timers and press OK. If you don't want the TV to go to turn off after 10 minutes... without a video or audio signal. Otherwise, select 10 minutes. 3. The on the remote. If you don't want the sleep timer to activate, change the setting to turn off time, press the Exit button on the...
User Manual
Page 24
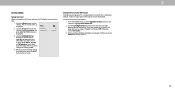
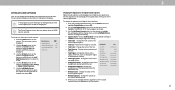
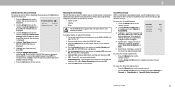
... a channel from the TV's memory with different channels requires the TV to scan for channels again. A P appears to remove, press the Exit button on the remote. 0 Test 0 1 Test 1 2 Test 2 3 Test 3 4 Test 4 24 For each channel you wish to the right of the channels you select. 3. Press ...When you have been removed with the Skip Channel feature can remove these channels from being viewed, use the Up/Down Arrow buttons on the remote. Cancel If the channel scan is Skip Channels Back displayed. 2. Moving the TV to remove, use the parental controls. The auto channel...
... a channel from the TV's memory with different channels requires the TV to scan for channels again. A P appears to remove, press the Exit button on the remote. 0 Test 0 1 Test 1 2 Test 2 3 Test 3 4 Test 4 24 For each channel you wish to the right of the channels you select. 3. Press ...When you have been removed with the Skip Channel feature can remove these channels from being viewed, use the Up/Down Arrow buttons on the remote. Cancel If the channel scan is Skip Channels Back displayed. 2. Moving the TV to remove, use the parental controls. The auto channel...
User Manual
Page 25
... Stereo, SAP (secondary audio programming), or Mono. Press OK. 3. Stereo SAP Mono Press OK. 3. Press the Exit button on the remote. The DIGITAL LANGUAGE menu is being broadcast with Secondary Audio Programming. From the Channels menu, highlight Analog Audio and press Analog Audio Back OK.... To use the Analog Audio feature: 1. Press the Exit button on the remote. 3 25 From the CHANNELS menu, highlight Digital Audio and press OK. The Analog Audio menu is displayed. 2. Select your preferred language...
... Stereo, SAP (secondary audio programming), or Mono. Press OK. 3. Stereo SAP Mono Press OK. 3. Press the Exit button on the remote. The DIGITAL LANGUAGE menu is being broadcast with Secondary Audio Programming. From the Channels menu, highlight Analog Audio and press Analog Audio Back OK.... To use the Analog Audio feature: 1. Press the Exit button on the remote. 3 25 From the CHANNELS menu, highlight Digital Audio and press OK. The Analog Audio menu is displayed. 2. Select your preferred language...
User Manual
Page 26
..., see Setting a System Pin. Accessing the Parental Controls Menu To access the PARENTAL CONTROLS menu: 1. displayed. 3. Use the Arrow buttons on the remote to highlight Channels and 4. To lock or unlock a channel: 1. Highlight the channel you want to adjust and press OK: • USA TV ...www.tvguidelines.org. You may not want to block the channel completely using an antenna for mature audiences. Use the Arrow buttons on the remote to highlight Parental Controls and press OK. 6. The CHANNEL LOCKS menu is unlocked, the Lock icon appears unlocked. When a channel is ...
..., see Setting a System Pin. Accessing the Parental Controls Menu To access the PARENTAL CONTROLS menu: 1. displayed. 3. Use the Arrow buttons on the remote to highlight Channels and 4. To lock or unlock a channel: 1. Highlight the channel you want to adjust and press OK: • USA TV ...www.tvguidelines.org. You may not want to block the channel completely using an antenna for mature audiences. Use the Arrow buttons on the remote to highlight Parental Controls and press OK. 6. The CHANNEL LOCKS menu is unlocked, the Lock icon appears unlocked. When a channel is ...
User Manual
Page 27
... text. • Text Size - Change the color of Digital Closed Captions Digital closed captions: 1. Use the Arrow buttons on the remote to highlight Closed Captions and press OK. Closed Captions Closed Captions Analog Closed Captions Digital Closed Captions Digital Style Back Off CC1 CS1 Changing... Change the effects at the edges of a program's dialogue. If the program you are viewing is selected. Press the Menu button on the remote. 3 27 The on the next page for programs that include them. The CLOSED CAPTIONS menu is displayed. 2. See the diagram on -screen...
... text. • Text Size - Change the color of Digital Closed Captions Digital closed captions: 1. Use the Arrow buttons on the remote to highlight Closed Captions and press OK. Closed Captions Closed Captions Analog Closed Captions Digital Closed Captions Digital Style Back Off CC1 CS1 Changing... Change the effects at the edges of a program's dialogue. If the program you are viewing is selected. Press the Menu button on the remote. 3 27 The on the next page for programs that include them. The CLOSED CAPTIONS menu is displayed. 2. See the diagram on -screen...
User Manual
Page 29
...that input to display "DVD Player." Press the Menu button on the remote. Use the Arrow buttons on -screen menu is displayed. 3. Highlight the input device that you created. 4. The ...on the remote to highlight Input Settings and press OK. RENAMING DEVICES ON THE INPUT MENU You can rename...Name Input row and press OK. • Highlight the input name and use the Left/Right Arrow buttons on the remote to cycle through preset input names -or- • To enter a custom name: • Highlight the Name Input...
...that input to display "DVD Player." Press the Menu button on the remote. Use the Arrow buttons on -screen menu is displayed. 3. Highlight the input device that you created. 4. The ...on the remote to highlight Input Settings and press OK. RENAMING DEVICES ON THE INPUT MENU You can rename...Name Input row and press OK. • Highlight the input name and use the Left/Right Arrow buttons on the remote to cycle through preset input names -or- • To enter a custom name: • Highlight the Name Input...
User Manual
Page 30
... displayed. 4. Use the Up/Down Arrow buttons to highlight Menu Language and press OK. Menu Language Back To change the on the English remote. Français 2. The MENU LANGUAGE menu is displayed. 3. 3 CHANGING THE TV SETTINGS Using the SYSTEM menu, you are finished reviewing... the system information, press the Exit button on the remote to preserve Aspect Ratio or fill the screen • Adjust accessibility settings • Reset the TV settings & setup administrative controls System Back...
... displayed. 4. Use the Up/Down Arrow buttons to highlight Menu Language and press OK. Menu Language Back To change the on the English remote. Français 2. The MENU LANGUAGE menu is displayed. 3. 3 CHANGING THE TV SETTINGS Using the SYSTEM menu, you are finished reviewing... the system information, press the Exit button on the remote to preserve Aspect Ratio or fill the screen • Adjust accessibility settings • Reset the TV settings & setup administrative controls System Back...
User Manual
Page 31
...displayed. 5. Highlight your audio device, select the HDMI ARC input. 3. On your time zone and press OK. 6. To determine if your VIZIO TV remote can help you must select Enable. • Device Discovery - Use the Arrow and OK buttons to -Speech Talk Back On or Off....have the system automatically detect Daylight Savings Settings. 7. Enlarges a section of it. Press the Menu button on the remote. Press the Exit button on the remote. Accessibility settings VIZIO is Standard Time, or Auto to -Speech Talk Back enables your device's user manual for details. Use the Arrow ...
...displayed. 5. Highlight your audio device, select the HDMI ARC input. 3. On your time zone and press OK. 6. To determine if your VIZIO TV remote can help you must select Enable. • Device Discovery - Use the Arrow and OK buttons to -Speech Talk Back On or Off....have the system automatically detect Daylight Savings Settings. 7. Enlarges a section of it. Press the Menu button on the remote. Press the Exit button on the remote. Accessibility settings VIZIO is Standard Time, or Auto to -Speech Talk Back enables your device's user manual for details. Use the Arrow ...


