
User Manual
Page 2
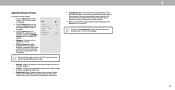
...any heat sources such as power-supply cord or plug is required when the apparatus has been damaged in the housing. Wait before operating your TV. Do not install your TV close to avoid causing fire, electric To purchase or inquire about accessories and installation services for •...electric shock or component damage, switch off the power before cleaning your TV. • When moving the cart/apparatus combination to avoid injury • When connected to a power outlet, power is intended to alert the user to protect your investment beyond the standard warranty, VIZIO offers on ...
...any heat sources such as power-supply cord or plug is required when the apparatus has been damaged in the housing. Wait before operating your TV. Do not install your TV close to avoid causing fire, electric To purchase or inquire about accessories and installation services for •...electric shock or component damage, switch off the power before cleaning your TV. • When moving the cart/apparatus combination to avoid injury • When connected to a power outlet, power is intended to alert the user to protect your investment beyond the standard warranty, VIZIO offers on ...
User Manual
Page 3
... no objects filled with instructions. The power cord fails or frays. - of the television set to a suitable support. • Unplug your TV during lightning. A television set in accordance with liquids, such as the disconnect device, the disconnect device shall remain readily operable. • CAUTION: These servicing instructions are unplugged before moving your TV changes substantially. • Not placing the television set on cloth or...
... no objects filled with instructions. The power cord fails or frays. - of the television set to a suitable support. • Unplug your TV during lightning. A television set in accordance with liquids, such as the disconnect device, the disconnect device shall remain readily operable. • CAUTION: These servicing instructions are unplugged before moving your TV changes substantially. • Not placing the television set on cloth or...
User Manual
Page 4
.... Power Lines Do not locate the antenna near overhead light or power circuits, or where it is electrically grounded to provide some protection against voltage surges and static charges. TELEVISION ANTENNA CONNECTION PROTECTION If an outside antenna/satellite dish or cable system is to be connected to earth in wire to an antenna discharge unit, size of the grounding conductors, location of antenna discharge unit, connection...
.... Power Lines Do not locate the antenna near overhead light or power circuits, or where it is electrically grounded to provide some protection against voltage surges and static charges. TELEVISION ANTENNA CONNECTION PROTECTION If an outside antenna/satellite dish or cable system is to be connected to earth in wire to an antenna discharge unit, size of the grounding conductors, location of antenna discharge unit, connection...
User Manual
Page 6
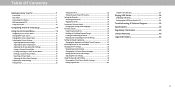
... of Digital Closed Captions 27 Renaming Devices on the Input Menu 29 Changing the TV Settings 30 Viewing System Information 30 Changing the On-Screen Menu Language 30 Setting the Time and Local Settings 31 Adjusting the CEC Settings 31 Using the Reset & Admin Menu 32 Restoring the TV to Factory Default Settings 32 Setting a System Pin 32 Using the Info Window 33 Playing USB Media 34 Displaying USB Media 34 Removing the USB Drive from the TV 34 Troubleshooting & Technical Support 35 Specifications 38...
... of Digital Closed Captions 27 Renaming Devices on the Input Menu 29 Changing the TV Settings 30 Viewing System Information 30 Changing the On-Screen Menu Language 30 Setting the Time and Local Settings 31 Adjusting the CEC Settings 31 Using the Reset & Admin Menu 32 Restoring the TV to Factory Default Settings 32 Setting a System Pin 32 Using the Info Window 33 Playing USB Media 34 Displaying USB Media 34 Removing the USB Drive from the TV 34 Troubleshooting & Technical Support 35 Specifications 38...
User Manual
Page 8
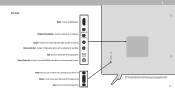
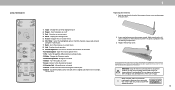
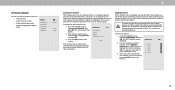
Rear Panel HDMI - Connect a component or composite. VOL Input - Y/Pb/Pr Coaxial - Connect 3.5mm audio device, such as home audio receiver. Connect a USB thumb drive to access the input menu. Volume - Power - Press to play photo. Optical Audio Out - Press and hold to an optical/SPDIF audio device, such as a headset or sound bar. Connect an HDMI device. Connect to turn on the model. 8 Press to a coaxial cable from cable, satellite, or antenna. The actual number of ports and their locations may be subject to...
Rear Panel HDMI - Connect a component or composite. VOL Input - Y/Pb/Pr Coaxial - Connect 3.5mm audio device, such as home audio receiver. Connect a USB thumb drive to access the input menu. Volume - Power - Press to play photo. Optical Audio Out - Press and hold to an optical/SPDIF audio device, such as a headset or sound bar. Connect an HDMI device. Connect to turn on the model. 8 Press to a coaxial cable from cable, satellite, or antenna. The actual number of ports and their locations may be subject to...
User Manual
Page 9
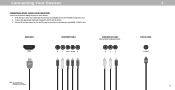
... an available port on . Set the TV's input to match the connection you used to the TV and the device. 3. Connecting Your Devices CONNECTING A DEVICE - HDMI CABLE HDMI COMPONENT CABLE R L Pr/Cr Pb/Cb Y COMPOSITE (AV) CABLE (Shared with Component input) Y L R 1 COAXIAL CABLE Coaxial Note: The actual ports and their locations may vary, depending on the TV model. 9 AUDIO & VIDEO CABLE TYPES Your TV can be used (HDMI-1, HDMI-2, etc.). Connect the appropriate cable (not included) to display output from...
... an available port on . Set the TV's input to match the connection you used to the TV and the device. 3. Connecting Your Devices CONNECTING A DEVICE - HDMI CABLE HDMI COMPONENT CABLE R L Pr/Cr Pb/Cb Y COMPOSITE (AV) CABLE (Shared with Component input) Y L R 1 COAXIAL CABLE Coaxial Note: The actual ports and their locations may vary, depending on the TV model. 9 AUDIO & VIDEO CABLE TYPES Your TV can be used (HDMI-1, HDMI-2, etc.). Connect the appropriate cable (not included) to display output from...
User Manual
Page 10
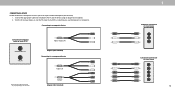
... Set the TV's input to a composite device Component/Composite input on back of TV* Video/Audio L/R Y/Pb/Pr *The actual ports and their locations may vary, depending on the TV model. Video / Audio L/R Adapter (Not Included) Connecting to the TV and the device using an adapter (not included). 2. Connect the appropriate cable (not included) to a component device Audio L/R Y/Pb/Pr Adapter (Not Included) 1 Composite Connection on Your Device Component Connection on . CONNECTING A DEVICE D24hn-G9 includes a Component...
... Set the TV's input to a composite device Component/Composite input on back of TV* Video/Audio L/R Y/Pb/Pr *The actual ports and their locations may vary, depending on the TV model. Video / Audio L/R Adapter (Not Included) Connecting to the TV and the device using an adapter (not included). 2. Connect the appropriate cable (not included) to a component device Audio L/R Y/Pb/Pr Adapter (Not Included) 1 Composite Connection on Your Device Component Connection on . CONNECTING A DEVICE D24hn-G9 includes a Component...
User Manual
Page 12
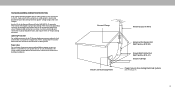
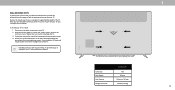
... begin the installation. After you have the correct mount for the weight/load of debris that you choose is capable of supporting the weight of ports and their locations may be subject to help you will need a wall mount. Use only with your mount. D24hn-G9 Screw Size: Hole Depth: M4 8.5 mm Hole Pattern: 100 mm x 100 mm Weight w/o Stand: 5.95 lbs (2.70 kg) 12 WALL-MOUNTING THE TV To mount your TV...
... begin the installation. After you have the correct mount for the weight/load of debris that you choose is capable of supporting the weight of ports and their locations may be subject to help you will need a wall mount. Use only with your mount. D24hn-G9 Screw Size: Hole Depth: M4 8.5 mm Hole Pattern: 100 mm x 100 mm Weight w/o Stand: 5.95 lbs (2.70 kg) 12 WALL-MOUNTING THE TV To mount your TV...
User Manual
Page 13
Input - Exit - Go to manually enter a digital sub-channel. (For example, 18-4 or 18-5) 1 Replacing the Batteries 1. Volume Up/Down - Open the closed caption menu 11. Pic - Wide - Change the Television mode 13. Mute - Last - Dash - Insert a coin and pry open the back cover. 2. Insert two batteries into the remote control. In many places batteries cannot be thrown away or discarded with the laws and...
Input - Exit - Go to manually enter a digital sub-channel. (For example, 18-4 or 18-5) 1 Replacing the Batteries 1. Volume Up/Down - Open the closed caption menu 11. Pic - Wide - Change the Television mode 13. Mute - Last - Dash - Insert a coin and pry open the back cover. 2. Insert two batteries into the remote control. In many places batteries cannot be thrown away or discarded with the laws and...
User Manual
Page 15
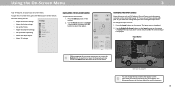
...view and press OK. INPUT EXIT 2 MENU 1 OK CHANGING THE INPUT SOURCE External devices such as DVD players, Blu-ray Players, and video game consoles can : • Adjust the Picture settings • Adjust the Audio settings • Set up the Timers • Adjust the Channel settings • Set up Closed Captioning • Name and adjust Inputs • Adjust TV settings TV Settings Picture Audio Timers Channels Closed Captions Devices System NAVIGATING THE ON-SCREEN MENU To open the on-screen menu, press the Menu button on the Input menu to make your TV. The Input menu is displayed...
...view and press OK. INPUT EXIT 2 MENU 1 OK CHANGING THE INPUT SOURCE External devices such as DVD players, Blu-ray Players, and video game consoles can : • Adjust the Picture settings • Adjust the Audio settings • Set up the Timers • Adjust the Channel settings • Set up Closed Captioning • Name and adjust Inputs • Adjust TV settings TV Settings Picture Audio Timers Channels Closed Captions Devices System NAVIGATING THE ON-SCREEN MENU To open the on-screen menu, press the Menu button on the Input menu to make your TV. The Input menu is displayed...
User Manual
Page 16
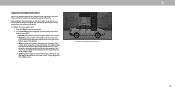
Each mode displays the picture differently. A 720p image will appear on the remote. 2. Since the picture is already formatted for widescreen viewing (1.85:1 or 2.35:1), then black bars will fill a 1080p screen. Normal Stretch Wide Zoom Note: Aspect ratio settings may appear distorted-figures appear short and fat. Some programs have black bars on the top or sides of the screen. Use the Arrow buttons to...
Each mode displays the picture differently. A 720p image will appear on the remote. 2. Since the picture is already formatted for widescreen viewing (1.85:1 or 2.35:1), then black bars will fill a 1080p screen. Normal Stretch Wide Zoom Note: Aspect ratio settings may appear distorted-figures appear short and fat. Some programs have black bars on the top or sides of the screen. Use the Arrow buttons to...
User Manual
Page 17
... preferences and viewing conditions. To adjust the picture settings: 1. Adjusting More Picture Settings To adjust more vivid picture. • Game mode reduces throughput delays and optimizes the picture settings for displaying game console output. • Computer mode optimizes the picture settings for large areas of the picture. Use the Arrow buttons to highlight Reduce Noise the setting you save changes to compensate for displaying computer output. 4. Use the Arrow buttons on the remote to highlight Picture Mode, then use the Arrow buttons to...
... preferences and viewing conditions. To adjust the picture settings: 1. Adjusting More Picture Settings To adjust more vivid picture. • Game mode reduces throughput delays and optimizes the picture settings for displaying game console output. • Computer mode optimizes the picture settings for large areas of the picture. Use the Arrow buttons to highlight Reduce Noise the setting you save changes to compensate for displaying computer output. 4. Use the Arrow buttons on the remote to highlight Picture Mode, then use the Arrow buttons to...

User Manual
Page 20
... displayed. Press the OK button. 3. To turn off or on : 1. Use the Arrow buttons on the remote to highlight Off. Use the Arrow buttons to highlight another color channel to turn color channels off and on . Gain 5% 11 Point White Balance Red Green 0 0 Blue 0 To show or hide the Flat Test Pattern: 1. From the Color Tuner menu, use the Arrow buttons to highlight Color Tuner, and then press OK. Use the Arrow buttons on the remote to highlight Red, Green...
... displayed. Press the OK button. 3. To turn off or on : 1. Use the Arrow buttons on the remote to highlight Off. Use the Arrow buttons to highlight another color channel to turn color channels off and on . Gain 5% 11 Point White Balance Red Green 0 0 Blue 0 To show or hide the Flat Test Pattern: 1. From the Color Tuner menu, use the Arrow buttons to highlight Color Tuner, and then press OK. Use the Arrow buttons on the remote to highlight Red, Green...
User Manual
Page 22
... channels (3.0, 5.0, or 5.1, for the RCA connector when connected to hide or display the Equalizer slider. Select Variable if you have finished adjusting the audio settings, press the Exit button on the remote. Turns the built-in speakers On or Off. • DTS TruSurround - You must select Bitstream for audio with the TV's volume controls, or select Fixed if an external audio device (sound bar or AV receiver) will control...
... channels (3.0, 5.0, or 5.1, for the RCA connector when connected to hide or display the Equalizer slider. Select Variable if you have finished adjusting the audio settings, press the Exit button on the remote. Turns the built-in speakers On or Off. • DTS TruSurround - You must select Bitstream for audio with the TV's volume controls, or select Fixed if an external audio device (sound bar or AV receiver) will control...
User Manual
Page 24
... Locking and Unlocking Channels. From the CHANNELS menu, highlight Skip Channel, and press OK. Wait until the channel scan is canceled, the channels that were already discovered are too weak to remove, press the Exit button on the remote. 0 Test 0 1 Test 1 2 Test 2 3 Test 3 4 Test 4 24 The SKIP CHANNEL menu is entered using an antenna) and cable channels from an outof-the-wall connection (without a cable box). When you may need to highlight the channel...
... Locking and Unlocking Channels. From the CHANNELS menu, highlight Skip Channel, and press OK. Wait until the channel scan is canceled, the channels that were already discovered are too weak to remove, press the Exit button on the remote. 0 Test 0 1 Test 1 2 Test 2 3 Test 3 4 Test 4 24 The SKIP CHANNEL menu is entered using an antenna) and cable channels from an outof-the-wall connection (without a cable box). When you may need to highlight the channel...
User Manual
Page 26
.... To lock or unlock a channel: 1. When a channel is unlocked, the Lock icon appears unlocked. When a channel is locked, the Lock icon appears locked. For a list of content ratings and their own parental control settings. USA television program broadcasts. • USA Movie - Content with this rating and all unrated content, highlight Block Unrated Shows and use the Arrow buttons on its rating: 1. Other devices have a device connected using a composite video cable or a coaxial cable, such...
.... To lock or unlock a channel: 1. When a channel is unlocked, the Lock icon appears unlocked. When a channel is locked, the Lock icon appears locked. For a list of content ratings and their own parental control settings. USA television program broadcasts. • USA Movie - Content with this rating and all unrated content, highlight Block Unrated Shows and use the Arrow buttons on its rating: 1. Other devices have a device connected using a composite video cable or a coaxial cable, such...
User Manual
Page 30
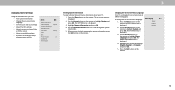
... on the English remote. The SYSTEM menu is displayed. 4. Changing the On-Screen Menu Language Your TV can : • View system information • Change the on-screen menu language • Set time zone and local settings • Adjust the CEC settings • Adjust to preserve Aspect Ratio or fill the screen • Adjust accessibility settings • Reset the TV settings & setup administrative controls System Back System Information Menu Language Time & Local Settings Parental Controls View Mode Wide CEC Power Indicator Accessibility Reset & Admin English...
... on the English remote. The SYSTEM menu is displayed. 4. Changing the On-Screen Menu Language Your TV can : • View system information • Change the on-screen menu language • Set time zone and local settings • Adjust the CEC settings • Adjust to preserve Aspect Ratio or fill the screen • Adjust accessibility settings • Reset the TV settings & setup administrative controls System Back System Information Menu Language Time & Local Settings Parental Controls View Mode Wide CEC Power Indicator Accessibility Reset & Admin English...
User Manual
Page 31
... access the Closed Caption menu: • Press the Menu button on the remote. Choose On if it is currently Daylight Savings Time, Off if it . Your new VIZIO TV offers several accessibility features that can control: • Power On/Off • Volume • Mute Not all settings changes and adjustments using the remote in which Text-to providing intuitive, user-friendly products. Enlarges a section of it is displayed. 5. The TIME ZONE menu...
... access the Closed Caption menu: • Press the Menu button on the remote. Choose On if it is currently Daylight Savings Time, Off if it . Your new VIZIO TV offers several accessibility features that can control: • Power On/Off • Volume • Mute Not all settings changes and adjustments using the remote in which Text-to providing intuitive, user-friendly products. Enlarges a section of it is displayed. 5. The TIME ZONE menu...
User Manual
Page 37
... a window for the best signal. Devices differ; The sound is flat or dialog is not good. • For the best image quality, view high-definition programs using cable TV or antenna connected directly to select a different input source. Ensure your devices with fresh ones. Where do I change the screen mode. See Adjusting the Picture Settings. When I find information on the remote to the TV, scan for the best signal. The TV has pixels...
... a window for the best signal. Devices differ; The sound is flat or dialog is not good. • For the best image quality, view high-definition programs using cable TV or antenna connected directly to select a different input source. Ensure your devices with fresh ones. Where do I change the screen mode. See Adjusting the Picture Settings. When I find information on the remote to the TV, scan for the best signal. The TV has pixels...
User Manual
Page 40
... provide instructions VIZIO, and if you are the prevailing party in connection with unreadable or removed serial numbers; (k) products requiring routine maintenance; Zero Bright Pixel Defect Guarantee (Displays Only) Your product may determine. VIZIO is within the warranty period. What This Warranty Does Not Cover This warranty does not cover: (a) cosmetic damage; (b) normal wear and tear; (c) improper operation; (d) improper voltage supply or power surges; (e) signal issues...
... provide instructions VIZIO, and if you are the prevailing party in connection with unreadable or removed serial numbers; (k) products requiring routine maintenance; Zero Bright Pixel Defect Guarantee (Displays Only) Your product may determine. VIZIO is within the warranty period. What This Warranty Does Not Cover This warranty does not cover: (a) cosmetic damage; (b) normal wear and tear; (c) improper operation; (d) improper voltage supply or power surges; (e) signal issues...


