
Camera Manual
Page 1
ViviCam X024 Digital Camera User‟s Manual © 2009 Sakar International, Inc. All other trademarks are registered trademarks of their respective companies. All rights reserved. Windows and the Windows logo are the property of Microsoft Corporation.
ViviCam X024 Digital Camera User‟s Manual © 2009 Sakar International, Inc. All other trademarks are registered trademarks of their respective companies. All rights reserved. Windows and the Windows logo are the property of Microsoft Corporation.

Camera Manual
Page 2
... for Windows Vista 4 Computer System Requirements for Macintosh 4 A Quick Look at Your Camera...5 Preparing Your Camera for Use...6 Installing SD Memory Card...7 Starting Your Digital Camera...9 Camera Mode...10 Video Mode ...30 Playback Mode ...32 Install the Vivitar Experience Image Manager Software 43 Connect your camera to the computer...45 Get photos and videos from your...
... for Windows Vista 4 Computer System Requirements for Macintosh 4 A Quick Look at Your Camera...5 Preparing Your Camera for Use...6 Installing SD Memory Card...7 Starting Your Digital Camera...9 Camera Mode...10 Video Mode ...30 Playback Mode ...32 Install the Vivitar Experience Image Manager Software 43 Connect your camera to the computer...45 Get photos and videos from your...

Camera Manual
Page 3
... take quality digital photos and videos is inserted into the camera. Vivitar makes capturing those special moments so easy. Please read this manual carefully first in Flash Vivitar Experience Image Manager software for purchasing the ViviCam X024 10.1 Mega-Pixel Digital Camera with your camera. Everything you for uploading and managing photos and videos to...
... take quality digital photos and videos is inserted into the camera. Vivitar makes capturing those special moments so easy. Please read this manual carefully first in Flash Vivitar Experience Image Manager software for purchasing the ViviCam X024 10.1 Mega-Pixel Digital Camera with your camera. Everything you for uploading and managing photos and videos to...

Camera Manual
Page 4
What your camera package includes Digital Camera Vivitar Experience Image Manager software Installation CD USB cable Quick Start Guide Strap Computer System Requirements for Windows XP To be able to ...
What your camera package includes Digital Camera Vivitar Experience Image Manager software Installation CD USB cable Quick Start Guide Strap Computer System Requirements for Windows XP To be able to ...

Camera Manual
Page 7
... 6 Insert the batteries correctly with the correct polarity facing up. 3. A "Low battery" message will power off. 2. Shortly thereafter your camera will flash on the LCD when the battery power is insufficient. Full battery power Medium battery power Low battery power Note: 1. Please remove ...your batteries when you don‟t intend to use your camera the battery icon will appear on the bottom of the LCD screen. Alkaline batteries are recommended. 1. Slide and open the battery door on...
... 6 Insert the batteries correctly with the correct polarity facing up. 3. A "Low battery" message will power off. 2. Shortly thereafter your camera will flash on the LCD when the battery power is insufficient. Full battery power Medium battery power Low battery power Note: 1. Please remove ...your batteries when you don‟t intend to use your camera the battery icon will appear on the bottom of the LCD screen. Alkaline batteries are recommended. 1. Slide and open the battery door on...

Camera Manual
Page 8
Installing SD Memory Card An external memory card is opened to replace the batteries. Locate the Memory Card slot on your camera before you have to transfer test photos to 8GB). Insert the Memory card into position. An SD icon will appear on the LCD screen after ...you turn on the side of the camera. The top of the card should be flushed with the camera should be lost when the camera loses power and turns off or when the battery door is required for normal use. 3. Your...
Installing SD Memory Card An external memory card is opened to replace the batteries. Locate the Memory Card slot on your camera before you have to transfer test photos to 8GB). Insert the Memory card into position. An SD icon will appear on the LCD screen after ...you turn on the side of the camera. The top of the card should be flushed with the camera should be lost when the camera loses power and turns off or when the battery door is required for normal use. 3. Your...

Camera Manual
Page 9
... batteries are removed. On selecting „Yes‟ the photo will be copied to your card. 3. The photo will now be deleted when the camera`s power is turned off . 2. Limited internal memory is not locked. Don‟t remove the SD card during formatting as this may damage the card.... 4. No images can be stored on the SD memory card including protected data. 4. When your card is a photo in order to continue using your camera, a "Copy to the card if it unusable. 5. Formatting will be transferred to card" message will appear on the SD card to capture more high ...
... batteries are removed. On selecting „Yes‟ the photo will be copied to your card. 3. The photo will now be deleted when the camera`s power is turned off . 2. Limited internal memory is not locked. Don‟t remove the SD card during formatting as this may damage the card.... 4. No images can be stored on the SD memory card including protected data. 4. When your card is a photo in order to continue using your camera, a "Copy to the card if it unusable. 5. Formatting will be transferred to card" message will appear on the SD card to capture more high ...

Camera Manual
Page 10
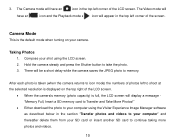
...When there is setup. You can preview photos and videos as well as being able to delete, rotate, protect, crop and print your camera is on and ready for you can shoot video files while in Video mode. In Playback mode you to take still photos, adjust the... off Press the Power button to turn on your camera. By default the Camera mode appears first on powering on the camera. 2. The LCD will automatically power off your camera. Your camera will light up indicating that your photos. Starting Your Digital Camera Power on Press the Power button on the top ...
...When there is setup. You can preview photos and videos as well as being able to delete, rotate, protect, crop and print your camera is on and ready for you can shoot video files while in Video mode. In Playback mode you to take still photos, adjust the... off Press the Power button to turn on your camera. By default the Camera mode appears first on powering on the camera. 2. The LCD will automatically power off your camera. Your camera will light up indicating that your photos. Starting Your Digital Camera Power on Press the Power button on the top ...
Camera Manual
Page 11
...the Vivitar Experience Image Manager software as described below in the section "Transfer photos and videos to your computer" and thereafter delete them from your SD card or insert another SD card to continue taking more photos and videos. 10 After each photo is taken (when the camera ...memory card to Transfer and Take More Photos!" Either download the photo to take the photo. 3. Hold the camera steady and press the Shutter button to your camera. The Camera mode will appear in the top left corner of the LCD screen. 3. Taking Photos 1. The Video mode will have ...
...the Vivitar Experience Image Manager software as described below in the section "Transfer photos and videos to your computer" and thereafter delete them from your SD card or insert another SD card to continue taking more photos and videos. 10 After each photo is taken (when the camera ...memory card to Transfer and Take More Photos!" Either download the photo to take the photo. 3. Hold the camera steady and press the Shutter button to your camera. The Camera mode will appear in the top left corner of the LCD screen. 3. Taking Photos 1. The Video mode will have ...

Camera Manual
Page 12
... the digital zoom. Macro shooting (up to indicate that the macro shooting is on . 1. Press the T button to zoom back out. Macro/Far shooting The camera has a function that the far shooting function is on . 11 The icon will appear on the object and press the W button to zoom in on... your LCD screen. The icon Far shooting: will be erased when the camera powers off. Slide the Macro/Far switch on the side of the camera to the position. 2. Slide the Macro/Far switch on the side of the...
... the digital zoom. Macro shooting (up to indicate that the macro shooting is on . 1. Press the T button to zoom back out. Macro/Far shooting The camera has a function that the far shooting function is on . 11 The icon will appear on the object and press the W button to zoom in on... your LCD screen. The icon Far shooting: will be erased when the camera powers off. Slide the Macro/Far switch on the side of the camera to the position. 2. Slide the Macro/Far switch on the side of the...

Camera Manual
Page 13
... the Macro/Far setting to operate the flash. 5. Select the Macro setting option to change to the Far mode in order to use when the camera is on. 12 The icon as well as the red LED will appear on the LCD screen. Press the Flash/Up button. 2. Press the Flash...
... the Macro/Far setting to operate the flash. 5. Select the Macro setting option to change to the Far mode in order to use when the camera is on. 12 The icon as well as the red LED will appear on the LCD screen. Press the Flash/Up button. 2. Press the Flash...

Camera Manual
Page 14
... button to toggle through the 4 selftimer options: 2 sec, 5 sec, 10 sec or Off Delete - This is Short cut buttons on the MENU dial The camera has 3 short cut buttons on the MENU dial to make for you selected Yes, the last image is deleted. Press the Left/Right button to...
... button to toggle through the 4 selftimer options: 2 sec, 5 sec, 10 sec or Off Delete - This is Short cut buttons on the MENU dial The camera has 3 short cut buttons on the MENU dial to make for you selected Yes, the last image is deleted. Press the Left/Right button to...
Camera Manual
Page 15
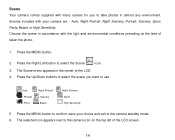
... or High Sensitivity. Auto Portrait Party Night Portrait Scenery Beach Night Scenery Sport High Sensitivity 5. Scene Your camera comes supplied with many scenes for you want to use. The selected icon appears next to the camera icon on the top left of the LCD. 4. Press the MENU button to confirm, save your... camera are - Choose the scene in the center of the LCD screen. 14 Press the Right/Left button to...
... or High Sensitivity. Auto Portrait Party Night Portrait Scenery Beach Night Scenery Sport High Sensitivity 5. Scene Your camera comes supplied with many scenes for you want to use. The selected icon appears next to the camera icon on the top left of the LCD. 4. Press the MENU button to confirm, save your... camera are - Choose the scene in the center of the LCD screen. 14 Press the Right/Left button to...

Camera Manual
Page 16
... MENU button to confirm, save and exit to select the icon. 3. Note: 1. To set the Image size: 1. Press the Right/Left button to the camera standby mode. 6. The selected image size icon will appear on the top of the LCD. 4. For Image sizes higher than 3M a SD card need to... a function that can effectively print your photo. Press the Up/Down buttons to select the image size you can be inserted into the camera. 2. Your camera has two HD "7M" and "2M" high definition image sizes. Press the MENU button. 2. The image size and quality will take. Image Size The image...
... MENU button to confirm, save and exit to select the icon. 3. Note: 1. To set the Image size: 1. Press the Right/Left button to the camera standby mode. 6. The selected image size icon will appear on the top of the LCD. 4. For Image sizes higher than 3M a SD card need to... a function that can effectively print your photo. Press the Up/Down buttons to select the image size you can be inserted into the camera. 2. Your camera has two HD "7M" and "2M" high definition image sizes. Press the MENU button. 2. The image size and quality will take. Image Size The image...

Camera Manual
Page 17
... face detecting that allows you to take better portrait photos. 1. shaking when taking the photo. Press the Right/Left button to the camera standby mode. 6. The Anti-Shake menu appears in order to take good quality photos. 1. The anti-shake icon selected will appear on the bottom of ...
... face detecting that allows you to take better portrait photos. 1. shaking when taking the photo. Press the Right/Left button to the camera standby mode. 6. The Anti-Shake menu appears in order to take good quality photos. 1. The anti-shake icon selected will appear on the bottom of ...

Camera Manual
Page 18
... the MENU button to confirm, save your choice and exit to select the icon. 3. Press the MENU button. 2. 2. Press the Right/Left button to the camera standby mode. 6. Self-Timer You can include yourself in a photo by using this feature to delay the time between you pressing the Shutter button and...
... the MENU button to confirm, save your choice and exit to select the icon. 3. Press the MENU button. 2. 2. Press the Right/Left button to the camera standby mode. 6. Self-Timer You can include yourself in a photo by using this feature to delay the time between you pressing the Shutter button and...

Camera Manual
Page 19
4. Press the Up/Down button to the camera standby mode. 6. Press the MENU button. 18 Setup You can adjust the way your choice and exit to select one of the green frame that ... photo. The Self-Timer icon selected will count down begin in the center of the self timer options: 5. Your camera will appear on the LCD. Press the MENU button to confirm, save your camera is setup with 10 setup options: Exposure, ISO, White Balance, Sharpness, Quality, Date, Auto Power off, Language, Format...
4. Press the Up/Down button to the camera standby mode. 6. Press the MENU button. 18 Setup You can adjust the way your choice and exit to select one of the green frame that ... photo. The Self-Timer icon selected will count down begin in the center of the self timer options: 5. Your camera will appear on the LCD. Press the MENU button to confirm, save your camera is setup with 10 setup options: Exposure, ISO, White Balance, Sharpness, Quality, Date, Auto Power off, Language, Format...

Camera Manual
Page 21
When using ISO sensitization, please choose the low value ISO to use a flash or tripod. 3. Press the Up/Down buttons to the camera standby mode. 4. ISO This is not good and you also specifically do not wish to prevent spots or blotches appearing on the bottom of the ...
When using ISO sensitization, please choose the low value ISO to use a flash or tripod. 3. Press the Up/Down buttons to the camera standby mode. 4. ISO This is not good and you also specifically do not wish to prevent spots or blotches appearing on the bottom of the ...

Camera Manual
Page 22
Press the Up/Down buttons to select the White Balance option in the Setup menu 2. The ISO icon for the option you selected appears on the bottom of your photos according to the camera standby mode. 5. Press the Up/Down buttons to select a White Balance option from the Menu that appears: Auto Daylight Cloudy Incandescent Fluorescent 21 White Balance This setting allows the camera to adjust the color of your light source. 1. Press the MENU button. 3. Press the MENU button to confirm, save and exit to the color of the LCD. 4.
Press the Up/Down buttons to select the White Balance option in the Setup menu 2. The ISO icon for the option you selected appears on the bottom of your photos according to the camera standby mode. 5. Press the Up/Down buttons to select a White Balance option from the Menu that appears: Auto Daylight Cloudy Incandescent Fluorescent 21 White Balance This setting allows the camera to adjust the color of your light source. 1. Press the MENU button. 3. Press the MENU button to confirm, save and exit to the color of the LCD. 4.

Camera Manual
Page 23
4. Sharpness This setting allows you selected. Press the Up/Down buttons to the camera standby mode. 5. Press the MENU button to confirm, save and exit to select the Sharpness option in the Setup menu 2. The LCD screen will be adjusted as per the White Balance option you to select a Sharpness option from the Menu that appears: 22 Press the MENU button. 3. Press the Up/Down buttons to adjust the sharpness of your images, making edges more or less distinct. 1.
4. Sharpness This setting allows you selected. Press the Up/Down buttons to the camera standby mode. 5. Press the MENU button to confirm, save and exit to select the Sharpness option in the Setup menu 2. The LCD screen will be adjusted as per the White Balance option you to select a Sharpness option from the Menu that appears: 22 Press the MENU button. 3. Press the Up/Down buttons to adjust the sharpness of your images, making edges more or less distinct. 1.


