
Quick Start Guide
Page 1
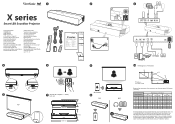
...Aan de slag Panduan Mulai Cepat Hướng dẫn Khởi động Nhanh 4 6 2 X series Smart LED Soundbar Projector Quick Start Guide Guide de démarrage rapide Schnellstarthandbuch Guía de inicio rápido Guida introduttiva Guia de Início Rápido ... situ before you permanently install it best suits your installation location. It is recommended that it , so as to the rear of the projector: 6.83 inches (17.35 cm) iOS / Android 16:9 image on a 16:9 screen 1 OK 2 (e) Screen (f) Center of lens Distance from the actual sizes. L = 8...
...Aan de slag Panduan Mulai Cepat Hướng dẫn Khởi động Nhanh 4 6 2 X series Smart LED Soundbar Projector Quick Start Guide Guide de démarrage rapide Schnellstarthandbuch Guía de inicio rápido Guida introduttiva Guia de Início Rápido ... situ before you permanently install it best suits your installation location. It is recommended that it , so as to the rear of the projector: 6.83 inches (17.35 cm) iOS / Android 16:9 image on a 16:9 screen 1 OK 2 (e) Screen (f) Center of lens Distance from the actual sizes. L = 8...
User Guide
Page 1
X1000-4K Smart LED Soundbar Projector User Guide IMPORTANT: Please read this User Guide will describe your product for future service. VS17679 P/N: X1000-4K Warranty information contained in this User Guide to obtain important information on installing and using your product in a safe manner, as well as registering your limited coverage from ViewSonic® Corporation, which is also found on our web site at http://www.viewsonic.com in English, or in specific languages using the Regional selection box in the upper right corner of our website. Model No.
X1000-4K Smart LED Soundbar Projector User Guide IMPORTANT: Please read this User Guide will describe your product for future service. VS17679 P/N: X1000-4K Warranty information contained in this User Guide to obtain important information on installing and using your product in a safe manner, as well as registering your limited coverage from ViewSonic® Corporation, which is also found on our web site at http://www.viewsonic.com in English, or in specific languages using the Regional selection box in the upper right corner of our website. Model No.

User Guide
Page 3
...on rare occasions. • Never replace the lamp assembly or any heavy objects on the projector or connection cables. • Do not stand the projector on an uneven or unstable surface. Allow the projector to cool for approximately 45 minutes prior to removing the lamp assembly for later reference. ...15° degrees forwards or backwards. • Do not look straight at least 20" (50 cm) clearance around the projector to ensure proper ventilation. • Place the projector in a safe place for replacement. • Do not use lamps beyond the rated life could cause objects to drop or...
...on rare occasions. • Never replace the lamp assembly or any heavy objects on the projector or connection cables. • Do not stand the projector on an uneven or unstable surface. Allow the projector to cool for approximately 45 minutes prior to removing the lamp assembly for later reference. ...15° degrees forwards or backwards. • Do not look straight at least 20" (50 cm) clearance around the projector to ensure proper ventilation. • Place the projector in a safe place for replacement. • Do not use lamps beyond the rated life could cause objects to drop or...

User Guide
Page 4
...call your outlet, obtain an adapter and do not stare into your dealer or ViewSonic®. This projector is a normal operation and not a defect. • Do not attempt to continue using the projector. • Use only attachments/accessories specified by the manufacturer. • Disconnect ...being treaded upon or pinched, particularly at the plug, and at the point where it to have the projector serviced. • When the projector is under operation, you connect your projector through a power stabilizer, surge protector, or uninterruptable power supply (UPS). • If smoke, an ...
...call your outlet, obtain an adapter and do not stare into your dealer or ViewSonic®. This projector is a normal operation and not a defect. • Do not attempt to continue using the projector. • Use only attachments/accessories specified by the manufacturer. • Disconnect ...being treaded upon or pinched, particularly at the plug, and at the point where it to have the projector serviced. • When the projector is under operation, you connect your projector through a power stabilizer, surge protector, or uninterruptable power supply (UPS). • If smoke, an ...

User Guide
Page 5
...use of the wrong gauge or length screws. You can purchase a projector ceiling mount kit from the ceiling due to mount the projector on the ceiling, it is strongly recommended that you use a proper fitting projector ceiling mount kit and that you intend to an improper attachment through the... use an inappropriate projector ceiling mount kit, there is a safety risk that the projector may fall from the place you start using the projector. If you ensure it is securely...
...use of the wrong gauge or length screws. You can purchase a projector ceiling mount kit from the ceiling due to mount the projector on the ceiling, it is strongly recommended that you use a proper fitting projector ceiling mount kit and that you intend to an improper attachment through the... use an inappropriate projector ceiling mount kit, there is a safety risk that the projector may fall from the place you start using the projector. If you ensure it is securely...

User Guide
Page 6
... Connection Ports...12 Remote Control...14 Initial Setup 16 Choosing a Location - Projection Orientation 16 Projection Dimensions 17 Mounting the Projector 18 Making Connections 19 Connecting to Power 19 Connecting to External Devices 20 HDMI Connection 20 Audio Connection 21 USB and Network Connection 22 Wireless ...
... Connection Ports...12 Remote Control...14 Initial Setup 16 Choosing a Location - Projection Orientation 16 Projection Dimensions 17 Mounting the Projector 18 Making Connections 19 Connecting to Power 19 Connecting to External Devices 20 HDMI Connection 20 Audio Connection 21 USB and Network Connection 22 Wireless ...

User Guide
Page 7
...Menu Tree 53 Menu Operations 58 File Management 58 Apps Center...63 Bluetooth...65 Setting...66 Screen Mirroring...81 7 Using the Projector 32 Starting Up the Projector 32 First Time Activation 32 Image Focus...32 Preferred Language 33 Projection Orientation 33 Network Settings...34 Source Input...34 Selecting an... Input Source 35 Adjusting the Projected Image 36 Adjusting the Projector's Height and Projection Angle 36 Setting Up the Desired Image Size 36 Fine-Tuning the Image Clarity 37 Shutting Down the...
...Menu Tree 53 Menu Operations 58 File Management 58 Apps Center...63 Bluetooth...65 Setting...66 Screen Mirroring...81 7 Using the Projector 32 Starting Up the Projector 32 First Time Activation 32 Image Focus...32 Preferred Language 33 Projection Orientation 33 Network Settings...34 Source Input...34 Selecting an... Input Source 35 Adjusting the Projected Image 36 Adjusting the Projector's Height and Projection Angle 36 Setting Up the Desired Image Size 36 Fine-Tuning the Image Clarity 37 Shutting Down the...
User Guide
Page 8
... Timing 89 IR Control Table...90 Glossary...91 Troubleshooting...94 Maintenance...95 General Precautions 95 Cleaning the Lens 95 Cleaning the Case 95 Storing the Projector 95 LED Indicators...96 Regulatory and Service Information 97 Compliance Information 97 FCC Compliance Statement 97 Industry Canada Statement 97 CE Conformity for European Countries...
... Timing 89 IR Control Table...90 Glossary...91 Troubleshooting...94 Maintenance...95 General Precautions 95 Cleaning the Lens 95 Cleaning the Case 95 Storing the Projector 95 LED Indicators...96 Regulatory and Service Information 97 Compliance Information 97 FCC Compliance Statement 97 Industry Canada Statement 97 CE Conformity for European Countries...
User Guide
Page 9
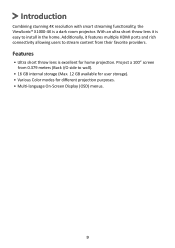
... with smart streaming functionality, the ViewSonic® X1000-4K is easy to wall). • 16 GB internal storage (Max. 12 GB available for user storage). • Various Color modes for home projection. With an .... Features • Ultra short throw lens is excellent for different projection purposes. • Multi-language On-Screen Display (OSD) menus. 9 Additionally, it is a dark room projector. Project a 100" screen from their favorite providers.
... with smart streaming functionality, the ViewSonic® X1000-4K is easy to wall). • 16 GB internal storage (Max. 12 GB available for user storage). • Various Color modes for home projection. With an .... Features • Ultra short throw lens is excellent for different projection purposes. • Multi-language On-Screen Display (OSD) menus. 9 Additionally, it is a dark room projector. Project a 100" screen from their favorite providers.

User Guide
Page 11
Product Overview Projector Front Rear USB 1 (3.0) USB 2 (2.0) 5V/2A 5V/1.5A USB C HDMI 1 HDCP 2.2 AUDIO AUDIO OUT IN Speaker IR Sensor Speaker Sides SUBWOOFER OUT HDMI 2 HDMI 3 LAN S/...
Product Overview Projector Front Rear USB 1 (3.0) USB 2 (2.0) 5V/2A 5V/1.5A USB C HDMI 1 HDCP 2.2 AUDIO AUDIO OUT IN Speaker IR Sensor Speaker Sides SUBWOOFER OUT HDMI 2 HDMI 3 LAN S/...

User Guide
Page 14
Play/Pause content. 14 Remote Control Button Description [1] Power Turns the projector On or Off [2] Source Displays the input source selection 1 bar. 3 2 4 [3] Focus Automatically focus the image. 5 6 [4] Bluetooth Launch Bluetooth search. 7 8 [5] OK Confirms the selection. 9 [6] Up/Down/ ...
Play/Pause content. 14 Remote Control Button Description [1] Power Turns the projector On or Off [2] Source Displays the input source selection 1 bar. 3 2 4 [3] Focus Automatically focus the image. 5 6 [4] Bluetooth Launch Bluetooth search. 7 8 [5] OK Confirms the selection. 9 [6] Up/Down/ ...

User Guide
Page 15
... illustration for your region. 15 Remote Control - The distance between the remote control and the sensor(s) should not exceed 8 m (26 ft.) NOTE: Refer to the projector's IR remote control sensor(s). 2. NOTE: Observe the battery's polarities as indicated. 3. Receiver Range To ensure proper function of the infrared (IR) remote control sensor(s).
... illustration for your region. 15 Remote Control - The distance between the remote control and the sensor(s) should not exceed 8 m (26 ft.) NOTE: Refer to the projector's IR remote control sensor(s). 2. NOTE: Observe the battery's polarities as indicated. 3. Receiver Range To ensure proper function of the infrared (IR) remote control sensor(s).

User Guide
Page 16
... upside-down from the ceiling in front of a suitable power outlet. • Location and distance between the projector and other equipment. Rear Table¹ The projector is required. 16 Initial Setup This section provides detailed instructions for the initial set up your screen. •... Orientation Personal preference and room layout will decide the installation location. The projector is designed to be installed in one of the following : • Size and position of your projector. Front Ceiling The projector is placed near the floor behind the screen. ¹ A rear projection...
... upside-down from the ceiling in front of a suitable power outlet. • Location and distance between the projector and other equipment. Rear Table¹ The projector is required. 16 Initial Setup This section provides detailed instructions for the initial set up your screen. •... Orientation Personal preference and room layout will decide the installation location. The projector is designed to be installed in one of the following : • Size and position of your projector. Front Ceiling The projector is placed near the floor behind the screen. ¹ A rear projection...

User Guide
Page 17
CAUTION: Allow at least 50 cm (20") of the projector is 17.35 cm (6.83"). 16:9 Image on a 16:9 Screen (a) Screen Size (b) Projection Distance in . Projection Dimensions • 16:9 Image on a 16:9 Screen NOTE: • (e) = ....48 546 150 3810 25.85 657 (c) Image Height (d) Vertical Offset in . mm in . Please refer to the actual projector for proper ventilation and to the rear of clearance around the projector for the precise dimensions. • To learn more about setting up your desired image size, see page 36. mm in...
CAUTION: Allow at least 50 cm (20") of the projector is 17.35 cm (6.83"). 16:9 Image on a 16:9 Screen (a) Screen Size (b) Projection Distance in . Projection Dimensions • 16:9 Image on a 16:9 Screen NOTE: • (e) = ....48 546 150 3810 25.85 657 (c) Image Height (d) Vertical Offset in . mm in . Please refer to the actual projector for proper ventilation and to the rear of clearance around the projector for the precise dimensions. • To learn more about setting up your desired image size, see page 36. mm in...

User Guide
Page 18
...: If you buy a third party mount, please use a ViewSonic® wall or ceiling mount. 2. Screw size can vary depending on the thickness of the projector. 18 Ensure the screws used to attach the mount to the projector meet the following specifications: • Screw type: M6 x 10 • Maximum Screw Length: ...10 mm CAUTION: • Avoid installing the projector near a heat source or air conditioner. • Keep at least a 10 cm (3.9 in.) gap between the ceiling and the bottom of the mounting plate...
...: If you buy a third party mount, please use a ViewSonic® wall or ceiling mount. 2. Screw size can vary depending on the thickness of the projector. 18 Ensure the screws used to attach the mount to the projector meet the following specifications: • Screw type: M6 x 10 • Maximum Screw Length: ...10 mm CAUTION: • Avoid installing the projector near a heat source or air conditioner. • Keep at least a 10 cm (3.9 in.) gap between the ceiling and the bottom of the mounting plate...

User Guide
Page 19
If a fault should occur during operation of the projector. 2. Connect the power cord to the AC IN jack at the rear of the projector, use the disconnect device to Power 1. Making Connections This section guides you on how to an easily accessible outlet near the unit. Plug the power cord into a power outlet. 1 2 NOTE: When installing the projector, incorporate a readily accessible disconnect device in the fixed wiring, or connect the power plug to connect the projector with other equipment. Connecting to switch off the power supply, or disconnect the power plug. 19
If a fault should occur during operation of the projector. 2. Connect the power cord to the AC IN jack at the rear of the projector, use the disconnect device to Power 1. Making Connections This section guides you on how to an easily accessible outlet near the unit. Plug the power cord into a power outlet. 1 2 NOTE: When installing the projector, incorporate a readily accessible disconnect device in the fixed wiring, or connect the power plug to connect the projector with other equipment. Connecting to switch off the power supply, or disconnect the power plug. 19

User Guide
Page 20
HDMI 1 HDCP 2.2 HDMI 2 HDCP 2.2 HDMI 3 HDCP 2.2 20 NOTE: iPhone/iPad users will need to use an additional adapter. Then connect the other end of the cable to the HDMI 1/2/3 port (each support HDCP 2.0/HDMI 2.2) of your projector. Connecting to External Devices HDMI Connection Connect one end of an HDMI cable to the HDMI port of your video device.
HDMI 1 HDCP 2.2 HDMI 2 HDCP 2.2 HDMI 3 HDCP 2.2 20 NOTE: iPhone/iPad users will need to use an additional adapter. Then connect the other end of the cable to the HDMI 1/2/3 port (each support HDCP 2.0/HDMI 2.2) of your projector. Connecting to External Devices HDMI Connection Connect one end of an HDMI cable to the HDMI port of your video device.

User Guide
Page 22
... DONGLE SERVICE 22 USB and Network Connection Just like any PC, it is easy to the projector's USB Type-A port. USB-C Connection Connect one end of a USB Type-C cable to the USB-C port of your projector. NOTE: Ensure your USB Type-C device can support video transmission. To learn more about managing storage...
... DONGLE SERVICE 22 USB and Network Connection Just like any PC, it is easy to the projector's USB Type-A port. USB-C Connection Connect one end of a USB Type-C cable to the USB-C port of your projector. NOTE: Ensure your USB Type-C device can support video transmission. To learn more about managing storage...

User Guide
Page 23
... follow the steps to directly cast your device is connected to mirror the screen on their personal device. Access the drop down control menu. 2. "ViewSonic PJ-XXXX" will now be visible, select it . 2. For Android: 1. NOTE: Some Android devices support direct "Casting". NOTE: Ensure your Android... device. 23 Pull-to the Casting feature and choose "ViewSonic PJ-XXX" from the list of available devices. If your device does, go to -refresh the app and wait for users to the same network...
... follow the steps to directly cast your device is connected to mirror the screen on their personal device. Access the drop down control menu. 2. "ViewSonic PJ-XXXX" will now be visible, select it . 2. For Android: 1. NOTE: Some Android devices support direct "Casting". NOTE: Ensure your Android... device. 23 Pull-to the Casting feature and choose "ViewSonic PJ-XXX" from the list of available devices. If your device does, go to -refresh the app and wait for users to the same network...

User Guide
Page 24
Press Left or Right on the remote control to a Wi-Fi network: 1. Connecting to Networks Wi-Fi Connection To connect to select Enable. 24 Go to: Home > Settings > Network Settings > Wi-Fi 3. Insert the Wi-Fi dongle into the projector's Wi-Fi dongle socket. 2.
Press Left or Right on the remote control to a Wi-Fi network: 1. Connecting to Networks Wi-Fi Connection To connect to select Enable. 24 Go to: Home > Settings > Network Settings > Wi-Fi 3. Insert the Wi-Fi dongle into the projector's Wi-Fi dongle socket. 2.


