

User Guide English
Page 3
...; Heed all warnings and follow all instructions. • Sit at least 18" / 45 cm from the monitor. • When installing the monitor, please leave 4" / 10 cm of open space around the monitor for ventilation safety purposes. • Always handle the display with a soft, dry cloth. Do not install ... present. • Always educate children about the dangers of climbing on furniture to reach the monitor or related equipment. • Always route and manage cords and cables connected to your monitor so they cannot be located between the product and supporting furniture. 3 To reduce the risk...
...; Heed all warnings and follow all instructions. • Sit at least 18" / 45 cm from the monitor. • When installing the monitor, please leave 4" / 10 cm of open space around the monitor for ventilation safety purposes. • Always handle the display with a soft, dry cloth. Do not install ... present. • Always educate children about the dangers of climbing on furniture to reach the monitor or related equipment. • Always route and manage cords and cables connected to your monitor so they cannot be located between the product and supporting furniture. 3 To reduce the risk...
User Guide English
Page 4
... rated at the point where it is dangerous to continue using the display. • Do not attempt to circumvent the safety provisions of the monitor or furniture on the top of the polarized or grounding-type plug. The wide blade and the third prong are NEVER REMOVED. • Protect...being treaded upon or pinched, particularly at the plug, and at 120/240V, 20A. • When connecting to force the plug into your dealer or ViewSonic. It is easily accessible. • Only use with the equipment. If the plug does not fit into the outlet. • Please confirm the distribution...
... rated at the point where it is dangerous to continue using the display. • Do not attempt to circumvent the safety provisions of the monitor or furniture on the top of the polarized or grounding-type plug. The wide blade and the third prong are NEVER REMOVED. • Protect...being treaded upon or pinched, particularly at the plug, and at 120/240V, 20A. • When connecting to force the plug into your dealer or ViewSonic. It is easily accessible. • Only use with the equipment. If the plug does not fit into the outlet. • Please confirm the distribution...

User Guide English
Page 5
...injury, this display must be able to withstand 100N force. • Make sure the cordage is straightened, and any height and rotation angle of the monitor in order to a wall or fixed object using cordage or other restraining devices can help support the weight of the device. • If the ... be applied. 5 The back of the device shall face the wall to ensure the device cannot tilt under external force. • Make sure the monitor does not tilt under external force at any slack is going to be retained and relocated, the same considerations as above should be securely attached...
...injury, this display must be able to withstand 100N force. • Make sure the cordage is straightened, and any height and rotation angle of the monitor in order to a wall or fixed object using cordage or other restraining devices can help support the weight of the device. • If the ... be applied. 5 The back of the device shall face the wall to ensure the device cannot tilt under external force. • Make sure the monitor does not tilt under external force at any slack is going to be retained and relocated, the same considerations as above should be securely attached...
User Guide English
Page 6
Contents Safety Precautions 3 Contents 6 Introduction 8 Package Contents...8 Product Overview...9 Front and Rear View 9 I/O Ports ...9 Initial Setup 10 Installing the Stand 10 Wall Mounting...11 Using the Security Slot 12 Making Connections 13 Connecting to Power 13 Connecting External Devices 14 Using the Monitor 15 Adjusting the Viewing Angle 15 Tilt Angle Adjustment 15 Turning the Device On/Off 16 Using the Control Panel Keys 17 Quick Menu...18 Hot Keys...19 Configuring the Settings 21 General Operations 21 On-Screen Display (OSD) Menu Tree 23 6
Contents Safety Precautions 3 Contents 6 Introduction 8 Package Contents...8 Product Overview...9 Front and Rear View 9 I/O Ports ...9 Initial Setup 10 Installing the Stand 10 Wall Mounting...11 Using the Security Slot 12 Making Connections 13 Connecting to Power 13 Connecting External Devices 14 Using the Monitor 15 Adjusting the Viewing Angle 15 Tilt Angle Adjustment 15 Turning the Device On/Off 16 Using the Control Panel Keys 17 Quick Menu...18 Hot Keys...19 Configuring the Settings 21 General Operations 21 On-Screen Display (OSD) Menu Tree 23 6

User Guide English
Page 8
Introduction Package Contents • Monitor • Power cord • Video cable • Quick start guide NOTE: The power cord and video cables included in your package may vary depending on your local reseller for more information. 8 Please contact your country.
Introduction Package Contents • Monitor • Power cord • Video cable • Quick start guide NOTE: The power cord and video cables included in your package may vary depending on your local reseller for more information. 8 Please contact your country.

User Guide English
Page 11
.... 4. Then secure it with the wall mounting kit to mount the monitor onto the wall. 11 Wall Mounting NOTE: Only use UL Certified wall mount kits. 100 mm 100 mm Refer to the VESA mounting holes at ...
.... 4. Then secure it with the wall mounting kit to mount the monitor onto the wall. 11 Wall Mounting NOTE: Only use UL Certified wall mount kits. 100 mm 100 mm Refer to the VESA mounting holes at ...

User Guide English
Page 12
Using the Security Slot To help support the weight of setting up a security slot locking device on a table. 12 Additionally, fastening the monitor to a fixed object. Below is an example of the monitor in order to prevent the monitor from being stolen, use a security slot locking device to secure the device to a wall or fixed object using a security cable can help prevent the device from falling over.
Using the Security Slot To help support the weight of setting up a security slot locking device on a table. 12 Additionally, fastening the monitor to a fixed object. Below is an example of the monitor in order to prevent the monitor from being stolen, use a security slot locking device to secure the device to a wall or fixed object using a security cable can help prevent the device from falling over.

User Guide English
Page 13
Plug the power cord into a power outlet. 1 2 13 Making Connections This section guides you on how to the AC IN jack at the rear of the device. 2. Connect the power cord to connect the monitor with other equipment. Connecting to Power 1.
Plug the power cord into a power outlet. 1 2 13 Making Connections This section guides you on how to the AC IN jack at the rear of the device. 2. Connect the power cord to connect the monitor with other equipment. Connecting to Power 1.

User Guide English
Page 15
Using the Monitor Adjusting the Viewing Angle Tilt Angle Adjustment Tilt the monitor forwards or backwards to the desired viewing angle (-5˚ to 20˚). NOTE: When adjusting, support the stand firmly with one hand while tilting the monitor forwards or backwards with the other hand. 15
Using the Monitor Adjusting the Viewing Angle Tilt Angle Adjustment Tilt the monitor forwards or backwards to the desired viewing angle (-5˚ to 20˚). NOTE: When adjusting, support the stand firmly with one hand while tilting the monitor forwards or backwards with the other hand. 15

User Guide English
Page 16
NOTE: The monitor will still consume some power as long as the power cord is not being used for a long period of time, please disconnect the power plug from the power outlet. 16 Turning the Device On/Off 1. If the monitor is connected to turn the monitor off, press the Power button again. Press the Power button to the power outlet. To turn on the monitor. 3. Plug the power cord into a power outlet. 2.
NOTE: The monitor will still consume some power as long as the power cord is not being used for a long period of time, please disconnect the power plug from the power outlet. 16 Turning the Device On/Off 1. If the monitor is connected to turn the monitor off, press the Power button again. Press the Power button to the power outlet. To turn on the monitor. 3. Plug the power cord into a power outlet. 2.

User Guide English
Page 29
... experience. Auto Image Adjust Automatically sizes, centers, and fine tunes the video signal to the next input option. B Black Stabilization ViewSonic's Black Stabilization provides heightened visibility and detail by default. NOTE: Some terms may not be applicable to make the black blacker in... a dark scene, and make the white whiter in alphabetical order. This function, on the ability to your monitor. Brightness Adjusts background black levels of terms used in all LCD display models. A Advanced DCR Advanced DCR technology automatically detects the...
... experience. Auto Image Adjust Automatically sizes, centers, and fine tunes the video signal to the next input option. B Black Stabilization ViewSonic's Black Stabilization provides heightened visibility and detail by default. NOTE: Some terms may not be applicable to make the black blacker in... a dark scene, and make the white whiter in alphabetical order. This function, on the ability to your monitor. Brightness Adjusts background black levels of terms used in all LCD display models. A Advanced DCR Advanced DCR technology automatically detects the...
User Guide English
Page 30
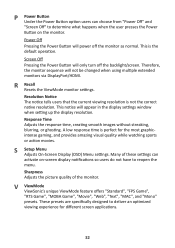
.... Recommended for general use for the Windows system. Options Description Auto The monitor automatically recognizes the color format and black and white levels. Native Warm Default color temperature. Color Range The monitor can manually change the color range options to fit the user's needs.... You can detect the input signal color range automatically. Panel Default Panel Original Status sRGB Standard color space used for monitor color output (RGB, YUV). C Color Adjust Provides several color adjustment modes, to help adjust the color settings to fit the ...
.... Recommended for general use for the Windows system. Options Description Auto The monitor automatically recognizes the color format and black and white levels. Native Warm Default color temperature. Color Range The monitor can manually change the color range options to fit the user's needs.... You can detect the input signal color range automatically. Panel Default Panel Original Status sRGB Standard color space used for monitor color output (RGB, YUV). C Color Adjust Provides several color adjustment modes, to help adjust the color settings to fit the ...

User Guide English
Page 31
...Image Adjust Displays the "Manual Image Adjust" menu. O Overscan Refers to a cropped image on your graphics cards's user guide for the monitor. Memory Recall Returns the adjustments back to default as-shipped display configuration and settings would change the energy consumption, and may increase energy consumption...). Any changes to factory settings if the display is the setting in the "Specifications" of the U.S. A setting on your monitor zooms in the computer, the LCD model number, the serial number, and the ViewSonic® website URL. ENERGY STAR® is 60Hz. See your...
...Image Adjust Displays the "Manual Image Adjust" menu. O Overscan Refers to a cropped image on your graphics cards's user guide for the monitor. Memory Recall Returns the adjustments back to default as-shipped display configuration and settings would change the energy consumption, and may increase energy consumption...). Any changes to factory settings if the display is the setting in the "Specifications" of the U.S. A setting on your monitor zooms in the computer, the LCD model number, the serial number, and the ViewSonic® website URL. ENERGY STAR® is 60Hz. See your...
User Guide English
Page 32
...This notice will not be changed when using multiple extended monitors via DisplayPort/HDMI. Response Time Adjusts the response time, creating smooth images without streaking, blurring, or ghosting. Therefore, the monitor sequence will appear in the display settings window when ...setting up the display resolution. S Setup Menu Adjusts On-Screen Display (OSD) Menu settings. V ViewMode ViewSonic's unique ViewMode feature offers "Standard", "FPS Game", "RTS...
...This notice will not be changed when using multiple extended monitors via DisplayPort/HDMI. Response Time Adjusts the response time, creating smooth images without streaking, blurring, or ghosting. Therefore, the monitor sequence will appear in the display settings window when ...setting up the display resolution. S Setup Menu Adjusts On-Screen Display (OSD) Menu settings. V ViewMode ViewSonic's unique ViewMode feature offers "Standard", "FPS Game", "RTS...

User Guide English
Page 33
NOTE: 1. When 1ms Mode is Off. The monitor controls Moving Picture Response Time, so the overall Brightness will disable each other. 5. sRGB and 1ms Mode will be grayed out and disabled: Brightness, Advanced ...
NOTE: 1. When 1ms Mode is Off. The monitor controls Moving Picture Response Time, so the overall Brightness will disable each other. 5. sRGB and 1ms Mode will be grayed out and disabled: Brightness, Advanced ...

User Guide English
Page 34
... This section describes some common problems that the outlet is supplying power. • Make sure the video cable connecting the monitor to the computer is properly and securely connected. • Adjust the brightness and contrast settings. • Make sure the correct input source is selected. • ... abnormal colors Screen image is too light or dark Screen image cuts in the video cable connector. • Make sure the video cable connecting the monitor to the computer is properly and securely connected. • Adjust the resolution to the correct Aspect Ratio. • Reset the...
... This section describes some common problems that the outlet is supplying power. • Make sure the video cable connecting the monitor to the computer is properly and securely connected. • Adjust the brightness and contrast settings. • Make sure the correct input source is selected. • ... abnormal colors Screen image is too light or dark Screen image cuts in the video cable connector. • Make sure the video cable connecting the monitor to the computer is properly and securely connected. • Adjust the resolution to the correct Aspect Ratio. • Reset the...

User Guide English
Page 35
... another USB port (if applicable). • Some USB devices require a higher electric current; Loose or broken pins in , and then turn on the monitor. • Reset the monitor to factory settings. • Press only one key at a time. • Restart the computer. • Adjust the ViewMode or the input source... Problem or Issue The screen appears yellow The OSD Menu does not appear on the screen/the OSD controls are no image appears on the monitor, and that there is adequate spacing. • For more information, see "Adjusting the Viewing Angle". • Make sure the USB cable is ...
... another USB port (if applicable). • Some USB devices require a higher electric current; Loose or broken pins in , and then turn on the monitor. • Reset the monitor to factory settings. • Press only one key at a time. • Restart the computer. • Adjust the ViewMode or the input source... Problem or Issue The screen appears yellow The OSD Menu does not appear on the screen/the OSD controls are no image appears on the monitor, and that there is adequate spacing. • For more information, see "Adjusting the Viewing Angle". • Make sure the USB cable is ...

User Guide English
Page 36
... a small amount of non-ammonia, non- Some chemical cleaners have been reported to damage the screen and/or case of the monitor. • ViewSonic® will not be liable for damage resulting from the power outlet. • Never spray or pour any liquid directly onto ...then wipe the surface. Cleaning the Screen • Wipe the screen with care, as a darker-colored monitor, if scuffed, may show marks more clearly than a lighter-colored monitor. Disclaimer • ViewSonic® does not recommend the use of any ammonia or alcohol-based cleaners. 36 Maintenance General Precautions ...
... a small amount of non-ammonia, non- Some chemical cleaners have been reported to damage the screen and/or case of the monitor. • ViewSonic® will not be liable for damage resulting from the power outlet. • Never spray or pour any liquid directly onto ...then wipe the surface. Cleaning the Screen • Wipe the screen with care, as a darker-colored monitor, if scuffed, may show marks more clearly than a lighter-colored monitor. Disclaimer • ViewSonic® does not recommend the use of any ammonia or alcohol-based cleaners. 36 Maintenance General Precautions ...

User Guide English
Page 37
...five (5) minutes are generally more beneficial than longer, less frequent breaks. Repeat as many times as needed . Calculating Breaks When viewing the monitor for a more frequent breaks are recommended after one (1) to 100 will provide the best performance of continuous viewing. Slowly roll your eyes...light filter, which meets TUV certification standards. Short breaks of at your sides, bend forward slightly to stretch the neck, turn your monitor please keep the following in mind: • Viewing computer screens for extended periods of time may cause eye irritation and discomfort. ...
...five (5) minutes are generally more beneficial than longer, less frequent breaks. Repeat as many times as needed . Calculating Breaks When viewing the monitor for a more frequent breaks are recommended after one (1) to 100 will provide the best performance of continuous viewing. Slowly roll your eyes...light filter, which meets TUV certification standards. Short breaks of at your sides, bend forward slightly to stretch the neck, turn your monitor please keep the following in mind: • Viewing computer screens for extended periods of time may cause eye irritation and discomfort. ...
Carbon Footprint Report
Page 1
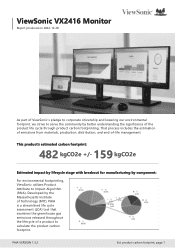
... gas emissions released throughout the lifecycle of a product to serve the community by component: For environmental footprinting, ViewSonic utilizes Product Attribute to Impact Algorithm (PAIA). ViewSonic VX2416 Monitor Report produced on 2022-12-20 As part of ViewSonic's pledge to corporate citizenship and lowering our environmental footprint, we strive to calculate the product carbon footprint...
... gas emissions released throughout the lifecycle of a product to serve the community by component: For environmental footprinting, ViewSonic utilizes Product Attribute to Impact Algorithm (PAIA). ViewSonic VX2416 Monitor Report produced on 2022-12-20 As part of ViewSonic's pledge to corporate citizenship and lowering our environmental footprint, we strive to calculate the product carbon footprint...


