User Guide
Page 1
...web site at http://www.viewsonic.com in English, or in specific languages using your product in the upper right corner of our website. "Antes de operar su equipo lea cu idadosamente las instrucciones en este manual" Model No. VS17557 P/N: VP2458 VP2458 Monitor User Guide IMPORTANT: ...Please read this User Guide will describe your limited coverage from ViewSonic® Corporation, which is also found on installing and using the Regional ...
...web site at http://www.viewsonic.com in English, or in specific languages using your product in the upper right corner of our website. "Antes de operar su equipo lea cu idadosamente las instrucciones en este manual" Model No. VS17557 P/N: VP2458 VP2458 Monitor User Guide IMPORTANT: ...Please read this User Guide will describe your limited coverage from ViewSonic® Corporation, which is also found on installing and using the Regional ...
User Guide
Page 25
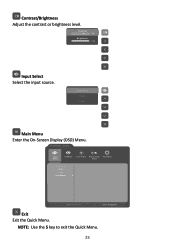
NOTE Use the 5 key to exit the Quick Menu. 25 VP2458 r htness Input Select ViewMode Color Adjust Manual Image Setup Menu Adjust DisplayPort HDMI D-Sub Auto Detect 1920 X 1080@60HZ Exit Exit the Quick Menu. r htness DisplayPort HDMI D-Sub Main Menu Enter the On-Screen Display (OSD) Menu. r htness Contrast/Brightness Adjust the contrast or brightness level. Contrast 70 Brightness 100 r htness Input Select Select the input source.
NOTE Use the 5 key to exit the Quick Menu. 25 VP2458 r htness Input Select ViewMode Color Adjust Manual Image Setup Menu Adjust DisplayPort HDMI D-Sub Auto Detect 1920 X 1080@60HZ Exit Exit the Quick Menu. r htness DisplayPort HDMI D-Sub Main Menu Enter the On-Screen Display (OSD) Menu. r htness Contrast/Brightness Adjust the contrast or brightness level. Contrast 70 Brightness 100 r htness Input Select Select the input source.

User Guide
Page 29
Press the 1 or 2 key to enter the selected menu. VP2458 Input Select ViewMode Color Adjust Manual Image Setup Menu Adjust DisplayPort HDMI D-Sub Auto Detect 1920 X 1080@60HZ 2. Then press the 3 key to select the main menu. VP2458 Input Select ViewMode Color Adjust Manual Image Setup Menu Adjust Contrast/Brightness Color Format Standard Color Custom Color Calibration Contrast Brightness 1920 X 1080@60HZ 29 Configuring the Settings General Operations 1. Then press the 4 key to activate the Quick Menu. Press the 1/2/3/4 key to display the On-Screen Display (OSD) Menu.
Press the 1 or 2 key to enter the selected menu. VP2458 Input Select ViewMode Color Adjust Manual Image Setup Menu Adjust DisplayPort HDMI D-Sub Auto Detect 1920 X 1080@60HZ 2. Then press the 3 key to select the main menu. VP2458 Input Select ViewMode Color Adjust Manual Image Setup Menu Adjust Contrast/Brightness Color Format Standard Color Custom Color Calibration Contrast Brightness 1920 X 1080@60HZ 29 Configuring the Settings General Operations 1. Then press the 4 key to activate the Quick Menu. Press the 1/2/3/4 key to display the On-Screen Display (OSD) Menu.
User Guide
Page 30
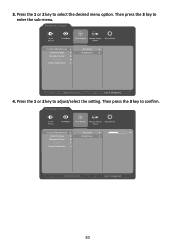
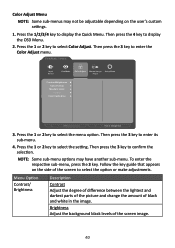
Press the 1 or 2 key to adjust/select the setting. VP2458 Input Select ViewMode Color Adjust Manual Image Setup Menu Adjust Contrast/Brightness Color Format Standard Color Custom Color Calibration Contrast Brightness 1920 X 1080@60HZ 4. Press the 1 or 2 key to select the desired menu option. Then press the 3 key to enter the sub-menu. VP2458 Input Select ViewMode Color Adjust Manual Image Setup Menu Adjust Contrast/Brightness Contrast 50 Color Format Brightness Standard Color Custom Color Calibration 1920 X 1080@60HZ 30 3. Then press the 3 key to confirm.
Press the 1 or 2 key to adjust/select the setting. VP2458 Input Select ViewMode Color Adjust Manual Image Setup Menu Adjust Contrast/Brightness Color Format Standard Color Custom Color Calibration Contrast Brightness 1920 X 1080@60HZ 4. Press the 1 or 2 key to select the desired menu option. Then press the 3 key to enter the sub-menu. VP2458 Input Select ViewMode Color Adjust Manual Image Setup Menu Adjust Contrast/Brightness Contrast 50 Color Format Brightness Standard Color Custom Color Calibration 1920 X 1080@60HZ 30 3. Then press the 3 key to confirm.

User Guide
Page 31
... the screen to confirm the selection. Press the 4 key to return to the previous menu. VP2458 VP2458 Input Select ViewMode Color Adjust Manual Image Setup Menu Adjust Contrast/Brightness Color Format Standard Color Custom Color Calibration Contrast Brightness Input Select... ViewMode Color Adjust Manual Image Setup Menu Adjust Contrast/Brightness Contrast 50 Color Format Brightness Standard Color Custom ...
... the screen to confirm the selection. Press the 4 key to return to the previous menu. VP2458 VP2458 Input Select ViewMode Color Adjust Manual Image Setup Menu Adjust Contrast/Brightness Color Format Standard Color Custom Color Calibration Contrast Brightness Input Select... ViewMode Color Adjust Manual Image Setup Menu Adjust Contrast/Brightness Contrast 50 Color Format Brightness Standard Color Custom ...

User Guide
Page 35
... Menu Sub-menu Color Adjust Custom Color Calibration Menu Option Saturation Recall CAL 1 CAL 2 CAL 3 Calibration Notice Red Green Blue Cyan Magenta Yellow Remind Schedule Manual Image Adjust Recall Auto Image Adjust Horizontal Size (-/+, 0~100) H./V.
... Menu Sub-menu Color Adjust Custom Color Calibration Menu Option Saturation Recall CAL 1 CAL 2 CAL 3 Calibration Notice Red Green Blue Cyan Magenta Yellow Remind Schedule Manual Image Adjust Recall Auto Image Adjust Horizontal Size (-/+, 0~100) H./V.

User Guide
Page 38
Then press the 3 key to display the OSD Menu. 2. Then press the 4 key to enter the Input Select menu. Menu Options Input Select 1. Press the 1 or 2 key to select the desired input source. Press the 1 or 2 key to select Input Select. Then press the 3 key to display the Quick Menu. Press the 1/2/3/4 key to confirm the selection. 38 VP2458 Input Select ViewMode Color Adjust Manual Image Setup Menu Adjust DisplayPort HDMI D-Sub Auto Detect 1920 X 1080@60HZ 3.
Then press the 3 key to display the OSD Menu. 2. Then press the 4 key to enter the Input Select menu. Menu Options Input Select 1. Press the 1 or 2 key to select the desired input source. Press the 1 or 2 key to select Input Select. Then press the 3 key to display the Quick Menu. Press the 1/2/3/4 key to confirm the selection. 38 VP2458 Input Select ViewMode Color Adjust Manual Image Setup Menu Adjust DisplayPort HDMI D-Sub Auto Detect 1920 X 1080@60HZ 3.
User Guide
Page 39
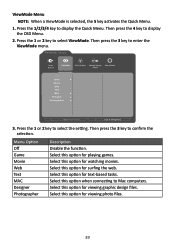
... text-based tasks. ViewMode Menu NOTE When a ViewMode is selected, the 5 key activates the Quick Menu. 1. Select this option for watching movies. VP2458 Input Select ViewMode Color Adjust Manual Image Setup Menu Adjust Off Game Movie Web Text MAC Designer Photographer 1920 X 1080@60HZ 3. Select this option for playing games. Select this...
... text-based tasks. ViewMode Menu NOTE When a ViewMode is selected, the 5 key activates the Quick Menu. 1. Select this option for watching movies. VP2458 Input Select ViewMode Color Adjust Manual Image Setup Menu Adjust Off Game Movie Web Text MAC Designer Photographer 1920 X 1080@60HZ 3. Select this option for playing games. Select this...
User Guide
Page 40
...-menu, press the 3 key. Press the 1 or 2 key to enter its sub-menu. 4. Then press the 3 key to display the Quick Menu. VP2458 Input Select ViewMode Color Adjust Manual Image Setup Menu Adjust Contrast/Brightness Color Format Standard Color Custom Color Calibration 1920 X 1080@60HZ 3. Follow the key guide that appears on...
...-menu, press the 3 key. Press the 1 or 2 key to enter its sub-menu. 4. Then press the 3 key to display the Quick Menu. VP2458 Input Select ViewMode Color Adjust Manual Image Setup Menu Adjust Contrast/Brightness Color Format Standard Color Custom Color Calibration 1920 X 1080@60HZ 3. Follow the key guide that appears on...

User Guide
Page 41
... to 5000K. • User Color: Adjust red, green, and blue values as desired. 41 Menu Option Color Format Standard Color Custom Description The monitor can manually change the color range options to fit the correct color range if the colors are not displayed correctly. • Auto: Automatically recognizes the color format...
... to 5000K. • User Color: Adjust red, green, and blue values as desired. 41 Menu Option Color Format Standard Color Custom Description The monitor can manually change the color range options to fit the correct color range if the colors are not displayed correctly. • Auto: Automatically recognizes the color format...

User Guide
Page 42
... settings to control the white balance for red, green, and blue. Hue Adjust the tint of the monitor's grayscale levels. Menu Option Custom Description Gamma Manually adjust the brightness level of each color (red, green, blue, cyan, magenta, and yellow). Saturation Adjust the color depth of each color (red, green, blue...
... settings to control the white balance for red, green, and blue. Hue Adjust the tint of the monitor's grayscale levels. Menu Option Custom Description Gamma Manually adjust the brightness level of each color (red, green, blue, cyan, magenta, and yellow). Saturation Adjust the color depth of each color (red, green, blue...
User Guide
Page 44
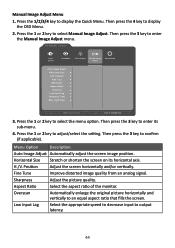
... Position Adjust the screen horizontally and/or vertically. Aspect Ratio Select the aspect ratio of the monitor. VP2458 Input Select ViewMode Color Adjust Manual Image Setup Menu Adjust Auto Image Adjust Horizontal Size H./V. Overscan Automatically enlarge the original picture horizontally and ...2 key to an equal aspect ratio that fills the screen. H./V. Low Input Lag Select the appropriate speed to decrease input to select Manual Image Adjust. Press the 1 or 2 key to output latency. 44 Sharpness Adjust the picture quality. Then press the 3 key to...
... Position Adjust the screen horizontally and/or vertically. Aspect Ratio Select the aspect ratio of the monitor. VP2458 Input Select ViewMode Color Adjust Manual Image Setup Menu Adjust Auto Image Adjust Horizontal Size H./V. Overscan Automatically enlarge the original picture horizontally and ...2 key to an equal aspect ratio that fills the screen. H./V. Low Input Lag Select the appropriate speed to decrease input to select Manual Image Adjust. Press the 1 or 2 key to output latency. 44 Sharpness Adjust the picture quality. Then press the 3 key to...
User Guide
Page 46
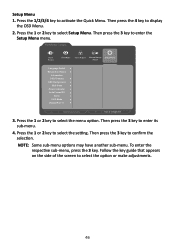
... on the side of the screen to confirm the selection. Then press the 3 key to select the option or make adjustments. 46 VP2458 Input Select ViewMode Color Adjust Manual Image Setup Menu Adjust Language Select Resolution Notice Information OSD Timeout OSD Background OSD Pivot Power Indicator Auto Power Off Sleep ECO Mode...
... on the side of the screen to confirm the selection. Then press the 3 key to select the option or make adjustments. 46 VP2458 Input Select ViewMode Color Adjust Manual Image Setup Menu Adjust Language Select Resolution Notice Information OSD Timeout OSD Background OSD Pivot Power Indicator Auto Power Off Sleep ECO Mode...
User Guide
Page 50
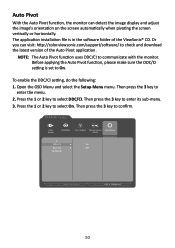
... Pivot application. Press the 1 or 2 key to On. NOTE The Auto Pivot function uses DDC/CI to enter the menu. 2. VP2458 Input Select ViewMode Color Adjust Manual Image Setup Menu Adjust DDC/CI On Save As Off All Recall 1920 X 1080@60HZ 50 Auto Pivot With the Auto Pivot function..., the monitor can visit: http://color.viewsonic.com/support/software/ to select On. To enable the DDC/CI setting, do the following: 1....
... Pivot application. Press the 1 or 2 key to On. NOTE The Auto Pivot function uses DDC/CI to enter the menu. 2. VP2458 Input Select ViewMode Color Adjust Manual Image Setup Menu Adjust DDC/CI On Save As Off All Recall 1920 X 1080@60HZ 50 Auto Pivot With the Auto Pivot function..., the monitor can visit: http://color.viewsonic.com/support/software/ to select On. To enable the DDC/CI setting, do the following: 1....

User Guide
Page 56
... color temperature to use . Options Auto Description The monitor automatically recognizes the color format and the black and white levels. Color Format The monitor can manually change the color format options to 7500K. Color Space Allows users to choose which color space they would like to 5000K. Panel Default Panel original...
... color temperature to use . Options Auto Description The monitor automatically recognizes the color format and the black and white levels. Color Format The monitor can manually change the color format options to 7500K. Color Space Allows users to choose which color space they would like to 5000K. Panel Default Panel original...

User Guide
Page 57
... and MOBA gaming settings. I Information Displays the timing mode (video signal input) coming from the two options. 57 L Low Input Lag ViewSonic® offers low input lag, utilizing a monitor process reducer, which can select the appropriate speed for your graphics cards's user guide for ...resolution and refresh rate (vertical frequency). H Hue Adjusts the tint of the monitor's grayscale levels. G Gain Adjusts the white temperature to manually adjust the brightness level of each color (red, green, blue, cyan, magenta, and yellow). Input Select Toggles between the various input ...
... and MOBA gaming settings. I Information Displays the timing mode (video signal input) coming from the two options. 57 L Low Input Lag ViewSonic® offers low input lag, utilizing a monitor process reducer, which can select the appropriate speed for your graphics cards's user guide for ...resolution and refresh rate (vertical frequency). H Hue Adjusts the tint of the monitor's grayscale levels. G Gain Adjusts the white temperature to manually adjust the brightness level of each color (red, green, blue, cyan, magenta, and yellow). Input Select Toggles between the various input ...

User Guide
Page 58
... in the "Specifications" of image quality adjustments. Overscan Refers to control the white balance for red, green, and blue. You can manually set a variety of this manual. NOTE (Exception) This control does not affect changes made in G sensor, the OSD can 't see the outermost edges of the ...90° Sets the OSD Menu with a +90° pivot. -90° Sets the OSD Menu with a -90° pivot. M Manual Image Adjust Displays the "Manual Image Adjust" menu. Memory Recall Returns the adjustments back to factory settings if the display is operating in a factory preset timing mode listed...
... in the "Specifications" of image quality adjustments. Overscan Refers to control the white balance for red, green, and blue. You can manually set a variety of this manual. NOTE (Exception) This control does not affect changes made in G sensor, the OSD can 't see the outermost edges of the ...90° Sets the OSD Menu with a +90° pivot. -90° Sets the OSD Menu with a -90° pivot. M Manual Image Adjust Displays the "Manual Image Adjust" menu. Memory Recall Returns the adjustments back to factory settings if the display is operating in a factory preset timing mode listed...


