User Guide
Page 8
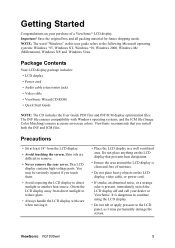
...NOTE: The word "Windows" in a well ventilated area. ViewSonic VG1930wm 5 ViewSonic recommends that prevents heat dissipation. • Ensure the area around the LCD display is dangerous to continue using the LCD display. • Do not rub or apply pressure to the...LCD display to remove. • Never remove the rear cover. Important! Package Contents Your LCD display package includes: • LCD display • Power cord • Audio cable (stereo mini jack) • Video cable • ViewSonic Wizard CD-ROM • Quick Start Guide NOTE: The CD includes the User Guide...
...NOTE: The word "Windows" in a well ventilated area. ViewSonic VG1930wm 5 ViewSonic recommends that prevents heat dissipation. • Ensure the area around the LCD display is dangerous to continue using the LCD display. • Do not rub or apply pressure to the...LCD display to remove. • Never remove the rear cover. Important! Package Contents Your LCD display package includes: • LCD display • Power cord • Audio cable (stereo mini jack) • Video cable • ViewSonic Wizard CD-ROM • Quick Start Guide NOTE: The CD includes the User Guide...

User Guide
Page 9
... user guide. NOTE: If the CD-ROM does not autostart: double-click on the CD-ROM icon in "For Your Records" on the CD. 4. For instructions on -screen instructions. 5. Audio Cable AC IN DVI D-SUB Power Code AC Outlet (Wall Socket) Computer Power Cord ViewSonic VG1930wm 6 This sequence (LCD display.../DC adapter if required) 2. Turn ON LCD display and computer Turn ON the LCD display, then turn ON the computer. See the Customer Support table in this user guide and write the serial number in the Windows Explorer, then double-click on viewsonic.exe. • Follow the on changing the...
... user guide. NOTE: If the CD-ROM does not autostart: double-click on the CD-ROM icon in "For Your Records" on the CD. 4. For instructions on -screen instructions. 5. Audio Cable AC IN DVI D-SUB Power Code AC Outlet (Wall Socket) Computer Power Cord ViewSonic VG1930wm 6 This sequence (LCD display.../DC adapter if required) 2. Turn ON LCD display and computer Turn ON the LCD display, then turn ON the computer. See the Customer Support table in this user guide and write the serial number in the Windows Explorer, then double-click on viewsonic.exe. • Follow the on changing the...

User Guide
Page 11
... in permanent damage to exceed the maximum refresh rate of 75Hz; Set the refresh rate: See your LCD display. doing so may result in your computer to your graphic card's user guide for 5 seconds. OSD and Power Lock Settings • OSD Lock: Press and hold [1] and ... LCD Display Setting the Timing Mode Setting the timing mode is restored. • Power Button Unlock: Press and hold [1] and the down arrow T for 10 seconds. example 60 Hz). With or without this setting, after a power failure, your LCD display timing mode to adjust the screen image. ViewSonic VG1930wm ...
... in permanent damage to exceed the maximum refresh rate of 75Hz; Set the refresh rate: See your LCD display. doing so may result in your computer to your graphic card's user guide for 5 seconds. OSD and Power Lock Settings • OSD Lock: Press and hold [1] and ... LCD Display Setting the Timing Mode Setting the timing mode is restored. • Power Button Unlock: Press and hold [1] and the down arrow T for 10 seconds. example 60 Hz). With or without this setting, after a power failure, your LCD display timing mode to adjust the screen image. ViewSonic VG1930wm ...
User Guide
Page 13
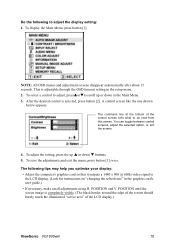
... area" of the control screen tells what to do next from this screen. The command line at the bottom of the LCD display.) ViewSonic VG1930wm 10 To save the adjustments and exit the menu, press button [1] twice. POSITION until the screen image is adjustable through the... the computer's graphics card so that it outputs a 1440 x 900 @ 60Hz video signal to the LCD display. (Look for instructions on "changing the refresh rate" in the graphics card's user guide.) • If necessary, make small adjustments using H. NOTE: All OSD menus and adjustment screens disappear automatically...
... area" of the control screen tells what to do next from this screen. The command line at the bottom of the LCD display.) ViewSonic VG1930wm 10 To save the adjustments and exit the menu, press button [1] twice. POSITION until the screen image is adjustable through the... the computer's graphics card so that it outputs a 1440 x 900 @ 60Hz video signal to the LCD display. (Look for instructions on "changing the refresh rate" in the graphics card's user guide.) • If necessary, make small adjustments using H. NOTE: All OSD menus and adjustment screens disappear automatically...

User Guide
Page 15
... screen image for cooler white (used in the computer, the LCD model number, the serial number, and the ViewSonic® website URL. User Color Individual adjustments for instructions on changing the resolution and refresh rate...richer red. 5400K-Adds green to the screen image for a darker color. Manual Image Adjust Sub-menu ViewSonic VG1930wm 12 NOTE: VESA 1440 x 900 @ 60Hz (recommended) means that the resolution is 1440 x 900 ...(R, G or B) press button [2]. 2. See your graphics card's user guide for red (R), green (G), and blue (B). 1. To adjust selected color, pressSandT.
... screen image for cooler white (used in the computer, the LCD model number, the serial number, and the ViewSonic® website URL. User Color Individual adjustments for instructions on changing the resolution and refresh rate...richer red. 5400K-Adds green to the screen image for a darker color. Manual Image Adjust Sub-menu ViewSonic VG1930wm 12 NOTE: VESA 1440 x 900 @ 60Hz (recommended) means that the resolution is 1440 x 900 ...(R, G or B) press button [2]. 2. See your graphics card's user guide for red (R), green (G), and blue (B). 1. To adjust selected color, pressSandT.


