

User Manual
Page 2
.... Electronic Warranty Registration To meet your future needs, and to change without notice. Please dispose of this document may be liable for any purpose without notice. Product Name: Model Number: Document Number: Serial Number: Purchase Date: ViewSonic VE170/VE170b VLCDS22034-1/1b VE170_UG_68 Product disposal at : http://www.viewsonic.com. Environmental Protection Agency (EPA). E VESA is a registered trademark of Microsoft Corporation in...
.... Electronic Warranty Registration To meet your future needs, and to change without notice. Please dispose of this document may be liable for any purpose without notice. Product Name: Model Number: Document Number: Serial Number: Purchase Date: ViewSonic VE170/VE170b VLCDS22034-1/1b VE170_UG_68 Product disposal at : http://www.viewsonic.com. Environmental Protection Agency (EPA). E VESA is a registered trademark of Microsoft Corporation in...

User Manual
Page 3
CONTENTS For Your Records 1 Getting Started Package Contents 3 E N Before using the ViewPanel 4 G Precautions 4 L I Quick Installation 5 S H Using the ViewPanel Setting the Timing Mode 6 Preset Timing Modes 6 Maximum Refresh Rates 6 Adjusting the Screen Image 7 Other Information Specifications 14 Troubleshooting 15 Customer Support 16 Cleaning the ViewPanel 17 Warranty 18 Appendix Power Cord Safety Guidelines 19 FCC Information 20 CE Conformity 20 *To meet your future needs, and to receive any additional product information as...
CONTENTS For Your Records 1 Getting Started Package Contents 3 E N Before using the ViewPanel 4 G Precautions 4 L I Quick Installation 5 S H Using the ViewPanel Setting the Timing Mode 6 Preset Timing Modes 6 Maximum Refresh Rates 6 Adjusting the Screen Image 7 Other Information Specifications 14 Troubleshooting 15 Customer Support 16 Cleaning the ViewPanel 17 Warranty 18 Appendix Power Cord Safety Guidelines 19 FCC Information 20 CE Conformity 20 *To meet your future needs, and to receive any additional product information as...

User Manual
Page 4
... a ViewSonic VE170/VE170b color ViewPanel®! The other end of the AC Adapter connects to receive Analog RGB video signal from PC • ViewSonic® Wizard CD-ROM Includes User Guide PDF files and INF/ ICM Display Optimization files* *NOTE: The supplied INF file assures compatibility with Windows operating systems, and the ICM file (Image Color Matching) ensures accurate on your purchase of the ViewPanel (the DC In port). ViewSonic VE170/VE170b Getting Started 3 Save...
... a ViewSonic VE170/VE170b color ViewPanel®! The other end of the AC Adapter connects to receive Analog RGB video signal from PC • ViewSonic® Wizard CD-ROM Includes User Guide PDF files and INF/ ICM Display Optimization files* *NOTE: The supplied INF file assures compatibility with Windows operating systems, and the ICM file (Image Color Matching) ensures accurate on your purchase of the ViewPanel (the DC In port). ViewSonic VE170/VE170b Getting Started 3 Save...
User Manual
Page 5
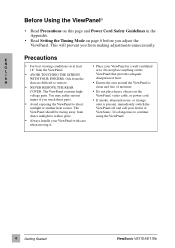
..., immediately switch the sunlight or another heat source. E Precautions N G • For best viewing conditions sit at least • Place your ViewPanel with care when moving it. 4 Getting Started ViewSonic VE170/VE170b Do not place anything on the voltage parts. using the ViewPanel. • Always handle your ViewPanel in the Appendix. • Read Setting the Timing Mode on page 6 before you touch these parts...
..., immediately switch the sunlight or another heat source. E Precautions N G • For best viewing conditions sit at least • Place your ViewPanel with care when moving it. 4 Getting Started ViewSonic VE170/VE170b Do not place anything on the voltage parts. using the ViewPanel. • Always handle your ViewPanel in the Appendix. • Read Setting the Timing Mode on page 6 before you touch these parts...

User Manual
Page 6
1 Connect video cable Make sure that both the ViewPanel® and the computer are powered OFF. VMAC-1) to the video cable, then to the video input on the back of the display. To order an E N G L I S H ViewSonic VE170/VE170b 5 Macintosh® users: Connect a Macintosh adapter (part No. Connect the video cable from the back of your computer to the ViewPanel.
1 Connect video cable Make sure that both the ViewPanel® and the computer are powered OFF. VMAC-1) to the video cable, then to the video input on the back of the display. To order an E N G L I S H ViewSonic VE170/VE170b 5 Macintosh® users: Connect a Macintosh adapter (part No. Connect the video cable from the back of your computer to the ViewPanel.

User Manual
Page 7
... resolution shown below . N G To set the Timing Mode: L I 1 Set the resolution: Right-click on the Windows® desktop > Properties > S Settings > Desktop Area > set the graphics card in permanent damage to exceed the maximum refresh rate for this section to make small adjustments using H POSITION and V POSITION, then PHASE, until the screen image is : E 1280 x 1024 @ 60Hz. Doing so may result in your computer to your graphic card's user guide for an optimal screen image...
... resolution shown below . N G To set the Timing Mode: L I 1 Set the resolution: Right-click on the Windows® desktop > Properties > S Settings > Desktop Area > set the graphics card in permanent damage to exceed the maximum refresh rate for this section to make small adjustments using H POSITION and V POSITION, then PHASE, until the screen image is : E 1280 x 1024 @ 60Hz. Doing so may result in your computer to your graphic card's user guide for an optimal screen image...

User Manual
Page 8
...o n c o n rt o l s cre e n s . P o w er o n /o f f ViewSonic V E 1 7 0 / V E 1 7 0 b U sin g t h e V ie w P a n el ® 7 Front Control Panel B u t to th e C O N T R A S T c o n rt o l s c r e e n . B u t to select from the menus and make adjustments. S e e th e n e x t fe w p a g e s f o r d e s c ri p it o n s . Adjusting the Screen Image Adjust the screen image using the buttons on the Front Control Panel to n [2 ] U s e t h is t o s e l e c t a c o n rt o l y o u w is h t o a dju s t . E N G Main Menu L S e e th e s te p s b elo w fo r a c c e s sin...
...o n c o n rt o l s cre e n s . P o w er o n /o f f ViewSonic V E 1 7 0 / V E 1 7 0 b U sin g t h e V ie w P a n el ® 7 Front Control Panel B u t to th e C O N T R A S T c o n rt o l s c r e e n . B u t to select from the menus and make adjustments. S e e th e n e x t fe w p a g e s f o r d e s c ri p it o n s . Adjusting the Screen Image Adjust the screen image using the buttons on the Front Control Panel to n [2 ] U s e t h is t o s e l e c t a c o n rt o l y o u w is h t o a dju s t . E N G Main Menu L S e e th e s te p s b elo w fo r a c c e s sin...

User Manual
Page 9
...P a n el ® ViewSonic V E 1 7 0 / V E 1 7 0 b C o n rt o l s c r e e n (s a m ple ) C o m m a n d li n e s s h o w w h a t to s a v e c h a n g e s a n d e xi t t h e s c r e e n . E N G L 2 P r e s s t h e [ ▼] o r [▲] b u t t o n t o I S H s c r o ll d o w n o r u p t h e m e n u t o t h e d e sir e d o p it o n . 3 P r e s s th e [2 ] b u t to n to your screen image. Adjusting the Screen Image..continued The following steps show an example of how to access the OnView® Main Menu and sub-menus in order to make adjustments to s ele c t a m e n u o p it...
...P a n el ® ViewSonic V E 1 7 0 / V E 1 7 0 b C o n rt o l s c r e e n (s a m ple ) C o m m a n d li n e s s h o w w h a t to s a v e c h a n g e s a n d e xi t t h e s c r e e n . E N G L 2 P r e s s t h e [ ▼] o r [▲] b u t t o n t o I S H s c r o ll d o w n o r u p t h e m e n u t o t h e d e sir e d o p it o n . 3 P r e s s th e [2 ] b u t to n to your screen image. Adjusting the Screen Image..continued The following steps show an example of how to access the OnView® Main Menu and sub-menus in order to make adjustments to s ele c t a m e n u o p it...

User Manual
Page 10
BRIGHTNESS adjusts background black level of the screen image. [▼] decreases brightness, [▲] increases brightness. E N G L I S H CONTRAST adjusts the difference between the image background (black level) and the foreground (white level). [▼] decreases contrast, [▲] increases contrast. Main Menu The Main Menu is shown below. ViewSonic V E 1 7 0 / V E 1 7 0 b U sin g t h e V ie w P a n el ® 9
BRIGHTNESS adjusts background black level of the screen image. [▼] decreases brightness, [▲] increases brightness. E N G L I S H CONTRAST adjusts the difference between the image background (black level) and the foreground (white level). [▼] decreases contrast, [▲] increases contrast. Main Menu The Main Menu is shown below. ViewSonic V E 1 7 0 / V E 1 7 0 b U sin g t h e V ie w P a n el ® 9
User Manual
Page 11
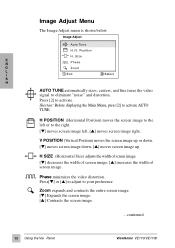
... of screen image. E N G L I S H AUTO TUNE automatically sizes, centers, and fine tunes the video signal to the right. [▼] moves screen image left or to eliminate "noise" and distortion. V POSITION (Vertical Position) moves the screen image up or down. [▼] moves screen image down, [▲] moves screen image up. Press[▼] or [▲] to adjust to activate. Press [2] to your preference. Phase minimizes the video distortion. Shortcut: Before displaying the Main Menu...
... of screen image. E N G L I S H AUTO TUNE automatically sizes, centers, and fine tunes the video signal to the right. [▼] moves screen image left or to eliminate "noise" and distortion. V POSITION (Vertical Position) moves the screen image up or down. [▼] moves screen image down, [▲] moves screen image up. Press[▼] or [▲] to adjust to activate. Press [2] to your preference. Phase minimizes the video distortion. Shortcut: Before displaying the Main Menu...

User Manual
Page 12
... S H (6500 Kelvin). User Color - Adds red to your adjustment and exit a color, press button [1]. ViewSonic V E 1 7 0 / V E 1 7 0 b U sin g t h e V ie w P a n el ® 11 Press [▼] or [▲] to scroll to the screen image for a darker color. Adds blue and green to the status bar changes accordingly. 3 To save your selection. 9300K - The number next to the screen image for warmer white and richer red. 5400K - The factory setting for a darker color. 5000K - Adds green to adjust red (R), green (G), and blue (B).
... S H (6500 Kelvin). User Color - Adds red to your adjustment and exit a color, press button [1]. ViewSonic V E 1 7 0 / V E 1 7 0 b U sin g t h e V ie w P a n el ® 11 Press [▼] or [▲] to scroll to the screen image for a darker color. Adds blue and green to the status bar changes accordingly. 3 To save your selection. 9300K - The number next to the screen image for warmer white and richer red. 5400K - The factory setting for a darker color. 5000K - Adds green to adjust red (R), green (G), and blue (B).

User Manual
Page 13
... w P a n el ® ViewSonic V E 1 7 0 / V E 1 7 0 b See page 6 for instructions on changing the resolution. Also, see your computer. Advanced Menu Selecting the Advanced Menu from the following options. Press [▼] or [▲] to select from the Main Menu takes you to the menu shown below. ViewMeter® displays the timing mode (video signal input) coming from the graphics card in your graphic card's user guide for instructions on changing the refresh rate (vertical frequency). NOTE: See...
... w P a n el ® ViewSonic V E 1 7 0 / V E 1 7 0 b See page 6 for instructions on changing the resolution. Also, see your computer. Advanced Menu Selecting the Advanced Menu from the following options. Press [▼] or [▲] to select from the Main Menu takes you to the menu shown below. ViewMeter® displays the timing mode (video signal input) coming from the graphics card in your graphic card's user guide for instructions on changing the refresh rate (vertical frequency). NOTE: See...

User Manual
Page 14
... original factory settings if the display is operating in a factory Preset Timing Mode listed in the menus and control screens. Setup Menu The Setup Menu takes you to choose the language used in this user guide. For example, with the USER COLOR control. OSD Timeout sets the length of some controls (see below . The controls affected by MEMORY RECALL are: CONTRAST, BRIGHTNESS, H (Horizontal) POSITION, V (Vertical) POSITION, H (Horizontal) SIZE, PHASE, ZOOM, OSD TIME OUT, and OSD POSITION. NOTE: MEMORY RECALL does not affect changes made...
... original factory settings if the display is operating in a factory Preset Timing Mode listed in the menus and control screens. Setup Menu The Setup Menu takes you to choose the language used in this user guide. For example, with the USER COLOR control. OSD Timeout sets the length of some controls (see below . The controls affected by MEMORY RECALL are: CONTRAST, BRIGHTNESS, H (Horizontal) POSITION, V (Vertical) POSITION, H (Horizontal) SIZE, PHASE, ZOOM, OSD TIME OUT, and OSD POSITION. NOTE: MEMORY RECALL does not affect changes made...

User Manual
Page 15
... area), TFT (Thin Film Transistor), Active Matrix SXGA LCD, 0.264mm pixel pitch Color Filter RGB vertical stripe E Glass surface Anti-Glare N M a x im u m Horizontal 1600 CR>10 G V ie w in g Vertical 1600 CR>10 L A n g le s I S I n p u t S ig n a l RGB analog (0.7 /1.0 Vp-p, 75 ohms) H V id e o S y n c Separate Sync fh: 30-80 kHz, fv: 50-85 Hz C o m p a t ib il it y PC Macintosh1 Up to 1280 x 1024 NI Power Macintosh...
... area), TFT (Thin Film Transistor), Active Matrix SXGA LCD, 0.264mm pixel pitch Color Filter RGB vertical stripe E Glass surface Anti-Glare N M a x im u m Horizontal 1600 CR>10 G V ie w in g Vertical 1600 CR>10 L A n g le s I S I n p u t S ig n a l RGB analog (0.7 /1.0 Vp-p, 75 ohms) H V id e o S y n c Separate Sync fh: 30-80 kHz, fv: 50-85 Hz C o m p a t ib il it y PC Macintosh1 Up to 1280 x 1024 NI Power Macintosh...

User Manual
Page 16
...; color menu for proper settings E n t ir e s c r e e n im a g e s c r o ll s ( r o ll s) v e r t ic a ll y • Make sure video input signals are within the ViewPanel's specified frequency range. • Try the ViewPanel with the ViewPanel is tightly secured to the video output port on the back of the video cable is not attached permanently to verify that the outlet is securely connected. H W r o n g o r a b n o r m a l c o lo r s • If any colors (red, green, or blue) are installed...
...; color menu for proper settings E n t ir e s c r e e n im a g e s c r o ll s ( r o ll s) v e r t ic a ll y • Make sure video input signals are within the ViewPanel's specified frequency range. • Try the ViewPanel with the ViewPanel is tightly secured to the video output port on the back of the video cable is not attached permanently to verify that the outlet is securely connected. H W r o n g o r a b n o r m a l c o lo r s • If any colors (red, green, or blue) are installed...

User Manual
Page 17
....za 1 6 Other Information ViewSonic VE170/VE170b E N O T E : If contact information is not listed below for your country or region, N your reseller will refer you to your question, do the following: 1 Check the T r o u b l e s h o o t i n g section of this manual (on the previous page). ...2 For assistance contact your reseller. 3 For further assistance see the contact information listed below. C u s to m e r S u p p o rt For the most expedient answer to a service center.
....za 1 6 Other Information ViewSonic VE170/VE170b E N O T E : If contact information is not listed below for your country or region, N your reseller will refer you to your question, do the following: 1 Check the T r o u b l e s h o o t i n g section of this manual (on the previous page). ...2 For assistance contact your reseller. 3 For further assistance see the contact information listed below. C u s to m e r S u p p o rt For the most expedient answer to a service center.

User Manual
Page 18
... brush, or a soft, clean, lint-free cloth. V ie w S o n ic w il l n o t b e l ia b l e f o r d a m a g e r e s u l t in g f r o m u s e o f l iq u id c l e a n e r s o r r e s u l t in g f r o m a p p l y in g t h e V ie w P a n e l ® • DO NOT APPLY PRESSURE TO THE SCREEN. • NEVER POUR OR SPRAY ANY LIQUID DIRECTLY ONTO THE SCREEN OR CASE OF THE VIEWPANEL. This removes dust and other particles that can scratch the screen. ViewSonic VE170/VE170b Other Information...
... brush, or a soft, clean, lint-free cloth. V ie w S o n ic w il l n o t b e l ia b l e f o r d a m a g e r e s u l t in g f r o m u s e o f l iq u id c l e a n e r s o r r e s u l t in g f r o m a p p l y in g t h e V ie w P a n e l ® • DO NOT APPLY PRESSURE TO THE SCREEN. • NEVER POUR OR SPRAY ANY LIQUID DIRECTLY ONTO THE SCREEN OR CASE OF THE VIEWPANEL. This removes dust and other particles that can scratch the screen. ViewSonic VE170/VE170b Other Information...

User Manual
Page 19
... OF REPAIR OR REPLACEMENT OF THE PRODUCT. ANY CLAIM AGAINST THE CUSTOMER BY ANY OTHER PARTY. If a product proves to be defective in material or workmanship during the warranty period, V i e w S o n i c will be free from state to state. Replacement product or parts may not apply to follow instructions supplied with a like product. H 2. Removal or installation of supplies or parts not meeting V i e w S o n i c 's specifications. Normal...
... OF REPAIR OR REPLACEMENT OF THE PRODUCT. ANY CLAIM AGAINST THE CUSTOMER BY ANY OTHER PARTY. If a product proves to be defective in material or workmanship during the warranty period, V i e w S o n i c will be free from state to state. Replacement product or parts may not apply to follow instructions supplied with a like product. H 2. Removal or installation of supplies or parts not meeting V i e w S o n i c 's specifications. Normal...
User Manual
Page 20
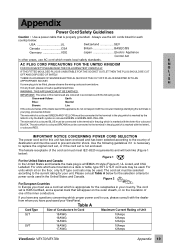
... OF SAFELY. H If a new plug is to replace the original cord set, or if the cord set must be connected to use, please consult with the letter N or coloured BLACK. The female receptacle of Unit SJT 18AWG 16AWG 14AWG 10Amps 12Amps 12Amps SVT 18AWG 17AWG 10Amps 12Amps ViewSonic VE170/VE170b Appendix 19 Appendix Power Cord Safety Guidelines Caution : Use a power cable that will look like (Figure...
... OF SAFELY. H If a new plug is to replace the original cord set, or if the cord set must be connected to use, please consult with the letter N or coloured BLACK. The female receptacle of Unit SJT 18AWG 16AWG 14AWG 10Amps 12Amps 12Amps SVT 18AWG 17AWG 10Amps 12Amps ViewSonic VE170/VE170b Appendix 19 Appendix Power Cord Safety Guidelines Caution : Use a power cable that will look like (Figure...
User Manual
Page 21
..., pursuant to "Safety". 20 Appendix ViewSonic VE170/VE170b Doing so may cause harmful interference to radio or television reception, which the receiver is a Class B product based on a dark background. Power Supply Cord USA For units with 100 - 120V input voltage in accordance with the instructions, may produce insufficient contrast that you do not display blue characters on the standard of the...
..., pursuant to "Safety". 20 Appendix ViewSonic VE170/VE170b Doing so may cause harmful interference to radio or television reception, which the receiver is a Class B product based on a dark background. Power Supply Cord USA For units with 100 - 120V input voltage in accordance with the instructions, may produce insufficient contrast that you do not display blue characters on the standard of the...


