Service Manual
Page 4
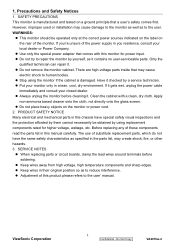
... power supply in this chassis have the same safety characteristics as specified in their original position so as it . 1. Stop using replacement components rated for power input. Always unplug the monitor before soldering. Do not place heavy objects on a ground principle that a user's safety comes first. SERVICE NOTES When replacing parts or circuit boards, clamp the lead wires around terminals before cleaning it contains no user-serviceable parts...
... power supply in this chassis have the same safety characteristics as specified in their original position so as it . 1. Stop using replacement components rated for power input. Always unplug the monitor before soldering. Do not place heavy objects on a ground principle that a user's safety comes first. SERVICE NOTES When replacing parts or circuit boards, clamp the lead wires around terminals before cleaning it contains no user-serviceable parts...

Service Manual
Page 14
Adjust range = 0 to 6500K 5400K 1. Key button definition: [1] = Back to Main Menu or OSD off (depend on existing input port by red color Change Color setting to Contrast OSD directly 1. Key button definition: User Color Red [1]: Back to previous OSD status [2]: Change to the selected color setting Jump to default Brightness 1. Do Not Copy VA2016w-2 Key button definition: [1] = Back to Main Menu or OSD off (depend on previous status) [2]: Change to Contrast OSD [Up]: Increase the OSD value setting [Dn]: Decrease the OSD value [Up...
Adjust range = 0 to 6500K 5400K 1. Key button definition: [1] = Back to Main Menu or OSD off (depend on existing input port by red color Change Color setting to Contrast OSD directly 1. Key button definition: User Color Red [1]: Back to previous OSD status [2]: Change to the selected color setting Jump to default Brightness 1. Do Not Copy VA2016w-2 Key button definition: [1] = Back to Main Menu or OSD off (depend on previous status) [2]: Change to Contrast OSD [Up]: Increase the OSD value setting [Dn]: Decrease the OSD value [Up...

Service Manual
Page 21
... LCD while the power button is restored after a power failure. If the power button is locked, a message will appear on the screen for 3 seconds showing "Power Button Locked" *2. The Power lock will be deactivated by pressing the front panel control buttons [1] + [▼] for 3 seconds as below , Range = 0 to 10 *4 When the OSD is locked will lock all functions, including "Volume", "Mute" and others. *5 Status bar indicating OSD Lock or Unlock is in the locked mode, then power...
... LCD while the power button is restored after a power failure. If the power button is locked, a message will appear on the screen for 3 seconds showing "Power Button Locked" *2. The Power lock will be deactivated by pressing the front panel control buttons [1] + [▼] for 3 seconds as below , Range = 0 to 10 *4 When the OSD is locked will lock all functions, including "Volume", "Mute" and others. *5 Status bar indicating OSD Lock or Unlock is in the locked mode, then power...

Service Manual
Page 28
... two controls on some screens. Also a shortcut to display the Contrast adjustment control screen. Displays the Main Menu or exits the control screen and saves adjustments. Power light Blue = ON Orange = Power Saving Standby Power On/Off Scrolls through menu options and adjusts the displayed control. 3. Front Panel Function Control Description Adjusting the Screen Image Main Menu with OSD controls Front Control Panel shown below in detail Displays the control screen for the highlighted control. Do Not Copy VA2016w-2 Also a shortcut to Auto Image Adjust. ViewSonic Corporation...
... two controls on some screens. Also a shortcut to display the Contrast adjustment control screen. Displays the Main Menu or exits the control screen and saves adjustments. Power light Blue = ON Orange = Power Saving Standby Power On/Off Scrolls through menu options and adjusts the displayed control. 3. Front Panel Function Control Description Adjusting the Screen Image Main Menu with OSD controls Front Control Panel shown below in detail Displays the control screen for the highlighted control. Do Not Copy VA2016w-2 Also a shortcut to Auto Image Adjust. ViewSonic Corporation...

Service Manual
Page 30
... screen image for warmer white and richer red. 5400K-Adds green to more accurately display colors the way they were originally intended. NOTE: Auto Image Adjust works with fluorescent lighting). 6500K-Adds red to the screen image for a darker color. Brightness adjusts background black level of red (R), green (G), and blue (B). Enabling the sRGB setting will cause the Contrast and Brightness adjustments to be disabled. 9300K-Adds blue to eliminate waviness and distortion. Color Adjust provides several color adjustment modes, including preset color temperatures and a User Color mode...
... screen image for warmer white and richer red. 5400K-Adds green to more accurately display colors the way they were originally intended. NOTE: Auto Image Adjust works with fluorescent lighting). 6500K-Adds red to the screen image for a darker color. Brightness adjusts background black level of red (R), green (G), and blue (B). Enabling the sRGB setting will cause the Contrast and Brightness adjustments to be disabled. 9300K-Adds blue to eliminate waviness and distortion. Color Adjust provides several color adjustment modes, including preset color temperatures and a User Color mode...
Service Manual
Page 31
... card's user guide for red (R), green (G), and blue (B). 1. To select color (R, G or B) press button [2]. 2. Information displays the timing mode (video signal input) coming from the Main Menu when the product is 60 Hertz. NOTE: Try Auto Image Adjust first. Position (Horizontal/Vertical Position) moves the screen image left or right and up or down. Fine Tune sharpens the focus by aligning text and/or graphics with pixel boundaries. Control Explanation User Color Individual adjustments for instructions on changing the resolution and refresh rate (vertical frequency...
... card's user guide for red (R), green (G), and blue (B). 1. To select color (R, G or B) press button [2]. 2. Information displays the timing mode (video signal input) coming from the Main Menu when the product is 60 Hertz. NOTE: Try Auto Image Adjust first. Position (Horizontal/Vertical Position) moves the screen image left or right and up or down. Fine Tune sharpens the focus by aligning text and/or graphics with pixel boundaries. Control Explanation User Color Individual adjustments for instructions on changing the resolution and refresh rate (vertical frequency...

Service Manual
Page 45
...: Brightness value CON: Contrast value 9300K: Set color temperature 9300K 6500K: Set color temperature 6500K USER: Set user preferred color temperature RS232: F/W RS232 debug on the monitor. Auto Color Balance (Automatically calibrate chip ADC parameter by using chip internal DAC.) If it is a new-built set and it is input, press "power key" to turn on or off the monitor. Press "-" and "Power" together to power off the monitor. - PANEL: Display panel information. Then press the "Menu/POWER...
...: Brightness value CON: Contrast value 9300K: Set color temperature 9300K 6500K: Set color temperature 6500K USER: Set user preferred color temperature RS232: F/W RS232 debug on the monitor. Auto Color Balance (Automatically calibrate chip ADC parameter by using chip internal DAC.) If it is a new-built set and it is input, press "power key" to turn on or off the monitor. Press "-" and "Power" together to power off the monitor. - PANEL: Display panel information. Then press the "Menu/POWER...

Service Manual
Page 46
... and adjustment Item Content Equipment Test OSD 1. 6. If the "EDID Rewrite" process finished, please pull out AC power cable or press power key to 32 gray shades Chroma 3. Set Pattern to restart 7. The brightest 5~8 shades Signal Generator brightness cannot be worked. Insert to the max. Set contrast to Parallel Port on PC ISP Board LCD Monitor D-Sub D-SUB Parallel Port 7.2. check VESA (640x480 800x600 1024x768 1280x1024), Chroma and power saving signal...
... and adjustment Item Content Equipment Test OSD 1. 6. If the "EDID Rewrite" process finished, please pull out AC power cable or press power key to 32 gray shades Chroma 3. Set Pattern to restart 7. The brightest 5~8 shades Signal Generator brightness cannot be worked. Insert to the max. Set contrast to Parallel Port on PC ISP Board LCD Monitor D-Sub D-SUB Parallel Port 7.2. check VESA (640x480 800x600 1024x768 1280x1024), Chroma and power saving signal...

Service Manual
Page 54
... you find the speaker don't working, please don't plug in the digital circuit part. z If brightness uneven, repairs Inverter circuit or change panel. Do Not Copy VA2016w-2 6. z If you check the H/V position, please use the crosshatch pattern. z This LCM support more than 30 timing modes, if the input timing mode is analog interface. z If you change the interface board, be sure that stand the problem happen in audio cable, unless change new speaker. ViewSonic Corporation 51 Confidential...
... you find the speaker don't working, please don't plug in the digital circuit part. z If brightness uneven, repairs Inverter circuit or change panel. Do Not Copy VA2016w-2 6. z If you check the H/V position, please use the crosshatch pattern. z This LCM support more than 30 timing modes, if the input timing mode is analog interface. z If you change the interface board, be sure that stand the problem happen in audio cable, unless change new speaker. ViewSonic Corporation 51 Confidential...
User Guide
Page 1
... our website. ViewSonic® VA2016w LCD Display IMPORTANT: Please read this User Guide to obtain important information on installing and using your product in a safe manner, as well as registering your limited coverage from ViewSonic Corporation, which is also found on our web site at http:// www.viewsonic.com in English, or in specific languages using the Regional selection box in this User Guide will describe...
... our website. ViewSonic® VA2016w LCD Display IMPORTANT: Please read this User Guide to obtain important information on installing and using your product in a safe manner, as well as registering your limited coverage from ViewSonic Corporation, which is also found on our web site at http:// www.viewsonic.com in English, or in specific languages using the Regional selection box in this User Guide will describe...

User Guide
Page 2
Contents TCO Information i Compliance Information 1 Important Safety Instructions 2 Declaration of RoHS Compliance 3 Copyright Information 4 Product Registration 4 Getting Started Package Contents 5 Precautions 5 Quick Installation 6 Wall Mounting (Optional 7 Using the LCD Display Setting the Timing Mode 8 OSD and Power Lock Settings 8 Adjusting the Screen Image 9 Main Menu Controls 11 Other Information Specifications 14 Troubleshooting 15 Customer Support 16 Cleaning the LCD Display 17 Limited Warranty 18 Mexico Limited Warranty 20 ViewSonic VA2016w
Contents TCO Information i Compliance Information 1 Important Safety Instructions 2 Declaration of RoHS Compliance 3 Copyright Information 4 Product Registration 4 Getting Started Package Contents 5 Precautions 5 Quick Installation 6 Wall Mounting (Optional 7 Using the LCD Display Setting the Timing Mode 8 OSD and Power Lock Settings 8 Adjusting the Screen Image 9 Main Menu Controls 11 Other Information Specifications 14 Troubleshooting 15 Customer Support 16 Cleaning the LCD Display 17 Limited Warranty 18 Mexico Limited Warranty 20 ViewSonic VA2016w

User Guide
Page 8
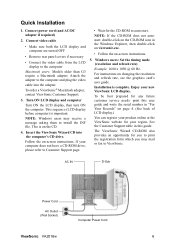
... Windows Vista. Package Contents Your LCD display package includes: • LCD display • Power cord • D-Sub cable • ViewSonic Wizard CD-ROM • Quick Start Guide NOTE: The CD includes the User Guide PDF files and INF/ICM display optimization files. Precautions • Sit at least 18" from direct sunlight to remove. • Never remove the rear cover. Orient the LCD display away from the LCD display. • Avoid touching the screen. Getting Started Congratulations on -screen colors...
... Windows Vista. Package Contents Your LCD display package includes: • LCD display • Power cord • D-Sub cable • ViewSonic Wizard CD-ROM • Quick Start Guide NOTE: The CD includes the User Guide PDF files and INF/ICM display optimization files. Precautions • Sit at least 18" from direct sunlight to remove. • Never remove the rear cover. Orient the LCD display away from the LCD display. • Avoid touching the screen. Getting Started Congratulations on -screen colors...
User Guide
Page 9
... -screen instructions. To be best prepared for the CD-ROM to install the INF file. See the Customer Support table in this user guide and write the serial number in the Windows Explorer, then double-click on viewsonic.exe. • Follow the on changing the resolution and refresh rate, see the graphics card's user guide. Insert the ViewSonic Wizard CD into the adapter. If your new ViewSonic LCD display. For instructions on -screen instructions. 5. To order a ViewSonic...
... -screen instructions. To be best prepared for the CD-ROM to install the INF file. See the Customer Support table in this user guide and write the serial number in the Windows Explorer, then double-click on viewsonic.exe. • Follow the on changing the resolution and refresh rate, see the graphics card's user guide. Insert the ViewSonic Wizard CD into the adapter. If your new ViewSonic LCD display. For instructions on -screen instructions. 5. To order a ViewSonic...

User Guide
Page 11
... adjust the screen image. Using the LCD Display Setting the Timing Mode Setting the timing mode is pressed the message Power Button Locked will display for 5 seconds. If the power button is important for maximizing the quality of the screen image and minimizing eye strain. The timing mode consists of 75Hz; After setting the timing mode, use the OSD (On-screen Display) controls to exceed the maximum refresh rate of the resolution (example 1680 x 1050) and refresh rate (or vertical frequency; If any buttons...
... adjust the screen image. Using the LCD Display Setting the Timing Mode Setting the timing mode is pressed the message Power Button Locked will display for 5 seconds. If the power button is important for maximizing the quality of the screen image and minimizing eye strain. The timing mode consists of 75Hz; After setting the timing mode, use the OSD (On-screen Display) controls to exceed the maximum refresh rate of the resolution (example 1680 x 1050) and refresh rate (or vertical frequency; If any buttons...

User Guide
Page 12
Adjusting the Screen Image Use the buttons on the front control panel to display and adjust the OSD controls which display on some screens. Also toggles between two controls on the screen. Also a shortcut to display the Contrast adjustment control screen. Also a shortcut to Auto Image Adjust. Power light Blue = ON Orange = Power Saving Standby Power On/Off Scrolls through menu options and adjusts the displayed control. Displays the Main Menu or exits the control screen and saves adjustments. ViewSonic VA2016w 9 The OSD controls are explained at the top of the next page and...
Adjusting the Screen Image Use the buttons on the front control panel to display and adjust the OSD controls which display on some screens. Also toggles between two controls on the screen. Also a shortcut to display the Contrast adjustment control screen. Also a shortcut to Auto Image Adjust. Power light Blue = ON Orange = Power Saving Standby Power On/Off Scrolls through menu options and adjusts the displayed control. Displays the Main Menu or exits the control screen and saves adjustments. ViewSonic VA2016w 9 The OSD controls are explained at the top of the next page and...

User Guide
Page 14
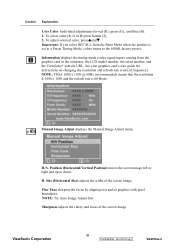
Control Explanation Auto Image Adjust automatically sizes, centers, and fine tunes the video signal to obtain a sharper image. The factory setting for red (R), green (G), and blue (B). 1. Enabling this function does not work on your LCD display, then lower the video refresh rate to 60 Hz and set the resolution to its pre-set to a Preset Timing Mode, colors return to the screen image for a darker color. Main Menu Controls Adjust the menu items shown below by using the up S and down T buttons. NOTE: Auto Image Adjust works with...
Control Explanation Auto Image Adjust automatically sizes, centers, and fine tunes the video signal to obtain a sharper image. The factory setting for red (R), green (G), and blue (B). 1. Enabling this function does not work on your LCD display, then lower the video refresh rate to 60 Hz and set the resolution to its pre-set to a Preset Timing Mode, colors return to the screen image for a darker color. Main Menu Controls Adjust the menu items shown below by using the up S and down T buttons. NOTE: Auto Image Adjust works with...

User Guide
Page 15
... ECO Mode is 60 Hertz. Fine Tune sharpens the focus by aligning text and/or graphics with pixel boundaries. Aspect ratio Selects the image size for instructions on changing the resolution and refresh rate (vertical frequency). NOTE: Try Auto Image Adjust first. H. See your graphics card's user guide for 4:3 and full screen. Control Explanation Information displays the timing mode (video signal input) coming from the graphics card in the computer, the LCD model number, the serial number, and the ViewSonic®...
... ECO Mode is 60 Hertz. Fine Tune sharpens the focus by aligning text and/or graphics with pixel boundaries. Aspect ratio Selects the image size for instructions on changing the resolution and refresh rate (vertical frequency). NOTE: Try Auto Image Adjust first. H. See your graphics card's user guide for 4:3 and full screen. Control Explanation Information displays the timing mode (video signal input) coming from the graphics card in the computer, the LCD model number, the serial number, and the ViewSonic®...

User Guide
Page 18
... cable connector could cause an improper connection. • Connect the LCD display to the video output port on the back of the video cable is not attached permanently to the LCD display, tightly secure it is securely connected. Wrong or abnormal colors • If any colors (red, green, or blue) are using an Macintosh older than G3, you need a Macintosh adapter. ViewSonic VA2016w 15 Power is ON but no screen image • Make sure the video cable supplied with the LCD display...
... cable connector could cause an improper connection. • Connect the LCD display to the video output port on the back of the video cable is not attached permanently to the LCD display, tightly secure it is securely connected. Wrong or abnormal colors • If any colors (red, green, or blue) are using an Macintosh older than G3, you need a Macintosh adapter. ViewSonic VA2016w 15 Power is ON but no screen image • Make sure the video cable supplied with the LCD display...

User Guide
Page 21
..., such as "image burn-in material and workmanship, under warranty, contact ViewSonic Customer Sup- Any product exhibiting a condition commonly known as electrical power fluctuations or failure. Limited Warranty VIEWSONIC® LCD DISPLAY What the warranty covers: ViewSonic warrants its sole option, repair or replace the product with the product. e. Removal, installation, one way transportation, insurance, and set-up service charges. c. Replacement product or parts may include...
..., such as "image burn-in material and workmanship, under warranty, contact ViewSonic Customer Sup- Any product exhibiting a condition commonly known as electrical power fluctuations or failure. Limited Warranty VIEWSONIC® LCD DISPLAY What the warranty covers: ViewSonic warrants its sole option, repair or replace the product with the product. e. Removal, installation, one way transportation, insurance, and set-up service charges. c. Replacement product or parts may include...
User Guide
Page 23
... 06-11-07 ViewSonic VA2016w 20 If a product proves to be free from defects in material and workmanship, under warranty, contact ViewSonic Customer Support (Please refer to shipment. How long the warranty is valid only for all parts including the light source and 3 years for the first consumer purchaser. Any other acts of purchase to support your future use , during the...
... 06-11-07 ViewSonic VA2016w 20 If a product proves to be free from defects in material and workmanship, under warranty, contact ViewSonic Customer Support (Please refer to shipment. How long the warranty is valid only for all parts including the light source and 3 years for the first consumer purchaser. Any other acts of purchase to support your future use , during the...


