
User Manual
Page 7
...ViewSonic Corporation. Taiwan: recycle.epa.gov.tw ViewSonic VA1912w/VA1912wb 4 As an ENERGY STAR® partner, ViewSonic Corporation has determined that this product properly at : www.viewsonic.com. Macintosh and Power Macintosh are registered trademarks of Apple Computer, Inc. Microsoft, Windows, Windows NT, and the Windows... mercury. For Your Records Product Name: Model Number: Document Number: Serial Number: Purchase Date: VA1912w/wb ViewSonic 19" LCD Display VS10866 VA1912w/wb-2_UG_ENG Rev. 1C 03-06-07 Product disposal at end of its useful life. VESA is...
...ViewSonic Corporation. Taiwan: recycle.epa.gov.tw ViewSonic VA1912w/VA1912wb 4 As an ENERGY STAR® partner, ViewSonic Corporation has determined that this product properly at : www.viewsonic.com. Macintosh and Power Macintosh are registered trademarks of Apple Computer, Inc. Microsoft, Windows, Windows NT, and the Windows... mercury. For Your Records Product Name: Model Number: Document Number: Serial Number: Purchase Date: VA1912w/wb ViewSonic 19" LCD Display VS10866 VA1912w/wb-2_UG_ENG Rev. 1C 03-06-07 Product disposal at end of its useful life. VESA is...
User Manual
Page 8
... both the INF and ICM files. You may permanently damage the screen. ViewSonic VA1912w/VA1912wb 5 Important! It is clean and free of a ViewSonic® LCD display. Precautions • Sit at least 18" from direct sunlight to reduce glare. • Always handle the LCD display with Windows operating systems, and the ICM file (Image Color Matching) ensures accurate...
... both the INF and ICM files. You may permanently damage the screen. ViewSonic VA1912w/VA1912wb 5 Important! It is clean and free of a ViewSonic® LCD display. Precautions • Sit at least 18" from direct sunlight to reduce glare. • Always handle the LCD display with Windows operating systems, and the ICM file (Image Color Matching) ensures accurate...
User Manual
Page 9
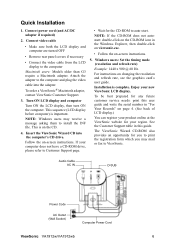
... and computer are turned OFF • Remove rear panel covers if necessary • Connect the video cable from the LCD display to auto-start. If your new ViewSonic LCD display. For instructions on -screen instructions. 5. Follow the on the CD. 4. This is on -screen instructions. ... and write the serial number in the Windows Explorer, then double-click on viewsonic.exe. • Follow the on changing the resolution and refresh rate, see the graphics card's user guide. Audio Cable AC IN D-SUB Power Code AC Outlet (Wall Socket) Computer Power Cord ViewSonic VA1912w/VA1912wb 6
... and computer are turned OFF • Remove rear panel covers if necessary • Connect the video cable from the LCD display to auto-start. If your new ViewSonic LCD display. For instructions on -screen instructions. 5. Follow the on the CD. 4. This is on -screen instructions. ... and write the serial number in the Windows Explorer, then double-click on viewsonic.exe. • Follow the on changing the resolution and refresh rate, see the graphics card's user guide. Audio Cable AC IN D-SUB Power Code AC Outlet (Wall Socket) Computer Power Cord ViewSonic VA1912w/VA1912wb 6
User Manual
Page 11
...mode to adjust the screen image. To set the resolution. 2. WARNING: Do not set your LCD display. ViewSonic VA1912w/VA1912wb 8 Set the refresh rate: See your LCD display's power will display for instructions. The timing mode consists of the screen image and minimizing ...LCD Display Setting the Timing Mode Setting the timing mode is restored. • Power Button Unlock: Press and hold [1] and the down arrow T again for maximizing the quality of the resolution (example 1440 x 900) and refresh rate (or vertical frequency; Set the resolution: Right-click on the Windows...
...mode to adjust the screen image. To set the resolution. 2. WARNING: Do not set your LCD display. ViewSonic VA1912w/VA1912wb 8 Set the refresh rate: See your LCD display's power will display for instructions. The timing mode consists of the screen image and minimizing ...LCD Display Setting the Timing Mode Setting the timing mode is restored. • Power Button Unlock: Press and hold [1] and the down arrow T again for maximizing the quality of the resolution (example 1440 x 900) and refresh rate (or vertical frequency; Set the resolution: Right-click on the Windows...


