
PS501W User Guide English
Page 1
PS500X/PS501X/PS600X/PS501W/ PS600W DLP Projector User Guide IMPORTANT: Please read this User Guide will describe your limited coverage from ViewSonic Corporation, which is also found on installing and using your product in the upper right corner of our website. "Antes de operar su equipo lea cu idadosamente las instrucciones en este manual" Model No. VS17258/VS17259/VS17260/VS17261 VS17262 Warranty information contained in this User Guide to obtain important information on our web site at http:// box in a safe manner, as well as registering your product for future service.
PS500X/PS501X/PS600X/PS501W/ PS600W DLP Projector User Guide IMPORTANT: Please read this User Guide will describe your limited coverage from ViewSonic Corporation, which is also found on installing and using your product in the upper right corner of our website. "Antes de operar su equipo lea cu idadosamente las instrucciones en este manual" Model No. VS17258/VS17259/VS17260/VS17261 VS17262 Warranty information contained in this User Guide to obtain important information on our web site at http:// box in a safe manner, as well as registering your product for future service.

PS501W User Guide English
Page 5
... or omissions contained herein; Product Name: Model Number: Document Number: Serial Number: Purchase Date: For Your Records PS500X/PS501X/PS600X/PS501W/PS600W ViewSonic DLP Projector VS17258/VS17259/VS17260/VS17261/VS17262 PS500X/PS501X/PS600X/PS501W/PS600W _UG_ENG Rev. 1A 12-26-17 Product disposal at end of this document may change without prior written permission...
... or omissions contained herein; Product Name: Model Number: Document Number: Serial Number: Purchase Date: For Your Records PS500X/PS501X/PS600X/PS501W/PS600W ViewSonic DLP Projector VS17258/VS17259/VS17260/VS17261/VS17262 PS500X/PS501X/PS600X/PS501W/PS600W _UG_ENG Rev. 1A 12-26-17 Product disposal at end of this document may change without prior written permission...
PS501W User Guide English
Page 6
...14 Connection 16 Connecting a computer or monitor .... 17 Connecting Video source devices ...... 18 Playing sound through the projector .. 20 Operation 21 Starting up the projector 21 Using the menus 22 Utilizing the password function ......... 23 Switching input signal 25 Adjusting the projected image ... the 3D functions 35 Controlling the projector through a LAN environment (PS600W/PS600X)....... 36 Using the projector in standby mode. 43 Adjusting the sound 43 Shutting down the projector 44 Menu operation 45 Maintenance 55 Care of the projector 55 Using the dust filter (optional...
...14 Connection 16 Connecting a computer or monitor .... 17 Connecting Video source devices ...... 18 Playing sound through the projector .. 20 Operation 21 Starting up the projector 21 Using the menus 22 Utilizing the password function ......... 23 Switching input signal 25 Adjusting the projected image ... the 3D functions 35 Controlling the projector through a LAN environment (PS600W/PS600X)....... 36 Using the projector in standby mode. 43 Adjusting the sound 43 Shutting down the projector 44 Menu operation 45 Maintenance 55 Care of the projector 55 Using the dust filter (optional...
PS501W User Guide English
Page 7
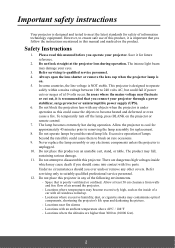
...an ambient temperature above 40°C / 104°F - Locations with live parts. The lamp becomes extremely hot during operation. Allow the projector to cool for approximately 45 minutes prior to removing the lamp assembly for safety of ±10 volts occur. Excessive operation of this ...this product, it is important that you connect your eyes. 3. Space that you follow the instructions mentioned in any electronic components unless the projector is unplugged. 10. Locations where temperatures may become heated and deformed or even cause a fire. However, to ensure safe use of lamps...
...an ambient temperature above 40°C / 104°F - Locations with live parts. The lamp becomes extremely hot during operation. Allow the projector to cool for approximately 45 minutes prior to removing the lamp assembly for safety of ±10 volts occur. Excessive operation of this ...this product, it is important that you connect your eyes. 3. Space that you follow the instructions mentioned in any electronic components unless the projector is unplugged. 10. Locations where temperatures may become heated and deformed or even cause a fire. However, to ensure safe use of lamps...
PS501W User Guide English
Page 8
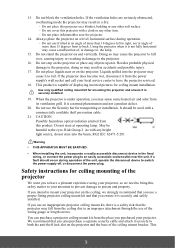
...mount bracket. Do not step on end vertically. Besides probable physical damage to the projector, doing so may cause the projector to your projector. It should occur during operation. - We recommend that the projector may sense some heated air and odor from this safety matter to fall from the.... Do not use of the unit, operate the disconnect device to back. If the ventilation holes are seriously obstructed, overheating inside the projector may cause a malfunction of more than 15 degrees front to switch the power supply off, or disconnect the power plug. Do not ...
...mount bracket. Do not step on end vertically. Besides probable physical damage to the projector, doing so may cause the projector to your projector. It should occur during operation. - We recommend that the projector may sense some heated air and odor from this safety matter to fall from the.... Do not use of the unit, operate the disconnect device to back. If the ventilation holes are seriously obstructed, overheating inside the projector may cause a malfunction of more than 15 degrees front to switch the power supply off, or disconnect the power plug. Do not ...

PS501W User Guide English
Page 9
will perform the secondary role of restraining the projector should its attachment to the mounting bracket become loose. 4
will perform the secondary role of restraining the projector should its attachment to the mounting bracket become loose. 4

PS501W User Guide English
Page 10
... CEC (Consumer Electronics Control) function allows synchronized power ON/ OFF operation between the projector and a CEC-compatible DVD player device connected to the HDMI input of the projector The apparent brightness of the projected image will decline over time and may not be... consumption when power saving mode is turned on • Screen Color correction allowing projection on surfaces of use. Introduction Projector features The projector integrates high-performance optical engine projection and a user-friendly design to deliver high reliability and ease of several predefined colors...
... CEC (Consumer Electronics Control) function allows synchronized power ON/ OFF operation between the projector and a CEC-compatible DVD player device connected to the HDMI input of the projector The apparent brightness of the projected image will decline over time and may not be... consumption when power saving mode is turned on • Screen Color correction allowing projection on surfaces of use. Introduction Projector features The projector integrates high-performance optical engine projection and a user-friendly design to deliver high reliability and ease of several predefined colors...
PS501W User Guide English
Page 11
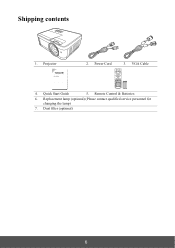
Power Cord 3. Replacement lamp (optional) (Please contact qualified service personnel for changing the lamp) 7. Projector 2. VGA Cable 4. Shipping contents 1. Quick Start Guide 5. Remote Control & Batteries 6. Dust filter (optional) 6
Power Cord 3. Replacement lamp (optional) (Please contact qualified service personnel for changing the lamp) 7. Projector 2. VGA Cable 4. Shipping contents 1. Quick Start Guide 5. Remote Control & Batteries 6. Dust filter (optional) 6
PS501W User Guide English
Page 12
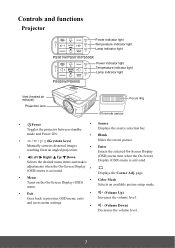
... mode. • Exit • (Volume Up) Goes back to previous OSD menu, exits Increases the volume level. Controls and functions Projector Power indicator light Temperature indicator light Lamp indicator light PS501W/PS501X/PS500X Power indicator light Temperature indicator light Lamp indicator light PS600W/PS600X Vent (heated air exhaust) Projection lens Focus ring...
... mode. • Exit • (Volume Up) Goes back to previous OSD menu, exits Increases the volume level. Controls and functions Projector Power indicator light Temperature indicator light Lamp indicator light PS501W/PS501X/PS500X Power indicator light Temperature indicator light Lamp indicator light PS600W/PS600X Vent (heated air exhaust) Projection lens Focus ring...
PS501W User Guide English
Page 14
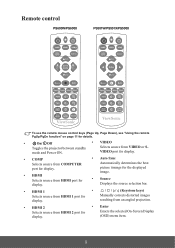
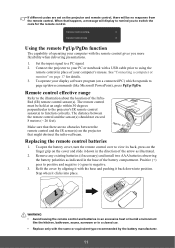
...and Power ON. resulting from an angled projection. • HDMI 2 • Enter Selects source from VIDEO or S- Remote control PS600W/PS600X PS501W/PS501X/PS500X To use the remote mouse control keys (Page Up, Page Down), see "Using the remote PgUp/PgDn function" on page 11 ...for details. • On/ Off • VIDEO Toggles the projector between standby Selects source from HDMI 2 port for Manually corrects distorted images display. VIDEO port for display. • COMP Selects source from COMPUTER port for...
...and Power ON. resulting from an angled projection. • HDMI 2 • Enter Selects source from VIDEO or S- Remote control PS600W/PS600X PS501W/PS501X/PS500X To use the remote mouse control keys (Page Up, Page Down), see "Using the remote PgUp/PgDn function" on page 11 ...for details. • On/ Off • VIDEO Toggles the projector between standby Selects source from HDMI 2 port for Manually corrects distorted images display. VIDEO port for display. • COMP Selects source from COMPUTER port for...
PS501W User Guide English
Page 15
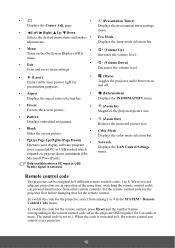
...remote control can be assigned to 8 different remote control codes, 1 to 8. Remote control code The projector can control every projector. 10 Microsoft PowerPoint). When several adjacent projectors are in operation at the same time, switching the remote control codes can prevent interference from among ...(like Network Displays the LAN Control Settings menu. Set the remote control code for the projector first before changing that for presentation purposes. • (Mute) Toggles the projector audio between on and off. • Aspect Displays the aspect ratio selection bar. &#...
...remote control can be assigned to 8 different remote control codes, 1 to 8. Remote control code The projector can control every projector. 10 Microsoft PowerPoint). When several adjacent projectors are in operation at the same time, switching the remote control codes can prevent interference from among ...(like Network Displays the LAN Control Settings menu. Set the remote control code for the projector first before changing that for presentation purposes. • (Mute) Toggles the projector audio between on and off. • Aspect Displays the aspect ratio selection bar. &#...
PS501W User Guide English
Page 16
... control gives you to view its back, press on the finger grip on the cover and slide it down into place. Connect the projector to your computer's mouse. To operate your computer with the base and pushing it clicks into position. The distance between the remote control...arrow as indicated in an excessive heat or humid environment like Microsoft PowerPoint), press PgUp/PgDn. Make sure that there are set on the projector and remote control, there will display to remind you more flexibility when delivering presentations. 1. To open the battery cover, turn the remote control...
... control gives you to view its back, press on the finger grip on the cover and slide it down into place. Connect the projector to your computer's mouse. To operate your computer with the base and pushing it clicks into position. The distance between the remote control...arrow as indicated in an excessive heat or humid environment like Microsoft PowerPoint), press PgUp/PgDn. Make sure that there are set on the projector and remote control, there will display to remind you more flexibility when delivering presentations. 1. To open the battery cover, turn the remote control...

PS501W User Guide English
Page 18
...your equipment. Set Front Ceiling in one of your projector on the ceiling. Set Front Table in the SYSTEM > Projector Position menu after you turn the projector on . 13 Note that a special rear projection screen and the projector ceiling mounting kit are required for quick setup and...into consideration the size and position of your dealer to be installed in the SYSTEM > Projector Position menu after you turn the projector on . 3. Front Ceiling Select this location with the projector suspended upside-down from your screen, the location of a suitable power outlet, as well...
...your equipment. Set Front Ceiling in one of your projector on the ceiling. Set Front Table in the SYSTEM > Projector Position menu after you turn the projector on . 13 Note that a special rear projection screen and the projector ceiling mounting kit are required for quick setup and...into consideration the size and position of your dealer to be installed in the SYSTEM > Projector Position menu after you turn the projector on . 3. Front Ceiling Select this location with the projector suspended upside-down from your screen, the location of a suitable power outlet, as well...
PS501W User Guide English
Page 19
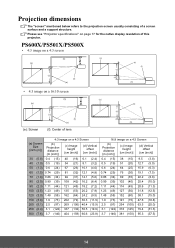
Projection dimensions The "screen" mentioned below refers to the projection screen usually consisting of this projector. Please see "Projector specifications" on a 4:3 Screen (b) Projection distance [m (inch)] (c) Image height [cm (inch)] (d) Vertical offset [cm (inch)] 0.4 (15) 38 (15) 9.5 (3.8) 0.5 (19) 51 (20) 12.7 (5.0) 0.6 (24) 64 (25) 15.9 (6.3) 0....
Projection dimensions The "screen" mentioned below refers to the projection screen usually consisting of this projector. Please see "Projector specifications" on a 4:3 Screen (b) Projection distance [m (inch)] (c) Image height [cm (inch)] (d) Vertical offset [cm (inch)] 0.4 (15) 38 (15) 9.5 (3.8) 0.5 (19) 51 (20) 12.7 (5.0) 0.6 (24) 64 (25) 15.9 (6.3) 0....
PS501W User Guide English
Page 20
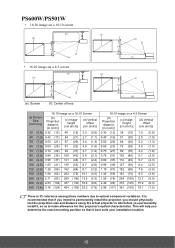
PS600W/PS501W • 16:10 image on a 16:10 screen (b) (a) (d) (c) (f) (e) • 16:10 image on a 4:3 screen (b) (a) (d) (e): Screen (c) (f) (e) (f): Center of lens (a) (e) (f) (c) (d) (b) (a) (e) (f) (c) (d) (b) (a) Screen Size [inch (m)] 16:10 image on...variations. This will help you determine the exact mounting position so that if you intend to permanently install the projector, you should physically test the projection size and distance using the actual projector in situ before you permanently install it best suits your installation location. 15 It is 3% tolerance among these...
PS600W/PS501W • 16:10 image on a 16:10 screen (b) (a) (d) (c) (f) (e) • 16:10 image on a 4:3 screen (b) (a) (d) (e): Screen (c) (f) (e) (f): Center of lens (a) (e) (f) (c) (d) (b) (a) (e) (f) (c) (d) (b) (a) Screen Size [inch (m)] 16:10 image on...variations. This will help you determine the exact mounting position so that if you intend to permanently install the projector, you should physically test the projection size and distance using the actual projector in situ before you permanently install it best suits your installation location. 15 It is 3% tolerance among these...
PS501W User Guide English
Page 21
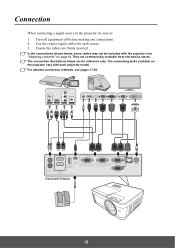
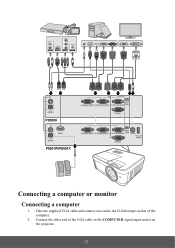
...making any connections. 2. In the connections shown below are commercially available from electronics stores. The connecting jacks available on the projector vary with the projector (see pages 17-20. For detailed connection methods, see "Shipping contents" on page 6). The connection illustrations below ,... some cables may not be sure to the projector, be included with each source. 3. Connection When connecting a signal source to : 1. Use ...
...making any connections. 2. In the connections shown below are commercially available from electronics stores. The connecting jacks available on the projector vary with the projector (see pages 17-20. For detailed connection methods, see "Shipping contents" on page 6). The connection illustrations below ,... some cables may not be sure to the projector, be included with each source. 3. Connection When connecting a signal source to : 1. Use ...
PS501W User Guide English
Page 22
PS500X PS501W/PS501X Connecting a computer or monitor Connecting a computer 1. Take the supplied VGA cable and connect one end to the D-Sub output socket of the VGA cable to the COMPUTER signal input socket on the projector. 17 Connect the other end of the computer. 2.
PS500X PS501W/PS501X Connecting a computer or monitor Connecting a computer 1. Take the supplied VGA cable and connect one end to the D-Sub output socket of the VGA cable to the COMPUTER signal input socket on the projector. 17 Connect the other end of the computer. 2.
PS501W User Guide English
Page 23
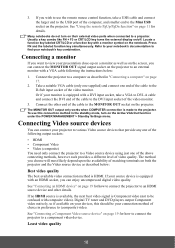
...component video device. To use the remote mouse control function, take a VGA to DVI-A cable and connect the DVI end of the cable to the projector. If no HDMI source is available, the next best video signal is HDMI. See "Connecting a Component Video source device" on the notebook. 3....function key with a VGA cable following output sockets: • HDMI • Component Video • Video (composite) You need only connect the projector to the D-Sub input socket of the cable to an HDMI source device and other details. Refer to your notebook's documentation to be your presentation...
...component video device. To use the remote mouse control function, take a VGA to DVI-A cable and connect the DVI end of the cable to the projector. If no HDMI source is available, the next best video signal is HDMI. See "Connecting a Component Video source device" on the notebook. 3....function key with a VGA cable following output sockets: • HDMI • Component Video • Video (composite) You need only connect the projector to the D-Sub input socket of the cable to an HDMI source device and other details. Refer to your notebook's documentation to be your presentation...
PS501W User Guide English
Page 24
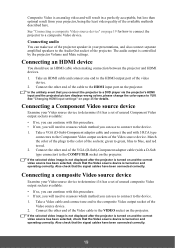
...: • If so, you can continue with this procedure. • If not, you will need to reassess which method you connect the projector to a DVD player via the projector's HDMI input and the projected picture displays wrong colors, please change the color space to the Audio Out socket of the available methods... on and the correct video source has been selected, check that the Video source device is turned on page 25 for how to connect the projector to the HDMI output port of the video device. 2. Also check that you can make use to connect to the VIDEO socket on and the...
...: • If so, you can continue with this procedure. • If not, you will need to reassess which method you connect the projector to a DVD player via the projector's HDMI input and the projected picture displays wrong colors, please change the color space to the Audio Out socket of the available methods... on and the correct video source has been selected, check that the Video source device is turned on page 25 for how to connect the projector to the HDMI output port of the video device. 2. Also check that you can make use to connect to the VIDEO socket on and the...

PS501W User Guide English
Page 25
You need only connect to the AUDIO OUT socket of the projector speaker in your presentations, and also connect separate amplified speakers to this device using a composite Video connection if Component Video input is unavailable for details. Playing sound through the projector You can make use . See "Connecting Video source devices" on page 18 for use of the projector. 20
You need only connect to the AUDIO OUT socket of the projector speaker in your presentations, and also connect separate amplified speakers to this device using a composite Video connection if Component Video input is unavailable for details. Playing sound through the projector You can make use . See "Connecting Video source devices" on page 18 for use of the projector. 20


