
User Guide
Page 3
...8226; A high brightness rating allows for presentations in daylight or in this manual for angled projections • Input source automatically detected ViewSonic PJ766D ii Keep this manual to alert you to situations that you to important information. Caution: Alerts you enjoy many years safe use...ensure that may damage the unit, create a hazardous environment, or cause personal injury. Note: Provides additional information on purchasing the DLP projector! The following boxes are denoted in bold font as in this example: "Push the Menu button on the remote control to...
...8226; A high brightness rating allows for presentations in daylight or in this manual for angled projections • Input source automatically detected ViewSonic PJ766D ii Keep this manual to alert you to situations that you to important information. Caution: Alerts you enjoy many years safe use...ensure that may damage the unit, create a hazardous environment, or cause personal injury. Note: Provides additional information on purchasing the DLP projector! The following boxes are denoted in bold font as in this example: "Push the Menu button on the remote control to...

User Guide
Page 4
... this manual and on the unit case. ¾ The projection lamp is both for end users and describes how to install and operate the DLP projector. It is intended for your needs. For servicing, contact qualified service personnel. ¾ Follow all warnings and cautions in use the supplied power...is suggested that you only print sections that are no user-serviceable parts in direct sunlight, or near water, in the unit. ViewSonic PJ766D iii Cleaning the Projector ¾ Unplug the power cord before cleaning. ¾ Allow the lamp sufficient time to cool. Place the power cord where it...
... this manual and on the unit case. ¾ The projection lamp is both for end users and describes how to install and operate the DLP projector. It is intended for your needs. For servicing, contact qualified service personnel. ¾ Follow all warnings and cautions in use the supplied power...is suggested that you only print sections that are no user-serviceable parts in direct sunlight, or near water, in the unit. ViewSonic PJ766D iii Cleaning the Projector ¾ Unplug the power cord before cleaning. ¾ Allow the lamp sufficient time to cool. Place the power cord where it...

User Guide
Page 5
... the United States and other countries. Product Registration To meet your product on the Internet at: www.viewsonic.com. ViewSonic PJ766D iv Copyright Information Copyright © ViewSonic® Corporation, 2006. Macintosh and Power Macintosh are registered trademarks of Apple Computer, Inc. Microsoft, Windows... For Your Records Product Name: Model Number: Document Number: Serial Number: Purchase Date: PJ766D ViewSonic DLP Projector VS11200 PJ766D -1_UG_ENG Rev.1A 01-12-06 The lamp in accordance with local, state or federal laws. DPMS and DDC are...
... the United States and other countries. Product Registration To meet your product on the Internet at: www.viewsonic.com. ViewSonic PJ766D iv Copyright Information Copyright © ViewSonic® Corporation, 2006. Macintosh and Power Macintosh are registered trademarks of Apple Computer, Inc. Microsoft, Windows... For Your Records Product Name: Model Number: Document Number: Serial Number: Purchase Date: PJ766D ViewSonic DLP Projector VS11200 PJ766D -1_UG_ENG Rev.1A 01-12-06 The lamp in accordance with local, state or federal laws. DPMS and DDC are...

User Guide
Page 6
...26 Language Menu ...27 Status Menu...28 MAINTENANCE AND SECURITY...29 REPLACING THE PROJECTION LAMP...29 Resetting the Lamp...30 CLEANING THE PROJECTOR...31 Cleaning the Lens ...31 Cleaning the Case ...32 USING THE KENSINGTON LOCK ...32 TROUBLESHOOTING ...33 COMMON PROBLEMS AND SOLUTIONS......34 IMAGE PROBLEMS...34 LAMP PROBLEMS ...35 REMOTE CONTROL PROBLEMS ...35 AUDIO PROBLEMS...35 HAVING THE PROJECTOR SERVICED ...36 SPECIFICATIONS...37 SPECIFICATIONS...37 Input/output connectors ...38 PROJECTION DISTANCE VERSUS PROJECTION SIZE...39 TIMING MODE TABLE ...40 DIMENSIONS ...41 ViewSonic PJ766D v
...26 Language Menu ...27 Status Menu...28 MAINTENANCE AND SECURITY...29 REPLACING THE PROJECTION LAMP...29 Resetting the Lamp...30 CLEANING THE PROJECTOR...31 Cleaning the Lens ...31 Cleaning the Case ...32 USING THE KENSINGTON LOCK ...32 TROUBLESHOOTING ...33 COMMON PROBLEMS AND SOLUTIONS......34 IMAGE PROBLEMS...34 LAMP PROBLEMS ...35 REMOTE CONTROL PROBLEMS ...35 AUDIO PROBLEMS...35 HAVING THE PROJECTOR SERVICED ...36 SPECIFICATIONS...37 SPECIFICATIONS...37 Input/output connectors ...38 PROJECTION DISTANCE VERSUS PROJECTION SIZE...39 TIMING MODE TABLE ...40 DIMENSIONS ...41 ViewSonic PJ766D v

User Guide
Page 7
... the case soon after switching off the power could cause the projector to break down. ViewSonic PJ766D 1 GETTING STARTED Packing Checklist Carefully unpack the projector and check that the following items are included: DLP PROJECTOR WITH LENS CAP REMOTE CONTROL (WITH TWO AAA BATTERIES) 250V POWER CABLE USB CABLE S-VIDEO CABLE COMPUTER CABLE (DVIDB15) CD-... dealer immediately if any items are missing, appear damaged, or if the unit does not work. Be sure to room temperature before placing the projector inside the soft case. Placing the projector into the soft case. Caution: 1.
... the case soon after switching off the power could cause the projector to break down. ViewSonic PJ766D 1 GETTING STARTED Packing Checklist Carefully unpack the projector and check that the following items are included: DLP PROJECTOR WITH LENS CAP REMOTE CONTROL (WITH TWO AAA BATTERIES) 250V POWER CABLE USB CABLE S-VIDEO CABLE COMPUTER CABLE (DVIDB15) CD-... dealer immediately if any items are missing, appear damaged, or if the unit does not work. Be sure to room temperature before placing the projector inside the soft case. Placing the projector into the soft case. Caution: 1.

User Guide
Page 8
Do not obstruct any of Projector Parts Front-left view GGeettttiinngg SSttaarrtteedd--VViieewwss ooff PPrroojjeeccttoorr PPaarrttss 12 3 8 76 5 4 ITEM 1. 2. 3. 4. 5. 6. 7. 8. ViewSonic PJ766D 2 Views of the grill openings. LABEL DESCRIPTION Zoom Enlarges the projected image See OSD buttons and LEDs below Projection lamp cover Remove when changing lamp ... pushed Height adjuster button Push to release height adjuster Speaker Built-in mono speaker SEE PAGE: 15 3 29 8 15 14 Important: Grill openings on the projector allow for good air circulation, which keeps the...
Do not obstruct any of Projector Parts Front-left view GGeettttiinngg SSttaarrtteedd--VViieewwss ooff PPrroojjeeccttoorr PPaarrttss 12 3 8 76 5 4 ITEM 1. 2. 3. 4. 5. 6. 7. 8. ViewSonic PJ766D 2 Views of the grill openings. LABEL DESCRIPTION Zoom Enlarges the projected image See OSD buttons and LEDs below Projection lamp cover Remove when changing lamp ... pushed Height adjuster button Push to release height adjuster Speaker Built-in mono speaker SEE PAGE: 15 3 29 8 15 14 Important: Grill openings on the projector allow for good air circulation, which keeps the...

User Guide
Page 9
...AUTO 8 MENU 9 ITEM 1. 2. Power 4. Top view-OSD buttons and LEDs 12 3 4 GGeettttiinngg SSttaarrtteedd--VViieewwss ooff PPrroojjeeccttoorr PPaarrttss VOL - Volume/ right cursor ViewSonic PJ766D 11 10 DESCRIPTION SEE PAGE: Decreases volume Navigates and changes settings in the OSD 16,17 Corrects image-trapezoid (narrower top) effect Navigates and changes...in the OSD 15, 17 Orange Lamp ready-you can safely turn on or off the projector Flashing Lamp not ready-do not press the power button Turns the projector on or off (main power switch must 13 be turned on first, see item 8 ...
...AUTO 8 MENU 9 ITEM 1. 2. Power 4. Top view-OSD buttons and LEDs 12 3 4 GGeettttiinngg SSttaarrtteedd--VViieewwss ooff PPrroojjeeccttoorr PPaarrttss VOL - Volume/ right cursor ViewSonic PJ766D 11 10 DESCRIPTION SEE PAGE: Decreases volume Navigates and changes settings in the OSD 16,17 Corrects image-trapezoid (narrower top) effect Navigates and changes...in the OSD 15, 17 Orange Lamp ready-you can safely turn on or off the projector Flashing Lamp not ready-do not press the power button Turns the projector on or off (main power switch must 13 be turned on first, see item 8 ...

User Guide
Page 13
Bottom view 12 3 GGeettttiinngg SSttaarrtteedd--VViieewwss ooff PPrroojjeeccttoorr PPaarrttss 3 3 2 1 ITEM 1. 2. 3. LABEL Height adjuster buttons Height adjusters Ceiling support holes DESCRIPTION SEE PAGE: Push to release height adjusters 14 Adjusters drop down when adjuster buttons are pushed Contact your dealer for information on mounting the projector on a ceiling. ViewSonic PJ766D 7
Bottom view 12 3 GGeettttiinngg SSttaarrtteedd--VViieewwss ooff PPrroojjeeccttoorr PPaarrttss 3 3 2 1 ITEM 1. 2. 3. LABEL Height adjuster buttons Height adjusters Ceiling support holes DESCRIPTION SEE PAGE: Push to release height adjusters 14 Adjusters drop down when adjuster buttons are pushed Contact your dealer for information on mounting the projector on a ceiling. ViewSonic PJ766D 7

User Guide
Page 14
... SEE PAGE: ViewSonic PJ766D 8 Remote Control Parts 28 27 26 25 24 23 22 21 20 19 18 17 GGeettttiinngg SSttaarrtteedd--VViieewwss ooff PPrroojjeeccttoorr PPaarrttss 1 2 3 4 5 6 7 8 9 10 11 12 13 14 16 15 Important: 1. Be sure nothing obstructs the path between remote and projector is used Press... to operate the on . LABEL IR transmitter Status LED Laser DESCRIPTION Transmits signals to projector Lights when the remote control is obstructed, you can disrupt remote control operation. 2....
... SEE PAGE: ViewSonic PJ766D 8 Remote Control Parts 28 27 26 25 24 23 22 21 20 19 18 17 GGeettttiinngg SSttaarrtteedd--VViieewwss ooff PPrroojjeeccttoorr PPaarrttss 1 2 3 4 5 6 7 8 9 10 11 12 13 14 16 15 Important: 1. Be sure nothing obstructs the path between remote and projector is used Press... to operate the on . LABEL IR transmitter Status LED Laser DESCRIPTION Transmits signals to projector Lights when the remote control is obstructed, you can disrupt remote control operation. 2....

User Guide
Page 15
...Up cursor Right cursor Down cursor Volume +/Mute Zoom+ ZoomFreeze Blank Source Auto Menu Status 21. Enter 24. Enter 27. Laser ViewSonic PJ766D GGeettttiinngg SSttaarrtteedd--VViieewwss ooff PPrroojjeeccttoorr PPaarrttss DESCRIPTION Up arrow when connected through USB to a PC Right arrow when connected through USB to... up when connected through USB to a PC Left arrow when connected through USB to a PC Enter key when connected through USB to a PC Turns the projector on or off Use as on-screen pointer. Power 28. Keystone top/bottom 22. ITEM 4. 5. 6. 7. 8. 9. 10. 11. 12. 13....
...Up cursor Right cursor Down cursor Volume +/Mute Zoom+ ZoomFreeze Blank Source Auto Menu Status 21. Enter 24. Enter 27. Laser ViewSonic PJ766D GGeettttiinngg SSttaarrtteedd--VViieewwss ooff PPrroojjeeccttoorr PPaarrttss DESCRIPTION Up arrow when connected through USB to a PC Right arrow when connected through USB to... up when connected through USB to a PC Left arrow when connected through USB to a PC Enter key when connected through USB to a PC Turns the projector on or off Use as on-screen pointer. Power 28. Keystone top/bottom 22. ITEM 4. 5. 6. 7. 8. 9. 10. 11. 12. 13....

User Guide
Page 16
... operations can be carried out with the remote control; For example, item 7/8 on the projector functions both as the volume down button and as the left cursor key in use. ViewSonic PJ766D 10 Some buttons on the projector. GGeettttiinngg SSttaarrtteedd--VViieewwss ooff PPrroojjeeccttoorr PPaarrttss Remote Control Operating Range The remote control uses infrared transmission...
... operations can be carried out with the remote control; For example, item 7/8 on the projector functions both as the volume down button and as the left cursor key in use. ViewSonic PJ766D 10 Some buttons on the projector. GGeettttiinngg SSttaarrtteedd--VViieewwss ooff PPrroojjeeccttoorr PPaarrttss Remote Control Operating Range The remote control uses infrared transmission...

User Guide
Page 17
Replace the cover. SSeettuupp aanndd OOppeerraattiioonn SETUP AND OPERATION 2. Remove the battery compartment cover by sliding the cover in the direction of the polarity (+/-) as shown here. 3. Only use AAA alkaline batteries. 2. ViewSonic PJ766D 11 Insert the supplied batteries taking note of the arrow. Dispose of used batteries according to local ordinance regulations. 3. Remove the batteries when not using the projector for prolonged periods. Inserting the Remote Control Batteries 1. Caution: 1.
Replace the cover. SSeettuupp aanndd OOppeerraattiioonn SETUP AND OPERATION 2. Remove the battery compartment cover by sliding the cover in the direction of the polarity (+/-) as shown here. 3. Only use AAA alkaline batteries. 2. ViewSonic PJ766D 11 Insert the supplied batteries taking note of the arrow. Dispose of used batteries according to local ordinance regulations. 3. Remove the batteries when not using the projector for prolonged periods. Inserting the Remote Control Batteries 1. Caution: 1.
User Guide
Page 18
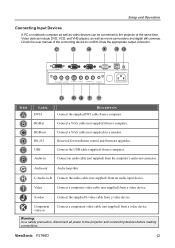
... the computer's audio-out connector. Reserved for installation control and firmware upgrades. Connect a VGA cable (not supplied) to the projector at the same time. Video Connect a composite video cable (not supplied) from an audio input device. SSeettuupp aanndd OOppeerraattiioonn Connecting...(supplied) from a video device. S-video Connect the supplied S-video cable from a computer. ViewSonic PJ766D 12 Check the user manual of the connecting device to the projector and connecting devices before making connections. Warning: As a safety precaution, disconnect all power to ...
... the computer's audio-out connector. Reserved for installation control and firmware upgrades. Connect a VGA cable (not supplied) to the projector at the same time. Video Connect a composite video cable (not supplied) from an audio input device. SSeettuupp aanndd OOppeerraattiioonn Connecting...(supplied) from a video device. S-video Connect the supplied S-video cable from a computer. ViewSonic PJ766D 12 Check the user manual of the connecting device to the projector and connecting devices before making connections. Warning: As a safety precaution, disconnect all power to ...

User Guide
Page 19
... OOppeerraattiioonn Splash Screen 6. Attention : Power off . Connect the power cord to turn off the projector, press the Power button. To turn on the computer keyboard to switch the display output to the projector. (Check the PC user manual to determine the appropriate Fn hot keys to switch among devices... Power button. Ensure the Lamp-ready LED is on a steady (not flashing) orange and then press the Power button to the projector. The projector turns off the projector normally and unplug the power cord before moving the projector ViewSonic PJ766D 13 Starting and Shutting down the...
... OOppeerraattiioonn Splash Screen 6. Attention : Power off . Connect the power cord to turn off the projector, press the Power button. To turn on the computer keyboard to switch the display output to the projector. (Check the PC user manual to determine the appropriate Fn hot keys to switch among devices... Power button. Ensure the Lamp-ready LED is on a steady (not flashing) orange and then press the Power button to the projector. The projector turns off the projector normally and unplug the power cord before moving the projector ViewSonic PJ766D 13 Starting and Shutting down the...

User Guide
Page 20
... are not in the way or can cause the projector to be knocked over. 1. The height-adjusters drop down on the top of the projector, press the height-adjuster buttons and push down [C]. 2. ViewSonic PJ766D 14 SSeettuupp aanndd OOppeerraattiioonn Adjusting the Projector Level Take note of the projector, lift the projector [A] and press the height-adjuster buttons [B].
... are not in the way or can cause the projector to be knocked over. 1. The height-adjusters drop down on the top of the projector, press the height-adjuster buttons and push down [C]. 2. ViewSonic PJ766D 14 SSeettuupp aanndd OOppeerraattiioonn Adjusting the Projector Level Take note of the projector, lift the projector [A] and press the height-adjuster buttons [B].

User Guide
Page 21
Use the Image-focus control (on the projector only) to resize the projected image and screen size A . 2. Use the Image-zoom control (on the projector only) to correct image-trapezoid (wider top or bottom) effect. SSeettuupp aanndd OOppeerraattiioonn ViewSonic PJ766D 15 Use the Keystone buttons (on the display. The keystone control appears on the projector or the remote control) to sharpen the projected image B 3. Adjust the Zoom, Focus and Keystone 1.
Use the Image-focus control (on the projector only) to resize the projected image and screen size A . 2. Use the Image-zoom control (on the projector only) to correct image-trapezoid (wider top or bottom) effect. SSeettuupp aanndd OOppeerraattiioonn ViewSonic PJ766D 15 Use the Keystone buttons (on the display. The keystone control appears on the projector or the remote control) to sharpen the projected image B 3. Adjust the Zoom, Focus and Keystone 1.

User Guide
Page 22
Press the Volume +/- The volume control appears on the projector or the remote control. Press the Mute button (on the remote control to turn off mute. or Mute on the remote control only) to adjust the level. 3. Use the Volume +/- Press Volume +/- SSeettuupp aanndd OOppeerraattiioonn ViewSonic PJ766D 16 Adjusting the Volume 1. buttons on the display. 2. buttons to turn off the volume. 4.
Press the Volume +/- The volume control appears on the projector or the remote control. Press the Mute button (on the remote control to turn off mute. or Mute on the remote control only) to adjust the level. 3. Use the Volume +/- Press Volume +/- SSeettuupp aanndd OOppeerraattiioonn ViewSonic PJ766D 16 Adjusting the Volume 1. buttons on the display. 2. buttons to turn off the volume. 4.

User Guide
Page 23
OOnn--SSccrreeeenn DDiissppllaayy MMeennuu SSeettttiinnggss ON-SCREEN DISPLAY MENU SETTINGS On-Screen Display Menu Controls The projector has an On-Screen Display (OSD) that lets you make changes to the OSD. ViewSonic PJ766D 17 The following illustration shows the corresponding buttons on the remote control and on the top of the projector to navigate and make image adjustments and change various settings. Navigating the OSD You can use the remote control or the buttons on the projector.
OOnn--SSccrreeeenn DDiissppllaayy MMeennuu SSeettttiinnggss ON-SCREEN DISPLAY MENU SETTINGS On-Screen Display Menu Controls The projector has an On-Screen Display (OSD) that lets you make changes to the OSD. ViewSonic PJ766D 17 The following illustration shows the corresponding buttons on the remote control and on the top of the projector to navigate and make image adjustments and change various settings. Navigating the OSD You can use the remote control or the buttons on the projector.

User Guide
Page 24
OOnn--SSccrreeeenn DDiissppllaayy MMeennuu SSeettttiinnggss Setting the OSD Language You may want is highlighted. 3. Press the Menu button. Press the Menu button twice to reference the OSD on your preference before continuing. (The default language is English.) 1. Press until Language is highlighted. 4. Press until the language you want to close the OSD. Press the Enter button to your projector while reading this section. ViewSonic PJ766D 18 The Main menu appears. 2. Set the OSD language to select the language. 5.
OOnn--SSccrreeeenn DDiissppllaayy MMeennuu SSeettttiinnggss Setting the OSD Language You may want is highlighted. 3. Press the Menu button. Press the Menu button twice to reference the OSD on your preference before continuing. (The default language is English.) 1. Press until Language is highlighted. 4. Press until the language you want to close the OSD. Press the Enter button to your projector while reading this section. ViewSonic PJ766D 18 The Main menu appears. 2. Set the OSD language to select the language. 5.
User Guide
Page 28
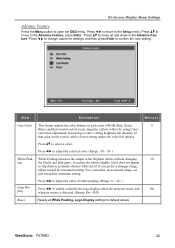
...the color balance in the Advance Feature. Press to select a color. It crushes the whites slightly, but it does not appear to default values ViewSonic PJ766D 22 Press to the Setup menu. Press to move to adjust the value of that color on the screen, while a lower setting makes the... color less intense. For a smoother, more natural image, ad- Press to enable or disable the logo displays when the projector starts, and On play when no source is detected. (Range: On-Off) Reset Resets all White Peaking, Logo Display settings to clip them or seriously...
...the color balance in the Advance Feature. Press to select a color. It crushes the whites slightly, but it does not appear to default values ViewSonic PJ766D 22 Press to the Setup menu. Press to move to adjust the value of that color on the screen, while a lower setting makes the... color less intense. For a smoother, more natural image, ad- Press to enable or disable the logo displays when the projector starts, and On play when no source is detected. (Range: On-Off) Reset Resets all White Peaking, Logo Display settings to clip them or seriously...


