User Guide
Page 2
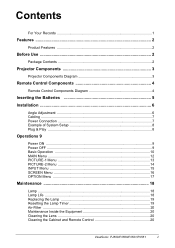
Contents For Your Records 1 Features ...2 Product Features 2 Before Use 2 Package Contents 2 Projector Components 3 Projector Components Diagram 3 Remote Control Components 4 Remote Control Components Diagram 4 Inserting the Batteries 5 Installation 6 Angle Adjustment 6 Cabling ...7 Power Connection 7 Example of System Setup 8 Plug & Play ...8 Operations 9 Power ON ...9 Power OFF ...9 ...Lamp 19 Resetting the Lamp Timer 19 Air-Filter ...20 Maintenance Inside the Equipment 20 Cleaning the Lens 20 Cleaning the Cabinet and Remote Control 20 ViewSonic PJ500/PJ550/PJ501/PJ551 i
Contents For Your Records 1 Features ...2 Product Features 2 Before Use 2 Package Contents 2 Projector Components 3 Projector Components Diagram 3 Remote Control Components 4 Remote Control Components Diagram 4 Inserting the Batteries 5 Installation 6 Angle Adjustment 6 Cabling ...7 Power Connection 7 Example of System Setup 8 Plug & Play ...8 Operations 9 Power ON ...9 Power OFF ...9 ...Lamp 19 Resetting the Lamp Timer 19 Air-Filter ...20 Maintenance Inside the Equipment 20 Cleaning the Lens 20 Cleaning the Cabinet and Remote Control 20 ViewSonic PJ500/PJ550/PJ501/PJ551 i

User Guide
Page 6
... adjuster Remote control sensor Component Video Y (In) CB/PB (In) CR/PR (In) S-Video (In) Zoom knob Focus ring Remote control sensor Lens (with lens cap) Lamp indicator Temp indicator Power indicator Menu Exhaust ventilation Interface panel RGB (In) Control (RS232) Audio (In, 3.5 mm) R Audio (In) L Audio (In) Video (In) Figure 2: Projector Components 3 ViewSonic PJ500/PJ550/PJ501/PJ551
... adjuster Remote control sensor Component Video Y (In) CB/PB (In) CR/PR (In) S-Video (In) Zoom knob Focus ring Remote control sensor Lens (with lens cap) Lamp indicator Temp indicator Power indicator Menu Exhaust ventilation Interface panel RGB (In) Control (RS232) Audio (In, 3.5 mm) R Audio (In) L Audio (In) Video (In) Figure 2: Projector Components 3 ViewSonic PJ500/PJ550/PJ501/PJ551

User Guide
Page 7
Remote Control Components Remote Control Components Diagram Search Button RGB Button VIDEO Button ASPECT Button MAGNIFY ON Button OFF Button FREEZE Button POSITION Button [Left] Arrow Button ENTER Button [Down] Arrow Button ESC (Escape) Button STANDBY/ON Button AUTO Button BLANK Button VOLUME Button MUTE Button KEYSTONE Button MENU Button [Up] Arrow Button [Right] Arrow Button RESET Button Figure 3: Remote Control Components ViewSonic PJ500/PJ550/PJ501/PJ551 4
Remote Control Components Remote Control Components Diagram Search Button RGB Button VIDEO Button ASPECT Button MAGNIFY ON Button OFF Button FREEZE Button POSITION Button [Left] Arrow Button ENTER Button [Down] Arrow Button ESC (Escape) Button STANDBY/ON Button AUTO Button BLANK Button VOLUME Button MUTE Button KEYSTONE Button MENU Button [Up] Arrow Button [Right] Arrow Button RESET Button Figure 3: Remote Control Components ViewSonic PJ500/PJ550/PJ501/PJ551 4

User Guide
Page 8
... cracking or leakage, which may result in accordance with local laws and regulations. • Keep the battery away from children and pets. • When the remote control will not to be used for an extended period, remove the batteries. Inserting the Batteries Figure 4: Battery 1 Remove the battery cover by pulling then lifting... injury. • Insert batteries according to the (+) and (-) markings on the cover. 2 Insert the batteries, corresponding to (+) and (-) markings. This may pose a risk of the remote control becomes irregular or weak. 5 ViewSonic PJ500/PJ550/PJ501/PJ551
... cracking or leakage, which may result in accordance with local laws and regulations. • Keep the battery away from children and pets. • When the remote control will not to be used for an extended period, remove the batteries. Inserting the Batteries Figure 4: Battery 1 Remove the battery cover by pulling then lifting... injury. • Insert batteries according to the (+) and (-) markings on the cover. 2 Insert the batteries, corresponding to (+) and (-) markings. This may pose a risk of the remote control becomes irregular or weak. 5 ViewSonic PJ500/PJ550/PJ501/PJ551

User Guide
Page 12
... correctly and lens cap has been removed. CAUTION • To turn OFF the projector press the Standby/ON button and hold for the cooling fan to [O] OFF. 9 ViewSonic PJ500/PJ550/PJ501/PJ551 Power Indicator Standby/On Button Zoom Knob Focus Ring Remote Control Power Switch Figure 9: Power Buttons NOTE: Except in green. 3 After several seconds...
... correctly and lens cap has been removed. CAUTION • To turn OFF the projector press the Standby/ON button and hold for the cooling fan to [O] OFF. 9 ViewSonic PJ500/PJ550/PJ501/PJ551 Power Indicator Standby/On Button Zoom Knob Focus Ring Remote Control Power Switch Figure 9: Power Buttons NOTE: Except in green. 3 After several seconds...

User Guide
Page 13
... VOLUME button to display the Volume menu, then press / sound. Table 3: Basic Operation Item INPUT SELECT (projector control panel) POSITION (remote control) RESET (*) (remote control) MAGNIFY (remote control) Description Select Input Signal (*) : press the INPUT Button. Move Magnified Area: Run the POSITION in the KEYSTONE...button. Image Position Adjustment: Press the buttons in the POSITION mode. • Valid only in this mode. (remote control) ViewSonic PJ500/PJ550/PJ501/PJ551 10 Initialize Each item: Select an item and press the RESET button. When the [ II ] icon is ...
... VOLUME button to display the Volume menu, then press / sound. Table 3: Basic Operation Item INPUT SELECT (projector control panel) POSITION (remote control) RESET (*) (remote control) MAGNIFY (remote control) Description Select Input Signal (*) : press the INPUT Button. Move Magnified Area: Run the POSITION in the KEYSTONE...button. Image Position Adjustment: Press the buttons in the POSITION mode. • Valid only in this mode. (remote control) ViewSonic PJ500/PJ550/PJ501/PJ551 10 Initialize Each item: Select an item and press the RESET button. When the [ II ] icon is ...

User Guide
Page 14
... the remote control) to turn to proceed. To return to the initial signal input. If no image) is detected, the projector displays the detected signal picture. Horizontal Position (H. It may not function correctly with following command : When a signal is displayed in this mode. NOTE: Pressing the button performs the same function. 11 ViewSonic PJ500...
... the remote control) to turn to proceed. To return to the initial signal input. If no image) is detected, the projector displays the detected signal picture. Horizontal Position (H. It may not function correctly with following command : When a signal is displayed in this mode. NOTE: Pressing the button performs the same function. 11 ViewSonic PJ500...

User Guide
Page 15
... Status: Press the / button to start operating. MAIN Menu To access the MAIN Menu, press the MENU button on the remote control to select the Aspect Ratio. The MAIN Menu has seven (7) items as shown in the Table 4. Select Picture Position (for...ViewSonic PJ500/PJ550/PJ501/PJ551 12 Please select the item you can also press the ASPECT button on the remote control. POSIT. (Picture Position) GAMMA MIRROR Table 4: MAIN Menu Actions/Description Lighter Darker Stronger Weaker Select Aspect Ratio Select ASPECT from the MAIN menu and then do the following table. This projector...
... Status: Press the / button to start operating. MAIN Menu To access the MAIN Menu, press the MENU button on the remote control to select the Aspect Ratio. The MAIN Menu has seven (7) items as shown in the Table 4. Select Picture Position (for...ViewSonic PJ500/PJ550/PJ501/PJ551 12 Please select the item you can also press the ASPECT button on the remote control. POSIT. (Picture Position) GAMMA MIRROR Table 4: MAIN Menu Actions/Description Lighter Darker Stronger Weaker Select Aspect Ratio Select ASPECT from the MAIN menu and then do the following table. This projector...

User Guide
Page 23
...projector is cleaned and checked by yourself is damaged. Air-Filter Cleaning the Air Filter The air filter should be removed, or if it is switched OFF automatically to prevent overheating. Cleaning the Lens Gently wipe the lens with a soft cloth. Cleaning the Cabinet and Remote Control... Maintenance Inside the Equipment For safety reasons, ensure that the equipment is switched on. 1 Switch the projector power supply OFF, and remove the power cord from the power outlet. 2 Remove the filter cover ... function of the "FILTER TIME" on the OPTION Menu. ViewSonic PJ500/PJ550/PJ501/PJ551 20
...projector is cleaned and checked by yourself is damaged. Air-Filter Cleaning the Air Filter The air filter should be removed, or if it is switched OFF automatically to prevent overheating. Cleaning the Lens Gently wipe the lens with a soft cloth. Cleaning the Cabinet and Remote Control... Maintenance Inside the Equipment For safety reasons, ensure that the equipment is switched on. 1 Switch the projector power supply OFF, and remove the power cord from the power outlet. 2 Remove the filter cover ... function of the "FILTER TIME" on the OPTION Menu. ViewSonic PJ500/PJ550/PJ501/PJ551 20
User Guide
Page 25
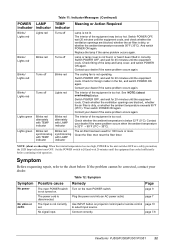
...) When the internal temperature rises too high, POWER to the chart below . The Input is disconnected. page 10 page 7,8 ViewSonic PJ500/PJ550/PJ501/PJ551 22 And switch POWER ON again. Check for 20 minutes until the equipment cools, and check whether the ventilation openings are blocked... LAMP indicator Lamp is too hot. Contact your dealer if the same problem occurs again. Table 12: Symptom Remedy Turn on projector control pad or remote control to [0] and wait 20 minutes until the equipment cools. Symptom Before requesting repair, refer to the unit switches OFF as a...
...) When the internal temperature rises too high, POWER to the chart below . The Input is disconnected. page 10 page 7,8 ViewSonic PJ500/PJ550/PJ501/PJ551 22 And switch POWER ON again. Check for 20 minutes until the equipment cools, and check whether the ventilation openings are blocked... LAMP indicator Lamp is too hot. Contact your dealer if the same problem occurs again. Table 12: Symptom Remedy Turn on projector control pad or remote control to [0] and wait 20 minutes until the equipment cools. Symptom Before requesting repair, refer to the unit switches OFF as a...
User Guide
Page 26
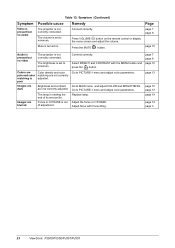
...projector is nearing the end of adjustment. Images are not correctly adjusted. Go to PICTURE-1 menu and adjust color parameters. Mute is poor Images are dark Color density and color matching are blurred The lamp is not correctly connected. Brightness and contrast are pale and color matching is turned on the remote control... the button. page 7 page 8 page 12 page 13 page 12 page 13 page 19 page 14 page 3 23 ViewSonic PJ500/PJ550/PJ501/PJ551 Go to minimum. Replace lamp. The brightness is out of its service life. Symptom Video is present but no audio ...
...projector is nearing the end of adjustment. Images are not correctly adjusted. Go to PICTURE-1 menu and adjust color parameters. Mute is poor Images are dark Color density and color matching are blurred The lamp is not correctly connected. Brightness and contrast are pale and color matching is turned on the remote control... the button. page 7 page 8 page 12 page 13 page 12 page 13 page 19 page 14 page 3 23 ViewSonic PJ500/PJ550/PJ501/PJ551 Go to minimum. Replace lamp. The brightness is out of its service life. Symptom Video is present but no audio ...

