

User Guide
Page 1
... equipo lea cu idadosamente las instrucciones en este manual" Model No. VS17054/VS17346/VS17058/VS17060 PX700HD/PG700WU PG705HD/PG705WU DLP Projector User Guide IMPORTANT: Please read this User Guide will describe your limited coverage from ViewSonic Corporation, which is also found on installing and using your product for future service. Warranty information contained in this User Guide to obtain important information on our web site...
... equipo lea cu idadosamente las instrucciones en este manual" Model No. VS17054/VS17346/VS17058/VS17060 PX700HD/PG700WU PG705HD/PG705WU DLP Projector User Guide IMPORTANT: Please read this User Guide will describe your limited coverage from ViewSonic Corporation, which is also found on installing and using your product for future service. Warranty information contained in this User Guide to obtain important information on our web site...

User Guide
Page 5
... you for being part of product life The lamp in accordance with local, state or federal laws. For additional information, please see the "Customer Support" section in this user guide and fill the information in the United States and other countries. Microsoft, Windows, Windows NT, and the Windows logo are registered trademarks of continuing product improvement, ViewSonic Corporation reserves WKH...
... you for being part of product life The lamp in accordance with local, state or federal laws. For additional information, please see the "Customer Support" section in this user guide and fill the information in the United States and other countries. Microsoft, Windows, Windows NT, and the Windows logo are registered trademarks of continuing product improvement, ViewSonic Corporation reserves WKH...

User Guide
Page 7
... remote control. 7. This projector is poorly ventilated or confined. To temporarily turn off the lamp, press BLANK on . 5. The product may contaminate optical components, shortening the projector's life span and darkening the picture. - Space that you should you operate your projector. Allow at the projector lens during operation. Locations where excessive humidity, dust, or cigarette smoke may fall, sustaining serious damage. 11. Locations with all windows...
... remote control. 7. This projector is poorly ventilated or confined. To temporarily turn off the lamp, press BLANK on . 5. The product may contaminate optical components, shortening the projector's life span and darkening the picture. - Space that you should you operate your projector. Allow at the projector lens during operation. Locations where excessive humidity, dust, or cigarette smoke may fall, sustaining serious damage. 11. Locations with all windows...

User Guide
Page 8
... is a safety risk that you to have the projector serviced. 18. Safety instructions for ceiling mount installation. Do not stand the projector on a level, horizontal surface during operation of the unit, operate the disconnect device to switch the power supply off, or disconnect the power plug. Liquids spilled into the beam, RG2 IEC 62471-5:201 Warning • THIS APPARATUS MUST BE EARTHED. • When...
... is a safety risk that you to have the projector serviced. 18. Safety instructions for ceiling mount installation. Do not stand the projector on a level, horizontal surface during operation of the unit, operate the disconnect device to switch the power supply off, or disconnect the power plug. Liquids spilled into the beam, RG2 IEC 62471-5:201 Warning • THIS APPARATUS MUST BE EARTHED. • When...

User Guide
Page 10
... subject to model specifications. • Power saving function decreasing the power consumption of the lamp by up the signal detecting process • Color modes providing choices for different projection purposes • One-key auto-adjustment to display the best picture quality (only for analog signal) • Digital keystone correction to correct distorted images • Adjustable color management control for data/video display • Ability to display 1.07 billion colors • Multi-language On-Screen Display (OSD) menus...
... subject to model specifications. • Power saving function decreasing the power consumption of the lamp by up the signal detecting process • Color modes providing choices for different projection purposes • One-key auto-adjustment to display the best picture quality (only for analog signal) • Digital keystone correction to correct distorted images • Adjustable color management control for data/video display • Ability to display 1.07 billion colors • Multi-language On-Screen Display (OSD) menus...

User Guide
Page 14
... Freezes the screen picture. • (Zoom In) Magnifies the projected picture size. • Pattern Displays embedded test pattern. • (Zoom Out) Reduces the projected picture size. • Blank Hides the screen picture. • (Information) Displays the INFORMATION menu. • PgUp (Page Up)/PgDn (Page Down) Operates your display software program • Color Mode (on the On-Screen Display (OSD) menu. Network Displays the LAN Control Settings Only available when a PC input signal is set in operation at the same time, switching the remote control codes can prevent...
... Freezes the screen picture. • (Zoom In) Magnifies the projected picture size. • Pattern Displays embedded test pattern. • (Zoom Out) Reduces the projected picture size. • Blank Hides the screen picture. • (Information) Displays the INFORMATION menu. • PgUp (Page Up)/PgDn (Page Down) Operates your display software program • Color Mode (on the On-Screen Display (OSD) menu. Network Displays the LAN Control Settings Only available when a PC input signal is set in operation at the same time, switching the remote control codes can prevent...

User Guide
Page 25
... in the standby mode, turn on their external video ports when connected to the COMPUTER IN signal input socket on the Active VGA Out function under the POWER MANAGEMENT > Standby Settings menu. Connecting a monitor If you want to view your monitor is equipped with a VGA cable following output sockets: • HDMI • Component Video • S-Video • Video (composite) You need only connect the projector to a Video source device using just one end to an HDMI source device...
... in the standby mode, turn on their external video ports when connected to the COMPUTER IN signal input socket on the Active VGA Out function under the POWER MANAGEMENT > Standby Settings menu. Connecting a monitor If you want to view your monitor is equipped with a VGA cable following output sockets: • HDMI • Component Video • S-Video • Video (composite) You need only connect the projector to a Video source device using just one end to an HDMI source device...

User Guide
Page 26
... Video source device, you should elect to use the S-Video option. If no HDMI source is available, the next best video signal is Component video (not to be your Video source device to determine if it has a set of unused Component Video output sockets available: • If so, you connect the projector to a DVD player via the projector's HDMI input and the projected picture displays wrong colors, please change the color space to YUV. Digital...
... Video source device, you should elect to use the S-Video option. If no HDMI source is available, the next best video signal is Component video (not to be your Video source device to determine if it has a set of unused Component Video output sockets available: • If so, you connect the projector to a DVD player via the projector's HDMI input and the projected picture displays wrong colors, please change the color space to YUV. Digital...

User Guide
Page 28
...' displayed on a blank screen. As soon as the lamp lights up the projector 1. To turn the projector on the wall socket switch (where fitted). 2. If the frequency/resolution of the input signal exceeds the projector's operating range, you turn off . Switch all of the connected equipment on . (If necessary) Rotate the focus ring to select your OSD language following the on page 44 for details. The Power indicator light stays blue when...
...' displayed on a blank screen. As soon as the lamp lights up the projector 1. To turn the projector on the wall socket switch (where fitted). 2. If the frequency/resolution of the input signal exceeds the projector's operating range, you turn off . Switch all of the connected equipment on . (If necessary) Rotate the focus ring to select your OSD language following the on page 44 for details. The Power indicator light stays blue when...

User Guide
Page 30
... incorrect password 5 times in succession, the projector will be used unless the correct password is entered every time the projector is set and the power on the projector. If you enter the wrong password, the password error message as pictured to enter the six-digit password every time you will automatically shut down in a safe place for the password. 5. The password can use , the projector includes an option for 5 seconds, and the message 'INPUT PASSWORD' follows...
... incorrect password 5 times in succession, the projector will be used unless the correct password is entered every time the projector is set and the power on the projector. If you enter the wrong password, the password error message as pictured to enter the six-digit password every time you will automatically shut down in a safe place for the password. 5. The password can use , the projector includes an option for 5 seconds, and the message 'INPUT PASSWORD' follows...

User Guide
Page 31
... > Security Settings > Power On Lock menu. 2. You may be displayed as asterisks on-screen. Press Enter. Enter the old password. • If the password is correct, another message 'INPUT NEW PASSWORD' is displayed. • If the password is incorrect, the password error message is displayed lasting for 5 seconds, and the message 'INPUT PASSWORD' is displayed. 3. You have to verify that vary depending on the screen. 2. The digits being input will display a coded number on different projector models. Open the OSD menu and...
... > Security Settings > Power On Lock menu. 2. You may be displayed as asterisks on-screen. Press Enter. Enter the old password. • If the password is correct, another message 'INPUT NEW PASSWORD' is displayed. • If the password is incorrect, the password error message is displayed lasting for 5 seconds, and the message 'INPUT PASSWORD' is displayed. 3. You have to verify that vary depending on the screen. 2. The digits being input will display a coded number on different projector models. Open the OSD menu and...

User Guide
Page 38
... fine color control adjustment to make adjustments. If you have purchased a test disc which contains various color test patterns and can project any image from the disc on the screen and enter the Color Management menu to allow for PC timings from a VGA or HDMI input signal. Press to highlight Hue and press / to select a color from the image entirely. For example, if you select Red and set its...
... fine color control adjustment to make adjustments. If you have purchased a test disc which contains various color test patterns and can project any image from the disc on the screen and enter the Color Management menu to allow for PC timings from a VGA or HDMI input signal. Press to highlight Hue and press / to select a color from the image entirely. For example, if you select Red and set its...

User Guide
Page 41
A confirmation message is displayed. 3. Operation under "High Altitude Mode" may display auto shut-down symptoms, which enables you use this is input from over-heating. Using the CEC function This projector supports CEC (Consumer Electronics Control) function for the projector to select Enable. You need to manually select a 3D Sync format for synchronized power on , the projector's power will be adjusted. 36 If the 3D signal is not to the ADVANCED > 3D Settings menu. 2. Go...
A confirmation message is displayed. 3. Operation under "High Altitude Mode" may display auto shut-down symptoms, which enables you use this is input from over-heating. Using the CEC function This projector supports CEC (Consumer Electronics Control) function for the projector to select Enable. You need to manually select a 3D Sync format for synchronized power on , the projector's power will be adjusted. 36 If the 3D signal is not to the ADVANCED > 3D Settings menu. 2. Go...

User Guide
Page 46
.... IMAGE menu" on page 51 and "Projector" on the OSD menus or remote control. When you to manage the projector, configure the LAN control settings and secure access of its user manual for the web browser to previous OSD menus, exit and save menu settings. You can also be used with the projector. 2. To switch between input signals, click on the projector. The source list varies according to change the OSD menu settings...
.... IMAGE menu" on page 51 and "Projector" on the OSD menus or remote control. When you to manage the projector, configure the LAN control settings and secure access of its user manual for the web browser to previous OSD menus, exit and save menu settings. You can also be used with the projector. 2. To switch between input signals, click on the projector. The source list varies according to change the OSD menu settings...

User Guide
Page 47
... Item Crestron Control Projector Network Configuration User Password Admin Password Input Length IP Address IP ID Port Projector Name Location Assigned To DHCP (Enabled) IP Address Subnet Mask Default Gateway DNS Server Enabled New Password Confirm Enabled New Password Confirm Maximum Number of Characters 16 4 5 32 32 32 (N/A) 16 16 16 16 (N/A) 26 26 (N/A) 26 26 42 iii. After making the adjustments, press the Send button and the data will be...
... Item Crestron Control Projector Network Configuration User Password Admin Password Input Length IP Address IP ID Port Projector Name Location Assigned To DHCP (Enabled) IP Address Subnet Mask Default Gateway DNS Server Enabled New Password Confirm Enabled New Password Confirm Maximum Number of Characters 16 4 5 32 32 32 (N/A) 16 16 16 16 (N/A) 26 26 (N/A) 26 26 42 iii. After making the adjustments, press the Send button and the data will be...

User Guide
Page 53
Main menu 5. ADVANCED 6. SYSTEM Sub-menu Options 3D Settings 3D Sync Auto/Off/Frame Sequential/Frame Packing/Top-Bottom/ Side-by-Side 3D Sync Invert Disable/Invert HDMI Settings HDMI Format HDMI Range Auto/RGB/YUV Auto/Enhanced/Normal LAN Settings DHCP ON/Static IP LAN Control Settings (PG705HD/ PG705WU) Projector IP Address Subnet Mask Default Gateway DNS Server Standby LAN Control Off/On Apply Lamp Settings Lamp Mode Reset Lamp Hours Normal/Eco/Dynamic Eco/SuperEco Lamp Hours Filter Mode On/Off Filter Settings Reset Filter Hours Reset/Cancel Filter Hours DCR On/...
Main menu 5. ADVANCED 6. SYSTEM Sub-menu Options 3D Settings 3D Sync Auto/Off/Frame Sequential/Frame Packing/Top-Bottom/ Side-by-Side 3D Sync Invert Disable/Invert HDMI Settings HDMI Format HDMI Range Auto/RGB/YUV Auto/Enhanced/Normal LAN Settings DHCP ON/Static IP LAN Control Settings (PG705HD/ PG705WU) Projector IP Address Subnet Mask Default Gateway DNS Server Standby LAN Control Off/On Apply Lamp Settings Lamp Mode Reset Lamp Hours Normal/Eco/Dynamic Eco/SuperEco Lamp Hours Filter Mode On/Off Filter Settings Reset Filter Hours Reset/Cancel Filter Hours DCR On/...
User Guide
Page 58
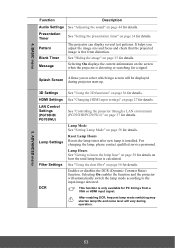
... image size and focus and check that the projected image is free from a VGA or HDMI input signal. Enables or disables the DCR (Dynamic Contrast Ratio) function. Selecting On enables the function and the projector will automatically switch the lamp mode according to know the lamp hour" on page 58 for details on page 37 for details. BASIC menu Function Description Audio Settings See "Adjusting the sound" on page 58 for details. Lamp Mode See "Setting Lamp Mode...
... image size and focus and check that the projected image is free from a VGA or HDMI input signal. Enables or disables the DCR (Dynamic Contrast Ratio) function. Selecting On enables the function and the projector will automatically switch the lamp mode according to know the lamp hour" on page 58 for details on page 37 for details. BASIC menu Function Description Audio Settings See "Adjusting the sound" on page 58 for details. Lamp Mode See "Setting Lamp Mode...

User Guide
Page 59
... selecting On when the selected input signal carries closed captioned (usually marked as "CC" in a high altitude environment" on -screen display of the dialogue, narration, and sound effects of time the OSD will still remain: Keystone, Phase, H. The following settings will remain active after your area). Size, OverScan, Language, Projector Position, High Altitude Mode, Security Settings, Remote Control Code, 3D Sync, Filter Mode, HDMI Settings. A mode for the On-Screen Display (OSD) menus. Selects a baud...
... selecting On when the selected input signal carries closed captioned (usually marked as "CC" in a high altitude environment" on -screen display of the dialogue, narration, and sound effects of time the OSD will still remain: Keystone, Phase, H. The following settings will remain active after your area). Size, OverScan, Language, Projector Position, High Altitude Mode, Security Settings, Remote Control Code, 3D Sync, Filter Mode, HDMI Settings. A mode for the On-Screen Display (OSD) menus. Selects a baud...

User Guide
Page 62
... > Filter Settings menu. 6. The filter timer starts counting. Failing to select On. Press Enter. Re-install the dust filter. 2 1 Resetting the filter timer 5. • If your personal safety when replacing the dust filter. Set Filter Mode to On only when using the projector after the dust filer (optional accessory) is displayed asking if you want to turn off the projector and unplug it from power source. 2. Loosen the screw the secures the dust filter. 3. Highlight Reset Filter Hours...
... > Filter Settings menu. 6. The filter timer starts counting. Failing to select On. Press Enter. Re-install the dust filter. 2 1 Resetting the filter timer 5. • If your personal safety when replacing the dust filter. Set Filter Mode to On only when using the projector after the dust filer (optional accessory) is displayed asking if you want to turn off the projector and unplug it from power source. 2. Loosen the screw the secures the dust filter. 3. Highlight Reset Filter Hours...

User Guide
Page 63
... waste of lamp life. 1. Or you can press Eco Mode on and set Filter Mode to On. Lamp information Getting to know the lamp hour When the projector is in operation, the duration (in hours) of time once no input source is displayed. 3. To leave the menu, press Exit. Eco Reduces lamp power consumption by 70% and lowers brightness to extend the lamp life and decreases the fan noise. SuperEco Reduces lamp power consumption...
... waste of lamp life. 1. Or you can press Eco Mode on and set Filter Mode to On. Lamp information Getting to know the lamp hour When the projector is in operation, the duration (in hours) of time once no input source is displayed. 3. To leave the menu, press Exit. Eco Reduces lamp power consumption by 70% and lowers brightness to extend the lamp life and decreases the fan noise. SuperEco Reduces lamp power consumption...


