User Manual
Page 2
... Adjust the Option 26 Other Information Specifications 27 Troubleshooting 28 Customer Support 29 Limited Warranty 30 Appendix Safety Guidelines 31 CE Conformity for Europe 31 ViewSonic N2750w 1
... Adjust the Option 26 Other Information Specifications 27 Troubleshooting 28 Customer Support 29 Limited Warranty 30 Appendix Safety Guidelines 31 CE Conformity for Europe 31 ViewSonic N2750w 1

User Manual
Page 3
...Your local waste disposal company may be liable for technical or editorial errors or omissions contained herein; ViewSonic N2750w 2 Copyright © ViewSonic Corporation, 2005. ViewSonic, the three birds logo, OnView, ViewMatch, and ViewMeter are registered trademarks of our environment. Product ... end of its useful life. For Your Records E Product Name: ViewSonic N2750w N Model Number: VS10576-1E G L Serial Number: I Purchase Date: S H Product disposal at : www.viewsonic.com. Disclaimer: ViewSonic Corporation shall not be copied, reproduced, or transmitted by any means,...
...Your local waste disposal company may be liable for technical or editorial errors or omissions contained herein; ViewSonic N2750w 2 Copyright © ViewSonic Corporation, 2005. ViewSonic, the three birds logo, OnView, ViewMatch, and ViewMeter are registered trademarks of our environment. Product ... end of its useful life. For Your Records E Product Name: ViewSonic N2750w N Model Number: VS10576-1E G L Serial Number: I Purchase Date: S H Product disposal at : www.viewsonic.com. Disclaimer: ViewSonic Corporation shall not be copied, reproduced, or transmitted by any means,...
User Manual
Page 4
... does not cover repair or attempted repair by anyone not authorized H by items placed upon or against them . If your dealer or ViewSonic. Avoid touching the screen. Skin oils are difficult to continue using the LCD display. Never remove the rear cover. Your LCD display contains... ViewSonic. Do not place heavy objects on the LCD display, video cable, or power cord. If smoke, abnormal noise, or strange odor is dangerous to remove. It is present, immediately switch the LCD display off and call your N2750w will fit into the outlet, try reversing the plug. ViewSonic N2750w ...
... does not cover repair or attempted repair by anyone not authorized H by items placed upon or against them . If your dealer or ViewSonic. Avoid touching the screen. Skin oils are difficult to continue using the LCD display. Never remove the rear cover. Your LCD display contains... ViewSonic. Do not place heavy objects on the LCD display, video cable, or power cord. If smoke, abnormal noise, or strange odor is dangerous to remove. It is present, immediately switch the LCD display off and call your N2750w will fit into the outlet, try reversing the plug. ViewSonic N2750w ...
User Manual
Page 5
... the case: 1 Use a soft, dry cloth. 2 If still not clean, apply a small amount of the LCD display. ViewSonic N2750w 4 Power Lines An outside antenna system should be fatal. Disclaimer ViewSonic® does not recommend the use of non-ammonia, non-alcohol based glass cleaner onto a clean, soft, lint-free cloth, ...and wipe the screen. ViewSonic will prevent damage to the product due to proper grounding of the mast and supporting structure, grounding of the lead-in the vicinity of ...
... the case: 1 Use a soft, dry cloth. 2 If still not clean, apply a small amount of the LCD display. ViewSonic N2750w 4 Power Lines An outside antenna system should be fatal. Disclaimer ViewSonic® does not recommend the use of non-ammonia, non-alcohol based glass cleaner onto a clean, soft, lint-free cloth, ...and wipe the screen. ViewSonic will prevent damage to the product due to proper grounding of the mast and supporting structure, grounding of the lead-in the vicinity of ...

User Manual
Page 6
Save the original box and all packing material for future shipping needs. Important! Package Contents Your LCD TV display package includes: LCD TV Display Power Cable ViewSonic User Guide RF Cable VGA Cable SCART Adaptor A/V Cable 32-Key Remote Control with batteries Quick Start Guide E N G L I S H ViewSonic N2750w 5 Getting Started Congratulations on your purchase of a ViewSonic® LCD TV display.
Save the original box and all packing material for future shipping needs. Important! Package Contents Your LCD TV display package includes: LCD TV Display Power Cable ViewSonic User Guide RF Cable VGA Cable SCART Adaptor A/V Cable 32-Key Remote Control with batteries Quick Start Guide E N G L I S H ViewSonic N2750w 5 Getting Started Congratulations on your purchase of a ViewSonic® LCD TV display.
User Manual
Page 7
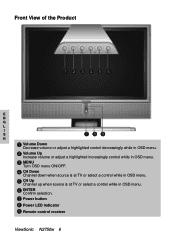
Front View of the Product 1 23456 E N G L I S 789 H 1 Volume Down Decrease volume or adjust a highlighted control decreasingly while in OSD menu. 2 Volume Up Increase volume or adjust a highlighted increasingly control while in OSD menu. 3 MENU Turn OSD menu ON/OFF. 4 CH Down Channel down when source is at TV or select a control while in OSD menu. 5 CH Up Channel up when source is at TV or select a control while in OSD menu. 6 ENTER Confirm selection. 7 Power button 8 Power LED indicator 9 Remote control receiver ViewSonic N2750w 6
Front View of the Product 1 23456 E N G L I S 789 H 1 Volume Down Decrease volume or adjust a highlighted control decreasingly while in OSD menu. 2 Volume Up Increase volume or adjust a highlighted increasingly control while in OSD menu. 3 MENU Turn OSD menu ON/OFF. 4 CH Down Channel down when source is at TV or select a control while in OSD menu. 5 CH Up Channel up when source is at TV or select a control while in OSD menu. 6 ENTER Confirm selection. 7 Power button 8 Power LED indicator 9 Remote control receiver ViewSonic N2750w 6
User Manual
Page 8
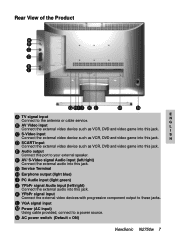
E Audio output Connect this jack. N AC power switch (Default = ON) ViewSonic N2750w 7 Rear View of the Product A B C D E F G HIJ K L M N E A TV signal input Connect to these jacks. K YPbPr signal input Connect the external video devices with progressive component output ...
E Audio output Connect this jack. N AC power switch (Default = ON) ViewSonic N2750w 7 Rear View of the Product A B C D E F G HIJ K L M N E A TV signal input Connect to these jacks. K YPbPr signal input Connect the external video devices with progressive component output ...
User Manual
Page 10
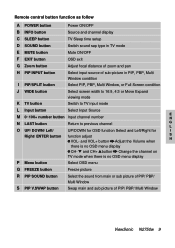
.../OFF F EXIT button OSD exit G Zoom button Adjust focal distance of zoom and pan H PIP INPUT button Select input source of PIP/ PBP/ Multi Window ViewSonic N2750w 9 and CH+ button Change the channel on TV mode when there is no OSD menu display P Menu button Select OSD menu Q FREEZE button Freeze picture...
.../OFF F EXIT button OSD exit G Zoom button Adjust focal distance of zoom and pan H PIP INPUT button Select input source of PIP/ PBP/ Multi Window ViewSonic N2750w 9 and CH+ button Change the channel on TV mode when there is no OSD menu display P Menu button Select OSD menu Q FREEZE button Freeze picture...
User Manual
Page 11
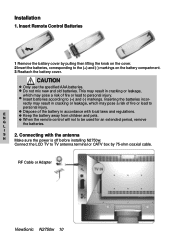
Dispose of the battery in accordance with the antenna H Make sure the power is off before installing N2750w. Insert batteries according to be used for an extended period, remove G the batteries. L I S 2. Connect the LCD TV to TV antenna terminal... lead to personal injury. E Keep the battery away from children and pets. Installation 1. Connecting with local laws and regulations. RF Cable or Adapter ViewSonic N2750w 10 Do not mix new and old batteries. N When the remote control will not to (+) and (-) markings. Inserting the batteries incor- CAUTION ...
Dispose of the battery in accordance with the antenna H Make sure the power is off before installing N2750w. Insert batteries according to be used for an extended period, remove G the batteries. L I S 2. Connect the LCD TV to TV antenna terminal... lead to personal injury. E Keep the battery away from children and pets. Installation 1. Connecting with local laws and regulations. RF Cable or Adapter ViewSonic N2750w 10 Do not mix new and old batteries. N When the remote control will not to (+) and (-) markings. Inserting the batteries incor- CAUTION ...
User Manual
Page 12
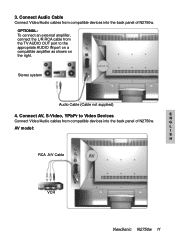
Connect AV, S-Video, YPbPr to Video Devices E N Connect Video/Audio cables from the TV AUDIO OUT port to the appropriate AUDIO IN port on a compatible amplifier as shown on the right. Stereo system Audio Cable (Cable not supplied) 4. OPTIONAL: To connect an external amplifier, connect the L/R RCA cable from compatible devices into the back panel of N2750w. Connect Audio Cable Connect Video/Audio cables from compatible devices into the back panel of N2750w. G AV model: L I S H RCA A/V Cable VCR ViewSonic N2750w 11 3.
Connect AV, S-Video, YPbPr to Video Devices E N Connect Video/Audio cables from the TV AUDIO OUT port to the appropriate AUDIO IN port on a compatible amplifier as shown on the right. Stereo system Audio Cable (Cable not supplied) 4. OPTIONAL: To connect an external amplifier, connect the L/R RCA cable from compatible devices into the back panel of N2750w. Connect Audio Cable Connect Video/Audio cables from compatible devices into the back panel of N2750w. G AV model: L I S H RCA A/V Cable VCR ViewSonic N2750w 11 3.
User Manual
Page 14
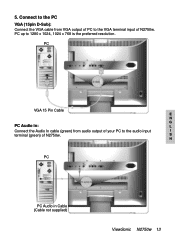
PC up to the VGA terminal input of N2750w. S H PC PC Audio in : L Connect the Audio In cable (green) from VGA output of PC to 1280 x 1024, 1024 x 768 is the preferred resolution. Connect to the PC VGA (15pin D-Sub): Connect the VGA cable from audio output of your PC to the audio input I terminal (green) of N2750w. PC VGA 15 Pin Cable E N G PC Audio in Cable (Cable not supplied) ViewSonic N2750w 13 5.
PC up to the VGA terminal input of N2750w. S H PC PC Audio in : L Connect the Audio In cable (green) from VGA output of PC to 1280 x 1024, 1024 x 768 is the preferred resolution. Connect to the PC VGA (15pin D-Sub): Connect the VGA cable from audio output of your PC to the audio input I terminal (green) of N2750w. PC VGA 15 Pin Cable E N G PC Audio in Cable (Cable not supplied) ViewSonic N2750w 13 5.
User Manual
Page 15
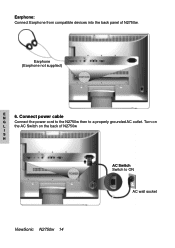
Earphone (Earphone not supplied) E N 6. Connect power cable G Connect the power cord to the N2750w then to ON AC wall socket ViewSonic N2750w 14 Turn on L the AC Switch on the back of N2750w. Earphone: Connect Earphone from compatible devices into the back panel of N2750w I S H AC Switch Switch to a properly grounded AC outlet.
Earphone (Earphone not supplied) E N 6. Connect power cable G Connect the power cord to the N2750w then to ON AC wall socket ViewSonic N2750w 14 Turn on L the AC Switch on the back of N2750w. Earphone: Connect Earphone from compatible devices into the back panel of N2750w I S H AC Switch Switch to a properly grounded AC outlet.
User Manual
Page 16
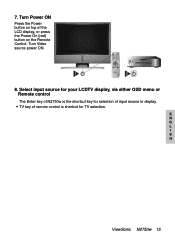
Turn Video source power ON. 8. Turn Power ON Press the Power button on top of input source to display. Select input source for your LCDTV display, via either OSD menu or Remote control The Enter key of N2750w is shortcut for selection of the LCD display, or press the Power On (red) button on the Remote Control. 7. E N G L I S H ViewSonic N2750w 15 TV key of remote control is the shortcut key for TV selection.
Turn Video source power ON. 8. Turn Power ON Press the Power button on top of input source to display. Select input source for your LCDTV display, via either OSD menu or Remote control The Enter key of N2750w is shortcut for selection of the LCD display, or press the Power On (red) button on the Remote Control. 7. E N G L I S H ViewSonic N2750w 15 TV key of remote control is the shortcut key for TV selection.

User Manual
Page 17
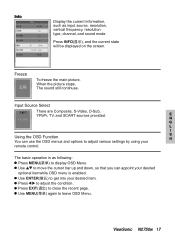
... of your LCD TV, you want to set input sources, such as following. Ex: Your desired number is as OSD sources, volume adjusting, and etc. ViewSonic N2750w 16 Volume Adjust Press or VOL(音量)-/+ to select your favorite channels. After auto scanning all the available channels, the ordinal of time, please...
... of your LCD TV, you want to set input sources, such as following. Ex: Your desired number is as OSD sources, volume adjusting, and etc. ViewSonic N2750w 16 Volume Adjust Press or VOL(音量)-/+ to select your favorite channels. After auto scanning all the available channels, the ordinal of time, please...
User Manual
Page 18
... to adjust various settings by using your desired optional itemwhile OSD menu is as input source, resolution, vertical frequency, resolution type, channel, and sound mode. ViewSonic N2750w 17
... to adjust various settings by using your desired optional itemwhile OSD menu is as input source, resolution, vertical frequency, resolution type, channel, and sound mode. ViewSonic N2750w 17
User Manual
Page 19
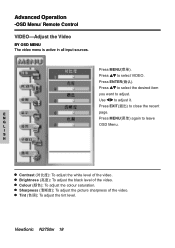
...;): To adjust the black level of the video. Sharpness To adjust the picture sharpness of the video. Tint (色调): To adjust the tint level. ViewSonic N2750w 18 Use to select VIDEO. N Press MENU(菜单) again to adjust. Press ENTER(确认). I S H Contrast To adjust the white level of the video...
...;): To adjust the black level of the video. Sharpness To adjust the picture sharpness of the video. Tint (色调): To adjust the tint level. ViewSonic N2750w 18 Use to select VIDEO. N Press MENU(菜单) again to adjust. Press ENTER(确认). I S H Contrast To adjust the white level of the video...
User Manual
Page 20
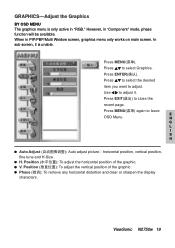
... "RGB." Press to select the desired item you want to adjust. H. When in PIP/PBP/Multi Window screen, graphics menu only works on main screen. ViewSonic N2750w 19
... "RGB." Press to select the desired item you want to adjust. H. When in PIP/PBP/Multi Window screen, graphics menu only works on main screen. ViewSonic N2750w 19
User Manual
Page 21
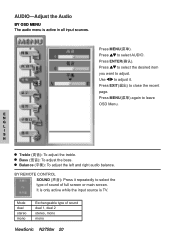
... REMOTE CONTROL SOUND (声音): Press it . Use to adjust it repeatedly to select the type of sound of sound dual 1, dual 2 stereo, mono mono ViewSonic N2750w 20 Press to leave OSD Menu. Press MENU(菜单) again to select AUDIO. Press to select the desired item you want to close the...
... REMOTE CONTROL SOUND (声音): Press it . Use to adjust it repeatedly to select the type of sound of sound dual 1, dual 2 stereo, mono mono ViewSonic N2750w 20 Press to leave OSD Menu. Press MENU(菜单) again to select AUDIO. Press to select the desired item you want to close the...
User Manual
Page 22
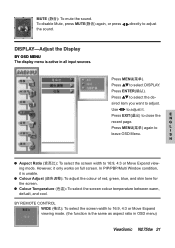
..., and cool. sired item you want to L I leave OSD Menu. Use to 16:9, 4:3 or Move Expand viewing mode. (the function is active in OSD menu) ViewSonic N2750w 21
..., and cool. sired item you want to L I leave OSD Menu. Use to 16:9, 4:3 or Move Expand viewing mode. (the function is active in OSD menu) ViewSonic N2750w 21
User Manual
Page 23
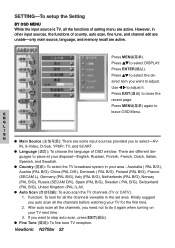
... functions of OSD window. After auto scan all the channels before watching your area - There are some input sources provided you want to select-AV- ViewSonic N2750w 22 Press MENU(菜单). Use to E leave OSD Menu. However, in your TV for all the functions of setting menu are active. N G L I ), All...
... functions of OSD window. After auto scan all the channels before watching your area - There are some input sources provided you want to select-AV- ViewSonic N2750w 22 Press MENU(菜单). Use to E leave OSD Menu. However, in your TV for all the functions of setting menu are active. N G L I ), All...


