User Manual
Page 2
CONTENTS Important Safety Instructions 1 Copyright Information 2 Antenna Installation Instructions 3 Cleaning the LCD TV 3 CONNECT PERIPHERAL EQUIPMENT Front Panel Control Knobs 4 Preparation 5 OPERATING INSTRUCTIONS Use of the remote control 6 remote control 7 Preparation 8 To use the menus 10 Main menu 10 Headphone 16 Tips 16 Appendix Specification 17 Troubleshooting Customer Support 20 Limited Warranty 21
CONTENTS Important Safety Instructions 1 Copyright Information 2 Antenna Installation Instructions 3 Cleaning the LCD TV 3 CONNECT PERIPHERAL EQUIPMENT Front Panel Control Knobs 4 Preparation 5 OPERATING INSTRUCTIONS Use of the remote control 6 remote control 7 Preparation 8 To use the menus 10 Main menu 10 Headphone 16 Tips 16 Appendix Specification 17 Troubleshooting Customer Support 20 Limited Warranty 21
User Manual
Page 3
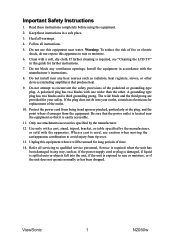
... if the unit does not operate normally or has been dropped. Service is required, see "Cleaning the LCD TV" in accordance with the manufacturer's instructions. 8. Keep these instructions completely before using the equipment. 2. Warning: To reduce the risk of the polarized or grounding-type plug. ViewSonic 1 N2060w A polarized plug has two blades with the apparatus. Protect the power cord from being tread upon...
... if the unit does not operate normally or has been dropped. Service is required, see "Cleaning the LCD TV" in accordance with the manufacturer's instructions. 8. Keep these instructions completely before using the equipment. 2. Warning: To reduce the risk of the polarized or grounding-type plug. ViewSonic 1 N2060w A polarized plug has two blades with the apparatus. Protect the power cord from being tread upon...
User Manual
Page 5
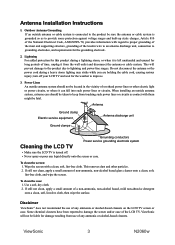
...-free cloth, then wipe the surface. ViewSonic 3 N2060w Wipe the screen with regard to proper grounding of the mast and supporting structure, grounding of any ammonia or alcohol-based cleaners. Do not disconnect the antenna or the power cord during a lightning storm, or when it from the wall outlet and disconnect the antenna or cable system. Use a soft, dry cloth. 2. Antenna Ground clamp Electric service...
...-free cloth, then wipe the surface. ViewSonic 3 N2060w Wipe the screen with regard to proper grounding of the mast and supporting structure, grounding of any ammonia or alcohol-based cleaners. Do not disconnect the antenna or the power cord during a lightning storm, or when it from the wall outlet and disconnect the antenna or cable system. Use a soft, dry cloth. 2. Antenna Ground clamp Electric service...
User Manual
Page 6
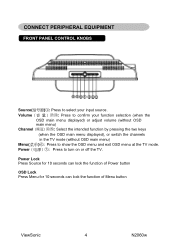
... show the OSD menu and exit OSD menu at the TV mode. Power Lock Press Source for 10 seconds can lock the function of Power button OSD Lock Press Menu for 10 seconds can lock the function of Menu button ViewSonic 4 N2060w Volume Press to confirm your input source. CONNECT PERIPHERAL EQUIPMENT FRONT PANEL CONTROL KNOBS Source Press to select your function selection (when the OSD main menu displayed) or adjust volume (without OSD main menu) Channel Select the...
... show the OSD menu and exit OSD menu at the TV mode. Power Lock Press Source for 10 seconds can lock the function of Power button OSD Lock Press Menu for 10 seconds can lock the function of Menu button ViewSonic 4 N2060w Volume Press to confirm your input source. CONNECT PERIPHERAL EQUIPMENT FRONT PANEL CONTROL KNOBS Source Press to select your function selection (when the OSD main menu displayed) or adjust volume (without OSD main menu) Channel Select the...
User Manual
Page 7
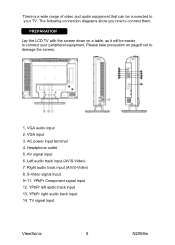
Headphone outlet 5. Right audio track input (AV/S-Video) 8. AC power input terminal 4. YPbPr left audio track input 13. PREPARATION Lay the LCD TV with the screen down on page8 not to connect your TV. AV signal input 6. YPbPr Component signal input 12. TV signal input ViewSonic 5 N2060w Please take precaution on a table, as it will be connected to connect them. Left audio track input (AV/S-Video) 7. VGA input 3. S-Video signal input 9~11. There is a wide range of video and audio equipment that...
Headphone outlet 5. Right audio track input (AV/S-Video) 8. AC power input terminal 4. YPbPr left audio track input 13. PREPARATION Lay the LCD TV with the screen down on page8 not to connect your TV. AV signal input 6. YPbPr Component signal input 12. TV signal input ViewSonic 5 N2060w Please take precaution on a table, as it will be connected to connect them. Left audio track input (AV/S-Video) 7. VGA input 3. S-Video signal input 9~11. There is a wide range of video and audio equipment that...
User Manual
Page 8
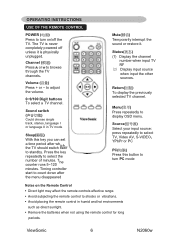
... vibrations. • Avoid placing the remote control in TV mode Sleep(睡眠) With this button to turn PC mode Notes on /off unless it . to select the number counter of minutes. The TV is never completely powered off the TV. Press the key repeatedly to adjust the volume. 0~9/100 Digit buttons To select a TV channel. Return(回复) To display the previously selected TV channel. ViewSonic 6 N2060w
... vibrations. • Avoid placing the remote control in TV mode Sleep(睡眠) With this button to turn PC mode Notes on /off unless it . to select the number counter of minutes. The TV is never completely powered off the TV. Press the key repeatedly to adjust the volume. 0~9/100 Digit buttons To select a TV channel. Return(回复) To display the previously selected TV channel. ViewSonic 6 N2060w
User Manual
Page 11
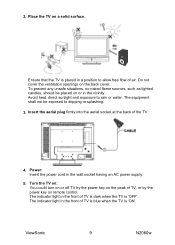
...: You could turn on or off TV by the power key on remote control. Ensure that the TV is placed in a position to dripping or splashing. 3. Do not cover the ventilation openings on a solid surface. 2. ViewSonic 9 N2060w Power: Insert the power cord in the vicinity. Avoid heat, direct sunlight and exposure to rain or water. The indicator light in the...
...: You could turn on or off TV by the power key on remote control. Ensure that the TV is placed in a position to dripping or splashing. 3. Do not cover the ventilation openings on a solid surface. 2. ViewSonic 9 N2060w Power: Insert the power cord in the vicinity. Avoid heat, direct sunlight and exposure to rain or water. The indicator light in the...
User Manual
Page 12
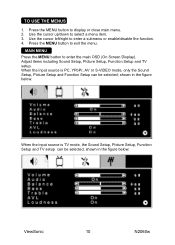
... be selected, shown in the figure below : When the input source is TV mode, the Sound Setup, Picture Setup, Function Setup and TV setup can be selected; Press the MENU button to enter a submenu or enable/disable the function. 4. Adjust items including Sound Setup, Picture Setup, Function Setup and TV setup. shown in the figure below : ViewSonic 10 N2060w TO USE THE MENUS 1. MAIN MENU Press the MENU button to enter the main OSD (On Screen Display).
... be selected, shown in the figure below : When the input source is TV mode, the Sound Setup, Picture Setup, Function Setup and TV setup can be selected; Press the MENU button to enter a submenu or enable/disable the function. 4. Adjust items including Sound Setup, Picture Setup, Function Setup and TV setup. shown in the figure below : ViewSonic 10 N2060w TO USE THE MENUS 1. MAIN MENU Press the MENU button to enter the main OSD (On Screen Display).
User Manual
Page 13
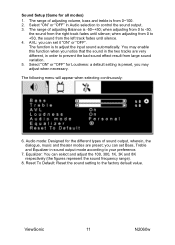
... to adjust the input sound automatically. ViewSonic 11 N2060w The function is -50~+50; Reset To Default: Reset the sound setting to control the sound output. 3. when adjusting from 0 to -50, the sound from 0~100. 2. The range of adjusting volume, bass and treble is preset, you may enable this function when you can set Bass, Treble and Equalizer in sound output mode according to your preference. 7. Sound Setup (Same for the different types of sound output...
... to adjust the input sound automatically. ViewSonic 11 N2060w The function is -50~+50; Reset To Default: Reset the sound setting to control the sound output. 3. when adjusting from 0 to -50, the sound from 0~100. 2. The range of adjusting volume, bass and treble is preset, you may enable this function when you can set Bass, Treble and Equalizer in sound output mode according to your preference. 7. Sound Setup (Same for the different types of sound output...
User Manual
Page 14
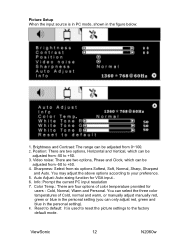
.... 5. Auto Adjust: Auto-sizing function for users - Color Temp.: There are two options, Phase and Clock, which can be adjusted from -50 to +50. 4. You can select the three color temperatures of color temperature provided for VGA input.. 6. Reset to default: It is in PC mode, shown in the personal setting). 8. Info: Prompt the current PC input resolution 7. Picture Setup When the input source is used to reset the picture settings to the factory default mode. Brightness...
.... 5. Auto Adjust: Auto-sizing function for users - Color Temp.: There are two options, Phase and Clock, which can be adjusted from -50 to +50. 4. You can select the three color temperatures of color temperature provided for VGA input.. 6. Reset to default: It is in PC mode, shown in the personal setting). 8. Info: Prompt the current PC input resolution 7. Picture Setup When the input source is used to reset the picture settings to the factory default mode. Brightness...
User Manual
Page 15
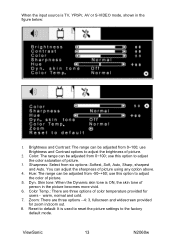
...: Softest, Soft, Auto, Sharp, sharpest and Auto. ViewSonic 13 N2060w use this option to adjust the color of picture. 3. warm, normal and cold. 7. Reset to default: It is used to reset the picture settings to adjust the brightness of person in the figure below: 1. Zoom: There are three options of picture using any option above. 4. When the input source is TV, YPbPr, AV or S-VIDEO mode, shown in the picture becomes more...
...: Softest, Soft, Auto, Sharp, sharpest and Auto. ViewSonic 13 N2060w use this option to adjust the color of picture. 3. warm, normal and cold. 7. Reset to default: It is used to reset the picture settings to adjust the brightness of person in the figure below: 1. Zoom: There are three options of picture using any option above. 4. When the input source is TV, YPbPr, AV or S-VIDEO mode, shown in the picture becomes more...
User Manual
Page 16
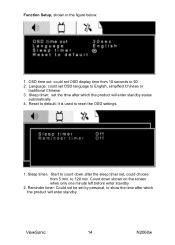
Function Setup, shown in the figure below: 1. Sleep timer: set the time after which the product will enter standby ViewSonic 14 N2060w Language: could set , could choose from 10 seconds to count down shown on the screen when only one minute left before enter standby 2. to reset the OSD settings. 1. Reset to default: It is used to 120 min. Count down after the sleep timer set OSD display time from 5 min. Sleep timer:...
Function Setup, shown in the figure below: 1. Sleep timer: set the time after which the product will enter standby ViewSonic 14 N2060w Language: could set , could choose from 10 seconds to count down shown on the screen when only one minute left before enter standby 2. to reset the OSD settings. 1. Reset to default: It is used to 120 min. Count down after the sleep timer set OSD display time from 5 min. Sleep timer:...
User Manual
Page 17
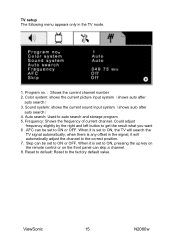
... mode. Color system: shows the current picture input system(shows auto after auto search) 4. when there is set to auto search and storage program 5. Reset to default: Reset to get the result what you want 6 . Frequency: Shows the frequency of current channel. Could adjust frequency slightly by the right and left button to the factory default value. Program no. : Shows the current channel number 2. AFC can skip a channel. 8. TV setup...
... mode. Color system: shows the current picture input system(shows auto after auto search) 4. when there is set to auto search and storage program 5. Reset to default: Reset to get the result what you want 6 . Frequency: Shows the frequency of current channel. Could adjust frequency slightly by the right and left button to the factory default value. Program no. : Shows the current channel number 2. AFC can skip a channel. 8. TV setup...
User Manual
Page 18
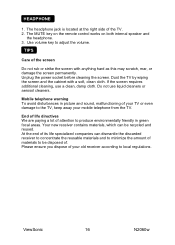
... located at the right side of the screen Do not rub or strike the screen with a soft, clean cloth. HEADPHONE 1. Use volume key to produce environmentally friendly in picture and sound, malfunctioning of your TV or even damage to the TV, keep away your old receiver according to be recycled and reused. Please ensure you dispose of . ViewSonic 16 N2060w...
... located at the right side of the screen Do not rub or strike the screen with a soft, clean cloth. HEADPHONE 1. Use volume key to produce environmentally friendly in picture and sound, malfunctioning of your TV or even damage to the TV, keep away your old receiver according to be recycled and reused. Please ensure you dispose of . ViewSonic 16 N2060w...
User Manual
Page 19
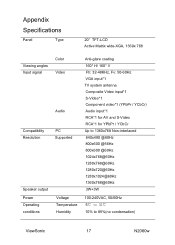
Appendix Specifications Panel Type 20" TFT-LCD Active Matrix wide-XGA, 1360x 768 Viewing angles Input signal Compatibility Resolution Speaker output Power Operating conditions Color Video Audio PC Supported Voltage Temperature Humidity Anti-glare coating 160° H/ 160° V Fh: 32-48KHz, Fv: 50-60Hz VGA input*1 TV system antenna Composite Video input*1 S-Video*1 Component video*1 (YPbPr / YCbCr) Audio input*1 RCA*1 for AV and S-Video RCA*1 for YPbPr / YCbCr Up to 1360x768 Non-interlaced 640x480 @60Hz 800x600 @56Hz...
Appendix Specifications Panel Type 20" TFT-LCD Active Matrix wide-XGA, 1360x 768 Viewing angles Input signal Compatibility Resolution Speaker output Power Operating conditions Color Video Audio PC Supported Voltage Temperature Humidity Anti-glare coating 160° H/ 160° V Fh: 32-48KHz, Fv: 50-60Hz VGA input*1 TV system antenna Composite Video input*1 S-Video*1 Component video*1 (YPbPr / YCbCr) Audio input*1 RCA*1 for AV and S-Video RCA*1 for YPbPr / YCbCr Up to 1360x768 Non-interlaced 640x480 @60Hz 800x600 @56Hz...
User Manual
Page 20
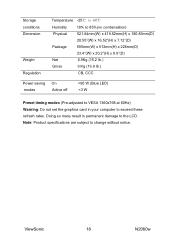
Storage conditions Dimension Weight Regulation Temperature -25℃ to 60℃ Humidity 10% to 85%(no condensation) Physical 521.84mm(W) x 419.52mm(H) x 180.83mm(D) 20.55"(W) x 16.52"(H) x 7.12"(D) Package 595mm(W) x 512mm(H) x 226mm(D) 23.4"(W) x 20.2"(H) x 8.9"(D) Net Gross 6.9Kg (15.2 Ib.) 9 Kg (19.9 Ib.) CB, CCC Power saving On modes Active off
Storage conditions Dimension Weight Regulation Temperature -25℃ to 60℃ Humidity 10% to 85%(no condensation) Physical 521.84mm(W) x 419.52mm(H) x 180.83mm(D) 20.55"(W) x 16.52"(H) x 7.12"(D) Package 595mm(W) x 512mm(H) x 226mm(D) 23.4"(W) x 20.2"(H) x 8.9"(D) Net Gross 6.9Kg (15.2 Ib.) 9 Kg (19.9 Ib.) CB, CCC Power saving On modes Active off
User Manual
Page 21
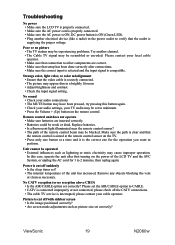
...; Is the sleep timer set correctly? Power is the correct one button at the remote control sensor on the power of the remote control beam may cause improper operation. Troubleshooting No power • Make sure the LCD TV is properly connected. • Make sure the AC power cord is properly connected. • Make sure the AC power is ON, DC power button is ON (Green LED). • Plug another channel. • The Cable TV signal may be scrambled...
...; Is the sleep timer set correctly? Power is the correct one button at the remote control sensor on the power of the remote control beam may cause improper operation. Troubleshooting No power • Make sure the LCD TV is properly connected. • Make sure the AC power cord is properly connected. • Make sure the AC power is ON, DC power button is ON (Green LED). • Plug another channel. • The Cable TV signal may be scrambled...
User Manual
Page 23
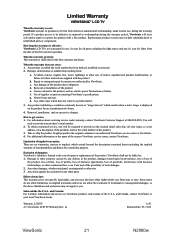
... cost of repair or replacement of nature, unauthorized product modification, or failure to follow instructions supplied with business relationships, or other property caused by any other rights which vary from defects in " which extend beyond the description contained herein including the implied warranty of time. 4. c. Removal or installation of the product. 3. and Canada, contact ViewSonic or your product's serial number. 2. Any...
... cost of repair or replacement of nature, unauthorized product modification, or failure to follow instructions supplied with business relationships, or other property caused by any other rights which vary from defects in " which extend beyond the description contained herein including the implied warranty of time. 4. c. Removal or installation of the product. 3. and Canada, contact ViewSonic or your product's serial number. 2. Any...
Brochure
Page 1
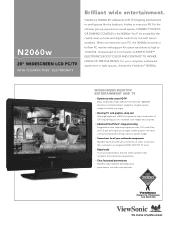
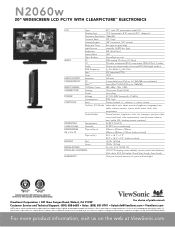
... inputs provide easy connection of 700:1 (typ) bring you rich, saturated color images and crisp text. > Advanced ClearPicture™ image processing Integrated motion adaptive progressive scan, 3-D comb filter and 3:2 pull down give you a larger, clearer picture. Also included is an integrated NTSC (STD.TV) TV tuner. > Digital audio It's all your PC, the N2060w becomes a brilliant PC monitor with true 1366x768 resolution...
... inputs provide easy connection of 700:1 (typ) bring you rich, saturated color images and crisp text. > Advanced ClearPicture™ image processing Integrated motion adaptive progressive scan, 3-D comb filter and 3:2 pull down give you a larger, clearer picture. Also included is an integrated NTSC (STD.TV) TV tuner. > Digital audio It's all your PC, the N2060w becomes a brilliant PC monitor with true 1366x768 resolution...
Brochure
Page 2
.../G5 up to 1360x768 INPUT SIGNAL TV/Video Comp. 480i, 480p, 720p, 1080i CONNECTOR Analog 15-pin mini D-sub (VGA) Power 3-pin plug POWER Voltage AC 100-240V (universal), 47-63Hz Consumption 90W (typ) CONTROLS Basic Power, channel +/-, volume +/-, menu, source OnView® (PC Mode) Video adjust, auto adjust, contrast, brightness, language, bass, treble, volume, position, source, audio select, clock, color temperature (Video Mode) Picture (contrast, brightness, color, tint, sharpness, position, video noise, black level, color temperature), sound (volume, balance, bass, treble...
.../G5 up to 1360x768 INPUT SIGNAL TV/Video Comp. 480i, 480p, 720p, 1080i CONNECTOR Analog 15-pin mini D-sub (VGA) Power 3-pin plug POWER Voltage AC 100-240V (universal), 47-63Hz Consumption 90W (typ) CONTROLS Basic Power, channel +/-, volume +/-, menu, source OnView® (PC Mode) Video adjust, auto adjust, contrast, brightness, language, bass, treble, volume, position, source, audio select, clock, color temperature (Video Mode) Picture (contrast, brightness, color, tint, sharpness, position, video noise, black level, color temperature), sound (volume, balance, bass, treble...


