
M1 mini User Guide
Page 1
... http://www.viewsonic.com in English, or in specific languages using your product for future service. "Antes de operar su equipo lea cu idadosamente las instrucciones en este manual" Model No. VS18039 P/N: M1 mini M1 mini Portable LED Projector User Guide IMPORTANT: Please read this User Guide will describe your limited coverage from ViewSonic® Corporation, which is also found on installing and using the Regional...
... http://www.viewsonic.com in English, or in specific languages using your product for future service. "Antes de operar su equipo lea cu idadosamente las instrucciones en este manual" Model No. VS18039 P/N: M1 mini M1 mini Portable LED Projector User Guide IMPORTANT: Please read this User Guide will describe your limited coverage from ViewSonic® Corporation, which is also found on installing and using the Regional...

M1 mini User Guide
Page 3
... sources of the projector to dangerous levels. 3 Do not install near any heavy objects on the projector or connection cables. • Do not stand the projector on end vertically. The intense light beam may cause death if you start using the projector. • Keep this could cause them to break on . • Do not block the projection lens with live parts. • When moving the projector...
... sources of the projector to dangerous levels. 3 Do not install near any heavy objects on the projector or connection cables. • Do not stand the projector on end vertically. The intense light beam may cause death if you start using the projector. • Keep this could cause them to break on . • Do not block the projection lens with live parts. • When moving the projector...
M1 mini User Guide
Page 6
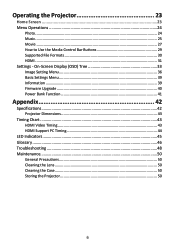
... Image Setting Menu 36 Basic Settings Menu 39 Information...39 Firmware Upgrade 40 Power Bank Function 41 Appendix 42 Specifications...42 Projector Dimensions 43 Timing Chart...43 HDMI Video Timing 43 HDMI Support PC Timing 44 LED Indicators...45 Glossary...46 Troubleshooting...48 Maintenance...50 General Precautions 50 Cleaning the Lens 50 Cleaning the Case 50 Storing the Projector 50 6 Operating the Projector 23 Home Screen 23 Menu Operations 24 Photo...24 Music...25 Movie...27 How to Use the Media Control...
... Image Setting Menu 36 Basic Settings Menu 39 Information...39 Firmware Upgrade 40 Power Bank Function 41 Appendix 42 Specifications...42 Projector Dimensions 43 Timing Chart...43 HDMI Video Timing 43 HDMI Support PC Timing 44 LED Indicators...45 Glossary...46 Troubleshooting...48 Maintenance...50 General Precautions 50 Cleaning the Lens 50 Cleaning the Case 50 Storing the Projector 50 6 Operating the Projector 23 Home Screen 23 Menu Operations 24 Photo...24 Music...25 Movie...27 How to Use the Media Control...
M1 mini User Guide
Page 8
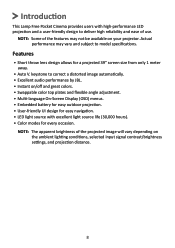
... users with excellent light source life (30,000 hours). • Color modes for every occasion. Actual performance may not be available on your projector. Features • Short throw lens design allows for easy navigation. • LED light source with high-performance LED projection and a user-friendly design to model specifications. keystone to correct a distorted image automatically. • Excellent audio performance by JBL. • Instant on the ambient lighting conditions, selected input signal contrast/brightness settings, and projection distance...
... users with excellent light source life (30,000 hours). • Color modes for every occasion. Actual performance may not be available on your projector. Features • Short throw lens design allows for easy navigation. • LED light source with high-performance LED projection and a user-friendly design to model specifications. keystone to correct a distorted image automatically. • Excellent audio performance by JBL. • Instant on the ambient lighting conditions, selected input signal contrast/brightness settings, and projection distance...
M1 mini User Guide
Page 10
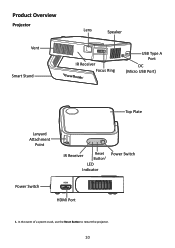
In the event of a system crash, use the Reset Button to restart the projector. 10 Product Overview Projector Vent Smart Stand Lens Speaker IR Receiver Focus Ring USB Type A Port DC (Micro USB Port) Top Plate Lanyard Attachment Point IR Receiver Reset Button¹ LED Indicator Power Switch HDMI Power Switch HDMI Port 1.
In the event of a system crash, use the Reset Button to restart the projector. 10 Product Overview Projector Vent Smart Stand Lens Speaker IR Receiver Focus Ring USB Type A Port DC (Micro USB Port) Top Plate Lanyard Attachment Point IR Receiver Reset Button¹ LED Indicator Power Switch HDMI Power Switch HDMI Port 1.

M1 mini User Guide
Page 16
NOTE: Charge the projector for 2 hours (5V/2A) before using it in battery mode for the first time. 16 Connecting to connect the projector with other end of the projector. 2. Plug the other equipment. Making Connections This section guides you on the side of the USB cord into a power bank, smartphone adapter, or PC (5V/2A). Connect the USB cord to the Micro USB Port on how to Power 1.
NOTE: Charge the projector for 2 hours (5V/2A) before using it in battery mode for the first time. 16 Connecting to connect the projector with other end of the projector. 2. Plug the other equipment. Making Connections This section guides you on the side of the USB cord into a power bank, smartphone adapter, or PC (5V/2A). Connect the USB cord to the Micro USB Port on how to Power 1.

M1 mini User Guide
Page 17
... Indicator (Charging) About 2 hours (5V/2A)1 2.1 hours (Normal) / 2.4 hours (ECO) During Charging: Red LED light is On Full Charge: Red LED light is Off NOTE: • When the projector is in use, a 5V/2A power adapter is required to power other devices, e.g. As the battery's power level runs low, the screen will turn off or restart automatically, suggest to remove USB A connected device to have battery fully charged. • To keep the projector powered...
... Indicator (Charging) About 2 hours (5V/2A)1 2.1 hours (Normal) / 2.4 hours (ECO) During Charging: Red LED light is On Full Charge: Red LED light is Off NOTE: • When the projector is in use, a 5V/2A power adapter is required to power other devices, e.g. As the battery's power level runs low, the screen will turn off or restart automatically, suggest to remove USB A connected device to have battery fully charged. • To keep the projector powered...
M1 mini User Guide
Page 18
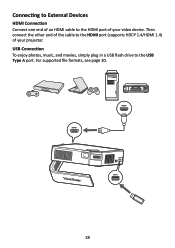
Then connect the other end of the cable to the HDMI port (supports HDCP 1.4/HDMI 1.4) of your projector. Connecting to External Devices HDMI Connection Connect one end of an HDMI cable to the HDMI port of your video device. HDMI HDMI USB A 18 USB Connection To enjoy photos, music, and movies, simply plug in a USB flash drive to the USB Type A port. For supported file formats, see page 30.
Then connect the other end of the cable to the HDMI port (supports HDCP 1.4/HDMI 1.4) of your projector. Connecting to External Devices HDMI Connection Connect one end of an HDMI cable to the HDMI port of your video device. HDMI HDMI USB A 18 USB Connection To enjoy photos, music, and movies, simply plug in a USB flash drive to the USB Type A port. For supported file formats, see page 30.

M1 mini User Guide
Page 19
Ensure the projector is connected to your desired viewing angle. Alternatively, press the Power button on the projector. Move the Smart Stand to a power source or that the battery has sufficient charge. 2. or 3. If only using the Power button on the remote control to turn on the remote control. Using the Projector Starting Up the Projector 1. Push the Power Switch to power off, the projector will enter standby mode and the embedded battery will still consume some power. 19 NOTE: When not in use, please push the Power Switch to Off.
Ensure the projector is connected to your desired viewing angle. Alternatively, press the Power button on the projector. Move the Smart Stand to a power source or that the battery has sufficient charge. 2. or 3. If only using the Power button on the remote control to turn on the remote control. Using the Projector Starting Up the Projector 1. Push the Power Switch to power off, the projector will enter standby mode and the embedded battery will still consume some power. 19 NOTE: When not in use, please push the Power Switch to Off.

M1 mini User Guide
Page 22
... Power Switch to power off the projector. Shutting Down the Projector 1. To cancel, press any other button on the remote control and the following confirmation message will still consume some power. 22 If only using the Power button on the remote control again to turn off , the projector will enter standby mode and the embedded battery will appear: Photo PrMesusstihce Power BuMttoonviAegain to PowHerDOMffI Setting 2. Push the Power Switch or press the Power button on the remote control...
... Power Switch to power off the projector. Shutting Down the Projector 1. To cancel, press any other button on the remote control and the following confirmation message will still consume some power. 22 If only using the Power button on the remote control again to turn off , the projector will enter standby mode and the embedded battery will appear: Photo PrMesusstihce Power BuMttoonviAegain to PowHerDOMffI Setting 2. Push the Power Switch or press the Power button on the remote control...

M1 mini User Guide
Page 29
... devices may be damaged or lost. Only use an USB extension cable, the USB device may not recognize the USB. 3. Data on screen if a video, music, or photo file are selected to load. 5. How to Use the Media Control Bar Buttons The media control bar buttons will need extra time to be opened. If you use USB storage devices formatted with Windows FAT32 or NTFS file system. 4. Larger...
... devices may be damaged or lost. Only use an USB extension cable, the USB device may not recognize the USB. 3. Data on screen if a video, music, or photo file are selected to load. 5. How to Use the Media Control Bar Buttons The media control bar buttons will need extra time to be opened. If you use USB storage devices formatted with Windows FAT32 or NTFS file system. 4. Larger...

M1 mini User Guide
Page 31
NOTE: If there is no signal in HDMI mode, Image and Basic settings can be adjusted by pressing the Settings [ ] button on the remote control select HDMI, and press OK. 3. Connect your media player, PC, or other HDMI compatible device to the projector via an HDMI cable. 2. Using the directional buttons on the remote control. While in HDMI input for 20 minutes, the system will power off automatically. 31 Photo Music Movie HDMI Setting 1. HDMI Project content from your media player, PC, or other HDMI compatible device.
NOTE: If there is no signal in HDMI mode, Image and Basic settings can be adjusted by pressing the Settings [ ] button on the remote control select HDMI, and press OK. 3. Connect your media player, PC, or other HDMI compatible device to the projector via an HDMI cable. 2. Using the directional buttons on the remote control. While in HDMI input for 20 minutes, the system will power off automatically. 31 Photo Music Movie HDMI Setting 1. HDMI Project content from your media player, PC, or other HDMI compatible device.

M1 mini User Guide
Page 36
... with several predefined picture modes so that you have previously adjusted the Brightness setting to suit your selected input and viewing environment. Brightness User Recalls the customized user settings. Contrast 1 Use this to set the peak white level after you can choose one to suit your operating environment and input signal. The higher the value, the brighter the image. Best for colorful movies, video clips from digital cameras, or...
... with several predefined picture modes so that you have previously adjusted the Brightness setting to suit your selected input and viewing environment. Brightness User Recalls the customized user settings. Contrast 1 Use this to set the peak white level after you can choose one to suit your operating environment and input signal. The higher the value, the brighter the image. Best for colorful movies, video clips from digital cameras, or...

M1 mini User Guide
Page 37
... the color temperature setting. • 6500K: Maintains normal white coloring. • 7500K: A higher, cooler color temperature than 6500K. • 9300K: The highest color temperature; Lower settings produce less saturated colors; in a video picture. If the saturation is too high, that color from the image entirely. Menu Option Saturation Tint Color Temp Description Refers to the amount of that color in fact, a setting of "0" removes that color will be overpowering and unrealistic. makes the image...
... the color temperature setting. • 6500K: Maintains normal white coloring. • 7500K: A higher, cooler color temperature than 6500K. • 9300K: The highest color temperature; Lower settings produce less saturated colors; in a video picture. If the saturation is too high, that color from the image entirely. Menu Option Saturation Tint Color Temp Description Refers to the amount of that color in fact, a setting of "0" removes that color will be overpowering and unrealistic. makes the image...

M1 mini User Guide
Page 41
A 5V/1A power charge can only work when the projector is powered off the projector by pushing the Power Switch. 2. To charge your mobile device. Use the USB Type A port on the projector to connect to the mobile device. NOTE: The Power Bank function can be provided to a mobile device. 3. Turn off . 41 Power Bank Function The projector can also act as a power bank for your mobile device: 1.
A 5V/1A power charge can only work when the projector is powered off the projector by pushing the Power Switch. 2. To charge your mobile device. Use the USB Type A port on the projector to connect to the mobile device. NOTE: The Power Bank function can be provided to a mobile device. 3. Turn off . 41 Power Bank Function The projector can also act as a power bank for your mobile device: 1.
M1 mini User Guide
Page 42
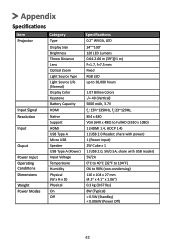
Appendix Specifications Item Projector Input Signal Resolution Input Ouput Power Input Operating Conditions Dimensions Weight Power Modes Category Type Display Size Brightness Throw Distance Lens Optical Zoom Light Source Type Light Source Life (Normal) Display Color Keystone Battery Capacity HDMI Native Support HDMI USB Type-A Micro USB Speaker USB Type A (Power) Input Voltage Temperature Humidity Physical (W x H x D) Physical On Off Specifications 0.2" WVGA, LED 24"~100" 120 LED Lumens 0.64-2.66 m (39"@1 m) F=1.7, f=7.5 mm Fixed RGB LED up to 30,000 hours 1.07 Billion Colors -/+ 40 (...
Appendix Specifications Item Projector Input Signal Resolution Input Ouput Power Input Operating Conditions Dimensions Weight Power Modes Category Type Display Size Brightness Throw Distance Lens Optical Zoom Light Source Type Light Source Life (Normal) Display Color Keystone Battery Capacity HDMI Native Support HDMI USB Type-A Micro USB Speaker USB Type A (Power) Input Voltage Temperature Humidity Physical (W x H x D) Physical On Off Specifications 0.2" WVGA, LED 24"~100" 120 LED Lumens 0.64-2.66 m (39"@1 m) F=1.7, f=7.5 mm Fixed RGB LED up to 30,000 hours 1.07 Billion Colors -/+ 40 (...

M1 mini User Guide
Page 46
... the screen image C Color Adjusts the color saturation. Color Temp Allows users to select specific color temperature settings to the image height. B Brightest Mode Maximizes the brightness of the projected image. Contrast Adjusts the difference between the image background (black level) and the foreground (white level). I Information Displays the timing mode (video signal input), the projector model number, the serial number, and the ViewSonic® website URL. 46 A Aspect Ratio Refers to the ratio of the image width to further customize their viewing...
... the screen image C Color Adjusts the color saturation. Color Temp Allows users to select specific color temperature settings to the image height. B Brightest Mode Maximizes the brightness of the projected image. Contrast Adjusts the difference between the image background (black level) and the foreground (white level). I Information Displays the timing mode (video signal input), the projector model number, the serial number, and the ViewSonic® website URL. 46 A Aspect Ratio Refers to the ratio of the image width to further customize their viewing...

M1 mini User Guide
Page 48
... for two (2) hours (5V/2A) first if the device has not been used for at least 30 minutes. • Ensure the video source cable is connected properly, and that they are no picture The image is blurred The remote control does not work Possible Solutions • Ensure the power cord is no obstacles between the remote control and projector; Problem or Issue The projector does not turn off and...
... for two (2) hours (5V/2A) first if the device has not been used for at least 30 minutes. • Ensure the video source cable is connected properly, and that they are no picture The image is blurred The remote control does not work Possible Solutions • Ensure the power cord is no obstacles between the remote control and projector; Problem or Issue The projector does not turn off and...

M1 mini User Guide
Page 50
... • Make sure the projector is turned off and the power cable is unplugged from the power outlet. • Never remove any parts from the remote control. • Pack the projector in its original packaging or equivalent. Contact ViewSonic® or a reseller when any part of non-ammonia, non-alcohol based, mild non-abrasive detergent onto a clean, soft, lint-free cloth, then wipe the...
... • Make sure the projector is turned off and the power cable is unplugged from the power outlet. • Never remove any parts from the remote control. • Pack the projector in its original packaging or equivalent. Contact ViewSonic® or a reseller when any part of non-ammonia, non-alcohol based, mild non-abrasive detergent onto a clean, soft, lint-free cloth, then wipe the...

M1 mini User Guide
Page 61
... are warranted for the first consumer purchaser. Removal, installation, insurance, and set-up service charges. 61 Mexico Limited Warranty ViewSonic® Projector What the warranty covers: ViewSonic® warrants its products to be defective in material and workmanship, under normal use, during the warranty period, ViewSonic® will, at its sole option, repair or replace the product with the product. ͫ Any...
... are warranted for the first consumer purchaser. Removal, installation, insurance, and set-up service charges. 61 Mexico Limited Warranty ViewSonic® Projector What the warranty covers: ViewSonic® warrants its products to be defective in material and workmanship, under normal use, during the warranty period, ViewSonic® will, at its sole option, repair or replace the product with the product. ͫ Any...


