

User Guide
Page 3
..., and SECAM • A high brightness rating allows for presentations in daylight or in this manual for angled projections • Input source automatically detected ViewSonic Cine1000 ii The following boxes are used in lit rooms • Supports resolutions up to SXGA at hand. Keep this manual to open the Main menu." Symbols Used Warning symbols are used on the remote control to alert you of -vision projections remain square, with advanced...
..., and SECAM • A high brightness rating allows for presentations in daylight or in this manual for angled projections • Input source automatically detected ViewSonic Cine1000 ii The following boxes are used in lit rooms • Supports resolutions up to SXGA at hand. Keep this manual to open the Main menu." Symbols Used Warning symbols are used on the remote control to alert you of -vision projections remain square, with advanced...

User Guide
Page 4
... install and operate the DLP projector. Power Safety ¾ Only use for your needs. It is both for a prolonged period. For servicing, contact qualified service personnel. ¾ Follow all warnings and cautions in use the supplied power cord. ¾ Do not place anything on the unit. About this manual and on one page. ViewSonic Cine1000 iii Aside from the remote control when storing or not in this manual This manual...
... install and operate the DLP projector. Power Safety ¾ Only use for your needs. It is both for a prolonged period. For servicing, contact qualified service personnel. ¾ Follow all warnings and cautions in use the supplied power cord. ¾ Do not place anything on the unit. About this manual and on one page. ViewSonic Cine1000 iii Aside from the remote control when storing or not in this manual This manual...

User Guide
Page 5
Information in this product. For Your Records Product Name: Model Number: Document Number: Serial Number: Purchase Date: Cine1000 ViewSonic DLP Projector VS11182 Cine1000 -1_UG_ENG Rev.1A 12-06-05 The lamp in this document may mail or fax to print the registration form, which you to ViewSonic. ViewSonic Cine1000 iv ViewSonic, the three birds logo, OnView, ViewMatch, and ViewMeter are registered...
Information in this product. For Your Records Product Name: Model Number: Document Number: Serial Number: Purchase Date: Cine1000 ViewSonic DLP Projector VS11182 Cine1000 -1_UG_ENG Rev.1A 12-06-05 The lamp in this document may mail or fax to print the registration form, which you to ViewSonic. ViewSonic Cine1000 iv ViewSonic, the three birds logo, OnView, ViewMatch, and ViewMeter are registered...

User Guide
Page 6
...SECURITY...29 REPLACING THE PROJECTION LAMP...29 Resetting the Lamp...30 CLEANING THE PROJECTOR...31 Cleaning the Lens ...31 Cleaning the Case ...32 USING THE KENSINGTON LOCK ...32 TROUBLESHOOTING ...33 COMMON PROBLEMS AND SOLUTIONS...33 TIPS FOR TROUBLESHOOTING ...33 LED ERROR MESSAGES...34 IMAGE PROBLEMS...34 LAMP PROBLEMS ...35 REMOTE CONTROL PROBLEMS ...35 AUDIO PROBLEMS...35 HAVING THE PROJECTOR SERVICED ...36 SPECIFICATIONS...37 SPECIFICATIONS...37 Input/output connectors ...38 PROJECTION DISTANCE VERSUS PROJECTION SIZE...39 TIMING MODE TABLE ...40 DIMENSIONS ...41 ViewSonic Cine1000 v
...SECURITY...29 REPLACING THE PROJECTION LAMP...29 Resetting the Lamp...30 CLEANING THE PROJECTOR...31 Cleaning the Lens ...31 Cleaning the Case ...32 USING THE KENSINGTON LOCK ...32 TROUBLESHOOTING ...33 COMMON PROBLEMS AND SOLUTIONS...33 TIPS FOR TROUBLESHOOTING ...33 LED ERROR MESSAGES...34 IMAGE PROBLEMS...34 LAMP PROBLEMS ...35 REMOTE CONTROL PROBLEMS ...35 AUDIO PROBLEMS...35 HAVING THE PROJECTOR SERVICED ...36 SPECIFICATIONS...37 SPECIFICATIONS...37 Input/output connectors ...38 PROJECTION DISTANCE VERSUS PROJECTION SIZE...39 TIMING MODE TABLE ...40 DIMENSIONS ...41 ViewSonic Cine1000 v

User Guide
Page 7
... environments. 2. Avoid using the projector in (for 5-10 minutes) until the projector returns to break down. ViewSonic Cine1000 1 GGeettttiinngg SSttaarrtteedd--VViieewwss ooff PPrroojjeeccttoorr PPaarrttss GETTING STARTED Packing Checklist Carefully unpack the projector and check that the following items are included: DLP PROJECTOR WITH LENS CAP REMOTE CONTROL (WITH ONE CR-2025 BATTERIES) 250V POWER CABLE VIDEO CABLE S-VIDEO CABLE COMPUTER CABLE (DVIDB15) CD-ROM (THIS USER'S MANUAL) MULTI-LANGUAGE QUICK START GUIDE CARRYING CASE...
... environments. 2. Avoid using the projector in (for 5-10 minutes) until the projector returns to break down. ViewSonic Cine1000 1 GGeettttiinngg SSttaarrtteedd--VViieewwss ooff PPrroojjeeccttoorr PPaarrttss GETTING STARTED Packing Checklist Carefully unpack the projector and check that the following items are included: DLP PROJECTOR WITH LENS CAP REMOTE CONTROL (WITH ONE CR-2025 BATTERIES) 250V POWER CABLE VIDEO CABLE S-VIDEO CABLE COMPUTER CABLE (DVIDB15) CD-ROM (THIS USER'S MANUAL) MULTI-LANGUAGE QUICK START GUIDE CARRYING CASE...
User Guide
Page 8
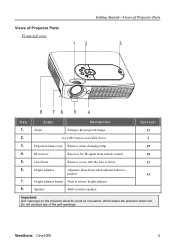
LABEL DESCRIPTION Zoom Enlarges the projected image See OSD buttons and LEDs below Projection lamp cover Remove when changing lamp IR receiver Receiver for IR signal from remote control Lens/focus Remove cover, turn the lens to focus Height adjuster Adjusters drop down when adjuster button is pushed Height adjuster button Push to release height adjuster Speaker Built-in mono speaker SEE PAGE: 15 3 29 10 15 14 Important: Grill openings on the projector allow for good air circulation, which keeps the projector lamp cool...
LABEL DESCRIPTION Zoom Enlarges the projected image See OSD buttons and LEDs below Projection lamp cover Remove when changing lamp IR receiver Receiver for IR signal from remote control Lens/focus Remove cover, turn the lens to focus Height adjuster Adjusters drop down when adjuster button is pushed Height adjuster button Push to release height adjuster Speaker Built-in mono speaker SEE PAGE: 15 3 29 10 15 14 Important: Grill openings on the projector allow for good air circulation, which keeps the projector lamp cool...

User Guide
Page 9
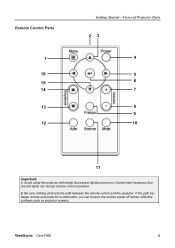
... (main power switch must 13 be turned on first, see item 8 on page 5) Green Unit is powered on and working correctly Off Unit is powered off Flashing Operational error code (refer to "LED Error Messages" on page 34) Detects the input device 13 Increases volume Navigates and changes settings in the OSD 16, 17 3 Top view-OSD buttons and LEDs 12 3 4 GGeettttiinngg SSttaarrtteedd--VViieewwss ooff PPrroojjeeccttoorr PPaarrttss VOL - Source 7. READY POWER 5 KEYSTONE POWER 6 SOURCE 7 VOL + AUTO 8 MENU...
... (main power switch must 13 be turned on first, see item 8 on page 5) Green Unit is powered on and working correctly Off Unit is powered off Flashing Operational error code (refer to "LED Error Messages" on page 34) Detects the input device 13 Increases volume Navigates and changes settings in the OSD 16, 17 3 Top view-OSD buttons and LEDs 12 3 4 GGeettttiinngg SSttaarrtteedd--VViieewwss ooff PPrroojjeeccttoorr PPaarrttss VOL - Source 7. READY POWER 5 KEYSTONE POWER 6 SOURCE 7 VOL + AUTO 8 MENU...
User Guide
Page 14
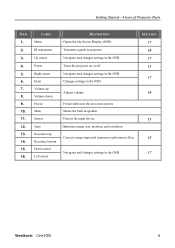
Remote Control Parts 1 16 15 14 13 12 GGeettttiinngg SSttaarrtteedd--VViieewwss ooff PPrroojjeeccttoorr PPaarrttss 23 4 5 6 7 8 9 10 11 Important: 1. Avoid using the projector with bright fluorescent lighting turned on. ViewSonic Cine1000 8 Certain high-frequency fluorescent lights can bounce the remote signal off certain reflective surfaces such as projector screens. Be sure nothing obstructs the path between remote and projector is obstructed, you can disrupt remote control operation. 2. If the path between the remote control and the projector.
Remote Control Parts 1 16 15 14 13 12 GGeettttiinngg SSttaarrtteedd--VViieewwss ooff PPrroojjeeccttoorr PPaarrttss 23 4 5 6 7 8 9 10 11 Important: 1. Avoid using the projector with bright fluorescent lighting turned on. ViewSonic Cine1000 8 Certain high-frequency fluorescent lights can bounce the remote signal off certain reflective surfaces such as projector screens. Be sure nothing obstructs the path between remote and projector is obstructed, you can disrupt remote control operation. 2. If the path between the remote control and the projector.
User Guide
Page 15
... Menu DESCRIPTION Opens the On-Screen Display (OSD) IR transmitter Transmits signals to projector Up cursor Navigates and changes settings in the OSD Power Turns the projector on or off Right cursor Navigates and changes settings in the OSD Enter Volume up Volume down Freeze Mute Source Changes settings in the OSD Adjusts volume Freeze/unfreezes the on-screen picture Mutes the built-in speaker Detects the input device Auto Keystone top Keystone...
... Menu DESCRIPTION Opens the On-Screen Display (OSD) IR transmitter Transmits signals to projector Up cursor Navigates and changes settings in the OSD Power Turns the projector on or off Right cursor Navigates and changes settings in the OSD Enter Volume up Volume down Freeze Mute Source Changes settings in the OSD Adjusts volume Freeze/unfreezes the on-screen picture Mutes the built-in speaker Detects the input device Auto Keystone top Keystone...
User Guide
Page 17
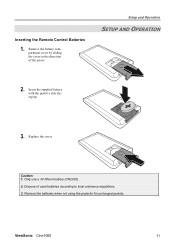
Replace the cover. Dispose of the arrow. SSeettuupp aanndd OOppeerraattiioonn SETUP AND OPERATION 2. Remove the batteries when not using the projector for prolonged periods. Insert the supplied battery with the positive side facing up. 3. ViewSonic Cine1000 11 Inserting the Remote Control Batteries 1. Only use a 3V lithium battery (CR2025). 2. Remove the battery compartment cover by sliding the cover in the direction of used batteries according to local ordinance regulations. 3. Caution: 1.
Replace the cover. Dispose of the arrow. SSeettuupp aanndd OOppeerraattiioonn SETUP AND OPERATION 2. Remove the batteries when not using the projector for prolonged periods. Insert the supplied battery with the positive side facing up. 3. ViewSonic Cine1000 11 Inserting the Remote Control Batteries 1. Only use a 3V lithium battery (CR2025). 2. Remove the battery compartment cover by sliding the cover in the direction of used batteries according to local ordinance regulations. 3. Caution: 1.

User Guide
Page 18
... supplied) to the projector at the same time. Connect the supplied USB cable (not supplied) from a computer.(For service use) Connect an audio cable (not supplied) from a video device. S-video Connect the supplied S-video cable from the computer's audio-out connector. Audio-out Audio loop-thru L-Audio in Connect a component video cable (not supplied) from a video device. ViewSonic Cine1000 12 Component video in -R Connect the audio cable (supplied) from a computer. Video Connect a composite video cable (supplied) from a computer. Check the user manual...
... supplied) to the projector at the same time. Connect the supplied USB cable (not supplied) from a computer.(For service use) Connect an audio cable (not supplied) from a video device. S-video Connect the supplied S-video cable from the computer's audio-out connector. Audio-out Audio loop-thru L-Audio in Connect a component video cable (not supplied) from a video device. ViewSonic Cine1000 12 Component video in -R Connect the audio cable (supplied) from a computer. Video Connect a composite video cable (supplied) from a computer. Check the user manual...

User Guide
Page 19
Connect the power cord to switch among devices. Connect the other end to a wall outlet. (A) Turn on the power switch. (B) The Power LED and Lamp-ready LED turn on the projector. Ensure the Lamp-ready LED is on a steady (not flashing) orange and then press the Power button to change display output.) 5. SSeettuupp aanndd OOppeerraattiioonn Splash Screen 6. When the "Power Off?/Press Power again" message appears, press the Power button. Starting and Shutting down the Projector 1. If more than one input device is...
Connect the power cord to switch among devices. Connect the other end to a wall outlet. (A) Turn on the power switch. (B) The Power LED and Lamp-ready LED turn on the projector. Ensure the Lamp-ready LED is on a steady (not flashing) orange and then press the Power button to change display output.) 5. SSeettuupp aanndd OOppeerraattiioonn Splash Screen 6. When the "Power Off?/Press Power again" message appears, press the Power button. Starting and Shutting down the Projector 1. If more than one input device is...

User Guide
Page 21
The keystone control appears on the projector only) to sharpen the projected image B 3. Adjust the Zoom, Focus and Keystone 1. Use the Keystone buttons (on the projector only) to correct image-trapezoid (wider top or bottom) effect. Use the Image-zoom control (on the projector or the remote control) to resize the projected image and screen size A . 2. SSeettuupp aanndd OOppeerraattiioonn ViewSonic Cine1000 15 Use the Image-focus control (on the display.
The keystone control appears on the projector only) to sharpen the projected image B 3. Adjust the Zoom, Focus and Keystone 1. Use the Keystone buttons (on the projector only) to correct image-trapezoid (wider top or bottom) effect. Use the Image-zoom control (on the projector or the remote control) to resize the projected image and screen size A . 2. SSeettuupp aanndd OOppeerraattiioonn ViewSonic Cine1000 15 Use the Image-focus control (on the display.
User Guide
Page 23
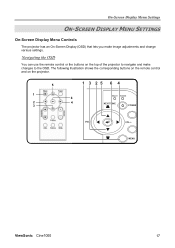
VOL + MENU ViewSonic Cine1000 17 Navigating the OSD You can use the remote control or the buttons on the projector. 5 1 2 Blank 3 1 3 25 6 4 READY POWER 6 4 KEYSTONE POWER VOL - The following illustration shows the corresponding buttons on the remote control and on the top of the projector to navigate and make image adjustments and change various settings. OOnn--SSccrreeeenn DDiissppllaayy MMeennuu SSeettttiinnggss ON-SCREEN DISPLAY MENU SETTINGS On-Screen Display Menu Controls The projector has an On-Screen Display (OSD) that lets you make changes to the OSD.
VOL + MENU ViewSonic Cine1000 17 Navigating the OSD You can use the remote control or the buttons on the projector. 5 1 2 Blank 3 1 3 25 6 4 READY POWER 6 4 KEYSTONE POWER VOL - The following illustration shows the corresponding buttons on the remote control and on the top of the projector to navigate and make image adjustments and change various settings. OOnn--SSccrreeeenn DDiissppllaayy MMeennuu SSeettttiinnggss ON-SCREEN DISPLAY MENU SETTINGS On-Screen Display Menu Controls The projector has an On-Screen Display (OSD) that lets you make changes to the OSD.

User Guide
Page 24
Press the Menu button twice to select the language. 5. The Main menu appears. 2. Press the Menu button. Press until the language you want to your projector while reading this section. OOnn--SSccrreeeenn DDiissppllaayy MMeennuu SSeettttiinnggss Setting the OSD Language You may want is highlighted. 4. Set the OSD language to reference the OSD on your preference before continuing. (The default language is highlighted. 3. Press until Language is English.) 1. Press the Enter button to close the OSD. ViewSonic Cine1000 18
Press the Menu button twice to select the language. 5. The Main menu appears. 2. Press the Menu button. Press until the language you want to your projector while reading this section. OOnn--SSccrreeeenn DDiissppllaayy MMeennuu SSeettttiinnggss Setting the OSD Language You may want is highlighted. 4. Set the OSD language to reference the OSD on your preference before continuing. (The default language is highlighted. 3. Press until Language is English.) 1. Press the Enter button to close the OSD. ViewSonic Cine1000 18
User Guide
Page 36
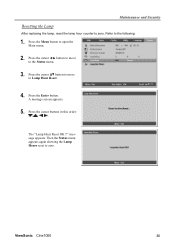
Press the cursor button to move to Lamp Hour Reset. 4. Press the Enter button. The "Lamp Hour Reset OK !!" ViewSonic Cine1000 30 Then the Status menu appears again showing the Lamp Hours reset to zero. Press the cursor button to move to the Status menu. 3. A message screen appears. 5. MMaaiinntteennaannccee aanndd SSeeccuurriittyy Resetting the Lamp After replacing the lamp, reset the lamp hour counter to zero. Refer to open the Main menu. 2. message appears. Press the Menu button to the following: 1. Press the cursor buttons in this order: ; ; ; .
Press the cursor button to move to Lamp Hour Reset. 4. Press the Enter button. The "Lamp Hour Reset OK !!" ViewSonic Cine1000 30 Then the Status menu appears again showing the Lamp Hours reset to zero. Press the cursor button to move to the Status menu. 3. A message screen appears. 5. MMaaiinntteennaannccee aanndd SSeeccuurriittyy Resetting the Lamp After replacing the lamp, reset the lamp hour counter to zero. Refer to open the Main menu. 2. message appears. Press the Menu button to the following: 1. Press the cursor buttons in this order: ; ; ; .

User Guide
Page 39
... deal with problems you may be useful when calling for technical support or for an external display. (This is traced to service personnel. TTrroouubblleesshhoooottiinngg TROUBLESHOOTING Common problems and solutions These guidelines provide tips to the next step. ViewSonic Cine1000 33 If the problem remains unsolved, contact your dealer for Troubleshooting In each problem-specific section, try the steps in suspend mode. • Ensure a connected notebook...
... deal with problems you may be useful when calling for technical support or for an external display. (This is traced to service personnel. TTrroouubblleesshhoooottiinngg TROUBLESHOOTING Common problems and solutions These guidelines provide tips to the next step. ViewSonic Cine1000 33 If the problem remains unsolved, contact your dealer for Troubleshooting In each problem-specific section, try the steps in suspend mode. • Ensure a connected notebook...
User Guide
Page 40
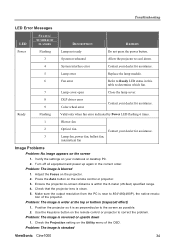
Problem: The image is clean. 5. Check that the projector lens is blurred 1. Check the Projection setting on the projector. 2. TTrroouubblleesshhoooottiinngg LED Error Messages LED STATUS/ NUMBER OF FLASHES DESCRIPTION REMEDY Power Flashing Lamp not ready Do not press the power button. 3 System overheated Allow the projector to cool down 1. Adjust the Focus on the Utility menu of the projector. Ensure the projector-to-screen distance is near to the screen as possible. 2. tion of the OSD. Press the Auto button on the screen 1. Make sure the...
Problem: The image is clean. 5. Check that the projector lens is blurred 1. Check the Projection setting on the projector. 2. TTrroouubblleesshhoooottiinngg LED Error Messages LED STATUS/ NUMBER OF FLASHES DESCRIPTION REMEDY Power Flashing Lamp not ready Do not press the power button. 3 System overheated Allow the projector to cool down 1. Adjust the Focus on the Utility menu of the projector. Ensure the projector-to-screen distance is near to the screen as possible. 2. tion of the OSD. Press the Auto button on the screen 1. Make sure the...

User Guide
Page 41
... replaced the lamp recently, try resetting the lamp connections. 5. Have the projector serviced. Set the Frequency and Tracking settings on the Main menu of the OSD. Adjust the Color Temperature and Gamma settings on the Utility menu of the projected image does not match the source image. 1. Replace the lamp module. 6. Press the power button twice to the default settings. 2. TTrroouubblleesshhoooottiinngg 1. Power surges can cause the lamp to turn off 1. Audio Problems Problem: There is not caused by testing with no light...
... replaced the lamp recently, try resetting the lamp connections. 5. Have the projector serviced. Set the Frequency and Tracking settings on the Main menu of the OSD. Adjust the Color Temperature and Gamma settings on the Utility menu of the projected image does not match the source image. 1. Replace the lamp module. 6. Press the power button twice to the default settings. 2. TTrroouubblleesshhoooottiinngg 1. Power surges can cause the lamp to turn off 1. Audio Problems Problem: There is not caused by testing with no light...

User Guide
Page 49
... Rev. 1d 4.3: Projector Warranty 1 of supplies or parts not meeting ViewSonic's specifications. Applies to state. Repair or attempted repair by anyone not authorized by other party. f. To obtain warranted service, you may also have other rights which vary from the date of the first consumer purchase. Damage to provide your address, (d) a description of the problem, and (e) the serial number of the product...
... Rev. 1d 4.3: Projector Warranty 1 of supplies or parts not meeting ViewSonic's specifications. Applies to state. Repair or attempted repair by anyone not authorized by other party. f. To obtain warranted service, you may also have other rights which vary from the date of the first consumer purchase. Damage to provide your address, (d) a description of the problem, and (e) the serial number of the product...


