English Owners Manual
Page 2
Important: Changes or modifications to this unit not expressly approved by Uniden could void your authority to the following two conditions: (1) This device may not cause harmful interference. (2) This device must accept any interference received, including interference that may cause undesired operation. The design of the radio complies with the safety standard previously set by FCC regulated transmitters. FCC...
Important: Changes or modifications to this unit not expressly approved by Uniden could void your authority to the following two conditions: (1) This device may not cause harmful interference. (2) This device must accept any interference received, including interference that may cause undesired operation. The design of the radio complies with the safety standard previously set by FCC regulated transmitters. FCC...
English Owners Manual
Page 4
... Your Microphone 7 About This Manual 7 How The Microphone's Controls Appear in This Manual 8 Setting Up the Microphone 8 Mounting the Microphone 8 Installing the Battery 9 Charging the Batteries 10 A Look at the Microphone 11 A Look at the Display 13 Basic Operation 14 Turning the Microphone On and Off 14 Setting the Base/Microphone ID 14 Adjusting the Volume and Squelch 14 Checking the Battery Level 14 Using Triple Watch 15 Tuning Weather Channels 15 Using Weather Alert Mode 15 Using Channel Step 15 Using Channel Scan...
... Your Microphone 7 About This Manual 7 How The Microphone's Controls Appear in This Manual 8 Setting Up the Microphone 8 Mounting the Microphone 8 Installing the Battery 9 Charging the Batteries 10 A Look at the Microphone 11 A Look at the Display 13 Basic Operation 14 Turning the Microphone On and Off 14 Setting the Base/Microphone ID 14 Adjusting the Volume and Squelch 14 Checking the Battery Level 14 Using Triple Watch 15 Tuning Weather Channels 15 Using Weather Alert Mode 15 Using Channel Step 15 Using Channel Scan...
English Owners Manual
Page 5
Resetting the Microphone 18 Using Setup Options 18 Using the Directory 18 Using Channel Names 19 Adjusting the Local Time 20 Turning Daylight Saving On or Off 20 Programming a FIPS Code 21 Using Auto Channel Switch 21 Using Position Reply 22 Using a Group MMSI 22 Setting Up the Scrambler 23 Using Exit 23 Using System Options 23 Adjusting the Contrast 23 Adjusting the Key Beep 24 Adjusting the VOX Sensitivity Level 24 Care and Maintenance 24 Appendix 24 Reference Information 25 Three Year Limited Warranty 27 Contents 5
Resetting the Microphone 18 Using Setup Options 18 Using the Directory 18 Using Channel Names 19 Adjusting the Local Time 20 Turning Daylight Saving On or Off 20 Programming a FIPS Code 21 Using Auto Channel Switch 21 Using Position Reply 22 Using a Group MMSI 22 Setting Up the Scrambler 23 Using Exit 23 Using System Options 23 Adjusting the Contrast 23 Adjusting the Key Beep 24 Adjusting the VOX Sensitivity Level 24 Care and Maintenance 24 Appendix 24 Reference Information 25 Three Year Limited Warranty 27 Contents 5
English Owners Manual
Page 6
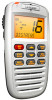
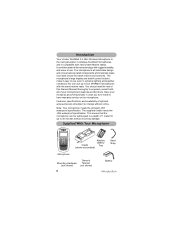
... in case you ever need to acquaint yourself with new Uniden Marine radios. Features, specifications, and availability of use up to change without incurring damage. Note: Your microphone meets the stringent JIS7 waterproof specification. Introduction Introduction Your Uniden WHAMx4 2.4 GHz Wireless Microphone is the next generation in wireless handheld microphones, and is compatible with all of this Owners Manual thoroughly to have warranty service on the microphone. The supplied cradle meets the...
... in case you ever need to acquaint yourself with new Uniden Marine radios. Features, specifications, and availability of use up to change without incurring damage. Note: Your microphone meets the stringent JIS7 waterproof specification. Introduction Introduction Your Uniden WHAMx4 2.4 GHz Wireless Microphone is the next generation in wireless handheld microphones, and is compatible with all of this Owners Manual thoroughly to have warranty service on the microphone. The supplied cradle meets the...
English Owners Manual
Page 7
... is in extreme conditions. Display Backlight/Key Light Adjustment - Contrast Adjustment - Floating Handset - Buttons you connect a headset to the microphone and use the radio's intercom function to make it . You can set the microphone's display to make them easier to see in this manual are representations of the display and the keys on the display appear in different conditions. You can adjust the volume of the battery. Key Beep Volume Adjustment - You can talk...
... is in extreme conditions. Display Backlight/Key Light Adjustment - Contrast Adjustment - Floating Handset - Buttons you connect a headset to the microphone and use the radio's intercom function to make it . You can set the microphone's display to make them easier to see in this manual are representations of the display and the keys on the display appear in different conditions. You can adjust the volume of the battery. Key Beep Volume Adjustment - You can talk...
English Owners Manual
Page 8
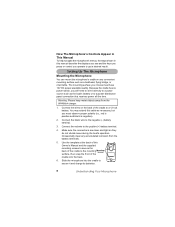
... can mount the microphone's cradle on the back of the cradle onto the back. 6. Connect the black wire to the positive (+) battery terminal. 4. You may extend this cable as necessary, but you operate to a power distribution panel connection that receives power all the time. UHonwdTehrsetaMnicdrionpghoYnoe'usrCMonitcrorolspAhpopneear in This Manual To help navigate the microphone's menus, the steps shown in this manual describe the displays you see and the keys...
... can mount the microphone's cradle on the back of the cradle onto the back. 6. Connect the black wire to the positive (+) battery terminal. 4. You may extend this cable as necessary, but you operate to a power distribution panel connection that receives power all the time. UHonwdTehrsetaMnicdrionpghoYnoe'usrCMonitcrorolspAhpopneear in This Manual To help navigate the microphone's menus, the steps shown in this manual describe the displays you see and the keys...
English Owners Manual
Page 9
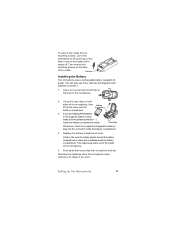
Case Clips Otherwise, insert the supplied rechargeable battery's plug into the connector inside the battery compartment match. Lift Here Installing the Battery Your microphone uses a rechargeable battery (supplied) for power. Caution: Be sure the rubber gasket around the battery compartment is too short. Setting Up the Microphone 9 If you are installing AAA batteries in the supplied battery holder, make sure the polarity symbols (+ -) inside the battery compartment. 4. Lift up the case...
Case Clips Otherwise, insert the supplied rechargeable battery's plug into the connector inside the battery compartment match. Lift Here Installing the Battery Your microphone uses a rechargeable battery (supplied) for power. Caution: Be sure the rubber gasket around the battery compartment is too short. Setting Up the Microphone 9 If you are installing AAA batteries in the supplied battery holder, make sure the polarity symbols (+ -) inside the battery compartment. 4. Lift up the case...
English Owners Manual
Page 10
... interference. In severe cases of engines is sometimes a problem with microphones. To charge the batteries, install the batteries in the microphone then slide it may be essentially impervious to a full charge. Charging the Batteries Before you use rechargeable batteries for the first time, charge them for more information. 10 Setting Up the Microphone The microphone has a built-in circuit that lets you must charge...
... interference. In severe cases of engines is sometimes a problem with microphones. To charge the batteries, install the batteries in the microphone then slide it may be essentially impervious to a full charge. Charging the Batteries Before you use rechargeable batteries for the first time, charge them for more information. 10 Setting Up the Microphone The microphone has a built-in circuit that lets you must charge...
English Owners Manual
Page 12
... battery level. 9 STEP/SCAN - Hold down to the active weather channel in memory. Hold down in memory. 10 MEM/UIC - Press again to turn on weather alert. 12 PTT - Hold down to scan through all channels in weather alert mode to turn on the squelch setting mode. Press again when the backlight is automatically cancelled. 14 LIGHT/LOCK - Hold down for 5 seconds to turn on keylock. The microphone...
... battery level. 9 STEP/SCAN - Hold down to the active weather channel in memory. Hold down in memory. 10 MEM/UIC - Press again to turn on weather alert. 12 PTT - Hold down to scan through all channels in weather alert mode to turn on the squelch setting mode. Press again when the backlight is automatically cancelled. 14 LIGHT/LOCK - Hold down for 5 seconds to turn on keylock. The microphone...

English Owners Manual
Page 13
... Channel 9. Shows when the microphone is set to 25 watts on the output channel. Shows the transmit output power is communicating with the main radio (by RF). HI - U I C - Appears while the microphone is set to 1 watt on the output channel. A Look at the Display - Shows the transmit output power is transmitting. Appears when the microphone is valid. - blinks when the GPS data being received is in use. Appears when the weather alert channel...
... Channel 9. Shows when the microphone is set to 25 watts on the output channel. Shows the transmit output power is communicating with the main radio (by RF). HI - U I C - Appears while the microphone is set to 1 watt on the output channel. A Look at the Display - Shows the transmit output power is transmitting. Appears when the microphone is valid. - blinks when the GPS data being received is in use. Appears when the weather alert channel...
English Owners Manual
Page 14
... 4 is the channel currently selected on both the radio's and microphone's display. 1. If you set the ID correctly, you want (00-99 for BASE ID or 1-4 for about 2 seconds again to turn off battery mode. 14 Basic Operation Repeatedly press or until LOCAL MENU appears, then press SELECT/SCRAM. 2. Then press SELECT/SCRAM. 4. Adjusting the Volume and Squelch Briefly press POWER/VOLUME, then repeatedly press...
... 4 is the channel currently selected on both the radio's and microphone's display. 1. If you set the ID correctly, you want (00-99 for BASE ID or 1-4 for about 2 seconds again to turn off battery mode. 14 Basic Operation Repeatedly press or until LOCAL MENU appears, then press SELECT/SCRAM. 2. Then press SELECT/SCRAM. 4. Adjusting the Volume and Squelch Briefly press POWER/VOLUME, then repeatedly press...
English Owners Manual
Page 15
... 2 seconds. Notes: • If the original working channel is a weather channel, the radio automatically enters Triple Watch mode. • If weather alert is turned off then turned back on the display. The radio also checks the active weather channel for about 2 seconds. The active weather channel number and WX appear. Basic Operation 15 To change the weather channel, repeatedly press to increase it . Using Weather Alert Mode Hold down 16/9/TRIPLE WATCH for...
... 2 seconds. Notes: • If the original working channel is a weather channel, the radio automatically enters Triple Watch mode. • If weather alert is turned off then turned back on the display. The radio also checks the active weather channel for about 2 seconds. The active weather channel number and WX appear. Basic Operation 15 To change the weather channel, repeatedly press to increase it . Using Weather Alert Mode Hold down 16/9/TRIPLE WATCH for...

English Owners Manual
Page 16
... the channel you press MEM/UIC. The displayed channel is active. Changing UIC Mode Hold down 16/9/TRIPLE WATCH to turn off display mode. The channel numbers appear on the display each time the channel number appears. Saving Channels to the highest. The current channel name appears. 16 Basic Operation The radio scans all channels stored using the memory feature, starting with the lowest channel number to Memory Briefly press MEM/UIC. Selecting Menu Items...
... the channel you press MEM/UIC. The displayed channel is active. Changing UIC Mode Hold down 16/9/TRIPLE WATCH to turn off display mode. The channel numbers appear on the display each time the channel number appears. Saving Channels to the highest. The current channel name appears. 16 Basic Operation The radio scans all channels stored using the memory feature, starting with the lowest channel number to Memory Briefly press MEM/UIC. Selecting Menu Items...

English Owners Manual
Page 17
... to decrease the outgoing hail volume. Using Keylock Hold down LIGHT/LOCK for the selected channel. The radio turns on again. The radio activates its highest level to turn the microphone off the hailer. To turn off the backlight. You hear an audible countdown from the channel display screen. It appears when the radio receives an incoming transmission or when the radio is set to 0 as you release...
... to decrease the outgoing hail volume. Using Keylock Hold down LIGHT/LOCK for the selected channel. The radio turns on again. The radio activates its highest level to turn the microphone off the hailer. To turn off the backlight. You hear an audible countdown from the channel display screen. It appears when the radio receives an incoming transmission or when the radio is set to 0 as you release...
English Owners Manual
Page 18
... radios. To add a new directory entry: 1. Repeatedly press or until SETUP appears, then press SELECT/SCRAM. 3. Resetting the Microphone Cautions: • Resetting the microphone does not reset the radio's user MMSI. • Resetting the microphone sets all features back to do so on the current channel. Using the Directory This option lets you set these options the first time you use the microphone. Note: Changing the output transmit power works only if it displays...
... radios. To add a new directory entry: 1. Repeatedly press or until SETUP appears, then press SELECT/SCRAM. 3. Resetting the Microphone Cautions: • Resetting the microphone does not reset the radio's user MMSI. • Resetting the microphone sets all features back to do so on the current channel. Using the Directory This option lets you set these options the first time you use the microphone. Note: Changing the output transmit power works only if it displays...

English Owners Manual
Page 21
.../SCRAM. 3. Press SELECT/SCRAM. Repeat Step 5 for each number in this section to prevent the radio from automatically changing channels in turn off during a DSC call. Repeat Steps 1-3 in this to change an existing FIPS code: 1. Using Auto Channel Switch This option lets you enter the last number, YES appears. 7. Using Setup Options 21 Programming a FIPS Code This option lets you entered. Then press SELECT/SCRAM...
.../SCRAM. 3. Press SELECT/SCRAM. Repeat Step 5 for each number in this section to prevent the radio from automatically changing channels in turn off during a DSC call. Repeat Steps 1-3 in this to change an existing FIPS code: 1. Using Auto Channel Switch This option lets you enter the last number, YES appears. 7. Using Setup Options 21 Programming a FIPS Code This option lets you entered. Then press SELECT/SCRAM...
English Owners Manual
Page 23
Otherwise, to the channel display screen. 1. Briefly press MENU. Repeatedly press or until SETUP appears, then press SELECT/SCRAM. 3. Using Exit Select this option. 1. Using System Options UThissisnecgtioSn dyestatilesmthe oOpeprattiioon nofsthe microphone's system options. You normally change the microphone display's contrast. Setting Up the Scrambler This option lets you are Using System Options 23 A number flashes. 4. YES appears. 5. Otherwise, to register it. Adjusting the Contrast This option...
Otherwise, to the channel display screen. 1. Briefly press MENU. Repeatedly press or until SETUP appears, then press SELECT/SCRAM. 3. Using Exit Select this option. 1. Using System Options UThissisnecgtioSn dyestatilesmthe oOpeprattiioon nofsthe microphone's system options. You normally change the microphone display's contrast. Setting Up the Scrambler This option lets you are Using System Options 23 A number flashes. 4. YES appears. 5. Otherwise, to register it. Adjusting the Contrast This option...

English Owners Manual
Page 26
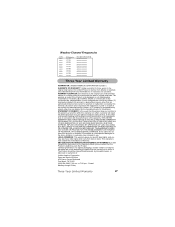
...MARINE OPERATOR MARINE OPERATOR INTER-SHIP SAFETY MARINE OPERATOR COMMERCIAL (SHIP-SHIP) BOATER CALLING CHANNEL COMMERCIAL VESSEL TRAFFIC SYSTEM VESSEL TRAFFIC SYSTEM BRIDGE TO BRIDGE VESSEL TRAFFIC SYSTEM ENVIRONM ENTA L DISTRES, SAFETY, CALLING GOVT MARINE CONTROL PORT OPERATION COMMERCIAL PORT OPERATION PORT OPERATION PORT OPERATION MARINE OPERATOR MARINE OPERATOR MARINE OPERATOR MARINE OPERATOR MARINE OPERATOR MARINE OPERATOR MARINE OPERATOR MARINE OPERATOR MARINE OPERATOR MARINE OPERATOR MARINE OPERATOR MARINE OPERATOR MARINE OPERATOR BRIDGE TO BRIDGE NON COMMERCIAL NON COMMERCIAL DIGITAL...
...MARINE OPERATOR MARINE OPERATOR INTER-SHIP SAFETY MARINE OPERATOR COMMERCIAL (SHIP-SHIP) BOATER CALLING CHANNEL COMMERCIAL VESSEL TRAFFIC SYSTEM VESSEL TRAFFIC SYSTEM BRIDGE TO BRIDGE VESSEL TRAFFIC SYSTEM ENVIRONM ENTA L DISTRES, SAFETY, CALLING GOVT MARINE CONTROL PORT OPERATION COMMERCIAL PORT OPERATION PORT OPERATION PORT OPERATION MARINE OPERATOR MARINE OPERATOR MARINE OPERATOR MARINE OPERATOR MARINE OPERATOR MARINE OPERATOR MARINE OPERATOR MARINE OPERATOR MARINE OPERATOR MARINE OPERATOR MARINE OPERATOR MARINE OPERATOR MARINE OPERATOR BRIDGE TO BRIDGE NON COMMERCIAL NON COMMERCIAL DIGITAL...
English Owners Manual
Page 27
... Information Weather Information Weather Information Weather Information Weather Information Weather Information Weather Information Weather Information Weather Information Weather Information Three Year Limited Warranty TWhArReReANYTeOaRr:LUimNIDitEeNdAWMaERrrIaCnAtCyORPORATION ("Uniden") ELEMENTS OF WARRANTY: Uniden warrants, for parts, service, or any other cost (except shipping and handling) incurred by warrantor or its original packaging). Some states do not allow this exclusion or limitation of this Operating Guide you . WARRANTY DURATION: This warranty to the original user...
... Information Weather Information Weather Information Weather Information Weather Information Weather Information Weather Information Weather Information Weather Information Weather Information Three Year Limited Warranty TWhArReReANYTeOaRr:LUimNIDitEeNdAWMaERrrIaCnAtCyORPORATION ("Uniden") ELEMENTS OF WARRANTY: Uniden warrants, for parts, service, or any other cost (except shipping and handling) incurred by warrantor or its original packaging). Some states do not allow this exclusion or limitation of this Operating Guide you . WARRANTY DURATION: This warranty to the original user...

English Owners Manual
Page 52
... CHANNEL CO MME RCIA L VESSEL TRAFFIC SYSTEM VESSEL TRAFFIC SYSTEM BRIDGE TO BRIDGE VESSEL TRAFFIC SYSTEM ENV IRO NMENTAL DISTRESS, SAFETY, CALLING GOVT MARINE CONTROL PORT OPERATION CO MME RCIA L PORT OPERATION PORT OPERATION PORT OPERATION MARINE OPERATOR MARINE OPERATOR MARINE OPERATOR MARINE OPERATOR MARINE OPERATOR MARINE OPERATOR MARINE OPERATOR MARINE OPERATOR MARINE OPERATOR MARINE OPERATOR MARINE OPERATOR MARINE OPERATOR MARINE OPERATOR BRIDGE TO BRIDGE NON COMMERCIAL NON COMMERCIAL DIGITAL SELECTIVE CALLING NON COMMERCIAL NON COMMERCIAL PORT OPERATION PORT OPERATION PORT OPERATION...
... CHANNEL CO MME RCIA L VESSEL TRAFFIC SYSTEM VESSEL TRAFFIC SYSTEM BRIDGE TO BRIDGE VESSEL TRAFFIC SYSTEM ENV IRO NMENTAL DISTRESS, SAFETY, CALLING GOVT MARINE CONTROL PORT OPERATION CO MME RCIA L PORT OPERATION PORT OPERATION PORT OPERATION MARINE OPERATOR MARINE OPERATOR MARINE OPERATOR MARINE OPERATOR MARINE OPERATOR MARINE OPERATOR MARINE OPERATOR MARINE OPERATOR MARINE OPERATOR MARINE OPERATOR MARINE OPERATOR MARINE OPERATOR MARINE OPERATOR BRIDGE TO BRIDGE NON COMMERCIAL NON COMMERCIAL DIGITAL SELECTIVE CALLING NON COMMERCIAL NON COMMERCIAL PORT OPERATION PORT OPERATION PORT OPERATION...


