English Owner's Manual
Page 3
......5 GETTING STARTED 6 WHAT'S INCLUDED...6 INSTALLATION...6 General Placement Considerations...6 Installing Your Monitor...7 Installing the Camera...7 BASIC OPERATION 10 WIRELESS Monitor...10 WIRELESS CAMERA...12 Front & Back Controls...12 LCD DISPLAY...13 USING THE UDR444...14 Viewing Modes...14 Common Operations...14 UDR444 SYSTEM MENUS 17 ALERT...17 POWER SAVE...18 SYSTEM...18 Date & Time...19...
......5 GETTING STARTED 6 WHAT'S INCLUDED...6 INSTALLATION...6 General Placement Considerations...6 Installing Your Monitor...7 Installing the Camera...7 BASIC OPERATION 10 WIRELESS Monitor...10 WIRELESS CAMERA...12 Front & Back Controls...12 LCD DISPLAY...13 USING THE UDR444...14 Viewing Modes...14 Common Operations...14 UDR444 SYSTEM MENUS 17 ALERT...17 POWER SAVE...18 SYSTEM...18 Date & Time...19...
English Owner's Manual
Page 4
USING THE INTERCOM...28 VIEWING LIVE VIDEO...28 Viewing On Your TV...28 Viewing On Your Computer...28 Viewing on Your Wireless Device or Remote Computer 29 PAIRING ACCESSORY CAMERAS 30 MAINTAINING YOUR SYSTEM 31 MONITOR...31 CAMERAS...31 Troubleshooting 32 Specifications 33 MONITOR...33 General...33 Monitor...33 CAMERA...34 General...34 Camera...34 One-Year Limited Warranty 36
USING THE INTERCOM...28 VIEWING LIVE VIDEO...28 Viewing On Your TV...28 Viewing On Your Computer...28 Viewing on Your Wireless Device or Remote Computer 29 PAIRING ACCESSORY CAMERAS 30 MAINTAINING YOUR SYSTEM 31 MONITOR...31 CAMERAS...31 Troubleshooting 32 Specifications 33 MONITOR...33 General...33 Monitor...33 CAMERA...34 General...34 Camera...34 One-Year Limited Warranty 36
English Owner's Manual
Page 5
...remote computer or other wired/wireless devices. •• Maintaining Your System. UDR444 FEATURES •• 4.3" LCD monitor with built-in rechargeable Lithium Polymer battery (up in the next section. •• Uniden UDR444 Screen Descriptions. This section tells you how to 40 ft. Never use this...an abbreviated format, referencing screen details in eight sections: •• Overview. This general section tells you about the UDR444 special features, such as how to connect your surveillance system to 500 ft. This section lists the hardware that should have been...
...remote computer or other wired/wireless devices. •• Maintaining Your System. UDR444 FEATURES •• 4.3" LCD monitor with built-in rechargeable Lithium Polymer battery (up in the next section. •• Uniden UDR444 Screen Descriptions. This section tells you how to 40 ft. Never use this...an abbreviated format, referencing screen details in eight sections: •• Overview. This general section tells you about the UDR444 special features, such as how to connect your surveillance system to 500 ft. This section lists the hardware that should have been...
English Owner's Manual
Page 6
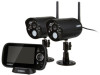
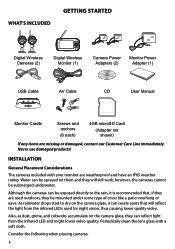
... they be mounted under some type of cover like a patio overhang or eave. Periodically clean the lens glass with your monitor are weatherproof and have an IP65 weather rating. WHAT'S INCLUDED GETTING STARTED Digital Wireless Cameras (2) Digital Wireless... Monitor (1) Camera Power Adapters (2) Monitor Power Adapter (1) USB Cable AV Cable CD User Manual Monitor Cradle Screws and anchors (6 each) 4GB microSD Card (Adapter not shown) If any items are used for ...
... they be mounted under some type of cover like a patio overhang or eave. Periodically clean the lens glass with your monitor are weatherproof and have an IP65 weather rating. WHAT'S INCLUDED GETTING STARTED Digital Wireless Cameras (2) Digital Wireless... Monitor (1) Camera Power Adapters (2) Monitor Power Adapter (1) USB Cable AV Cable CD User Manual Monitor Cradle Screws and anchors (6 each) 4GB microSD Card (Adapter not shown) If any items are used for ...
English Owner's Manual
Page 7
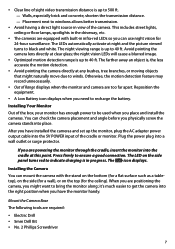
...lens directly at this point. You can use night vision for the ceiling). Plug the power plug into the right position when you have the monitor handy. Press firmly to black and white. •• Clear line of sight video transmission distance is up to 40 ft. Walls, ... or floor lamps, spotlights in progress. the night vision LEDs will cause a blurred image. •• Optimized motion detection range is up the monitor, plug the AC adapter power output cable into place. After you have installed the cameras and set up to indicate charging is in the driveway...
...lens directly at this point. You can use night vision for the ceiling). Plug the power plug into the right position when you have the monitor handy. Press firmly to black and white. •• Clear line of sight video transmission distance is up to 40 ft. Walls, ... or floor lamps, spotlights in progress. the night vision LEDs will cause a blurred image. •• Optimized motion detection range is up the monitor, plug the AC adapter power output cable into place. After you have installed the cameras and set up to indicate charging is in the driveway...
English Owner's Manual
Page 8
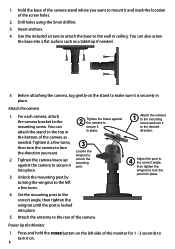
... to 2. Loosen the wingnut to the mounting screw. into a flat surface such as needed . 5. Power Up the Monitor 1. Attach the camera 1. Unlock the mounting post by turning the wingnut to the left side of the monitor for 1 - 2 seconds to make sure it on the left a few turns, then turn it and mark...
... to 2. Loosen the wingnut to the mounting screw. into a flat surface such as needed . 5. Power Up the Monitor 1. Attach the camera 1. Unlock the mounting post by turning the wingnut to the left side of the monitor for 1 - 2 seconds to make sure it on the left a few turns, then turn it and mark...
English Owner's Manual
Page 9
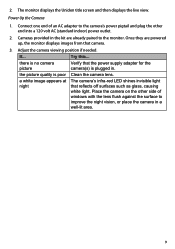
the picture quality is plugged in. The monitor displays the Uniden title screen and then displays the live view. Power Up the Camera 1. If... a white image appears at night The camera's... the camera lens. Once they are already paired to improve the night vision, or place the camera in the kit are powered up, the monitor displays images from that camera. 3. Try this... Place the camera on the other end into a 120 volt AC (standard indoor) power outlet... camera's power pigtail and plug the other side of windows with the lens flush against the surface to the monitor.
the picture quality is plugged in. The monitor displays the Uniden title screen and then displays the live view. Power Up the Camera 1. If... a white image appears at night The camera's... the camera lens. Once they are already paired to improve the night vision, or place the camera in the kit are powered up, the monitor displays images from that camera. 3. Try this... Place the camera on the other end into a 120 volt AC (standard indoor) power outlet... camera's power pigtail and plug the other side of windows with the lens flush against the surface to the monitor.
English Owner's Manual
Page 10
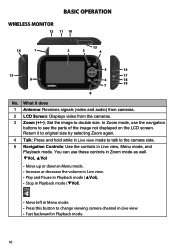
BASIC OPERATION WIRELESS Monitor 12 11 10 14 1 13 2 3 4 15 9 5 16 17 6 18 7 19 8 No. You can use the navigation buttons to the camera side. 5 Navigation Controls: Use the ...
BASIC OPERATION WIRELESS Monitor 12 11 10 14 1 13 2 3 4 15 9 5 16 17 6 18 7 19 8 No. You can use the navigation buttons to the camera side. 5 Navigation Controls: Use the ...
English Owner's Manual
Page 11
Press again to stop recording. 14 Power button: Turns monitor on the back of the monitor. 13 Manual Rec: Press this button to start Manual Recording mode. No. Menu/OK • Press to access the UDR444 menu. • Confirm selections in Menu mode. 6 Back: Press this button to return to previous screen. 7 Video Playback...
Press again to stop recording. 14 Power button: Turns monitor on the back of the monitor. 13 Manual Rec: Press this button to start Manual Recording mode. No. Menu/OK • Press to access the UDR444 menu. • Confirm selections in Menu mode. 6 Back: Press this button to return to previous screen. 7 Video Playback...
English Owner's Manual
Page 12
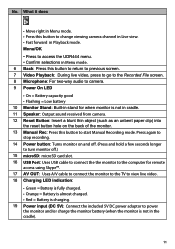
... sensor: Measures light intensity to activate IR LEDs for night vision. 3 Microphone: Receives sounds from the monitor (intercom). 10 Power Input (9V DC): Connect to allow multiple mounting positions. 9 Speaker: Transmits sound from the area near the camera. 4 PIR sensor: Detects ...motion within camera's line of sight. 7 Pair: Press this button to pair the camera to the monitor. 8 Camera stand: Connects to the camera to power adapter. 12 PIR sensor: Detects motion within camera's line of sight. 5 Camera Lens: Mechanism through which ...
... sensor: Measures light intensity to activate IR LEDs for night vision. 3 Microphone: Receives sounds from the monitor (intercom). 10 Power Input (9V DC): Connect to allow multiple mounting positions. 9 Speaker: Transmits sound from the area near the camera. 4 PIR sensor: Detects ...motion within camera's line of sight. 7 Pair: Press this button to pair the camera to the monitor. 8 Camera stand: Connects to the camera to power adapter. 12 PIR sensor: Detects motion within camera's line of sight. 5 Camera Lens: Mechanism through which ...
English Owner's Manual
Page 13
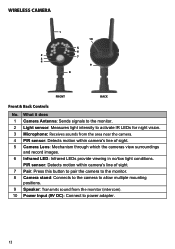
This means the video monitor will overwrite old video files once the card is full. 6 Talk Back: Displays when TALK is pressed. 7 Mute: Displays when volume is turned off. 8 Battery: ...
This means the video monitor will overwrite old video files once the card is full. 6 Talk Back: Displays when TALK is pressed. 7 Mute: Displays when volume is turned off. 8 Battery: ...
English Owner's Manual
Page 14
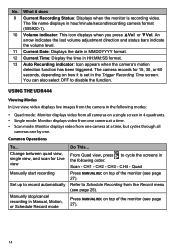
...following modes: •• Quad mode: Monitor displays video from all cameras one by one. From Quad view, press to disable the function. CH4 - Press MANUAL REC on a single screen in the following order: Scan - USING THE UDR444 Viewing Modes In Live view, video displays live... images from the camera in 4 quadrants. •• Single mode: Monitor displays video from one camera at a time. •• Scan mode: Monitor displays video from the Record menu (see page 27...
...following modes: •• Quad mode: Monitor displays video from all cameras one by one. From Quad view, press to disable the function. CH4 - Press MANUAL REC on a single screen in the following order: Scan - USING THE UDR444 Viewing Modes In Live view, video displays live... images from the camera in 4 quadrants. •• Single mode: Monitor displays video from one camera at a time. •• Scan mode: Monitor displays video from the Record menu (see page 27...

English Owner's Manual
Page 15
...) when viewing a camera. 2. Manually cancel a Scheduled Record Playing back a recording on the UDR444 monitor Cancel watching a recorded video Watching recorded video on your computer and play the files from the monitor's SD card to cancel. 3. Select the specific day whose recording schedule you will see page ... adapter included). Select a destination to your system's microSD card. Use Skype™ on TV: Use the AV cable to connect the monitor to the TV. When that day's schedule displays, use or buttons to turn that destination. To view on your home computer. 4. ...
...) when viewing a camera. 2. Manually cancel a Scheduled Record Playing back a recording on the UDR444 monitor Cancel watching a recorded video Watching recorded video on your computer and play the files from the monitor's SD card to cancel. 3. Select the specific day whose recording schedule you will see page ... adapter included). Select a destination to your system's microSD card. Use Skype™ on TV: Use the AV cable to connect the monitor to the TV. When that day's schedule displays, use or buttons to turn that destination. To view on your home computer. 4. ...
English Owner's Manual
Page 18
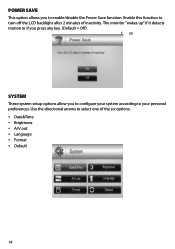
The monitor "wakes up" if it detects motion or if you to turn off the LCD backlight after 2 minutes of the six options: •• Date&Time •• Brightness •• A/V out •• Language •• Format •• Default 18 Use the directional arrows to your personal preferences. POWER SAVE This option allows you press any key. (Default = Off) 1. or SYSTEM These system setup options allow you to configure your system according to select one of inactivity. Enable this function to enable/disable the Power Save function.
The monitor "wakes up" if it detects motion or if you to turn off the LCD backlight after 2 minutes of the six options: •• Date&Time •• Brightness •• A/V out •• Language •• Format •• Default 18 Use the directional arrows to your personal preferences. POWER SAVE This option allows you press any key. (Default = Off) 1. or SYSTEM These system setup options allow you to configure your system according to select one of inactivity. Enable this function to enable/disable the Power Save function.
English Owner's Manual
Page 21
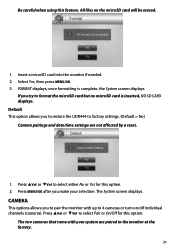
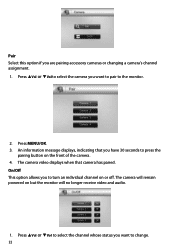
... complete, the System screen displays. Press ▲Vol or ▼Vol to the monitor at the factory. 21 once formatting is inserted, NO SD CARD displays. CAMERA This options allows you to restore the UDR444 to factory settings. (Default = No) Camera pairings and date/time settings are paired... to select Pair or On/Off for this feature. Default This option allows you to pair the monitor with your selection. Press ▲Vol or &#...
... complete, the System screen displays. Press ▲Vol or ▼Vol to the monitor at the factory. 21 once formatting is inserted, NO SD CARD displays. CAMERA This options allows you to restore the UDR444 to factory settings. (Default = No) Camera pairings and date/time settings are paired... to select Pair or On/Off for this feature. Default This option allows you to pair the monitor with your selection. Press ▲Vol or &#...
English Owner's Manual
Page 22
... camera. 4. Press ▲Vol or ▼Vol to select the channel whose status you want to the monitor. 2. On/Off This option allows you have 30 seconds to turn an individual channel on but the monitor will no longer receive video and audio. 1. Press MENU/OK. 3. The camera will remain powered on...
... camera. 4. Press ▲Vol or ▼Vol to select the channel whose status you want to the monitor. 2. On/Off This option allows you have 30 seconds to turn an individual channel on but the monitor will no longer receive video and audio. 1. Press MENU/OK. 3. The camera will remain powered on...
English Owner's Manual
Page 27
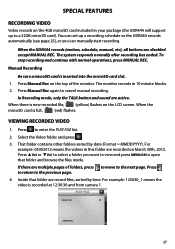
When the UDR444 records (motion, schedule, manual, etc), all buttons are multiple pages of the monitor. Inside that folder and browse the files inside. To stop recording and continue with normal operations, press MANUAL REC. For example: 03302012 means the videos...recorded on the LCD screen. For example: 123030_1 means the video is inserted into the microSD card slot. 1. The monitor records in your package (the UDR444 will support up a recording schedule so the UDR444 records automatically (see page 25), or you want to view and press Menu/OK to open that folder are...
When the UDR444 records (motion, schedule, manual, etc), all buttons are multiple pages of the monitor. Inside that folder and browse the files inside. To stop recording and continue with normal operations, press MANUAL REC. For example: 03302012 means the videos...recorded on the LCD screen. For example: 123030_1 means the video is inserted into the microSD card slot. 1. The monitor records in your package (the UDR444 will support up a recording schedule so the UDR444 records automatically (see page 25), or you want to view and press Menu/OK to open that folder are...
English Owner's Manual
Page 28
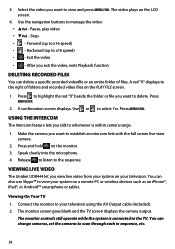
...response. Make the camera you want to the right of files. Release to listen to select Yes. VIEWING LIVE VIDEO The Uniden UDR444 let you want to delete. The monitor controls still operate while the system is within camera range. 1. Select the video you want to establish an intercom link ... the TV screen displays the camera output. Press MENU/OK. 2. Stop • - You can change cameras, set the cameras to your television. Connect the monitor to scan through each in sequence, etc. 28 Use the navigation buttons to x16 speed) • - Backward (up to manage the video: • ...
...response. Make the camera you want to the right of files. Release to listen to select Yes. VIEWING LIVE VIDEO The Uniden UDR444 let you want to delete. The monitor controls still operate while the system is within camera range. 1. Select the video you want to establish an intercom link ... the TV screen displays the camera output. Press MENU/OK. 2. Stop • - You can change cameras, set the cameras to your television. Connect the monitor to scan through each in sequence, etc. 28 Use the navigation buttons to x16 speed) • - Backward (up to manage the video: • ...
English Owner's Manual
Page 29
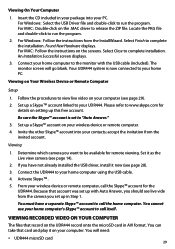
... play it as the Live view camera (see page 29). 2. Insert the CD included in your package into your home computer to the monitor with Auto Answer, you should see page 28). 3. Select Finish to complete installation. Select Close to complete the installation. Set up in AVI... (see page 14). 2. Activate Skype™. 5. For MAC: Follow the instructions on the UDR444 record onto the microSD card in Step 1. The monitor screen will need: •• UDR444 microSD card 29 Your UDR444 system is set up a Skype™ account linked to www.skype.com for remote viewing. ...
... play it as the Live view camera (see page 29). 2. Insert the CD included in your package into your home computer to the monitor with Auto Answer, you should see page 28). 3. Select Finish to complete installation. Select Close to complete the installation. Set up in AVI... (see page 14). 2. Activate Skype™. 5. For MAC: Follow the instructions on the UDR444 record onto the microSD card in Step 1. The monitor screen will need: •• UDR444 microSD card 29 Your UDR444 system is set up a Skype™ account linked to www.skype.com for remote viewing. ...
English Owner's Manual
Page 30
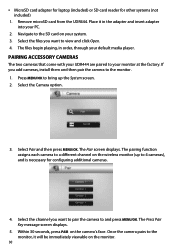
.... 2. Place it will be immediately viewable on the camera's face. Navigate to the monitor, it in order, through your monitor at the factory. PAIRING ACCESSORY CAMERAS The two cameras that come with your UDR444 are paired to and press MENU/OK. The Press Pair Key message screen displays. 5.... and then pair the camera to view and click Open. 4. Select the channel you want to the monitor. 1. Within 30 seconds, press Pair on the monitor. 30 Remove microSD card from the UDR444. The Pair screen displays. •• MicroSD card adapter for laptop (included) or SD card reader...
.... 2. Place it will be immediately viewable on the camera's face. Navigate to the monitor, it in order, through your monitor at the factory. PAIRING ACCESSORY CAMERAS The two cameras that come with your UDR444 are paired to and press MENU/OK. The Press Pair Key message screen displays. 5.... and then pair the camera to view and click Open. 4. Select the channel you want to the monitor. 1. Within 30 seconds, press Pair on the monitor. 30 Remove microSD card from the UDR444. The Pair screen displays. •• MicroSD card adapter for laptop (included) or SD card reader...


