English Owners Manual
Page 3
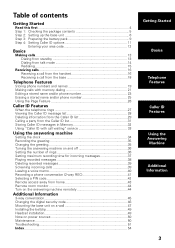
... Getting Started Read this first 4 Step 1: Checking the package contents 5 Step 2: Setting up the base unit 6 Step 3: Preparing the battery pack 9 Step 4: Setting Caller ID options 11 Entering your area code 12 Basics Making calls 13 Dialing from standby 13 Dialing from talk ...recording time for incoming messages 37 Playing recorded messages 38 Deleting recorded messages 39 Screening incoming calls 39 Leaving a voice memo 40 Recording a phone conversation (2-way REC 41 Selecting a PIN code 42 Remote access away from home 43 Remote room monitor 44 Turn on the answering machine...
... Getting Started Read this first 4 Step 1: Checking the package contents 5 Step 2: Setting up the base unit 6 Step 3: Preparing the battery pack 9 Step 4: Setting Caller ID options 11 Entering your area code 12 Basics Making calls 13 Dialing from standby 13 Dialing from talk ...recording time for incoming messages 37 Playing recorded messages 38 Deleting recorded messages 39 Screening incoming calls 39 Leaving a voice memo 40 Recording a phone conversation (2-way REC 41 Selecting a PIN code 42 Remote access away from home 43 Remote room monitor 44 Turn on the answering machine...

English Owners Manual
Page 4
... will be set up the base unit. Note: Skip the setting of area code if your base unit and handset when you charge the battery pack for 12-15 hours before use the Caller ID service. Handset About the digital security code This cordless telephone uses a digital security code... to prevent unauthorized access to set up before using the phone. To reset the security code, see page 46. 4 Follow these steps; Step 2 (page 6 to 8) Next, choose the best location to your base unit....
... will be set up the base unit. Note: Skip the setting of area code if your base unit and handset when you charge the battery pack for 12-15 hours before use the Caller ID service. Handset About the digital security code This cordless telephone uses a digital security code... to prevent unauthorized access to set up before using the phone. To reset the security code, see page 46. 4 Follow these steps; Step 2 (page 6 to 8) Next, choose the best location to your base unit....
English Owners Manual
Page 9
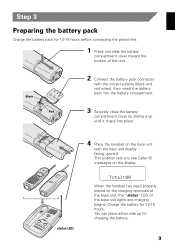
... cover by sliding it up for 12-15 hours. Charge the battery for charging the battery. 9 Step 3 Preparing the battery pack Charge the battery pack for 12-15 hours before connecting the phone line. 1 Press and slide the battery compartment cover toward the bottom of the base unit lights and charging begins. This position lets you... up until it snaps into place. 4 Place the handset on the charging terminals of the base unit, the "status" LED of the unit. 2 Connect the battery pack connector with the keys and display facing upward.
... cover by sliding it up for 12-15 hours. Charge the battery for charging the battery. 9 Step 3 Preparing the battery pack Charge the battery pack for 12-15 hours before connecting the phone line. 1 Press and slide the battery compartment cover toward the bottom of the base unit lights and charging begins. This position lets you... up until it snaps into place. 4 Place the handset on the charging terminals of the base unit, the "status" LED of the unit. 2 Connect the battery pack connector with the keys and display facing upward.

English Owners Manual
Page 10
...and none of the keys will gradually discharge over a long period. Cleaning the battery contacts To maintain a good charge, it will operate. Do not use any liquids or solvents. 10 If the phone is in the standby mode. Complete your conversation as quickly as possible and return... charged • Seven hours continuous use. • Seven days when the handset is in use, "Low Battery" flashes and the handset beeps. For optimum performance, be charged, the phone eliminates functions to 2 minutes, while you replace the battery pack. If the phone is not in the memory for charging.
...and none of the keys will gradually discharge over a long period. Cleaning the battery contacts To maintain a good charge, it will operate. Do not use any liquids or solvents. 10 If the phone is in the standby mode. Complete your conversation as quickly as possible and return... charged • Seven hours continuous use. • Seven days when the handset is in use, "Low Battery" flashes and the handset beeps. For optimum performance, be charged, the phone eliminates functions to 2 minutes, while you replace the battery pack. If the phone is not in the memory for charging.
English Owners Manual
Page 51
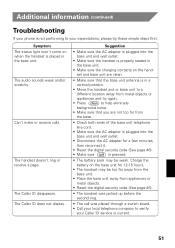
...'t ring or receive a page. The audio sounds weak and/or scratchy. The Caller ID disappears. The Caller ID does not display. Charge the battery on when the handset is not performing to your expectations, please try again. • Press to help eliminate background noise. • Make sure... sure that you are not too far from metal objects or appliances and try these simple steps first. Additional information (continued) Troubleshooting If your phone is placed in the base unit. Symptom The status light won't come on the base unit for a few minutes, then reconnect it. &#...
...'t ring or receive a page. The audio sounds weak and/or scratchy. The Caller ID disappears. The Caller ID does not display. Charge the battery on when the handset is not performing to your expectations, please try again. • Press to help eliminate background noise. • Make sure... sure that you are not too far from metal objects or appliances and try these simple steps first. Additional information (continued) Troubleshooting If your phone is placed in the base unit. Symptom The status light won't come on the base unit for a few minutes, then reconnect it. &#...

English Owners Manual
Page 54
...incoming message.....37 Turning the answering machine on and off 36 Area code 12 B Base ringer switch 18 Base speaker volume 18 Battery pack Preparing and charging 9 Replacement and handling 50 C Caller ID service Calling from the Caller ID list .........31 Deleting the...Channel button 13 Connection 7 D Dialing mode 8 Digital security code 4,46 54 E, F, G, H Editing a stored name and/or phone number 23 Erasing a stored name and/or phone number 25 Handset earpiece volume 17 Headset installation 49 I, J, K, L Installing the beltclip 49 M, N Maintenance 50 Making calls Dialing from...
...incoming message.....37 Turning the answering machine on and off 36 Area code 12 B Base ringer switch 18 Base speaker volume 18 Battery pack Preparing and charging 9 Replacement and handling 50 C Caller ID service Calling from the Caller ID list .........31 Deleting the...Channel button 13 Connection 7 D Dialing mode 8 Digital security code 4,46 54 E, F, G, H Editing a stored name and/or phone number 23 Erasing a stored name and/or phone number 25 Handset earpiece volume 17 Headset installation 49 I, J, K, L Installing the beltclip 49 M, N Maintenance 50 Making calls Dialing from...


