
English Owners Manual
Page 2
... digital security codes for explanation purposes. Features • 900 MHz Technology • 3-line Backlit Display • Face Up/Face Down Charging • 32 Digit Redial • Page/Find • Handset Earpiece and Ringer Volume Control • 15 minutes Record Memory • Conversation Record and Voice Memo • Call Waiting Caller ID • 30 Number Caller ID Memory • 10 Memory Dial Locations • Pulse / Tone Dialing • 7 Hour Talk Time • Remote Message Retrieval • Prerecorded Greetings Option • Hearing Aid Compatible...
... digital security codes for explanation purposes. Features • 900 MHz Technology • 3-line Backlit Display • Face Up/Face Down Charging • 32 Digit Redial • Page/Find • Handset Earpiece and Ringer Volume Control • 15 minutes Record Memory • Conversation Record and Voice Memo • Call Waiting Caller ID • 30 Number Caller ID Memory • 10 Memory Dial Locations • Pulse / Tone Dialing • 7 Hour Talk Time • Remote Message Retrieval • Prerecorded Greetings Option • Hearing Aid Compatible...
English Owners Manual
Page 3
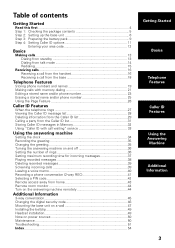
...the answering machine on and off 36 Setting the number of rings 36 Setting maximum recording time for incoming messages 37 Playing recorded messages 38 Deleting recorded messages 39 Screening incoming calls 39 Leaving a voice memo 40 Recording a phone conversation (2-way REC 41 Selecting a PIN code 42 Remote access away from home 43 Remote room monitor 44 Turn on the answering machine remotely 44 Additional Information 3-way conversation 45 Changing the digital security code 46 Mounting the base unit on a wall 47 Installing the beltclip 49 Headset installation 49 Note on power...
...the answering machine on and off 36 Setting the number of rings 36 Setting maximum recording time for incoming messages 37 Playing recorded messages 38 Deleting recorded messages 39 Screening incoming calls 39 Leaving a voice memo 40 Recording a phone conversation (2-way REC 41 Selecting a PIN code 42 Remote access away from home 43 Remote room monitor 44 Turn on the answering machine remotely 44 Additional Information 3-way conversation 45 Changing the digital security code 46 Mounting the base unit on a wall 47 Installing the beltclip 49 Headset installation 49 Note on power...

English Owners Manual
Page 4
... service. Step 2 (page 6 to 8) Next, choose the best location to use . This security code prevents other cordless handsets from making calls through your base unit. Follow these steps; Base unit Step 3 (page 9 to10) Then, insert the battery pack into the handset. Step 1 (page 5) Unpack the telephone and accessories. Handset About the digital security code This cordless telephone uses a digital security code to prevent unauthorized access to charge the battery pack for the first time. A random security code will be set up before using the phone...
... service. Step 2 (page 6 to 8) Next, choose the best location to use . This security code prevents other cordless handsets from making calls through your base unit. Follow these steps; Base unit Step 3 (page 9 to10) Then, insert the battery pack into the handset. Step 1 (page 5) Unpack the telephone and accessories. Handset About the digital security code This cordless telephone uses a digital security code to prevent unauthorized access to charge the battery pack for the first time. A random security code will be set up before using the phone...

English Owners Manual
Page 5
... the Uniden Parts Department (see below). • Base unit • Handset • AC adapter (AD-420) • Rechargeable battery pack (BT-905) • Telephone line cord • This Owner's Manual • Precautions and Important Safety Instructions • Registration Card • Wall mount adapter • Beltclip Uniden Parts Department (800) 554-3988 Hours are 7:00 a.m. We can also be reached on the web at www.uniden.com 5 to 5:00 p.m. Central Time, Monday...
... the Uniden Parts Department (see below). • Base unit • Handset • AC adapter (AD-420) • Rechargeable battery pack (BT-905) • Telephone line cord • This Owner's Manual • Precautions and Important Safety Instructions • Registration Card • Wall mount adapter • Beltclip Uniden Parts Department (800) 554-3988 Hours are 7:00 a.m. We can also be reached on the web at www.uniden.com 5 to 5:00 p.m. Central Time, Monday...

English Owners Manual
Page 7
... the handset battery is fully charged, you want to install the base unit on the wall, see page 47. 1 Connect the telephone line cord to the TEL LINE jack and to a telephone outlet. top and place the handset on a desk or table- Step 2 (continued) Connect the base unit If you can only answer incoming calls at the base unit. 2 Connect the AC adapter to the 3 DC IN 9V jack and to a standard 120VAC wall outlet. 3 Set the base unit...
... the handset battery is fully charged, you want to install the base unit on the wall, see page 47. 1 Connect the telephone line cord to the TEL LINE jack and to a telephone outlet. top and place the handset on a desk or table- Step 2 (continued) Connect the base unit If you can only answer incoming calls at the base unit. 2 Connect the AC adapter to the 3 DC IN 9V jack and to a standard 120VAC wall outlet. 3 Set the base unit...
English Owners Manual
Page 9
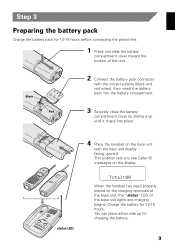
... battery compartment. 3 Securely close the battery compartment cover by sliding it up for charging the battery. 9 This position lets you see Caller ID messages on the charging terminals of the base unit, the "status" LED of the unit. 2 Connect the battery pack connector with the correct polarity (black and red wires), then insert the battery pack into place. 4 Place the handset on the base unit with the keys and display...
... battery compartment. 3 Securely close the battery compartment cover by sliding it up for charging the battery. 9 This position lets you see Caller ID messages on the charging terminals of the base unit, the "status" LED of the unit. 2 Connect the battery pack connector with the correct polarity (black and red wires), then insert the battery pack into place. 4 Place the handset on the base unit with the keys and display...

English Owners Manual
Page 10
... the handset to the base unit for charging the battery. • The built-in memory backup holds numbers and names stored in use, "Low Battery" flashes and the handset beeps. Cleaning the battery contacts To maintain a good charge, it will operate. If the phone is in the memory for up to 2 minutes, while you replace the battery pack. For optimum performance, be charged, the phone eliminates functions to save power. If the phone...
... the handset to the base unit for charging the battery. • The built-in memory backup holds numbers and names stored in use, "Low Battery" flashes and the handset beeps. Cleaning the battery contacts To maintain a good charge, it will operate. If the phone is in the memory for up to 2 minutes, while you replace the battery pack. For optimum performance, be charged, the phone eliminates functions to save power. If the phone...
English Owners Manual
Page 11
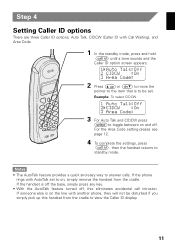
... to answer calls. If the handset is on and off , this handset from the cradle. If the phone rings with Call Waiting), and Area Code. 1 In the standby mode, press and hold until a tone sounds and the Caller ID option screen appears....call intrusion. If someone else is off the base, simply press any key. • With the AutoTalk feature turned off . Notes • The AutoTalk feature provides a quick and easy way to toggle between on the line with another phone, they will not be set to on, simply remove the handset from the cradle to standby mode. For the Area Code setting...
... to answer calls. If the handset is on and off , this handset from the cradle. If the phone rings with Call Waiting), and Area Code. 1 In the standby mode, press and hold until a tone sounds and the Caller ID option screen appears....call intrusion. If someone else is off the base, simply press any key. • With the AutoTalk feature turned off . Notes • The AutoTalk feature provides a quick and easy way to toggle between on the line with another phone, they will not be set to on, simply remove the handset from the cradle to standby mode. For the Area Code setting...

English Owners Manual
Page 12
... time, or move to an area that has a different area code, you use the number keypad to properly dial calls from the Caller ID message list. (See page 31.) 1 In the standby mode, press and hold from the display. to select 3 Press . 4 Use the number keypad ( to ) to the standby mode. The handset returns to enter the 3-digit area code. 5 Press . This is removed To complete the setting...
... time, or move to an area that has a different area code, you use the number keypad to properly dial calls from the Caller ID message list. (See page 31.) 1 In the standby mode, press and hold from the display. to select 3 Press . 4 Use the number keypad ( to ) to the standby mode. The handset returns to enter the 3-digit area code. 5 Press . This is removed To complete the setting...

English Owners Manual
Page 13
... . Making calls Dialing from standby 1 Dial the phone number. (up , press or place the handset on the display. The call-time will be displayed for a few seconds. Then the volume setting appears for about 5 seconds, the call-time display appears. 4 To hang up to pulse mode) To enter a pause in the dialing sequence Do this Press . Other Operations To To improve reception To adjust the earpiece volume To temporarily switch to tone dial...
... . Making calls Dialing from standby 1 Dial the phone number. (up , press or place the handset on the display. The call-time will be displayed for a few seconds. Then the volume setting appears for about 5 seconds, the call-time display appears. 4 To hang up to pulse mode) To enter a pause in the dialing sequence Do this Press . Other Operations To To improve reception To adjust the earpiece volume To temporarily switch to tone dial...

English Owners Manual
Page 14
Making calls (continued) Dialing from talk mode 1 Pick up , press or place the handset on the display. 3 Dial the phone number. Example: Enter 817-858-3300 4 To hang up the handset. 2 Press . The call -time display appears. "Talk" and the volume setting appear on the base. After about 5 seconds, the call -time will be displayed for about 5 seconds. The phone returns to standby. 14
Making calls (continued) Dialing from talk mode 1 Pick up , press or place the handset on the display. 3 Dial the phone number. Example: Enter 817-858-3300 4 To hang up the handset. 2 Press . The call -time display appears. "Talk" and the volume setting appear on the base. After about 5 seconds, the call -time will be displayed for about 5 seconds. The phone returns to standby. 14

English Owners Manual
Page 15
... mode 1 Press . The call -time display appears. 4 Press or place the handset on the display. 2 Press . "Talk" appears flashing on the display. 2 Press . 3 Press or place the handset on the display. 3 Then the phone number is dialed. Making calls (continued) Redialing The redial key redials the last number dialed. The call-time will be displayed for about 5 seconds, the call -time will be up to end the telephone call . "Talk" and the volume setting appear on the base...
... mode 1 Press . The call -time display appears. 4 Press or place the handset on the display. 2 Press . "Talk" appears flashing on the display. 2 Press . 3 Press or place the handset on the display. 3 Then the phone number is dialed. Making calls (continued) Redialing The redial key redials the last number dialed. The call-time will be displayed for about 5 seconds, the call -time will be up to end the telephone call . "Talk" and the volume setting appear on the base...

English Owners Manual
Page 16
... use this feature. "Talk" and the volume setting appear on the display. 3 To hang up, press or place the handset on , proceed to answer the phone. When a call is off the base, press any handset key to off as the default setting. Auto Talk when ringing When the Auto Talk setting is on and the handset is received during a telephone call , simply lift the handset from the handset 1 Phone rings. 2 Press . To turn...
... use this feature. "Talk" and the volume setting appear on the display. 3 To hang up, press or place the handset on , proceed to answer the phone. When a call is off the base, press any handset key to off as the default setting. Auto Talk when ringing When the Auto Talk setting is on and the handset is received during a telephone call , simply lift the handset from the handset 1 Phone rings. 2 Press . To turn...

English Owners Manual
Page 20
... delay of time between digits. The display shows a "P". The handset beeps and displays the confirmation screen. After about 2 seconds, "Memory Store" is complete. "Store Number" is ready for the number to be up to 16 digits. • Use the key to enter pause in the dialing sequence. Each pause counts as needed . 7 Press . Note The pause feature is useful for long distance calling, credit card dialing, or...
... delay of time between digits. The display shows a "P". The handset beeps and displays the confirmation screen. After about 2 seconds, "Memory Store" is complete. "Store Number" is ready for the number to be up to 16 digits. • Use the key to enter pause in the dialing sequence. Each pause counts as needed . 7 Press . Note The pause feature is useful for long distance calling, credit card dialing, or...

English Owners Manual
Page 21
... the display and the volume setting appears. The handset returns to standby. • Whenever you are using a menu screen, you would like to dial. For example if you would like to dial. The handset displays your programmed memory locations. 2 Press the and keys to select the memory location you must press a key within 20 seconds or the phone will return to the next memory location number. Then the displayed number...
... the display and the volume setting appears. The handset returns to standby. • Whenever you are using a menu screen, you would like to dial. For example if you would like to dial. The handset displays your programmed memory locations. 2 Press the and keys to select the memory location you must press a key within 20 seconds or the phone will return to the next memory location number. Then the displayed number...

English Owners Manual
Page 32
..., an error tone sounds and the telephone returns to the standby mode. • If there is an incoming call or page, memory storage is canceled and the telephone is set to the incoming call information (i.e., Caller ID list), the phone number of the party on the Caller ID list can not store a Caller ID message if no phone number appears in the message. • If no key is pressed for memory dialing. A tone will...
..., an error tone sounds and the telephone returns to the standby mode. • If there is an incoming call or page, memory storage is canceled and the telephone is set to the incoming call information (i.e., Caller ID list), the phone number of the party on the Caller ID list can not store a Caller ID message if no phone number appears in the message. • If no key is pressed for memory dialing. A tone will...

English Owners Manual
Page 36
... number of rings Choose one of three settings by playing the greeting. This way, when you have no new messages, the system answers after the second ring to save a charge. 36 If you can hang up after four rings. If the LED display is off, it will not take messages. If there are no messages, you want to stop playing, press . Using the answering machine (continued) Turning the answering machine...
... number of rings Choose one of three settings by playing the greeting. This way, when you have no new messages, the system answers after the second ring to save a charge. 36 If you can hang up after four rings. If the LED display is off, it will not take messages. If there are no messages, you want to stop playing, press . Using the answering machine (continued) Turning the answering machine...

English Owners Manual
Page 43
...; During the remote operation, rC displays on # then 7 Voice memo record/stop (up to the command waiting mode. Then, press # and your PIN code. 3 The answering system announces the time and day stamp and the number of your messages have played, or the playback time exceeds 4 minutes, you are finished, hang up and returns to standby. • The system will hear intermittent tones indicating that the system...
...; During the remote operation, rC displays on # then 7 Voice memo record/stop (up to the command waiting mode. Then, press # and your PIN code. 3 The answering system announces the time and day stamp and the number of your messages have played, or the playback time exceeds 4 minutes, you are finished, hang up and returns to standby. • The system will hear intermittent tones indicating that the system...
English Owners Manual
Page 51
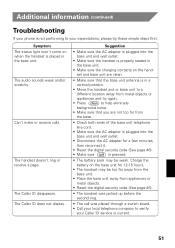
... the handset and or base unit to verify your Caller ID service is placed in the base unit. • Make sure the charging contacts on the handset and base unit are clean. • Make sure that you are not too far from the base. • Check both ends of the base unit telephone line cord. • Make sure the AC adapter is plugged into the base unit and wall outlet. • Disconnect the AC adapter for...
... the handset and or base unit to verify your Caller ID service is placed in the base unit. • Make sure the charging contacts on the handset and base unit are clean. • Make sure that you are not too far from the base. • Check both ends of the base unit telephone line cord. • Make sure the AC adapter is plugged into the base unit and wall outlet. • Disconnect the AC adapter for...

English Owners Manual
Page 54
... number of rings...........36 Setting the maximum recording time for the incoming message.....37 Turning the answering machine on and off 36 Area code 12 B Base ringer switch 18 Base speaker volume 18 Battery pack Preparing and charging 9 Replacement and handling 50 C Caller ID service Calling from the Caller ID list .........31 Deleting the Caller ID list 29 Storing the data of the Caller ID list to Memory 32 Viewing Caller ID message list ......28 Caller ID with Call Waiting 33 Channel button 13 Connection 7 D Dialing mode 8 Digital security code...
... number of rings...........36 Setting the maximum recording time for the incoming message.....37 Turning the answering machine on and off 36 Area code 12 B Base ringer switch 18 Base speaker volume 18 Battery pack Preparing and charging 9 Replacement and handling 50 C Caller ID service Calling from the Caller ID list .........31 Deleting the Caller ID list 29 Storing the data of the Caller ID list to Memory 32 Viewing Caller ID message list ......28 Caller ID with Call Waiting 33 Channel button 13 Connection 7 D Dialing mode 8 Digital security code...

