English Owners Manual
Page 1
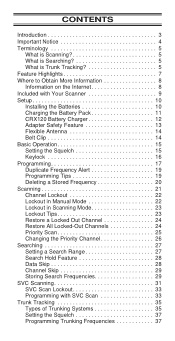
... is Trunk Tracking 5 Feature Highlights 7 Where to Obtain More Information 8 Information on the Internet 8 Included with Your Scanner 9 Setup 10 Installing the Batteries 10 Charging the Battery Pack 11 CRX120 Battery Charger 12 Adapter Safety Feature 13 Flexible Antenna 14 Belt Clip 14 Basic Operation 15 Setting the Squelch 15 Keylock 16 Programming...
... is Trunk Tracking 5 Feature Highlights 7 Where to Obtain More Information 8 Information on the Internet 8 Included with Your Scanner 9 Setup 10 Installing the Batteries 10 Charging the Battery Pack 11 CRX120 Battery Charger 12 Adapter Safety Feature 13 Flexible Antenna 14 Belt Clip 14 Basic Operation 15 Setting the Squelch 15 Keylock 16 Programming...
English Owners Manual
Page 7
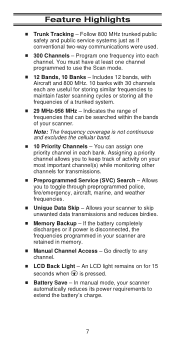
...unwanted data transmissions and reduces birdies. Unique Data Skip - Note: The frequency coverage is disconnected, the frequencies programmed in each channel. Battery Save - Feature Highlights Trunk Tracking - Program one frequency into each bank. Includes 12 bands, with Aircraft and 800 MHz. 10 banks...956 MHz - Assigning a priority channel allows you to use the Scan mode. 12 Bands, 10 Banks - Memory Backup - If the battery completely discharges or if power is not continuous and excludes the cellular band. 10 Priority Channels - LCD Back Light - An LCD light ...
...unwanted data transmissions and reduces birdies. Unique Data Skip - Note: The frequency coverage is disconnected, the frequencies programmed in each channel. Battery Save - Feature Highlights Trunk Tracking - Program one frequency into each bank. Includes 12 bands, with Aircraft and 800 MHz. 10 banks...956 MHz - Assigning a priority channel allows you to use the Scan mode. 12 Bands, 10 Banks - Memory Backup - If the battery completely discharges or if power is not continuous and excludes the cellular band. 10 Priority Channels - LCD Back Light - An LCD light ...

English Owners Manual
Page 10
Setup These are helpful guidelines when using your new scanner: If your scanner receives interference or electrical noise, move the scanner or its antenna away from the source. Insert the battery pack. 10 Read the precautions on the inside front cover of antenna at a local electronics store.) Use the included earphone or an optional stereo headset with proper impedance for multi-band coverage. (You can purchase this type of this Guide. Open the cover. 2. If you need to improve reception, use an optional antenna designed for private listening. Installing the Batteries 1.
Setup These are helpful guidelines when using your new scanner: If your scanner receives interference or electrical noise, move the scanner or its antenna away from the source. Insert the battery pack. 10 Read the precautions on the inside front cover of antenna at a local electronics store.) Use the included earphone or an optional stereo headset with proper impedance for multi-band coverage. (You can purchase this type of this Guide. Open the cover. 2. If you need to improve reception, use an optional antenna designed for private listening. Installing the Batteries 1.

English Owners Manual
Page 11
3. Replace cover and press down until it clicks into place. Use only the supplied AC Adapter (AD70U) or one of the optional power cords (WZ1015 or WZ1017). To fully charge the battery, leave the AC Adapter/Charger connected for 14 - 16 hours. Note: Disconnect the AC Adapter/Charger from an AC outlet. You can use your scanner while the battery charges. Charging the Battery Pack Use the AC Adapter/Charger to power the BC 235XLT from the unit when charging is complete. 11
3. Replace cover and press down until it clicks into place. Use only the supplied AC Adapter (AD70U) or one of the optional power cords (WZ1015 or WZ1017). To fully charge the battery, leave the AC Adapter/Charger connected for 14 - 16 hours. Note: Disconnect the AC Adapter/Charger from an AC outlet. You can use your scanner while the battery charges. Charging the Battery Pack Use the AC Adapter/Charger to power the BC 235XLT from the unit when charging is complete. 11

English Owners Manual
Page 12
...wire matches RED and the black wire matches BLK on the charger will light, indicating that the battery is charging. The red LED on the charger. 2. Then connect the adapter to go. Place the battery in the charger, and plug the AC Adapter into the CHARGE BLK RED connector in the ...charger for 14 - 16 hours. 1. Charging the Spare Battery To fully charge the extra battery in the CRX120, you should leave the battery in the CRX120. You can always ...
...wire matches RED and the black wire matches BLK on the charger will light, indicating that the battery is charging. The red LED on the charger. 2. Then connect the adapter to go. Place the battery in the charger, and plug the AC Adapter into the CHARGE BLK RED connector in the ...charger for 14 - 16 hours. 1. Charging the Spare Battery To fully charge the extra battery in the CRX120, you should leave the battery in the CRX120. You can always ...

English Owners Manual
Page 13
... plug will fit into an outlet, try reversing the plug. 13 When charging is complete, disconnect the CRX120 from your scanner. 2. To fully charge both batteries at the same time. If you should leave the AC Adapter/Charger connected for 14 - 16 hours. 1. DC IN 12 V Connecting the Charger to ...Your Scanner You can charge both batteries, you are unable to the charging jack on the CRX120 to insert the adapter's plug into a power outlet only one blade wider than the other.
... plug will fit into an outlet, try reversing the plug. 13 When charging is complete, disconnect the CRX120 from your scanner. 2. To fully charge both batteries at the same time. If you should leave the AC Adapter/Charger connected for 14 - 16 hours. 1. DC IN 12 V Connecting the Charger to ...Your Scanner You can charge both batteries, you are unable to the charging jack on the CRX120 to insert the adapter's plug into a power outlet only one blade wider than the other.

English Owners Manual
Page 54
... placing the unit in all channels when there has been a memory loss. Be careful not to the unit before disconnecting the power or replacing the batteries. Always write down the programmed frequencies in high-moisture environments such as the kitchen or bathroom. If possible, a higher elevation, may provide better reception. Also...
... placing the unit in all channels when there has been a memory loss. Be careful not to the unit before disconnecting the power or replacing the batteries. Always write down the programmed frequencies in high-moisture environments such as the kitchen or bathroom. If possible, a higher elevation, may provide better reception. Also...
English Owners Manual
Page 56
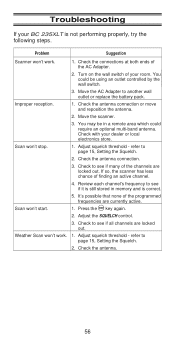
Improper reception. 1. Move the scanner. 3. refer to another wall outlet or replace the battery pack. Check to see if many of the channels are currently active. 1. You could be in memory and is not performing properly, try the following ...
Improper reception. 1. Move the scanner. 3. refer to another wall outlet or replace the battery pack. Check to see if many of the channels are currently active. 1. You could be in memory and is not performing properly, try the following ...

English Owners Manual
Page 58
...) 2 seconds 180 mW nominal into 8Ω internal speaker 30 mW nominal into 32Ω stereo headphone 8 mW nominal into 64Ω earphone 4.8 VDC 800mAh (internal battery or AD70U AC Adapter) Rubber antenna (included) External earphone, DC 12V power jack 21/2 in. (W) x 13/4 in. (D) x 61/2 in accordance with FCC Rules and Regulations...
...) 2 seconds 180 mW nominal into 8Ω internal speaker 30 mW nominal into 32Ω stereo headphone 8 mW nominal into 64Ω earphone 4.8 VDC 800mAh (internal battery or AD70U AC Adapter) Rubber antenna (included) External earphone, DC 12V power jack 21/2 in. (W) x 13/4 in. (D) x 61/2 in accordance with FCC Rules and Regulations...
English Owners Manual
Page 65
... This may be potentially hazardous to use a 32Ω stereo headset. NICKEL-CADMIUM BATTERY WARNING! Use of earphone that is a chemical known to the State of California to explode. Uniden® and Bearcat® are registered trademarks of the Volume Control or Squelch Control ... possible hearing damage if the volume suddenly becomes too loud because of Uniden America Corporation. Be sure to your hearing. You may explode. Do not charge Nickel-Cadmium Batteries with any Battery. Residents outside of Minnesota should contact 1-800-225-PRBA for information ...
... This may be potentially hazardous to use a 32Ω stereo headset. NICKEL-CADMIUM BATTERY WARNING! Use of earphone that is a chemical known to the State of California to explode. Uniden® and Bearcat® are registered trademarks of the Volume Control or Squelch Control ... possible hearing damage if the volume suddenly becomes too loud because of Uniden America Corporation. Be sure to your hearing. You may explode. Do not charge Nickel-Cadmium Batteries with any Battery. Residents outside of Minnesota should contact 1-800-225-PRBA for information ...

English Owners Manual
Page 67
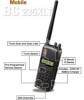
Squelch Control 22. Priority Channel Indicator 30. Antenna Connector 20. Frequency Display 25. Bank/Activity Indicators 26. Mode Indicators 29. Keypad Lockout Indicator 28. Earphone Jack 21. Bank/Trunk Indicators On/Off Volume Control 23 24 30 BANK 1 2 3 4 5 6 7 8 9 10 TRUNK 25 29 888 888.8888 BATT 26 DATA POLICE FIRE/EMG AIR MRN W X SCAN SRCH PRI HOLD DLY L /O 28 27 23. Top View and Display 19 20 21 22 19. Battery Low Indicator 27. Channel Display 24.
Squelch Control 22. Priority Channel Indicator 30. Antenna Connector 20. Frequency Display 25. Bank/Activity Indicators 26. Mode Indicators 29. Keypad Lockout Indicator 28. Earphone Jack 21. Bank/Trunk Indicators On/Off Volume Control 23 24 30 BANK 1 2 3 4 5 6 7 8 9 10 TRUNK 25 29 888 888.8888 BATT 26 DATA POLICE FIRE/EMG AIR MRN W X SCAN SRCH PRI HOLD DLY L /O 28 27 23. Top View and Display 19 20 21 22 19. Battery Low Indicator 27. Channel Display 24.


