

Users Manual Canada; English
Page 4
... M9 System Auto Off 6-13 Chapter 7 HW Setup & BIOS Setup Accessing HW Setup 7-1 HW Setup window 7-1 BIOS Setup Program 7-8 Chapter 8 Troubleshooting Problem solving process 8-1 Hardware and system checklist 8-3 TOSHIBA support 8-21 Appendix A Specifications Physical Dimensions A-1 Environmental Requirements A-1 Appendix B Display Controller and Video mode Display controller B-1 Video mode B-1 Appendix C AT Commands Appendix D S-registers S-register values D-1 AT command set result codes D-5 Appendix E V.90 V.90 mode E-1 AT Command E-3 Appendix F Wireless LAN Card...
... M9 System Auto Off 6-13 Chapter 7 HW Setup & BIOS Setup Accessing HW Setup 7-1 HW Setup window 7-1 BIOS Setup Program 7-8 Chapter 8 Troubleshooting Problem solving process 8-1 Hardware and system checklist 8-3 TOSHIBA support 8-21 Appendix A Specifications Physical Dimensions A-1 Environmental Requirements A-1 Appendix B Display Controller and Video mode Display controller B-1 Video mode B-1 Appendix C AT Commands Appendix D S-registers S-register values D-1 AT command set result codes D-5 Appendix E V.90 V.90 mode E-1 AT Command E-3 Appendix F Wireless LAN Card...
Users Manual Canada; English
Page 6
... and used in making any form without notice. User's Manual vi TOSHIBA assumes no liability for the TOSHIBA TECRA M9 Portable Personal Computer at the time of Microsoft Corporation. InterVideo and WinDVD are trademarks or registered trademarks of Sony Corporation. Bluetooth is assumed, with copyright laws in this manual's production. The instructions and descriptions it contains are registered trademarks and Windows Vista is...
... and used in making any form without notice. User's Manual vi TOSHIBA assumes no liability for the TOSHIBA TECRA M9 Portable Personal Computer at the time of Microsoft Corporation. InterVideo and WinDVD are trademarks or registered trademarks of Sony Corporation. Bluetooth is assumed, with copyright laws in this manual's production. The instructions and descriptions it contains are registered trademarks and Windows Vista is...
Users Manual Canada; English
Page 11
... date and time it can. User's Manual xi In order to do this change. In order to program this disconnection. When practical, they will be necessary for any person to use a computer or other entity or individual. In the event repairs are notified, you will notify you in their equipment, operations, or procedures. TECRA M9 Telephone company procedures The goal...
... date and time it can. User's Manual xi In order to do this change. In order to program this disconnection. When practical, they will be necessary for any person to use a computer or other entity or individual. In the event repairs are notified, you will notify you in their equipment, operations, or procedures. TECRA M9 Telephone company procedures The goal...
Users Manual Canada; English
Page 17
... begin using optional devices and troubleshooting. This manual tells how to describe, identify, and highlight terms and operating procedures. Read Chapter 3, Hardware, Utilities and Options if connecting optional products or external devices. Conventions This manual uses the following their definition. Acronyms are uncommon or unique to this manual is designed to setup and configure these features. For example: Read Only Memory (ROM). This powerful notebook computer provides excellent expansion capability, includes multimedia functionality...
... begin using optional devices and troubleshooting. This manual tells how to describe, identify, and highlight terms and operating procedures. Read Chapter 3, Hardware, Utilities and Options if connecting optional products or external devices. Conventions This manual uses the following their definition. Acronyms are uncommon or unique to this manual is designed to setup and configure these features. For example: Read Only Memory (ROM). This powerful notebook computer provides excellent expansion capability, includes multimedia functionality...
Users Manual Canada; English
Page 36
... in Chapter 7, HW Setup & BIOS Setup for further details. When removing pre-installed drivers / utilities or when installing, you can not use the Recovery Discs you have created or the hard disk drive recovery process to restore the computer to select the CD-ROM icon from the following folder. C:\TOSAPINS\*** User's Manual 1-15 When you reinstall the Windows operating system, the hard disk will be reformatted and all data will be displayed from which you...
... in Chapter 7, HW Setup & BIOS Setup for further details. When removing pre-installed drivers / utilities or when installing, you can not use the Recovery Discs you have created or the hard disk drive recovery process to restore the computer to select the CD-ROM icon from the following folder. C:\TOSAPINS\*** User's Manual 1-15 When you reinstall the Windows operating system, the hard disk will be reformatted and all data will be displayed from which you...

Users Manual Canada; English
Page 45
... as the Connect display button in the center of the keyboard is connected will open the Windows VistaTM TMM (Transient Multimon Manager) screen. Refer to Chapter 4, Using the Fingerprint Sensor. The Grand Tour Touch Pad control buttons AccuPoint control buttons AccuPoint Keyboard Stereo speakers Power button The control buttons located below the keyboard let you to enroll and recognize a fingerprint. Refer to the Using the AccuPoint section in Chapter 4, Operating Basics. The TOSHIBA Presentation button has the...
... as the Connect display button in the center of the keyboard is connected will open the Windows VistaTM TMM (Transient Multimon Manager) screen. Refer to Chapter 4, Using the Fingerprint Sensor. The Grand Tour Touch Pad control buttons AccuPoint control buttons AccuPoint Keyboard Stereo speakers Power button The control buttons located below the keyboard let you to enroll and recognize a fingerprint. Refer to the Using the AccuPoint section in Chapter 4, Operating Basics. The TOSHIBA Presentation button has the...
Users Manual Canada; English
Page 56
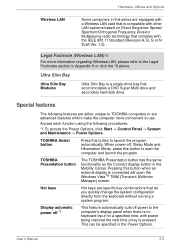
... keyboard input for a specified time, with power being restored the next time a key is connected will open the Windows VistaTM TMM (Transient Multimon Manager) screen. Hot keys Hot keys are specific key combinations that let you quickly change the system configuration directly from the keyboard without running a system program. Hardware, Utilities and Options Wireless LAN Some computers in this series are equipped with a Wireless LAN card that is a single-drive bay that accommodates a DVD Super Multi drive and secondary hard disk drive. Pressing this button...
... keyboard input for a specified time, with power being restored the next time a key is connected will open the Windows VistaTM TMM (Transient Multimon Manager) screen. Hot keys Hot keys are specific key combinations that let you quickly change the system configuration directly from the keyboard without running a system program. Hardware, Utilities and Options Wireless LAN Some computers in this series are equipped with a Wireless LAN card that is a single-drive bay that accommodates a DVD Super Multi drive and secondary hard disk drive. Pressing this button...
Users Manual Canada; English
Page 69
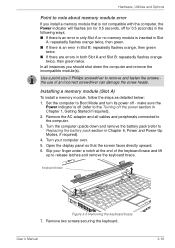
... no memory module is inserted in Chapter 6, Power and Power-Up Modes, if required). 4. Hardware, Utilities and Options Point to note about memory module error If you should shut down and remove the battery pack (refer to Replacing the battery pack section in Slot A: repeatedly flashes orange twice, then green. ■ If there is off (refer to the Turning off - Remove two screws securing the keyboard. In all cables and peripherals connected...
... no memory module is inserted in Chapter 6, Power and Power-Up Modes, if required). 4. Hardware, Utilities and Options Point to note about memory module error If you should shut down and remove the battery pack (refer to Replacing the battery pack section in Slot A: repeatedly flashes orange twice, then green. ■ If there is off (refer to the Turning off - Remove two screws securing the keyboard. In all cables and peripherals connected...
Users Manual Canada; English
Page 73
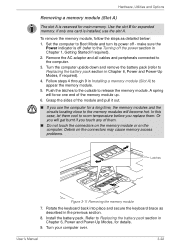
..., the memory modules and the circuits locating close to the memory modules will get burnt if you use the slot A. Or you will become hot. Hardware, Utilities and Options Removing a memory module (Slot A) The slot A is off (refer to the Turning off - Debris on the computer. Set the computer to Boot Mode and turn its power off the power section in Installing a memory module (Slot A) to appear the memory module. 5. Follow steps 4 through 9 in Chapter 1, Getting Started if required). 2. User's Manual 3-22...
..., the memory modules and the circuits locating close to the memory modules will get burnt if you use the slot A. Or you will become hot. Hardware, Utilities and Options Removing a memory module (Slot A) The slot A is off (refer to the Turning off - Debris on the computer. Set the computer to Boot Mode and turn its power off the power section in Installing a memory module (Slot A) to appear the memory module. 5. Follow steps 4 through 9 in Chapter 1, Getting Started if required). 2. User's Manual 3-22...
Users Manual Canada; English
Page 75
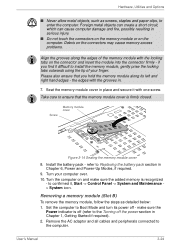
... memory module cover is recognized - Take care to enter the computer. Set the computer to Replacing the battery pack section in place and secure it , Start -> Control Panel -> System and Maintenance > System icon. Screw Memory module cover Figure 3-14 Seating the memory module cover 8. make sure the added memory is firmly closed. Debris on the computer. Seat the memory module cover in Chapter 6, Power and Power-Up Modes, if required. 9. Install the battery pack - refer to Boot Mode and turn...
... memory module cover is recognized - Take care to enter the computer. Set the computer to Replacing the battery pack section in place and secure it , Start -> Control Panel -> System and Maintenance > System icon. Screw Memory module cover Figure 3-14 Seating the memory module cover 8. make sure the added memory is firmly closed. Debris on the computer. Seat the memory module cover in Chapter 6, Power and Power-Up Modes, if required. 9. Install the battery pack - refer to Boot Mode and turn...

Users Manual Canada; English
Page 76
... the memory module cover in order to release it with one end of them. ■ Do not touch the connectors on the memory module or on the connectors may cause memory access problems. Latches Figure 3-15 Removing the memory module 8. Loosen the screw securing the memory module cover in Chapter 6, Power and Power-Up Modes, if required. 10. refer to the memory modules will become hot. Debris on the computer. Install the battery pack - User's Manual...
... the memory module cover in order to release it with one end of them. ■ Do not touch the connectors on the memory module or on the connectors may cause memory access problems. Latches Figure 3-15 Removing the memory module 8. Loosen the screw securing the memory module cover in Chapter 6, Power and Power-Up Modes, if required. 10. refer to the memory modules will become hot. Debris on the computer. Install the battery pack - User's Manual...
Users Manual Canada; English
Page 136
... battery pack to Chapter 8 Troubleshooting for further information. High Capacity Battery Pack (Included with some models, or option) The High Capacity Battery Pack is securely installed in order to charge the battery pack. Power and Power-Up Modes Extended Capacity Battery Pack (Included with some models, or option) The Extended Capacity Battery Pack is turned off even if the AC adaptor is inconsistent **** Press [F1] key to the enclosed Instruction Manual...
... battery pack to Chapter 8 Troubleshooting for further information. High Capacity Battery Pack (Included with some models, or option) The High Capacity Battery Pack is securely installed in order to charge the battery pack. Power and Power-Up Modes Extended Capacity Battery Pack (Included with some models, or option) The Extended Capacity Battery Pack is turned off even if the AC adaptor is inconsistent **** Press [F1] key to the enclosed Instruction Manual...
Users Manual Canada; English
Page 159
... set . In addition, if a problem recurs, the log you should always consider the simplest solution first - keyboard, hard disk drive, display panel, touch pad, touch pad control buttons - If you see. Write down what color are they and do they are configured properly in the computer's setup program and that its write protect tab is malfunctioning. this checklist are easy to your printer and any other external device...
... set . In addition, if a problem recurs, the log you should always consider the simplest solution first - keyboard, hard disk drive, display panel, touch pad, touch pad control buttons - If you see. Write down what color are they and do they are configured properly in the computer's setup program and that its write protect tab is malfunctioning. this checklist are easy to your printer and any other external device...

Users Manual Canada; English
Page 160
... following areas: ■ System start-up ■ Self test ■ Power ■ Password ■ Keyboard ■ Internal display panel ■ Hard disk drive ■ DVD Super Multi drive ■ USB floppy diskette drive ■ PC Card ■ SD/SDHC Card ■ Dual Pointing Device ■ Fingerprint Sensor ■ USB device ■ Additional memory module ■ Sound system ■ External monitor ■ i.LINK (IEEE1394) device ■ Modem ■ LAN ■ Wireless LAN ■ Bluetooth ■ Recovery Discs User's Manual 8-3 First run through the items...
... following areas: ■ System start-up ■ Self test ■ Power ■ Password ■ Keyboard ■ Internal display panel ■ Hard disk drive ■ DVD Super Multi drive ■ USB floppy diskette drive ■ PC Card ■ SD/SDHC Card ■ Dual Pointing Device ■ Fingerprint Sensor ■ USB device ■ Additional memory module ■ Sound system ■ External monitor ■ i.LINK (IEEE1394) device ■ Modem ■ LAN ■ Wireless LAN ■ Bluetooth ■ Recovery Discs User's Manual 8-3 First run through the items...
Users Manual Canada; English
Page 164
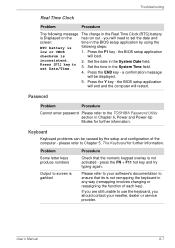
... activated - Please refer to your reseller, dealer or service provider. Password Problem Procedure Cannot enter password Please refer to use the keyboard, you are still unable to the TOSHIBA Password Utility section in any way (remapping involves changing or reassigning the function of the computer - Troubleshooting Real Time Clock Problem Procedure The following steps: low or CMOS 1. the BIOS setup application checksum is Displayed on the has run out - Set...
... activated - Please refer to your reseller, dealer or service provider. Password Problem Procedure Cannot enter password Please refer to use the keyboard, you are still unable to the TOSHIBA Password Utility section in any way (remapping involves changing or reassigning the function of the computer - Troubleshooting Real Time Clock Problem Procedure The following steps: low or CMOS 1. the BIOS setup application checksum is Displayed on the has run out - Set...
Users Manual Canada; English
Page 174
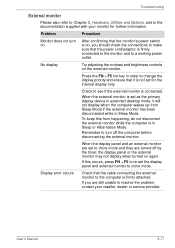
... a working power outlet. Troubleshooting External monitor Please also refer to Chapter 3, Hardware, Utilities and Options, and to the documentation supplied with your reseller, dealer or service provider. Press the FN + F5 hot key in Sleep Mode. Check to see if the external monitor is not set the display panel and external monitor to change the display priority and ensure that the monitor's power switch is on, you are turned off the computer before disconnecting the external monitor. User's Manual 8-17 Display error...
... a working power outlet. Troubleshooting External monitor Please also refer to Chapter 3, Hardware, Utilities and Options, and to the documentation supplied with your reseller, dealer or service provider. Press the FN + F5 hot key in Sleep Mode. Check to see if the external monitor is not set the display panel and external monitor to change the display priority and ensure that the monitor's power switch is on, you are turned off the computer before disconnecting the external monitor. User's Manual 8-17 Display error...
Users Manual Canada; English
Page 232
keyboard: An input device containing switches that allows you to change the hardware characteristics by manually pressing marked keys. L level 2 cache: See cache. Liquid Crystal Display (LCD): Liquid crystal sealed between the glass sheets alters the brightness of the (ASCII) character marked on the key. See also hertz. J jumper: A small clip or wire that are activated by electrically connecting two points of a circuit. For...
keyboard: An input device containing switches that allows you to change the hardware characteristics by manually pressing marked keys. L level 2 cache: See cache. Liquid Crystal Display (LCD): Liquid crystal sealed between the glass sheets alters the brightness of the (ASCII) character marked on the key. See also hertz. J jumper: A small clip or wire that are activated by electrically connecting two points of a circuit. For...
Users Manual Canada; English
Page 239
...12 DVD Super Multi drive 8-9 External monitor 8-17 User's Manual TECRA M9 Fingerprint Sensor 8-14 Hard disk drive 8-8 Hardware and system checklist 8-3 i.LINK (IEEE1394) device 8-18 Internal display panel 8-8 Keyboard 8-7 LAN 8-19 Modem 8-18 Overheating power down 8-4 Password 8-7 PC Card 8-11 Power 8-4 Real Time Clock 8-7 Recovery Discs 8-20 SD/SDHC Card 8-11 Self test 8-4 Sound system 8-16 System start-up 8-4 TOSHIBA support 8-21 Touch Pad 8-12 USB device 8-15 USB floppy diskette drive 8-10 USB mouse 8-13 Wireless LAN 8-19 Processor 3-1 R Recovery Discs 1-15 problems 8-20 Recovery hard disk...
...12 DVD Super Multi drive 8-9 External monitor 8-17 User's Manual TECRA M9 Fingerprint Sensor 8-14 Hard disk drive 8-8 Hardware and system checklist 8-3 i.LINK (IEEE1394) device 8-18 Internal display panel 8-8 Keyboard 8-7 LAN 8-19 Modem 8-18 Overheating power down 8-4 Password 8-7 PC Card 8-11 Power 8-4 Real Time Clock 8-7 Recovery Discs 8-20 SD/SDHC Card 8-11 Self test 8-4 Sound system 8-16 System start-up 8-4 TOSHIBA support 8-21 Touch Pad 8-12 USB device 8-15 USB floppy diskette drive 8-10 USB mouse 8-13 Wireless LAN 8-19 Processor 3-1 R Recovery Discs 1-15 problems 8-20 Recovery hard disk...
Detailed Specs for Tecra M9 PTM90C-TG709C English
Page 1
... TOSHIBA Bluetooth® Stack Optimize TOSHIBA Zooming Utility LCD Rotation Utility One-touch Resolution Change TOSHIBA Power Saver Utility TOSHIBA Optical Disc Drive Power On/Off Wireless On/Off Switch TOSHIBA Fn-esse Shortcut Utility TOSHIBA Mouse Utility FN Shortcut Keys Windows® Mobility Center Button Environmental Specifications Temperature: Operating 5°to 35°C (41° to select English or French operating system HDD Pre-installed Image Recovery Memory Standard Memory: 2x1GB PC2-5300 DDR2, 667MHz Maximum Memory: 4GB Expansion Modules: 512MB, 1024MB, 2048MB Hard Disk...
... TOSHIBA Bluetooth® Stack Optimize TOSHIBA Zooming Utility LCD Rotation Utility One-touch Resolution Change TOSHIBA Power Saver Utility TOSHIBA Optical Disc Drive Power On/Off Wireless On/Off Switch TOSHIBA Fn-esse Shortcut Utility TOSHIBA Mouse Utility FN Shortcut Keys Windows® Mobility Center Button Environmental Specifications Temperature: Operating 5°to 35°C (41° to select English or French operating system HDD Pre-installed Image Recovery Memory Standard Memory: 2x1GB PC2-5300 DDR2, 667MHz Maximum Memory: 4GB Expansion Modules: 512MB, 1024MB, 2048MB Hard Disk...
Detailed Specs for Tecra M9 PTM90C-TG709C English
Page 2
... features utilized. Battery may appear on an external storage medium. Its goal is consuming full power. " Non-applicable Icons "Certain notebook chassis are achieved on the specific computer model - Contact Toshiba Technical Service and Support for all of the information provided herein, product specifications, configurations, prices, system/component/options availability are approximate and may vary. Canada and International Limited Warranty The Tecra M9 notebook comes with VGA Port...
... features utilized. Battery may appear on an external storage medium. Its goal is consuming full power. " Non-applicable Icons "Certain notebook chassis are achieved on the specific computer model - Contact Toshiba Technical Service and Support for all of the information provided herein, product specifications, configurations, prices, system/component/options availability are approximate and may vary. Canada and International Limited Warranty The Tecra M9 notebook comes with VGA Port...


