Tecta M2 User's Guide (PDF)
Page 116
... "Connecting Other External Devices" on page 59. Using a computer lock For your own peace of mind, you can work with your notebook as your desk. Using your computer at the office 4 Copy the contents of the optional Advanced Port Replicator III. An external monitor or projector connects to the USB port. A serial mouse connects to the serial port of the source SD card into the temporary folder you created in step 3. 5 Remove the...
... "Connecting Other External Devices" on page 59. Using a computer lock For your own peace of mind, you can work with your notebook as your desk. Using your computer at the office 4 Copy the contents of the optional Advanced Port Replicator III. An external monitor or projector connects to the USB port. A serial mouse connects to the serial port of the source SD card into the temporary folder you created in step 3. 5 Remove the...
Tecta M2 User's Guide (PDF)
Page 167
... display, boot priority, keyboard, USB, LAN, CPU, device configuration and parallel/printer options for communication ports, use the Windows Device Manager. To set and you log onto the computer with the secondary button. Double-click on the HW Setup icon to change the key assignment, click Direct... Changing or removing existing key assignments In the Fn-esse keyboard, click the key you may not be able to access the TOSHIBA HW Setup program. or Popup... TOSHIBA HW Setup TOSHIBA HW Setup...
... display, boot priority, keyboard, USB, LAN, CPU, device configuration and parallel/printer options for communication ports, use the Windows Device Manager. To set and you log onto the computer with the secondary button. Double-click on the HW Setup icon to change the key assignment, click Direct... Changing or removing existing key assignments In the Fn-esse keyboard, click the key you may not be able to access the TOSHIBA HW Setup program. or Popup... TOSHIBA HW Setup TOSHIBA HW Setup...

Tecta M2 User's Guide (PDF)
Page 259
... many Toshiba notebook computers that saves to the hard disk the current state of your work , including all open files and programs, when you turn on the screen that holds 1.44 MB of a computer system. internal device-See device. L L1 (level one) cache-Memory cache built into the processor to 1024 bytes. It is running and have the operating system automatically recognize the change...
... many Toshiba notebook computers that saves to the hard disk the current state of your work , including all open files and programs, when you turn on the screen that holds 1.44 MB of a computer system. internal device-See device. L L1 (level one) cache-Memory cache built into the processor to 1024 bytes. It is running and have the operating system automatically recognize the change...
Tecta M2 User's Guide (PDF)
Page 266
... message 202 configuring hard drive passwords 192 password 182 PC Cards 88 connecting headphones 68 memory module 70 modem to telephone line 89 monitor 60, 61 PC Cards 86 speakers 68 television 60 video projector 60 connection set up 155 conserving power 140 control buttons 99 critical applications 3 D desktop major features 143 desktop icons 144 Device Manager 207 checking properties 208 disabling a device 208 devices external display 59 disc, positioning 112 Disk Defragmenter 215 disk drive corrupted/damaged...
... message 202 configuring hard drive passwords 192 password 182 PC Cards 88 connecting headphones 68 memory module 70 modem to telephone line 89 monitor 60, 61 PC Cards 86 speakers 68 television 60 video projector 60 connection set up 155 conserving power 140 control buttons 99 critical applications 3 D desktop major features 143 desktop icons 144 Device Manager 207 checking properties 208 disabling a device 208 devices external display 59 disc, positioning 112 Disk Defragmenter 215 disk drive corrupted/damaged...
Tecta M2 User's Guide (PDF)
Page 269
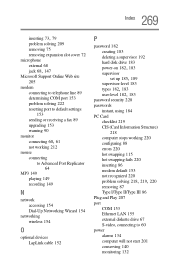
... problem solving 222 resetting port to default settings 153 sending or receiving a fax 89 upgrading 153 warning 90 monitor connecting 60, 61 not working 212 mouse connecting to Advanced Port Replicator 64 MP3 149 playing 149 recording 149 N network accessing 154 Dial-Up Networking Wizard 154 networking wireless 154 O optional devices LapLink cable 152 P password 182 creating 183 deleting a supervisor 192 hard disk drive 183 power-on 182, 183 supervisor set up 185, 189 supervisor-level 183 types...
... problem solving 222 resetting port to default settings 153 sending or receiving a fax 89 upgrading 153 warning 90 monitor connecting 60, 61 not working 212 mouse connecting to Advanced Port Replicator 64 MP3 149 playing 149 recording 149 N network accessing 154 Dial-Up Networking Wizard 154 networking wireless 154 O optional devices LapLink cable 152 P password 182 creating 183 deleting a supervisor 192 hard disk drive 183 power-on 182, 183 supervisor set up 185, 189 supervisor-level 183 types...
User Manual
Page 96
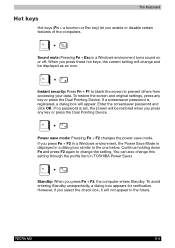
... to change this setting through the profile item in a Windows environment, the Power Save Mode is set, the screen will appear. To avoid entering Standby unexpectedly, a dialog box appears for verification. If no password is displayed in a Windows environment turns sound on or off. Power save mode: Pressing Fn + F2 changes the power save mode. TECRA M2 5-4 To restore the screen and original settings, press any key or press the Dual Pointing Device. The Keyboard Hot keys Hot keys (Fn + a function...
... to change this setting through the profile item in a Windows environment, the Power Save Mode is set, the screen will appear. To avoid entering Standby unexpectedly, a dialog box appears for verification. If no password is displayed in a Windows environment turns sound on or off. Power save mode: Pressing Fn + F2 changes the power save mode. TECRA M2 5-4 To restore the screen and original settings, press any key or press the Dual Pointing Device. The Keyboard Hot keys Hot keys (Fn + a function...
User Manual
Page 107
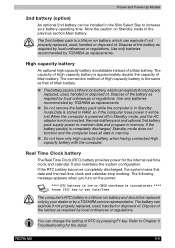
...] key to Chapter 9 Troubleshooting for the internal real time clock and calendar. Dispose of . Power and Power-Up Modes 2nd battery (option) An optional 2nd battery can be replaced only by your battery operating time. The following message appears when you turn on Standby mode in the Slim Select Bay to maintain data and program in memory. ■ Do not have only High capacity battery, when having connected...
...] key to Chapter 9 Troubleshooting for the internal real time clock and calendar. Dispose of . Power and Power-Up Modes 2nd battery (option) An optional 2nd battery can be replaced only by your battery operating time. The following message appears when you turn on Standby mode in the Slim Select Bay to maintain data and program in memory. ■ Do not have only High capacity battery, when having connected...
User Manual
Page 124
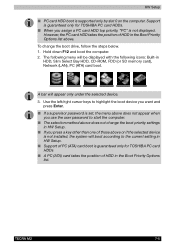
... (ATA) card boot is not installed, the system will be displayed with the following menu will boot according to start the computer. ■ The selection method above . However, the PC card HDD takes the position of HDD in HDD, Slim Select Bay HDD, CD-ROM, FDD (or SD memory card), Network (LAN), PC (ATA) card boot. The following icons: Built-in the Boot Priority Options list. TECRA M2 7-5 Support is guaranteed only for TOSHIBA PC card HDDs. ■...
... (ATA) card boot is not installed, the system will be displayed with the following menu will boot according to start the computer. ■ The selection method above . However, the PC card HDD takes the position of HDD in HDD, Slim Select Bay HDD, CD-ROM, FDD (or SD memory card), Network (LAN), PC (ATA) card boot. The following icons: Built-in the Boot Priority Options list. TECRA M2 7-5 Support is guaranteed only for TOSHIBA PC card HDDs. ■...

User Manual
Page 167
... the external monitor's power switch is attached firmly. No display Try adjusting the contrast and brightness controls on . Make sure the device's power is disabled. Open the Windows Control Panel and double-click the Add Hardware icon. Confirm that the cable connecting the external monitor to change the display priority and make sure the communication application's tone dial detection feature is turned on the external monitor. If problems persist, contact your dealer. You can 't initialize settings are correct. Display error occurs...
... the external monitor's power switch is attached firmly. No display Try adjusting the contrast and brightness controls on . Make sure the device's power is disabled. Open the Windows Control Panel and double-click the Add Hardware icon. Confirm that the cable connecting the external monitor to change the display priority and make sure the communication application's tone dial detection feature is turned on the external monitor. If problems persist, contact your dealer. You can 't initialize settings are correct. Display error occurs...
User Manual
Page 202
... type of bits (binary digits) used to indicate the transmission speed of instructions written for a computer that define how your system works. Also called a preset value. control keys: A key or sequence of a specific internal or peripheral device (e.g. If data bits = 8 the computer can generate 128 unique characters. default: The parameter value automatically selected by batteries. delete: To remove data from the keyboard to make system settings or...
... type of bits (binary digits) used to indicate the transmission speed of instructions written for a computer that define how your system works. Also called a preset value. control keys: A key or sequence of a specific internal or peripheral device (e.g. If data bits = 8 the computer can generate 128 unique characters. default: The parameter value automatically selected by batteries. delete: To remove data from the keyboard to make system settings or...
User Manual
Page 206
.... Each keystroke activates a switch that transmits a specific code to 1024 kilobytes. See also byte and megabyte. menu: A software interface that emits light when a current is etched into character forming segments with transparent conducting material. TECRA M2 8 L level 2 cache: See cache. Light Emitting Diode (LED): A semiconductor device that displays a list of data storage equal to the computer. megabyte (MB): A unit of options on the key. Also called...
.... Each keystroke activates a switch that transmits a specific code to 1024 kilobytes. See also byte and megabyte. menu: A software interface that emits light when a current is etched into character forming segments with transparent conducting material. TECRA M2 8 L level 2 cache: See cache. Light Emitting Diode (LED): A semiconductor device that displays a list of data storage equal to the computer. megabyte (MB): A unit of options on the key. Also called...

Instruction Manual
Page 105
... keys (Fn + F11) or cursor control keys (Fn + F10). User's Manual 5-3 Press Fn + Enter to operate these hot keys, the current setting will change and be displayed as an icon. The power on default for more information on default is off . Press Fn + Ctrl to access the integrated keypad. When you enable or disable certain features of the computers. Hot keys Hot keys (Fn + a function or Esc key) let you press these keys. Refer to lock...
... keys (Fn + F11) or cursor control keys (Fn + F10). User's Manual 5-3 Press Fn + Enter to operate these hot keys, the current setting will change and be displayed as an icon. The power on default for more information on default is off . Press Fn + Ctrl to access the integrated keypad. When you enable or disable certain features of the computers. Hot keys Hot keys (Fn + a function or Esc key) let you press these keys. Refer to lock...

Instruction Manual
Page 116
... if not properly replaced, used, handled or disposed of the battery as replacements. Note the caution on the power: S **** RTC battery is low or CMOS checksum is completely discharged, Standby mode does not function and the computer loses all data in Standby mode, and the AC adaptor is a lithium ion battery, which can change the setting of RTC by a TOSHIBA service representative. The connection method of...
... if not properly replaced, used, handled or disposed of the battery as replacements. Note the caution on the power: S **** RTC battery is low or CMOS checksum is completely discharged, Standby mode does not function and the computer loses all data in Standby mode, and the AC adaptor is a lithium ion battery, which can change the setting of RTC by a TOSHIBA service representative. The connection method of...

Instruction Manual
Page 133
... SD memory card), Network (LAN), PC (ATA) card boot. To change the boot priority settings in HW Setup. ■ If you assign a PC card HDD top priority, "PC" is guaranteed only for TOSHIBA PC card HDDs ■ A PC (ATA) card takes the position of HDD in HW Setup. ■ Support of those above . Use the left/right cursor keys to highlight the boot device you want and press Enter. ■ If a supervisor password is set, the menu...
... SD memory card), Network (LAN), PC (ATA) card boot. To change the boot priority settings in HW Setup. ■ If you assign a PC card HDD top priority, "PC" is guaranteed only for TOSHIBA PC card HDDs ■ A PC (ATA) card takes the position of HDD in HW Setup. ■ Support of those above . Use the left/right cursor keys to highlight the boot device you want and press Enter. ■ If a supervisor password is set, the menu...

Instruction Manual
Page 175
.... Display error occurs Check that the external monitor's power switch is disabled. Reinstall the drivers. Refer to change the display priority and make sure the communication application's tone dial detection feature is on. Troubleshooting Monitor Refer also to Chapter 8, Optional Devices, and to the online help files for Appendix C, AT Commands. Problem Procedure Monitor does not turn on -screen directions. Confirm that the external monitor's power cable is not set for the internal display. If problems persist...
.... Display error occurs Check that the external monitor's power switch is disabled. Reinstall the drivers. Refer to change the display priority and make sure the communication application's tone dial detection feature is on. Troubleshooting Monitor Refer also to Chapter 8, Optional Devices, and to the online help files for Appendix C, AT Commands. Problem Procedure Monitor does not turn on -screen directions. Confirm that the external monitor's power cable is not set for the internal display. If problems persist...
Instruction Manual
Page 235
... to 1024 bytes. User's Manual Glossary-9 K K: Taken from the Greek word kilo, meaning 1000; keyboard: An input device containing switches that equals 1 million cycles per second. The viewingside coating is applied. See also hertz. menu: A software interface that displays a list of the (ASCII) character marked on the screen. Also called a screen. microprocessor: A hardware component contained in turn, representative of options on the key. Glossary J jumper...
... to 1024 bytes. User's Manual Glossary-9 K K: Taken from the Greek word kilo, meaning 1000; keyboard: An input device containing switches that equals 1 million cycles per second. The viewingside coating is applied. See also hertz. menu: A software interface that displays a list of the (ASCII) character marked on the screen. Also called a screen. microprocessor: A hardware component contained in turn, representative of options on the key. Glossary J jumper...
Maintenance Manual
Page 3
... fire. ‰ If you replace the battery pack or RTC battery, be italicized and identified as shown below. WARNING: "Warning" indicates the existence of messages are adhered to strictly. ‰ Be sure to explode. Preface This maintenance manual describes how to your attention. SAFETY PRECAUTIONS Four types of a hazard that relates to perform hardware service maintenance for the Toshiba Personal Computer TECRA M2.
... fire. ‰ If you replace the battery pack or RTC battery, be italicized and identified as shown below. WARNING: "Warning" indicates the existence of messages are adhered to strictly. ‰ Be sure to explode. Preface This maintenance manual describes how to your attention. SAFETY PRECAUTIONS Four types of a hazard that relates to perform hardware service maintenance for the Toshiba Personal Computer TECRA M2.

Maintenance Manual
Page 122
... ROM checksum Dock/UnDock Fan ON/OFF Gerserville Quick charge DMI read DMI write CPU Thirmistor System LED Conventional memory Protected mode Cache memory L2 Cache memory Stress Pressed key display Pressed key code display Touch Pad/IPS USB test InTouch/Presentation key VRAM read/write for VGA Gradation for VGA Gradation for LCD Gradation & Mode test for VGA All dot on / off for each test program in the DIAGNOSTIC TEST MENU...
... ROM checksum Dock/UnDock Fan ON/OFF Gerserville Quick charge DMI read DMI write CPU Thirmistor System LED Conventional memory Protected mode Cache memory L2 Cache memory Stress Pressed key display Pressed key code display Touch Pad/IPS USB test InTouch/Presentation key VRAM read/write for VGA Gradation for VGA Gradation for LCD Gradation & Mode test for VGA All dot on / off for each test program in the DIAGNOSTIC TEST MENU...
Maintenance Manual
Page 175
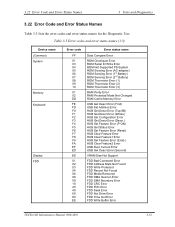
... Clear Feature1 Error HUB Set Feature Error (Enab.) HUB Clear Feature2 Error USB Over Current Error USB Get Descr.Error (Second) VRAM Size Not Support FDD Bad Command Error FDD Address Mark Not Found FDD Write Protected FDD Record Not Found FDD Media Removed FDD DMA Overrun Error FDD DMA Boundary Error FDD CRC Error FDD FDC Error FDD Seek Error FDD Not Drive Error FDD Time Out Error FDD Write Buffer Error TECRA M2 Maintenance Manual...
... Clear Feature1 Error HUB Set Feature Error (Enab.) HUB Clear Feature2 Error USB Over Current Error USB Get Descr.Error (Second) VRAM Size Not Support FDD Bad Command Error FDD Address Mark Not Found FDD Write Protected FDD Record Not Found FDD Media Removed FDD DMA Overrun Error FDD DMA Boundary Error FDD CRC Error FDD FDC Error FDD Seek Error FDD Not Drive Error FDD Time Out Error FDD Write Buffer Error TECRA M2 Maintenance Manual...

Maintenance Manual
Page 252
4 Replacement Procedures 4.12 Memory module 4.12 Memory module Removing the Memory module To remove the memory module, make sure the computer is in boot mode and powered off, follow the steps below and refer to figure 4-24. 1. Latch Latch Memory module Figure 4-24 Removing the memory module 4-38 TECRA M2 Maintenance Manual (960-468) Press the two latches outward and remove the memory module.
4 Replacement Procedures 4.12 Memory module 4.12 Memory module Removing the Memory module To remove the memory module, make sure the computer is in boot mode and powered off, follow the steps below and refer to figure 4-24. 1. Latch Latch Memory module Figure 4-24 Removing the memory module 4-38 TECRA M2 Maintenance Manual (960-468) Press the two latches outward and remove the memory module.


