
User Manual
Page 33
...in the Windows® operating system 188 If you need further assistance 192 Before you contact Toshiba 192 Contacting Toshiba 193 Other Toshiba Internet Web sites 193 Toshiba's worldwide offices 194 Appendix A: Hot Keys/TOSHIBA Cards 196 Hot Key Cards 196 Using the Hot Key Cards 197 Application Cards 198 Using ... Display brightness 207 Disabling or enabling wireless devices............208 Disabling or enabling the TouchPad™ or Dual Mode Pad 209 Changing screen resolution 210 Keyboard hot key functions 211 Appendix B: Power Cord/Cable Connectors 212 Glossary 213 Index 227
...in the Windows® operating system 188 If you need further assistance 192 Before you contact Toshiba 192 Contacting Toshiba 193 Other Toshiba Internet Web sites 193 Toshiba's worldwide offices 194 Appendix A: Hot Keys/TOSHIBA Cards 196 Hot Key Cards 196 Using the Hot Key Cards 197 Application Cards 198 Using ... Display brightness 207 Disabling or enabling wireless devices............208 Disabling or enabling the TouchPad™ or Dual Mode Pad 209 Changing screen resolution 210 Keyboard hot key functions 211 Appendix B: Power Cord/Cable Connectors 212 Glossary 213 Index 227
User Manual
Page 41
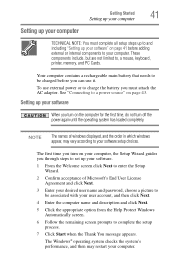
... The first time you turn on your computer, the Setup Wizard guides you through steps to set up your software. 1 From the Welcome screen click Next to enter the Setup Wizard. 2 Confirm acceptance of windows displayed, and the order in which windows appear, may restart your user ... Next. 4 Enter the computer name and description and click Next. 5 Click the appropriate option from the Help Protect Windows Automatically screen. 6 Follow the remaining screen prompts to your software When you must complete all setup steps up to and including "Setting up your software" on page 41 before...
... The first time you turn on your computer, the Setup Wizard guides you through steps to set up your software. 1 From the Welcome screen click Next to enter the Setup Wizard. 2 Confirm acceptance of windows displayed, and the order in which windows appear, may restart your user ... Next. 4 Enter the computer name and description and click Next. 5 Click the appropriate option from the Help Protect Windows Automatically screen. 6 Follow the remaining screen prompts to your software When you must complete all setup steps up to and including "Setting up your software" on page 41 before...

User Manual
Page 46
... is manufactured using it moves easily and never lift the computer by the display panel. Your display contains an extremely large number of the screen will dim and you turn it on and begin using highprecision technology. Over a period of time, and depending on your computer. To ...bright dots that may appear on the palm rest to slowly open or close the display panel. This is operated on battery power, the screen will deteriorate. When the computer is also an intrinsic characteristic of the TFT manufacturing technology. Opening the display panel 1 Facing the front of...
... is manufactured using it moves easily and never lift the computer by the display panel. Your display contains an extremely large number of the screen will dim and you turn it on and begin using highprecision technology. Over a period of time, and depending on your computer. To ...bright dots that may appear on the palm rest to slowly open or close the display panel. This is operated on battery power, the screen will deteriorate. When the computer is also an intrinsic characteristic of the TFT manufacturing technology. Opening the display panel 1 Facing the front of...
User Manual
Page 54
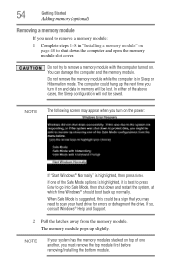
... and the memory module. The computer could be a sign that you need to scan your system has the memory modules stacked on . NOTE The following screen may need to remove a memory module: 1 Complete steps 1-8 in "Installing a memory module" on page 48 to go into Safe Mode, then shut down the computer...
... and the memory module. The computer could be a sign that you need to scan your system has the memory modules stacked on . NOTE The following screen may need to remove a memory module: 1 Complete steps 1-8 in "Installing a memory module" on page 48 to go into Safe Mode, then shut down the computer...

User Manual
Page 56
... to touch and enables you can click it into the socket and lined up that the module is much smaller than the display screen, moving your cursor across the screen often means having to move your finger several times across the TouchPad from left to right. ❖ To move it to the...
... to touch and enables you can click it into the socket and lined up that the module is much smaller than the display screen, moving your cursor across the screen often means having to move your finger several times across the TouchPad from left to right. ❖ To move it to the...
User Manual
Page 61
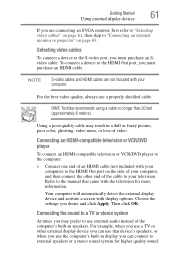
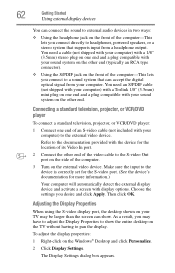
...purchase an HDMI cable. Choose the settings you desire and click Apply. Your computer will automatically detect the external display device and activate a screen with your computer, and then connect the other external display device you can connect to the manual that device's speakers, or when you ...best video quality, always use a TV or other end of the cable to your computer) to the HDMI Out port on page 63. HINT: Toshiba recommends using a cable no longer than 20 feet (approximately 6 meters). Then click OK. NOTE S-video cables and HDMI cables are connecting an SVGA...
...purchase an HDMI cable. Choose the settings you desire and click Apply. Your computer will automatically detect the external display device and activate a screen with your computer, and then connect the other external display device you can connect to the manual that device's speakers, or when you ...best video quality, always use a TV or other end of the cable to your computer) to the HDMI Out port on page 63. HINT: Toshiba recommends using a cable no longer than 20 feet (approximately 6 meters). Then click OK. NOTE S-video cables and HDMI cables are connecting an SVGA...
User Manual
Page 62
...sure the input to the documentation provided with the device for more information.) Your computer will automatically detect the external display device and activate a screen with your computer. Then click OK. Choose the settings you desire and click Apply. The Display Settings dialog box appears. You need a... Right-click on the Windows® Desktop and click Personalize. 2 Click Display Settings. As a result, you may be larger than the screen can show the entire desktop on the TV without having to a sound system that supports input from your sound system on the other end of...
...sure the input to the documentation provided with the device for more information.) Your computer will automatically detect the external display device and activate a screen with your computer. Then click OK. Choose the settings you desire and click Apply. The Display Settings dialog box appears. You need a... Right-click on the Windows® Desktop and click Personalize. 2 Click Display Settings. As a result, you may be larger than the screen can show the entire desktop on the TV without having to a sound system that supports input from your sound system on the other end of...
User Manual
Page 63
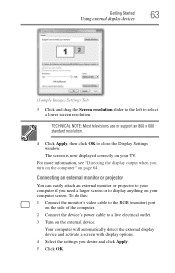
... OK. Your computer will automatically detect the external display device and activate a screen with display options. 4 Select the settings you need a larger screen or to a live electrical outlet. 3 Turn on your computer screen. TECHNICAL NOTE: Most televisions use or support an 800 x 600 standard resolution.... 4 Click Apply, then click OK to select a lower screen resolution. Getting Started Using external display devices 63 (Sample Image) Settings Tab 3 Click and drag the Screen resolution slider to the left to close the Display Settings window. To do this...
... OK. Your computer will automatically detect the external display device and activate a screen with display options. 4 Select the settings you need a larger screen or to a live electrical outlet. 3 Turn on your computer screen. TECHNICAL NOTE: Most televisions use or support an 800 x 600 standard resolution.... 4 Click Apply, then click OK to select a lower screen resolution. Getting Started Using external display devices 63 (Sample Image) Settings Tab 3 Click and drag the Screen resolution slider to the left to close the Display Settings window. To do this...
User Manual
Page 66
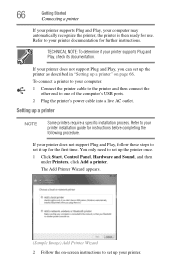
TECHNICAL NOTE: To determine if your printer documentation for the first time. The Add Printer Wizard appears. (Sample Image) Add Printer Wizard 2 Follow the on-screen instructions to set up the printer as described in "Setting up your printer. Refer to your printer supports Plug and Play, check its documentation. If ...
TECHNICAL NOTE: To determine if your printer documentation for the first time. The Add Printer Wizard appears. (Sample Image) Add Printer Wizard 2 Follow the on-screen instructions to set up the printer as described in "Setting up your printer. Refer to your printer supports Plug and Play, check its documentation. If ...
User Manual
Page 71
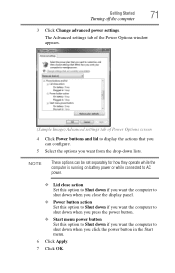
... computer 71 3 Click Change advanced power settings. The Advanced settings tab of the Power Options window appears. (Sample Image) Advanced settings tab of Power Options screen 4 Click Power buttons and lid to shut down lists. NOTE These options can be set separately for how they operate while the computer is running...
... computer 71 3 Click Change advanced power settings. The Advanced settings tab of the Power Options window appears. (Sample Image) Advanced settings tab of Power Options screen 4 Click Power buttons and lid to shut down lists. NOTE These options can be set separately for how they operate while the computer is running...
User Manual
Page 73
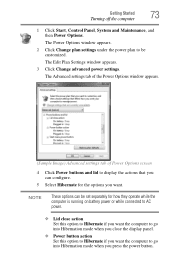
... go into Hibernation mode when you want. The Advanced settings tab of the Power Options window appears. (Sample Image) Advanced settings tab of Power Options screen 4 Click Power buttons and lid to be set separately for the options you press the power button. The Edit Plan Settings window appears. 3 Click Change...
... go into Hibernation mode when you want. The Advanced settings tab of the Power Options window appears. (Sample Image) Advanced settings tab of Power Options screen 4 Click Power buttons and lid to be set separately for the options you press the power button. The Edit Plan Settings window appears. 3 Click Change...
User Manual
Page 74
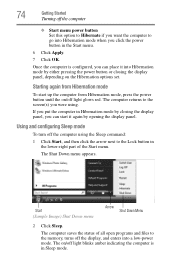
... you click the power button in Sleep mode. Start (Sample Image) Shut Down menu Arrow Shut Down Menu 2 Click Sleep. The computer returns to the screen(s) you were using the Sleep command: 1 Click Start, and then click the arrow next to the Lock button in Hibernation mode by opening the display...
... you click the power button in Sleep mode. Start (Sample Image) Shut Down menu Arrow Shut Down Menu 2 Click Sleep. The computer returns to the screen(s) you were using the Sleep command: 1 Click Start, and then click the arrow next to the Lock button in Hibernation mode by opening the display...
User Manual
Page 75
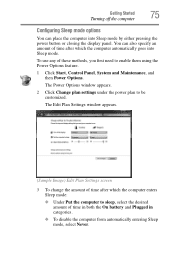
... and Maintenance, and then Power Options. You can place the computer into Sleep mode. The Edit Plan Settings window appears. (Sample Image) Edit Plan Settings screen 3 To change the amount of time after which the computer enters Sleep mode: ❖ Under Put the computer to sleep, select the desired amount of...
... and Maintenance, and then Power Options. You can place the computer into Sleep mode. The Edit Plan Settings window appears. (Sample Image) Edit Plan Settings screen 3 To change the amount of time after which the computer enters Sleep mode: ❖ Under Put the computer to sleep, select the desired amount of...
User Manual
Page 76
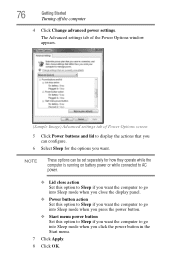
... the computer 4 Click Change advanced power settings. The Advanced settings tab of the Power Options window appears. (Sample Image) Advanced settings tab of Power Options screen 5 Click Power buttons and lid to display the actions that you can be set separately for the options you want the computer to go into...
... the computer 4 Click Change advanced power settings. The Advanced settings tab of the Power Options window appears. (Sample Image) Advanced settings tab of Power Options screen 5 Click Power buttons and lid to display the actions that you can be set separately for the options you want the computer to go into...
User Manual
Page 77
... can choose. For more information, see "Taking care of the computer's keyboard, speaker, and other openings. Never use harsh or caustic chemical products to the screen(s) you were using. The computer returns to clean the computer. You may also wish to your operating system documentation or Help and Support for your...
... can choose. For more information, see "Taking care of the computer's keyboard, speaker, and other openings. Never use harsh or caustic chemical products to the screen(s) you were using. The computer returns to clean the computer. You may also wish to your operating system documentation or Help and Support for your...
User Manual
Page 89
...optical drive Optical storage has become the preferred medium for setting up the Media Center. Digital versatile discs (DVDs) provide a significant increase in full screen mode. You will also need to: Log on the computer. 5 To send the display signal to the TV, press Fn+F5, and ...Out connector on the side of your computer. 3 If you are not available on certain models. NOTE The first time you have questions on -screen instructions for software, music, and video. Follow the on using S-video output, you need to your Internet connection and speakers. Media Center opens ...
...optical drive Optical storage has become the preferred medium for setting up the Media Center. Digital versatile discs (DVDs) provide a significant increase in full screen mode. You will also need to: Log on the computer. 5 To send the display signal to the TV, press Fn+F5, and ...Out connector on the side of your computer. 3 If you are not available on certain models. NOTE The first time you have questions on -screen instructions for software, music, and video. Follow the on using S-video output, you need to your Internet connection and speakers. Media Center opens ...

User Manual
Page 93
...tray until it clicks into place. You can open it through the Start menu. Stop button Play/Pause button (Sample Image) Windows Media® Player screen The Windows Media® Player control panel works much like an ordinary compact disc player: ❖ To play . Learning the Basics Using the optical ...CD, click the Stop button. You are ready to use the Windows Media® Player program to control the CD. To prevent this happens, contact Toshiba support for assistance. 9 Push the disc tray in by pressing gently on , Windows Media® Player opens and the CD begins to play the CD...
...tray until it clicks into place. You can open it through the Start menu. Stop button Play/Pause button (Sample Image) Windows Media® Player screen The Windows Media® Player control panel works much like an ordinary compact disc player: ❖ To play . Learning the Basics Using the optical ...CD, click the Stop button. You are ready to use the Windows Media® Player program to control the CD. To prevent this happens, contact Toshiba support for assistance. 9 Push the disc tray in by pressing gently on , Windows Media® Player opens and the CD begins to play the CD...

User Manual
Page 104
... settings tab of your open programs and files to alert you have Hibernation mode enabled (the default), the computer copies the details of Power Options screen
... settings tab of your open programs and files to alert you have Hibernation mode enabled (the default), the computer copies the details of Power Options screen
User Manual
Page 106
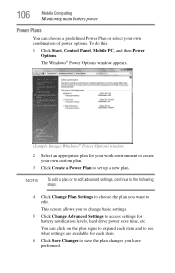
... appears. (Sample Image) Windows® Power Options window 2 Select an appropriate plan for your work environment or create your own combination of power options. This screen allows you to change basic settings. 5 Click Change Advanced Settings to set up a new plan. 106 Mobile Computing Monitoring main battery power Power Plans You...
... appears. (Sample Image) Windows® Power Options window 2 Select an appropriate plan for your work environment or create your own combination of power options. This screen allows you to change basic settings. 5 Click Change Advanced Settings to set up a new plan. 106 Mobile Computing Monitoring main battery power Power Plans You...
User Manual
Page 115
Chapter 4 Exploring Your Computer's Features In this chapter, you can do not indicate any change in this guide may appear slightly different from the screens displayed by your notebook computer. You use its features to start programs, find documents, set up system components, and perform most other computing tasks. The ...
Chapter 4 Exploring Your Computer's Features In this chapter, you can do not indicate any change in this guide may appear slightly different from the screens displayed by your notebook computer. You use its features to start programs, find documents, set up system components, and perform most other computing tasks. The ...


