

User Manual
Page 32
...in the Windows® operating system 187 If you need further assistance 190 Before you contact Toshiba 190 Contacting Toshiba 191 Other Toshiba Internet Web sites 192 Toshiba's worldwide offices 192 Appendix A: Hot Keys/TOSHIBA Cards 194 Hot Key Cards 194 Using the Hot Key Cards 195 Application Cards 196 Using... 203 Display modes 204 Display brightness 205 Disabling or enabling wireless devices............206 Disabling or enabling the TouchPad 207 Changing screen resolution 208 Keyboard hot key functions 209 Appendix B: Power Cord/Cable Connectors 210 Glossary 211 Index 225
...in the Windows® operating system 187 If you need further assistance 190 Before you contact Toshiba 190 Contacting Toshiba 191 Other Toshiba Internet Web sites 192 Toshiba's worldwide offices 192 Appendix A: Hot Keys/TOSHIBA Cards 194 Hot Key Cards 194 Using the Hot Key Cards 195 Application Cards 196 Using... 203 Display modes 204 Display brightness 205 Disabling or enabling wireless devices............206 Disabling or enabling the TouchPad 207 Changing screen resolution 208 Keyboard hot key functions 209 Appendix B: Power Cord/Cable Connectors 210 Glossary 211 Index 225
User Manual
Page 40
... 40 before you can use external power or to charge the battery you through steps to set up your software. 1 From the Welcome screen click Next to enter the Setup Wizard. 2 Confirm acceptance of windows displayed, and the order in which windows appear, may restart your...steps up to and including "Setting up your background and then click Next. 5 Click the appropriate option from the Help Protect Windows Automatically screen. 6 Follow the remaining screen prompts to your computer. See "Connecting to , a mouse, keyboard, printer, memory, and PC Cards. 40 Getting Started Setting up ...
... 40 before you can use external power or to charge the battery you through steps to set up your software. 1 From the Welcome screen click Next to enter the Setup Wizard. 2 Confirm acceptance of windows displayed, and the order in which windows appear, may restart your...steps up to and including "Setting up your background and then click Next. 5 Click the appropriate option from the Help Protect Windows Automatically screen. 6 Follow the remaining screen prompts to your computer. See "Connecting to , a mouse, keyboard, printer, memory, and PC Cards. 40 Getting Started Setting up ...

User Manual
Page 45
...able to turn on and begin using highprecision technology. Small bright dots may appear on your screen display when you turn it on your display are an intrinsic characteristic of the screen technology. Using the computer for the first time The computer is manufactured using it moves ... on the applications, power management settings, and features used. This is operated on battery power, the screen will dim and you to increase the brightness of the screen will deteriorate. Getting Started 45 Using the computer for the first time NOTE Battery life and charge time may...
...able to turn on and begin using highprecision technology. Small bright dots may appear on your screen display when you turn it on your display are an intrinsic characteristic of the screen technology. Using the computer for the first time The computer is manufactured using it moves ... on the applications, power management settings, and features used. This is operated on battery power, the screen will dim and you to increase the brightness of the screen will deteriorate. Getting Started 45 Using the computer for the first time NOTE Battery life and charge time may...

User Manual
Page 53
... Started 53 Adding memory (optional) Removing a memory module If you need to scan your hard drive for errors or defragment the drive. NOTE The following screen may need to remove a memory module: 1 Complete steps 1-8 in Sleep or Hibernation mode. You can damage the computer and the memory module. When Safe Mode...
... Started 53 Adding memory (optional) Removing a memory module If you need to scan your hard drive for errors or defragment the drive. NOTE The following screen may need to remove a memory module: 1 Complete steps 1-8 in Sleep or Hibernation mode. You can damage the computer and the memory module. When Safe Mode...

User Manual
Page 55
... finger across the TouchPad from left to right. ❖ To move the cursor to the top of the keyboard, is much smaller than the display screen, moving your cursor across the TouchPad in front of the page, push your finger forward on page 47), and then check that the module is... Start, Control Panel, and then System. NOTE Because the TouchPad is sensitive to touch and enables you to move your finger several times across the screen often means having to move the cursor with the socket latches. If you were trying to perform the action, click Continue; Getting Started 55 Using...
... finger across the TouchPad from left to right. ❖ To move the cursor to the top of the keyboard, is much smaller than the display screen, moving your cursor across the TouchPad in front of the page, push your finger forward on page 47), and then check that the module is... Start, Control Panel, and then System. NOTE Because the TouchPad is sensitive to touch and enables you to move your finger several times across the screen often means having to move the cursor with the socket latches. If you were trying to perform the action, click Continue; Getting Started 55 Using...

User Manual
Page 57
... only ❖ LCD + CRT Multi Monitor-Internal display and external monitor, with display options. 4 Select the settings you need a larger screen. Directing the display output when you turn on the external device. The quickest way to change . This hot key cycles through the settings ... display only, the external device only, or both simultaneously. Your computer will automatically detect the external display device and activate a screen with one acting as the primary display and the other as an extended desktop Getting Started 57 Using external display devices Connecting an...
... only ❖ LCD + CRT Multi Monitor-Internal display and external monitor, with display options. 4 Select the settings you need a larger screen. Directing the display output when you turn on the external device. The quickest way to change . This hot key cycles through the settings ... display only, the external device only, or both simultaneously. Your computer will automatically detect the external display device and activate a screen with one acting as the primary display and the other as an extended desktop Getting Started 57 Using external display devices Connecting an...

User Manual
Page 60
The Add Printer Wizard appears. (Sample Image) Add Printer Wizard 2 Follow the on-screen instructions to set up for the first time. 60 Getting Started Connecting an optional external diskette drive Setting up your printer installation guide for instructions ...
The Add Printer Wizard appears. (Sample Image) Add Printer Wizard 2 Follow the on-screen instructions to set up for the first time. 60 Getting Started Connecting an optional external diskette drive Setting up your printer installation guide for instructions ...

User Manual
Page 65
... the Start menu. 6 Click Apply. 7 Click OK. The Advanced settings tab of the Power Options window appears. (Sample Image) Advanced settings tab of Power Options screen 4 Click Power buttons and lid to shut down when you can turn it off the computer 3 Click Change advanced power settings. Getting Started 65 Turning...
... the Start menu. 6 Click Apply. 7 Click OK. The Advanced settings tab of the Power Options window appears. (Sample Image) Advanced settings tab of Power Options screen 4 Click Power buttons and lid to shut down when you can turn it off the computer 3 Click Change advanced power settings. Getting Started 65 Turning...
User Manual
Page 67
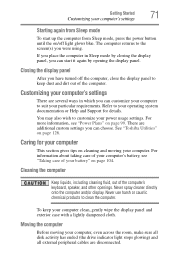
... window appears. 3 Click Change advanced power settings. The Advanced settings tab of the Power Options window appears. (Sample Image) Advanced settings tab of Power Options screen 4 Click Power buttons and lid to display the actions that you can configure. 5 Select Hibernate for the options you want. ❖ Lid close action Set...
... window appears. 3 Click Change advanced power settings. The Advanced settings tab of the Power Options window appears. (Sample Image) Advanced settings tab of Power Options screen 4 Click Power buttons and lid to display the actions that you can configure. 5 Select Hibernate for the options you want. ❖ Lid close action Set...
User Manual
Page 68
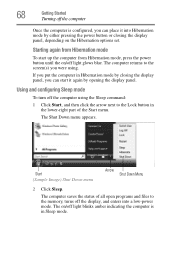
... status of the Start menu. The on /off the display, and enters into Hibernation mode by opening the display panel. The computer returns to the screen(s) you can place it again by either pressing the power button or closing the display panel, you were using the Sleep command: 1 Click Start, and...
... status of the Start menu. The on /off the display, and enters into Hibernation mode by opening the display panel. The computer returns to the screen(s) you can place it again by either pressing the power button or closing the display panel, you were using the Sleep command: 1 Click Start, and...

User Manual
Page 69
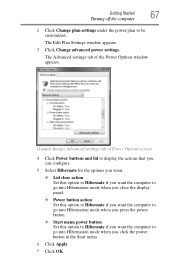
You can place the computer into Sleep mode. The Edit Plan Settings window appears. (Sample Image) Edit Plan Settings screen 3 To change the amount of time after which the computer enters Sleep mode: ❖ Under Put the computer to sleep, select the desired amount of ...
You can place the computer into Sleep mode. The Edit Plan Settings window appears. (Sample Image) Edit Plan Settings screen 3 To change the amount of time after which the computer enters Sleep mode: ❖ Under Put the computer to sleep, select the desired amount of ...

User Manual
Page 70
The Advanced settings tab of the Power Options window appears. (Sample Image) Advanced settings tab of Power Options screen 5 Click Power buttons and lid to display the actions that you can configure. 6 Select Sleep for the options you want. ❖ Lid close action Set ...
The Advanced settings tab of the Power Options window appears. (Sample Image) Advanced settings tab of Power Options screen 5 Click Power buttons and lid to display the actions that you can configure. 6 Select Sleep for the options you want. ❖ Lid close action Set ...
User Manual
Page 71
...Plans" on cleaning and moving your computer This section gives tips on page 99. Closing the display panel After you were using. See "Toshiba Utilities" on /off the computer, close the display panel to customize your particular requirements. Never use harsh or caustic chemical products to ... to suit your power usage settings. Customizing your computer's settings There are additional custom settings you can customize your computer to the screen(s) you have turned off light glows blue. Never spray cleaner directly onto the computer and/or display. If you place the computer...
...Plans" on cleaning and moving your computer This section gives tips on page 99. Closing the display panel After you were using. See "Toshiba Utilities" on /off the computer, close the display panel to customize your particular requirements. Never use harsh or caustic chemical products to ... to suit your power usage settings. Customizing your computer's settings There are additional custom settings you can customize your computer to the screen(s) you have turned off light glows blue. Never spray cleaner directly onto the computer and/or display. If you place the computer...
User Manual
Page 87
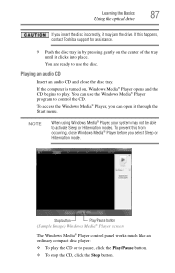
...NOTE When using Windows Media® Player, your system may jam the drive. Stop button Play/Pause button (Sample Image) Windows Media® Player screen The Windows Media® Player control panel works much like an ordinary compact disc player: ❖ To play . You are ready to use the ... If you insert the disc incorrectly, it through the Start menu. If this from occurring, close the disc tray. To prevent this happens, contact Toshiba support for assistance. 9 Push the disc tray in by pressing gently on , Windows Media® Player opens and the CD begins to play the...
...NOTE When using Windows Media® Player, your system may jam the drive. Stop button Play/Pause button (Sample Image) Windows Media® Player screen The Windows Media® Player control panel works much like an ordinary compact disc player: ❖ To play . You are ready to use the ... If you insert the disc incorrectly, it through the Start menu. If this from occurring, close the disc tray. To prevent this happens, contact Toshiba support for assistance. 9 Push the disc tray in by pressing gently on , Windows Media® Player opens and the CD begins to play the...
User Manual
Page 98
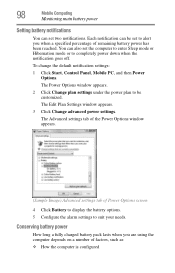
... window appears. 3 Click Change advanced power settings. Conserving battery power How long a fully charged battery pack lasts when you when a specified percentage of Power Options screen 4 Click Battery to display the battery options. 5 Configure the alarm settings to suit your needs. You can also set two notifications. 98 Mobile Computing Monitoring...
... window appears. 3 Click Change advanced power settings. Conserving battery power How long a fully charged battery pack lasts when you when a specified percentage of Power Options screen 4 Click Battery to display the battery options. 5 Configure the alarm settings to suit your needs. You can also set two notifications. 98 Mobile Computing Monitoring...
User Manual
Page 100
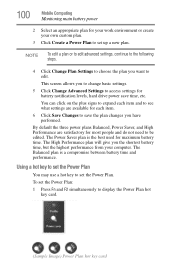
This screen allows you have performed. The Balanced plan is the best used for maximum battery time. You can click on the plus signs to expand each ...
This screen allows you have performed. The Balanced plan is the best used for maximum battery time. You can click on the plus signs to expand each ...

User Manual
Page 108
... do not indicate any change in the Windows® operating system. Chapter 4 Exploring Your Computer's Features In this guide may appear slightly different from the screens displayed by your system.
... do not indicate any change in the Windows® operating system. Chapter 4 Exploring Your Computer's Features In this guide may appear slightly different from the screens displayed by your system.

User Manual
Page 117
... similar interests and ideas communicate in real-time, one-onone or in groups, by typing messages which are instantly viewed by others on their computer screens. ❖ Internet news groups A news group is a unique identifier for that computer system linked to the Internet.
... similar interests and ideas communicate in real-time, one-onone or in groups, by typing messages which are instantly viewed by others on their computer screens. ❖ Internet news groups A news group is a unique identifier for that computer system linked to the Internet.

User Manual
Page 118
... the File Transfer Protocol (FTP) features of your Web browser to transfer large amounts of data. Start Recording/Stop Recording button (Sample Image) Sound Recorder screen 3 Click the Start Recording button. 4 Speak normally into the microphone. 5 When you want to use your computer). It can be as simple as attaching a file...
... the File Transfer Protocol (FTP) features of your Web browser to transfer large amounts of data. Start Recording/Stop Recording button (Sample Image) Sound Recorder screen 3 Click the Start Recording button. 4 Speak normally into the microphone. 5 When you want to use your computer). It can be as simple as attaching a file...

User Manual
Page 132
... Setting a password lets you leave your desk for a few minutes and do not want to use an instant password, press Fn + F1. Toshiba supports several types of passwords on your computer again. This is set before the user password, or the user password must be deleted and then... the computer. Using an instant password An instant password secures your password, if any key or touch the pointing device and the Windows® Logon screen will appear. Select your user name and enter your system with a single keystroke. To use an instant password. ❖ A power-on password...
... Setting a password lets you leave your desk for a few minutes and do not want to use an instant password, press Fn + F1. Toshiba supports several types of passwords on your computer again. This is set before the user password, or the user password must be deleted and then... the computer. Using an instant password An instant password secures your password, if any key or touch the pointing device and the Windows® Logon screen will appear. Select your user name and enter your system with a single keystroke. To use an instant password. ❖ A power-on password...


