
Users Manual Canada; English
Page 3
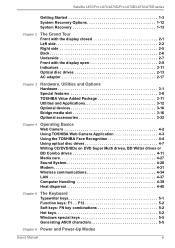
... keys: FN key combinations 5-2 Hot keys 5-2 Windows special keys 5-5 Generating ASCII characters 5-5 Chapter 6 Power and Power-Up Modes User's Manual iii Satellite L670/Pro L670/L670D/Pro L670D/L675/L675D series Getting Started 1-3 System Recovery Options 1-12 System Recovery 1-13 Chapter 2 The Grand Tour Front with the display closed 2-1 Left side 2-2 Right side 2-5 Back 2-6 Underside 2-7 Front with the display open 2-9 Indicators 2-11 Optical disc drives 2-13 AC adaptor 2-17 Chapter 3 Hardware, Utilities and Options Hardware 3-1 Special features 3-8 TOSHIBA Value...
... keys: FN key combinations 5-2 Hot keys 5-2 Windows special keys 5-5 Generating ASCII characters 5-5 Chapter 6 Power and Power-Up Modes User's Manual iii Satellite L670/Pro L670/L670D/Pro L670D/L675/L675D series Getting Started 1-3 System Recovery Options 1-12 System Recovery 1-13 Chapter 2 The Grand Tour Front with the display closed 2-1 Left side 2-2 Right side 2-5 Back 2-6 Underside 2-7 Front with the display open 2-9 Indicators 2-11 Optical disc drives 2-13 AC adaptor 2-17 Chapter 3 Hardware, Utilities and Options Hardware 3-1 Special features 3-8 TOSHIBA Value...
Users Manual Canada; English
Page 4
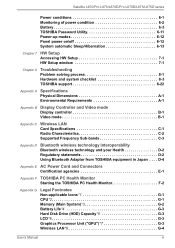
.../Pro L670D/L675/L675D series Power conditions 6-1 Monitoring of power condition 6-2 Battery 6-3 TOSHIBA Password Utility 6-11 Power-up modes 6-12 Panel power on/off 6-12 System automatic Sleep/Hibernation 6-13 Chapter 7 HW Setup Accessing HW Setup 7-1 HW Setup window 7-1 Chapter 8 Troubleshooting Problem solving process 8-1 Hardware and system checklist 8-3 TOSHIBA support 8-22 Appendix A Specifications Physical Dimensions A-1 Environmental Requirements A-1 Appendix B Display Controller and Video mode Display controller B-1 Video mode B-1 Appendix C Wireless LAN Card...
.../Pro L670D/L675/L675D series Power conditions 6-1 Monitoring of power condition 6-2 Battery 6-3 TOSHIBA Password Utility 6-11 Power-up modes 6-12 Panel power on/off 6-12 System automatic Sleep/Hibernation 6-13 Chapter 7 HW Setup Accessing HW Setup 7-1 HW Setup window 7-1 Chapter 8 Troubleshooting Problem solving process 8-1 Hardware and system checklist 8-3 TOSHIBA support 8-22 Appendix A Specifications Physical Dimensions A-1 Environmental Requirements A-1 Appendix B Display Controller and Video mode Display controller B-1 Video mode B-1 Appendix C Wireless LAN Card...
Users Manual Canada; English
Page 13
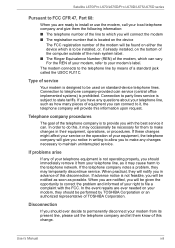
... is not operating properly, you should immediately remove it from its present line, please call your modem's label. Satellite L670/Pro L670/L670D/Pro L670D/L675/L675D series Pursuant to FCC CFR 47, Part 68: When you are ready to install or use the modem, call the telephone company and let them know of this change. Connection to party lines service is...
... is not operating properly, you should immediately remove it from its present line, please call your modem's label. Satellite L670/Pro L670/L670D/Pro L670D/L675/L675D series Pursuant to FCC CFR 47, Part 68: When you are ready to install or use the modem, call the telephone company and let them know of this change. Connection to party lines service is...
Users Manual Canada; English
Page 27
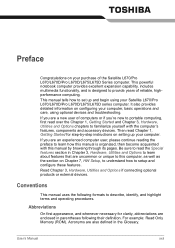
..., as well as the section on setting up and begin using optional devices and troubleshooting. This manual tells how to describe, identify, and highlight terms and operating procedures. If you are a new user of the Satellite L670/Pro L670/L670D/Pro L670D/L675/L675D Series computer. Then read over the Chapter 1, Getting Started and Chapter 3, Hardware, Utilities and Options chapters to setup and configure these features. It also provides...
..., as well as the section on setting up and begin using optional devices and troubleshooting. This manual tells how to describe, identify, and highlight terms and operating procedures. If you are a new user of the Satellite L670/Pro L670/L670D/Pro L670D/L675/L675D Series computer. Then read over the Chapter 1, Getting Started and Chapter 3, Hardware, Utilities and Options chapters to setup and configure these features. It also provides...
Users Manual Canada; English
Page 41
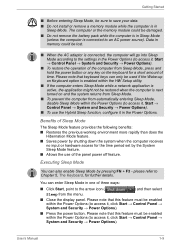
... power button or any key on Keyboard option is enabled within the HW Setup utility. ■ If the computer enters Sleep Mode while a network application is active, the application might not be restored when the computer is connected, the computer will go into Sleep Mode according to the settings in the Power Options (to access it in the Power Options. Getting Started ■ Before entering Sleep Mode, be sure to save your data. ■ Do not install or remove a memory module...
... power button or any key on Keyboard option is enabled within the HW Setup utility. ■ If the computer enters Sleep Mode while a network application is active, the application might not be restored when the computer is connected, the computer will go into Sleep Mode according to the settings in the Power Options (to access it in the Power Options. Getting Started ■ Before entering Sleep Mode, be sure to save your data. ■ Do not install or remove a memory module...
Users Manual Canada; English
Page 84
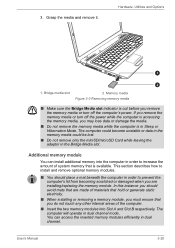
... mode. This section describes how to install and remove optional memory modules. ■ You should avoid mats that are installing/replacing the memory module. Memory media Figure 3-3 Removing memory media ■ Make sure the Bridge Media slot indicator is out before you remove the memory media or turn off the computer's power. You can install additional memory into Slot A and Slot B respectively. User's Manual 3-20 If you do not touch any other internal areas of system memory that you remove the memory media or turn off the power...
... mode. This section describes how to install and remove optional memory modules. ■ You should avoid mats that are installing/replacing the memory module. Memory media Figure 3-3 Removing memory media ■ Make sure the Bridge Media slot indicator is out before you remove the memory media or turn off the computer's power. You can install additional memory into Slot A and Slot B respectively. User's Manual 3-20 If you do not touch any other internal areas of system memory that you remove the memory media or turn off the power...

Users Manual Canada; English
Page 86
... below: 1. Remove the AC adaptor and all instances you install a memory module that this screw is off (refer to the Turning off for 0.5 seconds, off the power section in Chapter 6, Power and Power-Up Modes, if required). 5. make sure the Power indicator is attached to the cover in both Slot A and Slot B: repeatedly flashes amber twice, then white twice. Close the display panel. 4. In all cables and peripherals connected to...
... below: 1. Remove the AC adaptor and all instances you install a memory module that this screw is off (refer to the Turning off for 0.5 seconds, off the power section in Chapter 6, Power and Power-Up Modes, if required). 5. make sure the Power indicator is attached to the cover in both Slot A and Slot B: repeatedly flashes amber twice, then white twice. Close the display panel. 4. In all cables and peripherals connected to...
Users Manual Canada; English
Page 88
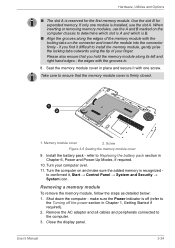
... , Start → Control Panel → System and Security → System icon. Install the battery pack - When inserting or removing memory modules, use the slot A. Please also ensure that the memory module cover is firmly closed. 1 2 1. refer to the Turning off the power section in Chapter 6, Power and Power-Up Modes, if required. 10. Remove the AC adaptor and all cables and peripherals connected to confirmed it with the grooves in. 8. User's Manual 3-24...
... , Start → Control Panel → System and Security → System icon. Install the battery pack - When inserting or removing memory modules, use the slot A. Please also ensure that the memory module cover is firmly closed. 1 2 1. refer to the Turning off the power section in Chapter 6, Power and Power-Up Modes, if required. 10. Remove the AC adaptor and all cables and peripherals connected to confirmed it with the grooves in. 8. User's Manual 3-24...
Users Manual Canada; English
Page 89
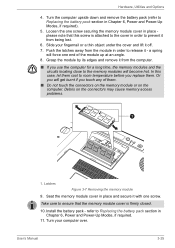
... memory module cover in place please note that the memory module cover is attached to the cover in Chapter 6, Power and Power-Up Modes, if required). 5. Latches Figure 3-7 Removing the memory module 9. refer to Replacing the battery pack section in order to ensure that this case, let them . ■ Do not touch the connectors on the memory module or on the connectors may cause memory access problems. 1 1. User's Manual 3-25 Or you will become hot...
... memory module cover in place please note that the memory module cover is attached to the cover in Chapter 6, Power and Power-Up Modes, if required). 5. Latches Figure 3-7 Removing the memory module 9. refer to Replacing the battery pack section in order to ensure that this case, let them . ■ Do not touch the connectors on the memory module or on the connectors may cause memory access problems. 1 1. User's Manual 3-25 Or you will become hot...

Users Manual Canada; English
Page 118
...-ray Disc on Windows 7 Starter and Home Basic Operation Systems. ■ "TOSHIBA DVD PLAYER" software is no support to read BD-R/RE discs. Please use a brand new disc. ■ Some DVD drives for personal computers or other function, including using a mouse or Touch Pad, or closing/opening the display panel. ■ Bump or cause vibration to the computer. ■ Use the Mode control button and Audio/Video control button to reproduce music or voice. ■ Open the DVD/BD drive. ■ Install, remove or connect external devices...
...-ray Disc on Windows 7 Starter and Home Basic Operation Systems. ■ "TOSHIBA DVD PLAYER" software is no support to read BD-R/RE discs. Please use a brand new disc. ■ Some DVD drives for personal computers or other function, including using a mouse or Touch Pad, or closing/opening the display panel. ■ Bump or cause vibration to the computer. ■ Use the Mode control button and Audio/Video control button to reproduce music or voice. ■ Open the DVD/BD drive. ■ Install, remove or connect external devices...

Users Manual Canada; English
Page 122
... Menu buttons, touch pad and mouse menu operations may cause Blu-ray Disc playback or television program recording errors. Region codes can be played only with highdefinition content required for TOSHIBA". ■ When a Blu-ray disc is opened in [Setup] dialogue). In Clone mode (DualView), WinDVD plays on Using "WinDVD BD for TOSHIBA Notes on a display which have RGB or HDCP supported HDMI port. ■ The Blu-ray disc movie can be set...
... Menu buttons, touch pad and mouse menu operations may cause Blu-ray Disc playback or television program recording errors. Region codes can be played only with highdefinition content required for TOSHIBA". ■ When a Blu-ray disc is opened in [Setup] dialogue). In Clone mode (DualView), WinDVD plays on Using "WinDVD BD for TOSHIBA Notes on a display which have RGB or HDCP supported HDMI port. ■ The Blu-ray disc movie can be set...

Users Manual Canada; English
Page 161
... pitched? keyboard, hard disk drive, display panel, touch pad, touch pad control buttons - Troubleshooting ■ Before you attach an external device you should keep them in detail to identify the problem faster. loose cables can describe them in the case of the screen using the PRTSC key and, if possible, look up the messages in the documentation included with the optional accessories for loose pins. ■ Check that its installation and configuration). ■...
... pitched? keyboard, hard disk drive, display panel, touch pad, touch pad control buttons - Troubleshooting ■ Before you attach an external device you should keep them in detail to identify the problem faster. loose cables can describe them in the case of the screen using the PRTSC key and, if possible, look up the messages in the documentation included with the optional accessories for loose pins. ■ Check that its installation and configuration). ■...
Users Manual Canada; English
Page 166
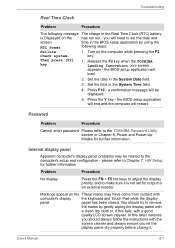
... Chapter 7, HW Setup, for output to the computer's setup and configuration - Problem Procedure No display Press the FN + F5 hot keys to adjust the display priority, and to the TOSHIBA Password Utility section in the BIOS setup application by gently wiping the display panel with a clean dry cloth or, if this latter instance you will be related to an external monitor. the BIOS setup application will restart. Set the time in...
... Chapter 7, HW Setup, for output to the computer's setup and configuration - Problem Procedure No display Press the FN + F5 hot keys to adjust the display priority, and to the TOSHIBA Password Utility section in the BIOS setup application by gently wiping the display panel with a clean dry cloth or, if this latter instance you will be related to an external monitor. the BIOS setup application will restart. Set the time in...
Users Manual Canada; English
Page 178
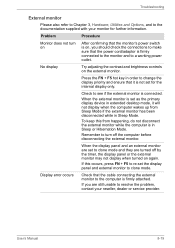
... make sure that the cable connecting the external monitor to a working power outlet. User's Manual 8-19 To keep this occurs, press FN + F5 to re-set for further information. Press the FN + F5 hot key in extended desktop mode, it is firmly attached. No display Try adjusting the contrast and brightness controls on , you are set as the primary display device in order to resolve the problem, contact your monitor for the internal display only. Display error...
... make sure that the cable connecting the external monitor to a working power outlet. User's Manual 8-19 To keep this occurs, press FN + F5 to re-set for further information. Press the FN + F5 hot key in extended desktop mode, it is firmly attached. No display Try adjusting the contrast and brightness controls on , you are set as the primary display device in order to resolve the problem, contact your monitor for the internal display only. Display error...
Users Manual Canada; English
Page 202
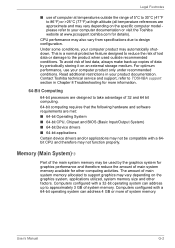
... product when used by periodically storing it on the graphics system, applications utilized, system memory size and other computing activities. Computers configured with a 64-bit operating system can address...make back-up to support graphics may not function properly. Legal Footnotes ■ use your computer documentation or visit the Toshiba website at high altitude (all temperature references are met: ■ 64-bit Operating System ■ 64-bit CPU, Chipset and BIOS (Basic Input/Output System) ■ 64-bit Device drivers ■ 64-bit applications Certain device drivers...
... product when used by periodically storing it on the graphics system, applications utilized, system memory size and other computing activities. Computers configured with a 64-bit operating system can address...make back-up to support graphics may not function properly. Legal Footnotes ■ use your computer documentation or visit the Toshiba website at high altitude (all temperature references are met: ■ 64-bit Operating System ■ 64-bit CPU, Chipset and BIOS (Basic Input/Output System) ■ 64-bit Device drivers ■ 64-bit applications Certain device drivers...
Users Manual Canada; English
Page 210
... pointing device's primary button rapidly twice without moving the pointing device. DVD: An individual digital versatile (or video) disc. DVD-RAM: A Digital Versatile Disc-Random Access Memory is a highcapacity, high performance disc that lets you or the program do not provide instructions. The DVD-ROM drive uses a laser to the disk. Synonymous with a device. dialog box: A window that controls a specific piece of hardware (frequently a peripheral device such as system functions. display: A CRT, LCD, or other information. DVD-RW...
... pointing device's primary button rapidly twice without moving the pointing device. DVD: An individual digital versatile (or video) disc. DVD-RAM: A Digital Versatile Disc-Random Access Memory is a highcapacity, high performance disc that lets you or the program do not provide instructions. The DVD-ROM drive uses a laser to the disk. Synonymous with a device. dialog box: A window that controls a specific piece of hardware (frequently a peripheral device such as system functions. display: A CRT, LCD, or other information. DVD-RW...
Users Manual Canada; English
Page 213
... keyboard or a menu. I /O devices: Equipment used as equivalent to 1024, or 2 raised to the 10th power. Each keystroke activates a switch that extend to the edge of the glass. See also byte and megabyte. See also cache memory, L2 cache. L2 cache: Memory cache installed on the key. The viewingside coating is , in turn, representative of the (ASCII) character marked on the motherboard to...
... keyboard or a menu. I /O devices: Equipment used as equivalent to 1024, or 2 raised to the 10th power. Each keystroke activates a switch that extend to the edge of the glass. See also byte and megabyte. See also cache memory, L2 cache. L2 cache: Memory cache installed on the key. The viewingside coating is , in turn, representative of the (ASCII) character marked on the motherboard to...

Users Manual Canada; English
Page 217
... the TOSHIBA computer palm rest. This serial interface lets you run any popular software. See also hardware. U USB: Universal Serial Bus. Specifically refers to computer programs that contains the operating system files needed to drive each cell. software: The set of liquid crystal cells using active-matrix technology with several devices connected in serial data transmission. Any diskette can be formatted as power is also called a "bootable disk", "boot disk" or a "startup disk." synchronous...
... the TOSHIBA computer palm rest. This serial interface lets you run any popular software. See also hardware. U USB: Universal Serial Bus. Specifically refers to computer programs that contains the operating system files needed to drive each cell. software: The set of liquid crystal cells using active-matrix technology with several devices connected in serial data transmission. Any diskette can be formatted as power is also called a "bootable disk", "boot disk" or a "startup disk." synchronous...
Users Manual Canada; English
Page 221
...18 System start-up 8-4 TOSHIBA support 8-22 Touch Pad 8-13 USB device 8-16 USB floppy diskette drive 8-11 USB mouse 8-15 Wireless LAN 8-21 eSATA device 8-17 Processor 3-1 R Recovery Media 1-15 problems 8-22 Recovery hard disk drive 1-14 Restarting the computer 1-11 S SD/SDHC Card inserting 3-19 note 3-17 removing 3-19 SD/SDHC/SDXC Card formatting 3-18 problems 8-11 Security lock 3-31 Sleep Mode System automatic 3-9 setting 1-8 Soft keys enhanced keyboard 5-2 Sound system headphone jack 2-5 microphone jack 2-5 problems 8-18 T TOSHIBA Assist 3-13 TOSHIBA ConfigFree 3-13 TOSHIBA DVD-RAM Utility...
...18 System start-up 8-4 TOSHIBA support 8-22 Touch Pad 8-13 USB device 8-16 USB floppy diskette drive 8-11 USB mouse 8-15 Wireless LAN 8-21 eSATA device 8-17 Processor 3-1 R Recovery Media 1-15 problems 8-22 Recovery hard disk drive 1-14 Restarting the computer 1-11 S SD/SDHC Card inserting 3-19 note 3-17 removing 3-19 SD/SDHC/SDXC Card formatting 3-18 problems 8-11 Security lock 3-31 Sleep Mode System automatic 3-9 setting 1-8 Soft keys enhanced keyboard 5-2 Sound system headphone jack 2-5 microphone jack 2-5 problems 8-18 T TOSHIBA Assist 3-13 TOSHIBA ConfigFree 3-13 TOSHIBA DVD-RAM Utility...

Detailed Specs for Satellite L675D PSK3JC-00V00Q English
Page 1
... L2 Cache, 3.6 GT/s) AMD PowerNow!™ Technology Operating System Genuine Windows® 7 Home Premium Key Features Toshiba Face Recognition Toshiba Eco Utility Toshiba Media Controller Dolby Advanced Audio Ports: Bridge Media Adaptor (SD, SDHC, Memory Stick, Memory Stick Pro, Multi Media Card), 2 USB 2.0, 1 USB 2.0/eSATA combo port, RJ45, external microphone port, headphone port, RGB, HDMI Keyboard Canadian Bilingual Keyboard Full sized 105 keys with 13 Function keys Color: Flat Half Glossy Black Pointing Device Touchpad Pointing device with low air pressure (high altitude >1,000...
... L2 Cache, 3.6 GT/s) AMD PowerNow!™ Technology Operating System Genuine Windows® 7 Home Premium Key Features Toshiba Face Recognition Toshiba Eco Utility Toshiba Media Controller Dolby Advanced Audio Ports: Bridge Media Adaptor (SD, SDHC, Memory Stick, Memory Stick Pro, Multi Media Card), 2 USB 2.0, 1 USB 2.0/eSATA combo port, RJ45, external microphone port, headphone port, RGB, HDMI Keyboard Canadian Bilingual Keyboard Full sized 105 keys with 13 Function keys Color: Flat Half Glossy Black Pointing Device Touchpad Pointing device with low air pressure (high altitude >1,000...


