User Guide
Page 32
32 Contents Using an external keyboard 88 Using a mouse 88 Connecting a printer 88 Setting up a printer 89 Turning off the computer 90 Options for turning off the computer 90 Using the ... the computer 100 Moving the computer 101 Using a computer lock 101 Chapter 2: Learning the Basics 102 Computing tips 102 Using the keyboard 103 Character keys 104 Making your keyboard emulate a full-size keyboard 104 Ctrl, Fn, and Alt keys 105 Function keys 105 Special Windows® keys 105 Overlay keys 106 Starting a program...
32 Contents Using an external keyboard 88 Using a mouse 88 Connecting a printer 88 Setting up a printer 89 Turning off the computer 90 Options for turning off the computer 90 Using the ... the computer 100 Moving the computer 101 Using a computer lock 101 Chapter 2: Learning the Basics 102 Computing tips 102 Using the keyboard 103 Character keys 104 Making your keyboard emulate a full-size keyboard 104 Ctrl, Fn, and Alt keys 105 Function keys 105 Special Windows® keys 105 Overlay keys 106 Starting a program...
User Guide
Page 35
...35 USB Sleep and Charge 166 Enabling/Disabling USB Sleep and Charge 168 Power supply mode settings 168 USB Sleep and Music 169 TOSHIBA Button Support 170 TOSHIBA Accessibility 171 Fingerprint Authentication Utility 172 Fingerprint utility limitations 172 Using the Fingerprint Authentication Utility 172 Fingerprint Logon 173 Care and maintenance of ...operating system can help you 185 Fixing a problem with Device Manager 186 Checking device properties 186 Memory problems 187 Power and the batteries 187 Keyboard problems 189 Display problems 189 Disk or storage drive problems 191
...35 USB Sleep and Charge 166 Enabling/Disabling USB Sleep and Charge 168 Power supply mode settings 168 USB Sleep and Music 169 TOSHIBA Button Support 170 TOSHIBA Accessibility 171 Fingerprint Authentication Utility 172 Fingerprint utility limitations 172 Using the Fingerprint Authentication Utility 172 Fingerprint Logon 173 Care and maintenance of ...operating system can help you 185 Fixing a problem with Device Manager 186 Checking device properties 186 Memory problems 187 Power and the batteries 187 Keyboard problems 189 Display problems 189 Disk or storage drive problems 191
User Guide
Page 36
... in the Windows® operating system 200 If you need further assistance 204 Before you contact Toshiba 204 Contacting Toshiba 205 Other Toshiba Internet Web sites 205 Toshiba's worldwide offices 206 Appendix A: Hot Keys/TOSHIBA Cards 208 Hot Key Cards 208 Using the Hot Key Cards 209 Hot key functions 209 Optical...Display switch 216 Display brightness 217 Disabling or enabling wireless devices............218 Disabling or enabling the touch pad 219 Zoom (Display resolution 220 Keyboard hot key functions 221 Appendix B: Power Cord/Cable Connectors 222 Glossary 223 Index 238
... in the Windows® operating system 200 If you need further assistance 204 Before you contact Toshiba 204 Contacting Toshiba 205 Other Toshiba Internet Web sites 205 Toshiba's worldwide offices 206 Appendix A: Hot Keys/TOSHIBA Cards 208 Hot Key Cards 208 Using the Hot Key Cards 209 Hot key functions 209 Optical...Display switch 216 Display brightness 217 Disabling or enabling wireless devices............218 Disabling or enabling the touch pad 219 Zoom (Display resolution 220 Keyboard hot key functions 221 Appendix B: Power Cord/Cable Connectors 222 Glossary 223 Index 238
User Guide
Page 45
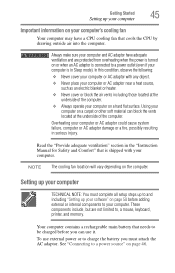
... and including "Setting up your computer Important information on your computer's cooling fan Your computer may have adequate ventilation and are not limited to, a mouse, keyboard, printer, and memory. NOTE The cooling fan location will vary depending on page 46. To use it. See "Connecting to a power source" on the computer...
... and including "Setting up your computer Important information on your computer's cooling fan Your computer may have adequate ventilation and are not limited to, a mouse, keyboard, printer, and memory. NOTE The cooling fan location will vary depending on page 46. To use it. See "Connecting to a power source" on the computer...
User Guide
Page 49
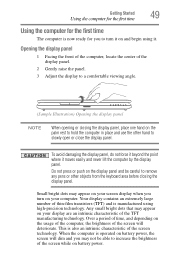
... deteriorate. Any small bright dots that may appear on the palm rest to hold the computer in place and use the other objects from the keyboard area before closing the display panel, place one hand on your display are an intrinsic characteristic of thin-film transistors (TFT) and is manufactured using...
... deteriorate. Any small bright dots that may appear on the palm rest to hold the computer in place and use the other objects from the keyboard area before closing the display panel, place one hand on your display are an intrinsic characteristic of thin-film transistors (TFT) and is manufactured using...
User Guide
Page 51
...on page 52) ❖ Connect a mouse (see "Using a mouse" on page 88) ❖ Connect an external keyboard (see "Using an external keyboard" on page 88) ❖ Connect an external monitor (see "Using external display devices" on page 85) ❖ ...Connect a local printer (see "Connecting a printer" on page 50. Getting Started 51 Registering your computer with Toshiba Registering your computer with Toshiba Product registration is strongly recommended, and allows Toshiba...
...on page 52) ❖ Connect a mouse (see "Using a mouse" on page 88) ❖ Connect an external keyboard (see "Using an external keyboard" on page 88) ❖ Connect an external monitor (see "Using external display devices" on page 85) ❖ ...Connect a local printer (see "Connecting a printer" on page 50. Getting Started 51 Registering your computer with Toshiba Registering your computer with Toshiba Product registration is strongly recommended, and allows Toshiba...
User Guide
Page 77
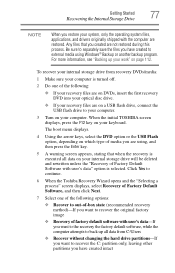
... USB flash drive to external media using , and then press the Enter key. 5 A warning screen appears, stating that you are on your keyboard. The boot menu displays. 4 Using the arrow keys, select the DVD option or the USB Flash option, depending on which type of media you... your computer is turned off. 2 Do one of Factory Default Software with user's data" option is selected. Click Yes to continue. 6 When the Toshiba Recovery Wizard opens and the "Selecting a process" screen displays, select Recovery of Factory Default Software, and then click Next. 7 Select one of the following...
... USB flash drive to external media using , and then press the Enter key. 5 A warning screen appears, stating that you are on your keyboard. The boot menu displays. 4 Using the arrow keys, select the DVD option or the USB Flash option, depending on which type of media you... your computer is turned off. 2 Do one of Factory Default Software with user's data" option is selected. Click Yes to continue. 6 When the Toshiba Recovery Wizard opens and the "Selecting a process" screen displays, select Recovery of Factory Default Software, and then click Next. 7 Select one of the following...

User Guide
Page 80
... the Volume list to display its status in the lower portion of the screen. To reinstall drivers and applications: 1 Click Start, All Programs, My Toshiba, and then TOSHIBA Application Installer. 2 Click Next. 3 Click the item you want to install. 4 Click Install. 5 Follow the on the screen ❖ Scroll through ... drive operating status After restoring your internal storage drive, you can use the touch pad (the small, touch-sensitive area in front of the keyboard) and the adjacent control buttons to: ❖ Move the pointer on the screen ❖ Select an item on the screen ❖ Open...
... the Volume list to display its status in the lower portion of the screen. To reinstall drivers and applications: 1 Click Start, All Programs, My Toshiba, and then TOSHIBA Application Installer. 2 Click Next. 3 Click the item you want to install. 4 Click Install. 5 Follow the on the screen ❖ Scroll through ... drive operating status After restoring your internal storage drive, you can use the touch pad (the small, touch-sensitive area in front of the keyboard) and the adjacent control buttons to: ❖ Move the pointer on the screen ❖ Select an item on the screen ❖ Open...
User Guide
Page 88
...come with your printer does not support Plug and Play, you need to use a USB-compatible mouse. 88 Getting Started Using an external keyboard Adjusting the quality of the computer's built-in "Setting up the printer as instructed by the printer manufacturer, the printer may want to adjust... 89. If your printer. TECHNICAL NOTE: To determine if your computer through the USB ports. See the video device documentation for use an external keyboard, you can purchase one to your printer. You can connect a USB-compatible printer to use . You can use a mouse instead of the ...
...come with your printer does not support Plug and Play, you need to use a USB-compatible mouse. 88 Getting Started Using an external keyboard Adjusting the quality of the computer's built-in "Setting up the printer as instructed by the printer manufacturer, the printer may want to adjust... 89. If your printer. TECHNICAL NOTE: To determine if your computer through the USB ports. See the video device documentation for use an external keyboard, you can purchase one to your printer. You can connect a USB-compatible printer to use . You can use a mouse instead of the ...
User Guide
Page 100
... customize your computer. The computer returns to suit your computer's battery, see "Power Plans" on page 135. For information about taking care of the computer's keyboard, speaker, and other openings.
... customize your computer. The computer returns to suit your computer's battery, see "Power Plans" on page 135. For information about taking care of the computer's keyboard, speaker, and other openings.
User Guide
Page 103
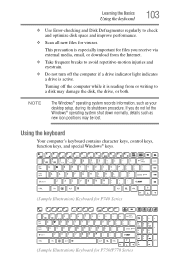
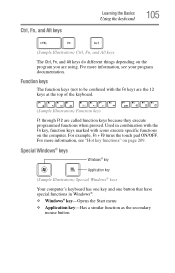
Learning the Basics Using the keyboard 103 ❖ Use Error-checking and Disk Defragmenter regularly to check and optimize disk space and improve performance. ❖ Scan all new files for P750/... is reading from or writing to avoid repetitive-motion injuries and eyestrain. ❖ Do not turn off the computer while it is active. Using the keyboard Your computer's keyboard contains character keys, control keys, function keys, and special Windows® keys. (Sample Illustration...
Learning the Basics Using the keyboard 103 ❖ Use Error-checking and Disk Defragmenter regularly to check and optimize disk space and improve performance. ❖ Scan all new files for P750/... is reading from or writing to avoid repetitive-motion injuries and eyestrain. ❖ Do not turn off the computer while it is active. Using the keyboard Your computer's keyboard contains character keys, control keys, function keys, and special Windows® keys. (Sample Illustration...
User Guide
Page 104
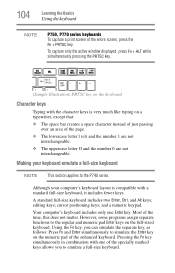
..., except that: ❖ The space bar creates a space character instead of just passing over an area of the enhanced keyboard. editing keys; A standard full-size keyboard includes two Enter, Ctrl, and Alt keys; To capture only the active window displayed, press Fn + ALT while simultaneously... pressing the PRTSC key. (Sample Illustration) PRTSC key on the keyboard Character keys Typing with the character keys is compatible with one Enter key. However, some programs assign separate functions to simulate the ...
..., except that: ❖ The space bar creates a space character instead of just passing over an area of the enhanced keyboard. editing keys; A standard full-size keyboard includes two Enter, Ctrl, and Alt keys; To capture only the active window displayed, press Fn + ALT while simultaneously... pressing the PRTSC key. (Sample Illustration) PRTSC key on the keyboard Character keys Typing with the character keys is compatible with one Enter key. However, some programs assign separate functions to simulate the ...
User Guide
Page 105
...execute programmed functions when pressed. Special Windows® keys Windows® key Application key (Sample Illustration) Special Windows® keys Your computer's keyboard has one key and one button that have special functions in combination with the Fn key, function keys marked with the Fn key) are the... 12 keys at the top of the keyboard. (Sample Illustration) Function keys F1 through F12 are using. Function keys The function keys (not to be confused with icons execute specific ...
...execute programmed functions when pressed. Special Windows® keys Windows® key Application key (Sample Illustration) Special Windows® keys Your computer's keyboard has one key and one button that have special functions in combination with the Fn key, function keys marked with the Fn key) are the... 12 keys at the top of the keyboard. (Sample Illustration) Function keys F1 through F12 are using. Function keys The function keys (not to be confused with icons execute specific ...
User Guide
Page 106
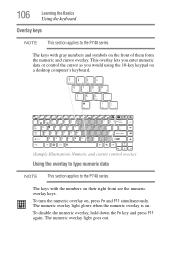
... overlay light goes out. To disable the numeric overlay, hold down the Fn key and press F11 again. 106 Learning the Basics Using the keyboard Overlay keys NOTE This section applies to the P740 series. The numeric overlay light glows when the numeric overlay is on , press Fn and ...F11 simultaneously. The keys with the numbers on a desktop computer's keyboard. (Sample Illustration) Numeric and cursor control overlay Using the overlay to type numeric data NOTE This section applies to the P740 series.
... overlay light goes out. To disable the numeric overlay, hold down the Fn key and press F11 again. 106 Learning the Basics Using the keyboard Overlay keys NOTE This section applies to the P740 series. The numeric overlay light glows when the numeric overlay is on , press Fn and ...F11 simultaneously. The keys with the numbers on a desktop computer's keyboard. (Sample Illustration) Numeric and cursor control overlay Using the overlay to type numeric data NOTE This section applies to the P740 series.

User Guide
Page 110
... created a new document, your program displays a Save As dialog box. Some applications do . 110 Learning the Basics Saving your work Saving files 1 Click on the keyboard, except for these characters File names are working with a document that can include spaces.
... created a new document, your program displays a Save As dialog box. Some applications do . 110 Learning the Basics Saving your work Saving files 1 Click on the keyboard, except for these characters File names are working with a document that can include spaces.
User Guide
Page 115
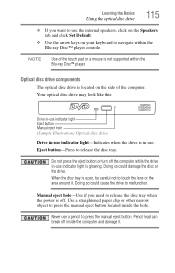
NOTE Use of the computer. Optical disc drive components The optical disc drive is located on your keyboard to navigate within the Blu-ray Disc™ player. Doing so could cause the drive to malfunction. When the disc tray is open, be careful ...
NOTE Use of the computer. Optical disc drive components The optical disc drive is located on your keyboard to navigate within the Blu-ray Disc™ player. Doing so could cause the drive to malfunction. When the disc tray is open, be careful ...
User Guide
Page 116
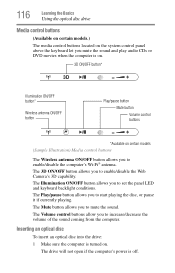
The Illumination ON/OFF button allows you to mute the sound. The Mute button allows you to set the panel LED and keyboard backlight conditions. Inserting an optical disc To insert an optical disc into the drive: 1 Make sure the computer is turned on certain models (Sample Illustration) ... Basics Using the optical disc drive Media control buttons (Available on certain models.) The media control buttons located on the system control panel above the keyboard let you mute the sound and play audio CDs or DVD movies when the computer is on. 3D ON/OFF button* Illumination ON/OFF button...
The Illumination ON/OFF button allows you to mute the sound. The Mute button allows you to set the panel LED and keyboard backlight conditions. Inserting an optical disc To insert an optical disc into the drive: 1 Make sure the computer is turned on certain models (Sample Illustration) ... Basics Using the optical disc drive Media control buttons (Available on certain models.) The media control buttons located on the system control panel above the keyboard let you mute the sound and play audio CDs or DVD movies when the computer is on. 3D ON/OFF button* Illumination ON/OFF button...
User Guide
Page 126
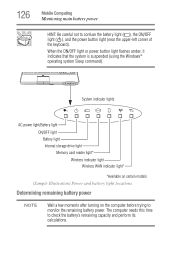
... the computer before trying to confuse the battery light ( ), the ON/OFF light ( ), and the power button light (near the upper-left corner of the keyboard). 126 Mobile Computing Monitoring main battery power HINT: Be careful not to monitor the remaining battery power. The computer needs this time to check the...
... the computer before trying to confuse the battery light ( ), the ON/OFF light ( ), and the power button light (near the upper-left corner of the keyboard). 126 Mobile Computing Monitoring main battery power HINT: Be careful not to monitor the remaining battery power. The computer needs this time to check the...
User Guide
Page 165
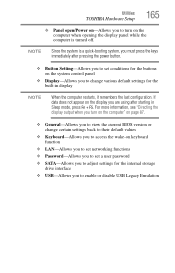
... appear on the system control panel ❖ Display-Allows you to change certain settings back to their default values ❖ Keyboard-Allows you to access the wake-on keyboard function ❖ LAN-Allows you to set networking functions ❖ Password-Allows you to set conditions for the buttons on ...-Allows you to set a user password ❖ SATA-Allows you to adjust settings for the built-in Sleep mode, press Fn + F5. Utilities TOSHIBA Hardware Setup 165 ❖ Panel open/Power on-Allows you to turn on the computer" on page 87. ❖ General-Allows you to view the...
... appear on the system control panel ❖ Display-Allows you to change certain settings back to their default values ❖ Keyboard-Allows you to access the wake-on keyboard function ❖ LAN-Allows you to set networking functions ❖ Password-Allows you to set conditions for the buttons on ...-Allows you to set a user password ❖ SATA-Allows you to adjust settings for the built-in Sleep mode, press Fn + F5. Utilities TOSHIBA Hardware Setup 165 ❖ Panel open/Power on-Allows you to turn on the computer" on page 87. ❖ General-Allows you to view the...
User Guide
Page 167
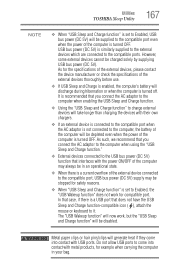
... before use. ❖ If USB Sleep and Charge is enabled, the computer's battery will be charged solely by supplying USB bus power (DC 5V). Utilities TOSHIBA Sleep Utility 167 NOTE ❖ When "USB Sleep and Charge function" is set to the compatible port even when the power of the computer is... the computer, the battery of the computer is recommended that does not have the USB Sleep and Charge function-compatible icon ( ), attach the mouse or keyboard to the compatible ports.
... before use. ❖ If USB Sleep and Charge is enabled, the computer's battery will be charged solely by supplying USB bus power (DC 5V). Utilities TOSHIBA Sleep Utility 167 NOTE ❖ When "USB Sleep and Charge function" is set to the compatible port even when the power of the computer is... the computer, the battery of the computer is recommended that does not have the USB Sleep and Charge function-compatible icon ( ), attach the mouse or keyboard to the compatible ports.

