

Satellite M60-M65 User's Guide (PDF)
Page 29
... for the first time 54 Opening the display panel 54 Your computer's features and specifications ....55 Turning on the power 55 Adding memory 56 Installing a memory module 57 Removing a memory module 62 Using the TouchPad 64 Scrolling with the TouchPad 65 Control buttons 65 Disabling or enabling the TouchPad 66 Turning off the...
... for the first time 54 Opening the display panel 54 Your computer's features and specifications ....55 Turning on the power 55 Adding memory 56 Installing a memory module 57 Removing a memory module 62 Using the TouchPad 64 Scrolling with the TouchPad 65 Control buttons 65 Disabling or enabling the TouchPad 66 Turning off the...
Satellite M60-M65 User's Guide (PDF)
Page 32
... Card for your computer .........138 Hot swapping 138 Inserting an ExpressCard 139 Removing an ExpressCard 140 Using the Bridge Media Adapter Slot 140 Inserting memory media 140 Removing memory media 141 Using the i.LINK® port 142 Media Center Setup 144 Connecting to a Television 144 Starting the Media Center 145 Using Media...
... Card for your computer .........138 Hot swapping 138 Inserting an ExpressCard 139 Removing an ExpressCard 140 Using the Bridge Media Adapter Slot 140 Inserting memory media 140 Removing memory media 141 Using the i.LINK® port 142 Media Center Setup 144 Connecting to a Television 144 Starting the Media Center 145 Using Media...
Satellite M60-M65 User's Guide (PDF)
Page 34
34 Contents TOSHIBA Power Saver 192 SD Memory Card Format 194 Mouse utility 194 TOSHIBA Accessibility 195 TOSHIBA Zooming Utility 196 TOSHIBA Button Controls 197 CD/DVD Drive Acoustic Silencer 198 Hotkey utility 199 TOSHIBA HW Setup 200 TOSHIBA Touch and Launch utility 202 Chapter 6: If Something Goes ... conflict 213 A plan of action 213 Resolving hardware conflicts on your own .....214 Fixing a problem with Device Manager ...........215 Memory problems 217 Power and the batteries 218 Keyboard problems 220 Display problems 221 Disk drive problems 223 DVD-ROM or multi-function ...
34 Contents TOSHIBA Power Saver 192 SD Memory Card Format 194 Mouse utility 194 TOSHIBA Accessibility 195 TOSHIBA Zooming Utility 196 TOSHIBA Button Controls 197 CD/DVD Drive Acoustic Silencer 198 Hotkey utility 199 TOSHIBA HW Setup 200 TOSHIBA Touch and Launch utility 202 Chapter 6: If Something Goes ... conflict 213 A plan of action 213 Resolving hardware conflicts on your own .....214 Fixing a problem with Device Manager ...........215 Memory problems 217 Power and the batteries 218 Keyboard problems 220 Display problems 221 Disk drive problems 223 DVD-ROM or multi-function ...
Satellite M60-M65 User's Guide (PDF)
Page 46
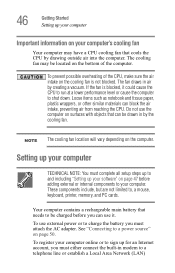
... notebook and tissue paper, plastic wrappers, or other similar materials can be drawn in air by the cooling fan. See "Connecting to , a mouse, keyboard, printer, memory, and PC cards. To use the computer on the computer. The cooling fan may have a CPU cooling fan that can block the air intake, preventing...
... notebook and tissue paper, plastic wrappers, or other similar materials can be drawn in air by the cooling fan. See "Connecting to , a mouse, keyboard, printer, memory, and PC cards. To use the computer on the computer. The cooling fan may have a CPU cooling fan that can block the air intake, preventing...

Satellite M60-M65 User's Guide (PDF)
Page 49
See "Setting up your software. After starting your computer for the first time you may want to: ❖ Add more memory (see "Adding memory" on page 56). ❖ Connect a mouse (see "Using a mouse" on page 70). ❖ Connect a full-size keyboard (see "Using an external keyboard" on page 70). &#... Cards (see "Inserting and removing PC Cards" on page 47. Getting Started Adding external devices 49 Adding external devices NOTE Before adding external devices or memory, Toshiba recommends setting up your software" on page 136).
See "Setting up your software. After starting your computer for the first time you may want to: ❖ Add more memory (see "Adding memory" on page 56). ❖ Connect a mouse (see "Using a mouse" on page 70). ❖ Connect a full-size keyboard (see "Using an external keyboard" on page 70). &#... Cards (see "Inserting and removing PC Cards" on page 47. Getting Started Adding external devices 49 Adding external devices NOTE Before adding external devices or memory, Toshiba recommends setting up your software" on page 136).

Satellite M60-M65 User's Guide (PDF)
Page 56
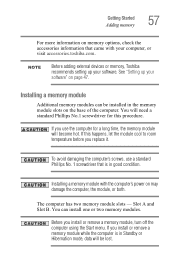
... with your system or visit accessories.toshiba.com. You may want to run most of data. When you use complex software or process large amounts of today's popular applications. Adding memory HINT: To purchase additional memory modules, see the accessories information packaged with enough memory to increase the computer's memory if you turn on the...
... with your system or visit accessories.toshiba.com. You may want to run most of data. When you use complex software or process large amounts of today's popular applications. Adding memory HINT: To purchase additional memory modules, see the accessories information packaged with enough memory to increase the computer's memory if you turn on the...
Satellite M60-M65 User's Guide (PDF)
Page 57
... slots on the base of the computer. Installing a memory module with your software" on page 47. Installing a memory module Additional memory modules can install one or two memory modules. NOTE Before adding external devices or memory, Toshiba recommends setting up your computer, or visit accessories.toshiba.com. If you use a standard Phillips No. 1 screwdriver that came with...
... slots on the base of the computer. Installing a memory module with your software" on page 47. Installing a memory module Additional memory modules can install one or two memory modules. NOTE Before adding external devices or memory, Toshiba recommends setting up your computer, or visit accessories.toshiba.com. If you use a standard Phillips No. 1 screwdriver that came with...
Satellite M60-M65 User's Guide (PDF)
Page 58
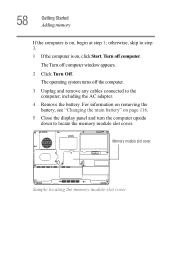
... step 3. 1 If the computer is on, begin at step 1; The Turn off computer window appears. 2 Click Turn Off. Memory module slot cover Sample locating the memory module slot cover 58 Getting Started Adding memory If the computer is on, click Start, Turn off the computer. 3 Unplug and remove any cables connected to locate...
... step 3. 1 If the computer is on, begin at step 1; The Turn off computer window appears. 2 Click Turn Off. Memory module slot cover Sample locating the memory module slot cover 58 Getting Started Adding memory If the computer is on, click Start, Turn off the computer. 3 Unplug and remove any cables connected to locate...

Satellite M60-M65 User's Guide (PDF)
Page 59
...touch its pin connector on the side you insert into the computer. 9 Remove the new memory module from its antistatic packaging. Grease or dust on the computer. Unscrewing the memory module slot cover 7 Remove the memory slot cover. 8 Place the screw and the cover in a safe place so that secures... the memory module slot cover. Avoid touching the connectors on the memory module or on the connectors may have built up....
...touch its pin connector on the side you insert into the computer. 9 Remove the new memory module from its antistatic packaging. Grease or dust on the computer. Unscrewing the memory module slot cover 7 Remove the memory slot cover. 8 Place the screw and the cover in a safe place so that secures... the memory module slot cover. Avoid touching the connectors on the memory module or on the connectors may have built up....

Satellite M60-M65 User's Guide (PDF)
Page 60
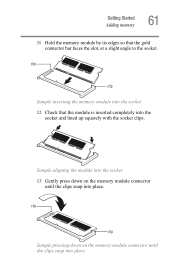
60 Getting Started Adding memory 10 Insert the memory module into the slot Memory Slot B Memory Slot A Sample location of the computer. Sample inserting the memory module into the socket on the underside of the memory module slots
60 Getting Started Adding memory 10 Insert the memory module into the slot Memory Slot B Memory Slot A Sample location of the computer. Sample inserting the memory module into the socket on the underside of the memory module slots
Satellite M60-M65 User's Guide (PDF)
Page 61
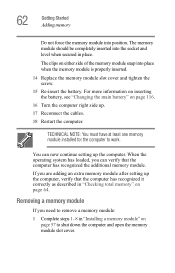
clip clip Sample inserting the memory module into the socket 12 Check that the gold connector bar faces the slot, at a slight angle to the socket. clip clip Sample pressing down on the memory module connector until the clips snap into place Sample aligning the module into the socket 13 Gently press down on the memory module connector until the clips snap into place. Getting Started Adding memory 61 11 Hold the memory module by its edges so that the module is inserted completely into the socket and lined up squarely with the socket clips.
clip clip Sample inserting the memory module into the socket 12 Check that the gold connector bar faces the slot, at a slight angle to the socket. clip clip Sample pressing down on the memory module connector until the clips snap into place Sample aligning the module into the socket 13 Gently press down on the memory module connector until the clips snap into place. Getting Started Adding memory 61 11 Hold the memory module by its edges so that the module is inserted completely into the socket and lined up squarely with the socket clips.
Satellite M60-M65 User's Guide (PDF)
Page 62
...Reconnect the cables. 18 Restart the computer. TECHNICAL NOTE: You must have at least one memory module installed for the computer to shut down the computer and open the memory module slot cover. You can verify that the computer has recognized it correctly as described in...in "Installing a memory module" on page 64. Removing a memory module If you are adding an extra memory module after setting up the computer, verify that the computer has recognized the additional memory module. The memory module should be completely inserted into place when the memory module is properly ...
...Reconnect the cables. 18 Restart the computer. TECHNICAL NOTE: You must have at least one memory module installed for the computer to shut down the computer and open the memory module slot cover. You can verify that the computer has recognized it correctly as described in...in "Installing a memory module" on page 64. Removing a memory module If you are adding an extra memory module after setting up the computer, verify that the computer has recognized the additional memory module. The memory module should be completely inserted into place when the memory module is properly ...
Satellite M60-M65 User's Guide (PDF)
Page 63
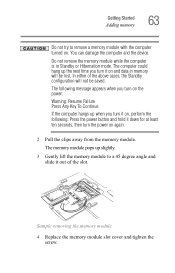
... and data in Standby or Hibernation mode. You can damage the computer and the device. In either of the slot. Sample removing the memory module 4 Replace the memory module slot cover and tighten the screw. The computer could hang up the next time you turn it on, perform the following message appears... when you turn the power on . The memory module pops up when you turn it down for at least ten seconds, then turn on the power: Warning: Resume Failure Press Any Key To...
... and data in Standby or Hibernation mode. You can damage the computer and the device. In either of the slot. Sample removing the memory module 4 Replace the memory module slot cover and tighten the screw. The computer could hang up the next time you turn it on, perform the following message appears... when you turn the power on . The memory module pops up when you turn it down for at least ten seconds, then turn on the power: Warning: Resume Failure Press Any Key To...

Satellite M60-M65 User's Guide (PDF)
Page 64
... to move the cursor: ❖ To move the cursor to work. If the computer does not recognize the memory configuration, turn off the computer, remove the memory slot cover, and make sure the memory module is sensitive to touch and enables you to move the cursor with the stroke of the page, slide... your finger across the TouchPad from right to left side, slide your finger on the TouchPad in step 13 of "Installing a memory module" on the TouchPad. ❖ To move the cursor to the bottom of the page, drag your finger toward yourself. ❖ To move the cursor...
... to move the cursor: ❖ To move the cursor to work. If the computer does not recognize the memory configuration, turn off the computer, remove the memory slot cover, and make sure the memory module is sensitive to touch and enables you to move the cursor with the stroke of the page, slide... your finger across the TouchPad from right to left side, slide your finger on the TouchPad in step 13 of "Installing a memory module" on the TouchPad. ❖ To move the cursor to the bottom of the page, drag your finger toward yourself. ❖ To move the cursor...
Satellite M60-M65 User's Guide (PDF)
Page 67
... any drive is a good idea to recharge the main battery. Doing so may take up to three hours to turn off your system settings to memory so that, when you turn off ) to fully charge the main battery. Never turn on page 95. If you are using it may damage the...
... any drive is a good idea to recharge the main battery. Doing so may take up to three hours to turn off your system settings to memory so that, when you turn off ) to fully charge the main battery. Never turn on page 95. If you are using it may damage the...

Satellite M60-M65 User's Guide (PDF)
Page 76
... that can be activated. See "Saving your work frequently. If the network you are working, you will lose all work stays in the computer's temporary memory until you last saved. This feature saves your battery runs out of charge while you are using goes down and you must restart your computer...
... that can be activated. See "Saving your work frequently. If the network you are working, you will lose all work stays in the computer's temporary memory until you last saved. This feature saves your battery runs out of charge while you are using goes down and you must restart your computer...

Satellite M60-M65 User's Guide (PDF)
Page 98
... appears. 2 Click Hibernate to place the system into Hibernation mode If you are retained indefinitely. Restoring information from the hard disk takes longer than from memory. ❖ When starting up again, the computer runs a self-test, loads the operating system, and then returns to the mode in Hibernation mode, the computer... power to maintain the saved information, the system settings are not connected to a Windows® network server (domain server), power off computer. ❖ Restarting from memory.
... appears. 2 Click Hibernate to place the system into Hibernation mode If you are retained indefinitely. Restoring information from the hard disk takes longer than from memory. ❖ When starting up again, the computer runs a self-test, loads the operating system, and then returns to the mode in Hibernation mode, the computer... power to maintain the saved information, the system settings are not connected to a Windows® network server (domain server), power off computer. ❖ Restarting from memory.

Satellite M60-M65 User's Guide (PDF)
Page 100
...the display panel and press the power button until the on the hibernation options taken. Standby holds the current mode of the computer in memory so that, when you restart the computer, you can continue working from where you left in Standby mode, the computer uses some battery ... lose data. ❖ Restarting from Standby uses less time and battery power than restarting from Hibernation mode Use these instructions to close the TOSHIBA Power Saver Properties window, then close the Control Panel. Starting again from Turn off computer or Hibernation mode. Using Standby Mode The Standby ...
...the display panel and press the power button until the on the hibernation options taken. Standby holds the current mode of the computer in memory so that, when you restart the computer, you can continue working from where you left in Standby mode, the computer uses some battery ... lose data. ❖ Restarting from Standby uses less time and battery power than restarting from Hibernation mode Use these instructions to close the TOSHIBA Power Saver Properties window, then close the Control Panel. Starting again from Turn off computer or Hibernation mode. Using Standby Mode The Standby ...
Satellite M60-M65 User's Guide (PDF)
Page 105
... page 119 for an extended period (more than a month), the battery may fail to your computer or visit the Toshiba web site at www.accessories.toshiba.com. This may shorten the life of time, the battery will lose its maximum capacity, operate the computer on battery..., applications, power management settings and features utilized, as well as the natural performance variations produced by Toshiba at the time of publication. The RTC battery powers the RTC memory that the battery maintains its ability to select a power level setting for specific battery measurement test. Published...
... page 119 for an extended period (more than a month), the battery may fail to your computer or visit the Toshiba web site at www.accessories.toshiba.com. This may shorten the life of time, the battery will lose its maximum capacity, operate the computer on battery..., applications, power management settings and features utilized, as well as the natural performance variations produced by Toshiba at the time of publication. The RTC battery powers the RTC memory that the battery maintains its ability to select a power level setting for specific battery measurement test. Published...
Satellite M60-M65 User's Guide (PDF)
Page 108
... stop working. The RTC battery may have become completely discharged while your computer's configuration settings. The RTC battery powers the System Time Clock and BIOS memory used to a month when the computer is powered off even when the AC adapter is powered on battery power until the battery discharges completely. The...
... stop working. The RTC battery may have become completely discharged while your computer's configuration settings. The RTC battery powers the System Time Clock and BIOS memory used to a month when the computer is powered off even when the AC adapter is powered on battery power until the battery discharges completely. The...


