User Guide
Page 7
... range 5.15 GHz to 5.25 GHz to reduce the potential for harmful interference to co-channel Mobile Satellite systems. High power radars are designed to its operation in the United States for more information. Radio Frequency Interference Requirements This... device is compliant to 5.85 GHz bands. Wireless Interoperability The TOSHIBA Wireless LAN Mini PCI Card products are allocated as defined by the Wi-Fi Alliance. The "Wi-Fi CERTIFIED" logo is jack...
... range 5.15 GHz to 5.25 GHz to reduce the potential for harmful interference to co-channel Mobile Satellite systems. High power radars are designed to its operation in the United States for more information. Radio Frequency Interference Requirements This... device is compliant to 5.85 GHz bands. Wireless Interoperability The TOSHIBA Wireless LAN Mini PCI Card products are allocated as defined by the Wi-Fi Alliance. The "Wi-Fi CERTIFIED" logo is jack...
User Guide
Page 143
... using amplified speakers, use the computer's volume control. To play back sound files through external speakers or headphones: 1 Locate the headphone jack on the computer. 2 Using any necessary adapters, plug the cable from the computer. To adjust the volume: ❖ For external ...from the headphones or external speakers into the headphone jack. Using the Web Camera (Available on each speaker. ❖ For headphones, use speakers that require an external power source. Depending on the software, click Start, All Programs, TOSHIBA, Utilities, and then Web Camera Application Help....
... using amplified speakers, use the computer's volume control. To play back sound files through external speakers or headphones: 1 Locate the headphone jack on the computer. 2 Using any necessary adapters, plug the cable from the computer. To adjust the volume: ❖ For external ...from the headphones or external speakers into the headphone jack. Using the Web Camera (Available on each speaker. ❖ For headphones, use speakers that require an external power source. Depending on the software, click Start, All Programs, TOSHIBA, Utilities, and then Web Camera Application Help....

User Manual
Page 30
DC IN 19V jack 2. User's Manual 1-5 the Battery and DC IN indicators on the right of the computer should glow. DC output plug Figure 1-3 Connecting the DC output plug ... the AC adaptor's DC output plug to the AC adaptor. Getting Started Figure 1-1 Connecting the power cord to the AC adaptor (2-pin plug) Figure 1-2 Connecting the power cord to the computer 3. Plug the power cord into a live wall outlet - Connect the power cord to the DC IN 19V jack on the front of the computer. 1 2 1. 1.
DC IN 19V jack 2. User's Manual 1-5 the Battery and DC IN indicators on the right of the computer should glow. DC output plug Figure 1-3 Connecting the DC output plug ... the AC adaptor's DC output plug to the AC adaptor. Getting Started Figure 1-1 Connecting the power cord to the AC adaptor (2-pin plug) Figure 1-2 Connecting the power cord to the computer 3. Plug the power cord into a live wall outlet - Connect the power cord to the DC IN 19V jack on the front of the computer. 1 2 1. 1.
User Manual
Page 43
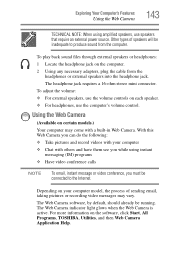
...objects can cause damage and fire, possibly resulting in support for details. ■ Do not connect any cable other than a LAN cable to a power supply. User's Manual 2-3 The port with a Gigabit Ethernet LAN (1000 megabits per second, 100BASE-TX). It could cause damage or malfunction. ■...; Do not connect the LAN cable to the LAN jack. Refer to a LAN. External monitor port This port provides 15-pin, analog VGA port. The Grand Tour LAN jack This jack lets you connect to Chapter 4, Operating Basics, for Ethernet LAN (10 megabits ...
...objects can cause damage and fire, possibly resulting in support for details. ■ Do not connect any cable other than a LAN cable to a power supply. User's Manual 2-3 The port with a Gigabit Ethernet LAN (1000 megabits per second, 100BASE-TX). It could cause damage or malfunction. ■...; Do not connect the LAN cable to the LAN jack. Refer to a LAN. External monitor port This port provides 15-pin, analog VGA port. The Grand Tour LAN jack This jack lets you connect to Chapter 4, Operating Basics, for Ethernet LAN (10 megabits ...
User Manual
Page 45
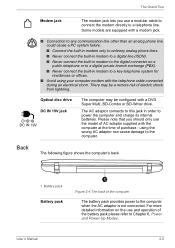
...■ Never connect the built-in order to a telephone line. The Grand Tour Back Modem jack The modem jack lets you should only use the model of AC adaptor supplied with the telephone cable connected during... an electrical storm. The following figure shows the computer's back. 1. Battery pack Battery pack 1 Figure 2-4 The back of the computer The battery pack provides power... 2-5 The AC adaptor connects to this jack in modem to Chapter 6, Power and Power-Up Modes.
...■ Never connect the built-in order to a telephone line. The Grand Tour Back Modem jack The modem jack lets you should only use the model of AC adaptor supplied with the telephone cable connected during... an electrical storm. The following figure shows the computer's back. 1. Battery pack Battery pack 1 Figure 2-4 The back of the computer The battery pack provides power... 2-5 The AC adaptor connects to this jack in modem to Chapter 6, Power and Power-Up Modes.

User Manual
Page 58
...User's Manual 3-5 Sound Sound system The integrated sound system provides support for more information regarding the LCD, please refer to be connected via the appropriate jacks. Hardware, Utilities and Options Vari-Bright™ Your model may include the AMD® Vari-Bright™ feature that can be used if the ...■ running under the conditions mentioned above, adjust the setting towards Maximize Quality or disable this control center, 1. This feature can save the computer's power consumption by optimizing picture contrast on the internal LCD. Select PowerPlay™ under...
...User's Manual 3-5 Sound Sound system The integrated sound system provides support for more information regarding the LCD, please refer to be connected via the appropriate jacks. Hardware, Utilities and Options Vari-Bright™ Your model may include the AMD® Vari-Bright™ feature that can be used if the ...■ running under the conditions mentioned above, adjust the setting towards Maximize Quality or disable this control center, 1. This feature can save the computer's power consumption by optimizing picture contrast on the internal LCD. Select PowerPlay™ under...

User Manual
Page 115
... possible to make a network connection to be configured for IEEE 802.11b/g or/and IEEE802.11n ■ Roaming over multiple channels ■ Card power management User's Manual 4-32 Operating Basics Disconnecting the modular cable To disconnect the modular cable, follow the steps as automatic doors or fire detectors. Wireless... ad hoc network function. Pinch the lever on the plug in the computer's modem jack and pull it out from within the connector. 2. Pinch the lever on the plug in the telephone jack and pull it out from within the computer. Radio waves may not be sure to...
... possible to make a network connection to be configured for IEEE 802.11b/g or/and IEEE802.11n ■ Roaming over multiple channels ■ Card power management User's Manual 4-32 Operating Basics Disconnecting the modular cable To disconnect the modular cable, follow the steps as automatic doors or fire detectors. Wireless... ad hoc network function. Pinch the lever on the plug in the computer's modem jack and pull it out from within the connector. 2. Pinch the lever on the plug in the telephone jack and pull it out from within the computer. Radio waves may not be sure to...

User Manual
Page 119
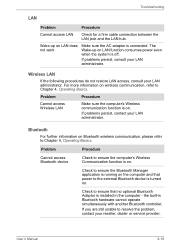
...with your LAN administrator and hardware or software vendor before connecting the LAN cable. Turn off the power to the computer and to all external devices connected to the LAN jack. Disconnecting the LAN cable To disconnect the LAN cable, follow the steps as detailed below : &#.... User's Manual 4-36 Otherwise, malfunctions or damage may occur. ■ Do not connect any power supplying device to the LAN cable that is accessing a LAN, the system may occur. 1. LAN jack 2. Disconnect the cable from the hub. LAN cable Figure 4-9 Connecting the LAN cable 3. Operating ...
...with your LAN administrator and hardware or software vendor before connecting the LAN cable. Turn off the power to the computer and to all external devices connected to the LAN jack. Disconnecting the LAN cable To disconnect the LAN cable, follow the steps as detailed below : &#.... User's Manual 4-36 Otherwise, malfunctions or damage may occur. ■ Do not connect any power supplying device to the LAN cable that is accessing a LAN, the system may occur. 1. LAN jack 2. Disconnect the cable from the hub. LAN cable Figure 4-9 Connecting the LAN cable 3. Operating ...
User Manual
Page 133
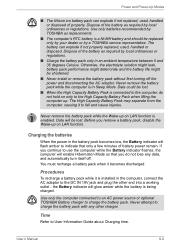
... shortened. ■ Never install or remove the battery pack without first turning off . Use only the computer connected to an AC power source or optional TOSHIBA Battery charger to User Information Guide about Charging time. User's Manual 6-5 Never remove the battery pack while the computer is enabled.... Never attempt to the DC IN 19V jack and plug the other charger. Data will flash amber to indicate that you remove a battery pack, disable the Wake-up on LAN function. Power and Power-Up Modes ■ The lithium ion battery pack can explode ...
... shortened. ■ Never install or remove the battery pack without first turning off . Use only the computer connected to an AC power source or optional TOSHIBA Battery charger to User Information Guide about Charging time. User's Manual 6-5 Never remove the battery pack while the computer is enabled.... Never attempt to the DC IN 19V jack and plug the other charger. Data will flash amber to indicate that you remove a battery pack, disable the Wake-up on LAN function. Power and Power-Up Modes ■ The lithium ion battery pack can explode ...
User Manual
Page 134
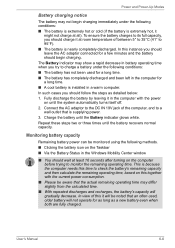
...the remaining operating time. Connect the AC adaptor to 95°F). ■ The battery is nearly completely discharged. User's Manual 6-6 Power and Power-Up Modes Battery charging notice The battery may not begin charging. Charge the battery until the battery recovers normal capacity. The Battery indicator ...should charge it at room temperature of between 5° to 35°C (41° to the DC IN 19V jack of this together with the power on until the system automatically turns itself off. 2. To ensure the battery charges to check the battery's remaining capacity and...
...the remaining operating time. Connect the AC adaptor to 95°F). ■ The battery is nearly completely discharged. User's Manual 6-6 Power and Power-Up Modes Battery charging notice The battery may not begin charging. Charge the battery until the battery recovers normal capacity. The Battery indicator ...should charge it at room temperature of between 5° to 35°C (41° to the DC IN 19V jack of this together with the power on until the system automatically turns itself off. 2. To ensure the battery charges to check the battery's remaining capacity and...
User Manual
Page 136
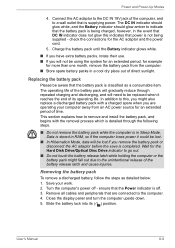
...display panel and turn the computer upside down. 5. This section explains how to a wall outlet that is off - Power and Power-Up Modes 4. Connect the AC adaptor to the DC IN 19V jack of the computer, and to remove and install the battery pack, and begins with a charged spare when you are... connected to the unintentional release of time. Turn the computer's power off . 3. check the connections for more than one month, ...
...display panel and turn the computer upside down. 5. This section explains how to a wall outlet that is off - Power and Power-Up Modes 4. Connect the AC adaptor to the DC IN 19V jack of the computer, and to remove and install the battery pack, and begins with a charged spare when you are... connected to the unintentional release of time. Turn the computer's power off . 3. check the connections for more than one month, ...
User Manual
Page 162
The Wake-up on . Bluetooth For further information on LAN function consumes power even when the system is off. Check to ensure that power to the external Bluetooth device is installed in Bluetooth hardware cannot operate simultaneously with another Bluetooth controller. If you are still unable to Chapter 4, Operating ... access, consult your LAN administrator. the built-in the computer - Troubleshooting LAN Problem Procedure Cannot access LAN Check for a firm cable connection between the LAN jack and the LAN hub.
The Wake-up on . Bluetooth For further information on LAN function consumes power even when the system is off. Check to ensure that power to the external Bluetooth device is installed in Bluetooth hardware cannot operate simultaneously with another Bluetooth controller. If you are still unable to Chapter 4, Operating ... access, consult your LAN administrator. the built-in the computer - Troubleshooting LAN Problem Procedure Cannot access LAN Check for a firm cable connection between the LAN jack and the LAN hub.

User Manual
Page 191
... DC IN 19V jack 2-5 ASCII characters 5-5 B Battery charging 6-5 extending life 6-7 indicator 2-10, 6-2 monitoring capacity 6-6 real time clock 3-3, 6-4 save mode 3-8 types 6-3 Battery pack 2-5, 3-2 replacing 6-8 BD drive problems 8-10 Bluetooth 3-6, 4-33 Bluetooth Stack for Windows by Toshiba 3-11 problems 8-...16 C CD/DVD/BD drive using 4-6 Cleaning the computer 4-37 Cooling vents 2-2 Corel Digital Studio for TOSHIBA 3-13 D DC IN indicator 2-10, 6-3 Display 3-4 automatic power off 3-7 brightness down 5-3 brightness up 5-3 controller B-1 hinges 2-9 opening 1-6 screen 2-8 Documentation list 1-1 ...
... DC IN 19V jack 2-5 ASCII characters 5-5 B Battery charging 6-5 extending life 6-7 indicator 2-10, 6-2 monitoring capacity 6-6 real time clock 3-3, 6-4 save mode 3-8 types 6-3 Battery pack 2-5, 3-2 replacing 6-8 BD drive problems 8-10 Bluetooth 3-6, 4-33 Bluetooth Stack for Windows by Toshiba 3-11 problems 8-...16 C CD/DVD/BD drive using 4-6 Cleaning the computer 4-37 Cooling vents 2-2 Corel Digital Studio for TOSHIBA 3-13 D DC IN indicator 2-10, 6-3 Display 3-4 automatic power off 3-7 brightness down 5-3 brightness up 5-3 controller B-1 hinges 2-9 opening 1-6 screen 2-8 Documentation list 1-1 ...
User Manual
Page 192
Satellite L750/L755/L750D/L755D/Satellite Pro L750/L750D FN + F7 (Brightness Up) 5-3 FN + F8 (Wireless) 5-4 FN + F9 (Touch Pad) 5-4 FN + space (Zoom) 5-4 Function keys 5-2 G Graphics controller 3-5 H Hard disk drive 3-3 automatic power off 3-7 Hard Disk Drive/Optical Disc Drive indicator 2-10 HDMI 3-25 Heat dispersal ...5-2 Hot keys 5-3 problems 8-7 typewriter keys 5-1 Windows special keys 5-5 L LAN 3-6, 4-35 cable types 4-35 connecting 4-36 disconnecting 4-36 jack 2-3 problems 8-18 M Media care 4-27 Card care 3-18 Memory card care 3-18 Memory 3-2 additional 3-29 installing 3-21 problems 8-15 ...
Satellite L750/L755/L750D/L755D/Satellite Pro L750/L750D FN + F7 (Brightness Up) 5-3 FN + F8 (Wireless) 5-4 FN + F9 (Touch Pad) 5-4 FN + space (Zoom) 5-4 Function keys 5-2 G Graphics controller 3-5 H Hard disk drive 3-3 automatic power off 3-7 Hard Disk Drive/Optical Disc Drive indicator 2-10 HDMI 3-25 Heat dispersal ...5-2 Hot keys 5-3 problems 8-7 typewriter keys 5-1 Windows special keys 5-5 L LAN 3-6, 4-35 cable types 4-35 connecting 4-36 disconnecting 4-36 jack 2-3 problems 8-18 M Media care 4-27 Card care 3-18 Memory card care 3-18 Memory 3-2 additional 3-29 installing 3-21 problems 8-15 ...
User Manual
Page 193
Satellite L750/L755/L750D/L755D/Satellite Pro L750/L750D Touch Pad 8-12 Power conditions 6-1 Hibernation Mode 1-10 indicators 6-2 panel on/off 3-8, 6-11 Shut Down mode (Boot Mode) 1-8 Sleep Mode 1-8 System Auto Off 6-11 turning off 1-8 turning on 1-7 Problems AC power 8-5 Additional memory module 8-15 Analyzing the problem 8-2 Battery 8-5 BD drive 8-10 Bluetooth 8-18 Dual Pointing device 8-12...
Satellite L750/L755/L750D/L755D/Satellite Pro L750/L750D Touch Pad 8-12 Power conditions 6-1 Hibernation Mode 1-10 indicators 6-2 panel on/off 3-8, 6-11 Shut Down mode (Boot Mode) 1-8 Sleep Mode 1-8 System Auto Off 6-11 turning off 1-8 turning on 1-7 Problems AC power 8-5 Additional memory module 8-15 Analyzing the problem 8-2 Battery 8-5 BD drive 8-10 Bluetooth 8-18 Dual Pointing device 8-12...


