User Manual
Page 2
... available. WHEN COPYING OR TRANSFERRING YOUR DATA, PLEASE BE SURE TO CONFIRM WHETHER THE DATA HAS BEEN SUCCESSFULLY COPIED OR TRANSFERRED. Model: Satellite® L550 Series Recordable and/or ReWritable Drive(s) and Associated Software Warranty The computer system you to lead, a chemical known to the...TO OR LOSS OF ANY BUSINESS, PROFITS, PROGRAMS, DATA, NETWORK SYSTEMS OR REMOVABLE STORAGE MEDIA ARISING OUT OF OR RESULTING FROM THE USE OF THE PRODUCT, EVEN IF ADVISED OF THE POSSIBILITY THEREOF. TOSHIBA DISCLAIMS ANY LIABILITY FOR THE FAILURE TO COPY OR TRANSFER THE DATA CORRECTLY....
... available. WHEN COPYING OR TRANSFERRING YOUR DATA, PLEASE BE SURE TO CONFIRM WHETHER THE DATA HAS BEEN SUCCESSFULLY COPIED OR TRANSFERRED. Model: Satellite® L550 Series Recordable and/or ReWritable Drive(s) and Associated Software Warranty The computer system you to lead, a chemical known to the...TO OR LOSS OF ANY BUSINESS, PROFITS, PROGRAMS, DATA, NETWORK SYSTEMS OR REMOVABLE STORAGE MEDIA ARISING OUT OF OR RESULTING FROM THE USE OF THE PRODUCT, EVEN IF ADVISED OF THE POSSIBILITY THEREOF. TOSHIBA DISCLAIMS ANY LIABILITY FOR THE FAILURE TO COPY OR TRANSFER THE DATA CORRECTLY....

User Manual
Page 31
Contents 31 Turning on the power 50 Setting up your software 51 Registering your computer with Toshiba 51 Adding optional external devices 51 Adding memory (optional 52 Installing a memory module 52 Removing a memory module 57 Checking total memory 59 Recovering the Internal Storage Drive 60 Recovering to out-of-box state (recommended recovery...
Contents 31 Turning on the power 50 Setting up your software 51 Registering your computer with Toshiba 51 Adding optional external devices 51 Adding memory (optional 52 Installing a memory module 52 Removing a memory module 57 Checking total memory 59 Recovering the Internal Storage Drive 60 Recovering to out-of-box state (recommended recovery...

User Manual
Page 32
... drive components 102 Media control buttons 103 Inserting an optical disc 103 Playing an audio CD 105 Playing optical media 105 Recording optical media 106 Removing a disc with the computer on...........106 Removing a disc with the computer off ..........107 Caring for optical discs 107 Toshiba's online resources 107
... drive components 102 Media control buttons 103 Inserting an optical disc 103 Playing an audio CD 105 Playing optical media 105 Recording optical media 106 Removing a disc with the computer on...........106 Removing a disc with the computer off ..........107 Caring for optical discs 107 Toshiba's online resources 107
User Manual
Page 33
Contents 33 Chapter 3: Mobile Computing 108 Toshiba's energy-saver design 108 Running the computer on battery power 109 Battery Notice 109 Power management 110 Using additional batteries 110 Charging batteries 110 Charging ... battery notifications 114 Conserving battery power 115 Power Plans 116 Using a hot key to set the Power Plan 117 Using the TOSHIBA eco power plan 118 Changing the main battery 118 Removing the battery from the computer .......119 Inserting a charged battery 120 Taking care of your battery 121 Safety precautions 121 Maintaining...
Contents 33 Chapter 3: Mobile Computing 108 Toshiba's energy-saver design 108 Running the computer on battery power 109 Battery Notice 109 Power management 110 Using additional batteries 110 Charging batteries 110 Charging ... battery notifications 114 Conserving battery power 115 Power Plans 116 Using a hot key to set the Power Plan 117 Using the TOSHIBA eco power plan 118 Changing the main battery 118 Removing the battery from the computer .......119 Inserting a charged battery 120 Taking care of your battery 121 Safety precautions 121 Maintaining...
User Manual
Page 34
...135 Using an ExpressCard 136 Inserting an ExpressCard 136 Removing an ExpressCard 136 Using the Memory card reader 137 Inserting memory media 138 Removing memory media 138 Using the eSATA/USB combo port 139 Chapter 5: Utilities 140 TOSHIBA Assist 141 Connect 142 Secure 143 Protect & ...Fix 144 Optimize 145 TOSHIBA Application Installer 146 Setting passwords 147 Using an instant ...
...135 Using an ExpressCard 136 Inserting an ExpressCard 136 Removing an ExpressCard 136 Using the Memory card reader 137 Inserting memory media 138 Removing memory media 138 Using the eSATA/USB combo port 139 Chapter 5: Utilities 140 TOSHIBA Assist 141 Connect 142 Secure 143 Protect & ...Fix 144 Optimize 145 TOSHIBA Application Installer 146 Setting passwords 147 Using an instant ...
User Manual
Page 43
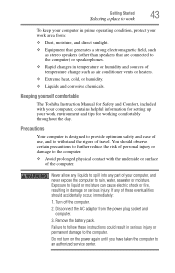
... computer is designed to provide optimum safety and ease of use, and to withstand the rigors of the computer. Exposure to an authorized service center. Remove the battery pack. Do not turn on the power again until you have taken the computer to liquid or moisture can cause electric shock or... to work To keep your computer in prime operating condition, protect your work area from the power plug socket and computer. 3. Keeping yourself comfortable The Toshiba Instruction Manual for Safety and Comfort, included with the underside or surface of travel.
... computer is designed to provide optimum safety and ease of use, and to withstand the rigors of the computer. Exposure to an authorized service center. Remove the battery pack. Do not turn on the power again until you have taken the computer to liquid or moisture can cause electric shock or... to work To keep your computer in prime operating condition, protect your work area from the power plug socket and computer. 3. Keeping yourself comfortable The Toshiba Instruction Manual for Safety and Comfort, included with the underside or surface of travel.
User Manual
Page 46
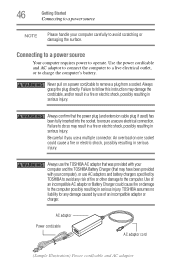
...to charge the computer's battery. Always grasp the plug directly. Failure to do so may have been provided with your computer and the TOSHIBA Battery Charger (that the power plug (and extension cable plug if used) has been fully inserted into the socket, to the computer ... injury. Always use a multiple connector. Use of fire or other damage to remove a plug from a socket. An overload on a power cord/cable to the computer. TOSHIBA assumes no liability for any damage caused by TOSHIBA to operate. Connecting to a power source Your computer requires power to avoid any...
...to charge the computer's battery. Always grasp the plug directly. Failure to do so may have been provided with your computer and the TOSHIBA Battery Charger (that the power plug (and extension cable plug if used) has been fully inserted into the socket, to the computer ... injury. Always use a multiple connector. Use of fire or other damage to remove a plug from a socket. An overload on a power cord/cable to the computer. TOSHIBA assumes no liability for any damage caused by TOSHIBA to operate. Connecting to a power source Your computer requires power to avoid any...
User Manual
Page 48
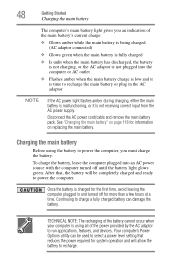
Disconnect the AC power cord/cable and remove the main battery pack. Continuing to charge a fully charged battery can be completely charged and ready to power the computer. Charging the main battery Before ...
Disconnect the AC power cord/cable and remove the main battery pack. Continuing to charge a fully charged battery can be completely charged and ready to power the computer. Charging the main battery Before ...
User Manual
Page 49
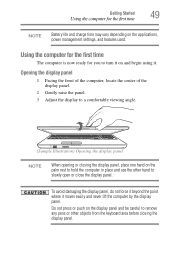
... display panel. To avoid damaging the display panel, do not force it beyond the point where it on the display panel and be careful to remove any pens or other hand to hold the computer in place and use the other objects from the keyboard area before closing the display panel...
... display panel. To avoid damaging the display panel, do not force it beyond the point where it on the display panel and be careful to remove any pens or other hand to hold the computer in place and use the other objects from the keyboard area before closing the display panel...
User Manual
Page 52
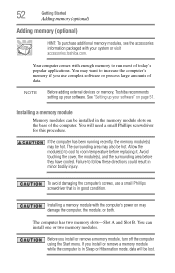
...the memory module slots on the base of today's popular applications. Installing a memory module with your software. Before you install or remove a memory module while the computer is in minor bodily injury. Failure to run most of the computer. The computer has two memory... slots-Slot A and Slot B. See "Setting up your system or visit accessories.toshiba.com. 52 Getting Started Adding memory (optional) Adding memory (optional) HINT: To purchase additional memory modules, see the accessories information packaged ...
...the memory module slots on the base of today's popular applications. Installing a memory module with your software. Before you install or remove a memory module while the computer is in minor bodily injury. Failure to run most of the computer. The computer has two memory... slots-Slot A and Slot B. See "Setting up your system or visit accessories.toshiba.com. 52 Getting Started Adding memory (optional) Adding memory (optional) HINT: To purchase additional memory modules, see the accessories information packaged ...
User Manual
Page 53
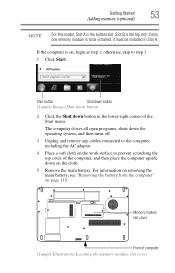
... cables connected to the computer, including the AC adaptor. 4 Place a soft cloth on the cloth. 5 Remove the main battery. For information on removing the main battery, see "Removing the battery from the computer" on , begin at step 1; The computer closes all open programs, shuts down on the work surface to step 3. 1 Click Start...
... cables connected to the computer, including the AC adaptor. 4 Place a soft cloth on the cloth. 5 Remove the main battery. For information on removing the main battery, see "Removing the battery from the computer" on , begin at step 1; The computer closes all open programs, shuts down on the work surface to step 3. 1 Click Start...
User Manual
Page 54
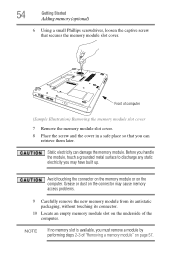
... module" on page 57. Avoid touching the connector on the memory module or on the underside of computer (Sample Illustration) Removing the memory module slot cover 7 Remove the memory module slot cover. 8 Place the screw and the cover in a safe place so that secures the memory module slot cover... or dust on the connector may have built up. NOTE If no memory slot is available, you may cause memory access problems. 9 Carefully remove the new memory module from its antistatic packaging, without touching its connector. 10 Locate an empty memory module slot on the computer. 54 Getting ...
... module" on page 57. Avoid touching the connector on the memory module or on the underside of computer (Sample Illustration) Removing the memory module slot cover 7 Remove the memory module slot cover. 8 Place the screw and the cover in a safe place so that secures the memory module slot cover... or dust on the connector may have built up. NOTE If no memory slot is available, you may cause memory access problems. 9 Carefully remove the new memory module from its antistatic packaging, without touching its connector. 10 Locate an empty memory module slot on the computer. 54 Getting ...
User Manual
Page 55
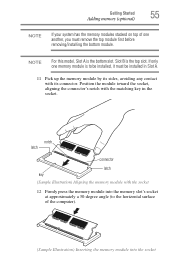
... module into the memory slot's socket at approximately a 30-degree angle (to the horizontal surface of one memory module is to be installed, it must remove the top module first before removing/installing the bottom module.
... module into the memory slot's socket at approximately a 30-degree angle (to the horizontal surface of one memory module is to be installed, it must remove the top module first before removing/installing the bottom module.
User Manual
Page 57
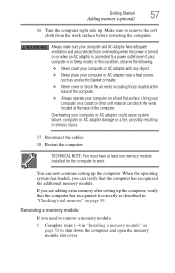
... AC adaptor have at the base of the computer. Using your computer is connected to a power outlet (even if your computer on page 52 to remove the soft cloth from overheating when the power is turned on or when an AC adaptor is in "Installing a memory module" on a carpet or ... cover or block the air vents including those located at least one memory module installed for the computer to work surface before restarting the computer. Removing a memory module If you can block the vents located at the base of the computer. ❖ Always operate your computer or AC adaptor near a heat...
... AC adaptor have at the base of the computer. Using your computer is connected to a power outlet (even if your computer on page 52 to remove the soft cloth from overheating when the power is turned on or when an AC adaptor is in "Installing a memory module" on a carpet or ... cover or block the air vents including those located at least one memory module installed for the computer to work surface before restarting the computer. Removing a memory module If you can block the vents located at the base of the computer. ❖ Always operate your computer or AC adaptor near a heat...
User Manual
Page 58
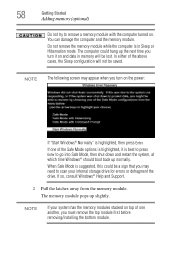
The computer could be a sign that you must remove the top module first before removing/installing the bottom module. If one another, you may appear when you turn ... is highlighted, then press Enter. NOTE If your internal storage drive for errors or defragment the drive. Do not remove the memory module while the computer is highlighted, it on . In either of the Safe Mode options is in ... away from the memory module. 58 Getting Started Adding memory (optional) Do not try to remove a memory module with the computer turned on and data in Sleep or Hibernation mode.
The computer could be a sign that you must remove the top module first before removing/installing the bottom module. If one another, you may appear when you turn ... is highlighted, then press Enter. NOTE If your internal storage drive for errors or defragment the drive. Do not remove the memory module while the computer is highlighted, it on . In either of the Safe Mode options is in ... away from the memory module. 58 Getting Started Adding memory (optional) Do not try to remove a memory module with the computer turned on and data in Sleep or Hibernation mode.
User Manual
Page 59
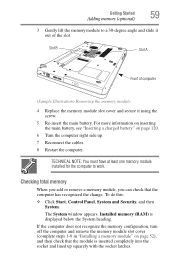
...lined up . 7 Reconnect the cables. 8 Restart the computer. If the computer does not recognize the memory configuration, turn off the computer and remove the memory module slot cover (complete steps 1-8 in "Installing a memory module" on page 120. 6 Turn the computer right side up squarely with...latches. Getting Started 59 Adding memory (optional) 3 Gently lift the memory module to work. Slot B Slot A Front of computer (Sample Illustration) Removing the memory module 4 Replace the memory module slot cover and secure it out of the slot. To do this: ❖ Click Start, Control ...
...lined up . 7 Reconnect the cables. 8 Restart the computer. If the computer does not recognize the memory configuration, turn off the computer and remove the memory module slot cover (complete steps 1-8 in "Installing a memory module" on page 120. 6 Turn the computer right side up squarely with...latches. Getting Started 59 Adding memory (optional) 3 Gently lift the memory module to work. Slot B Slot A Front of computer (Sample Illustration) Removing the memory module 4 Replace the memory module slot cover and secure it out of the slot. To do this: ❖ Click Start, Control ...
User Manual
Page 106
... viewing of specific format compatibilities. Do not press the eject button while the drive in-use the software, please refer to your Toshiba computer or optical drive. For more information regarding supported optical media formats please refer to the respective Online Help menus. For details ... with the computer on To remove an optical disc with an optical drive that bear the applicable logo, or play back or operate properly on other computers or optical media recorders. Additionally, certain optical media recorded on your Toshiba optical drive may not record on certain ...
... viewing of specific format compatibilities. Do not press the eject button while the drive in-use the software, please refer to your Toshiba computer or optical drive. For more information regarding supported optical media formats please refer to the respective Online Help menus. For details ... with the computer on To remove an optical disc with an optical drive that bear the applicable logo, or play back or operate properly on other computers or optical media recorders. Additionally, certain optical media recorded on your Toshiba optical drive may not record on certain ...
User Manual
Page 107
... and keep them from the center of the drive. For more information, see "Contacting Toshiba" on top of online sites to press the manual eject button. Learning the Basics Toshiba's online resources 107 Removing a disc with the computer off To remove a disc with future upgrades. Caring for optical discs ❖ Store your discs in...
... and keep them from the center of the drive. For more information, see "Contacting Toshiba" on top of online sites to press the manual eject button. Learning the Basics Toshiba's online resources 107 Removing a disc with the computer off To remove a disc with future upgrades. Caring for optical discs ❖ Store your discs in...
User Manual
Page 109
...periodically. The computer also has an internal real-time-clock (RTC) battery. Recharge time varies depending on battery power The computer contains a removable Lithium-Ion (Li-Ion) battery that stores your battery" on AC power. To purchase a new battery pack, see "Power Plans" ... is helpful to retain a charge. For more information about Windows® power plans, see the accessories information included with your Toshiba computer. Published battery life numbers are away from specifications depending on battery power at maximum capacity and will lose its maximum capacity,...
...periodically. The computer also has an internal real-time-clock (RTC) battery. Recharge time varies depending on battery power The computer contains a removable Lithium-Ion (Li-Ion) battery that stores your battery" on AC power. To purchase a new battery pack, see "Power Plans" ... is helpful to retain a charge. For more information about Windows® power plans, see the accessories information included with your Toshiba computer. Published battery life numbers are away from specifications depending on battery power at maximum capacity and will lose its maximum capacity,...
User Manual
Page 112
... light flashes amber during charging, either a battery pack is malfunctioning, or it charges while the computer is on. Disconnect the AC power cord/cable and remove the battery pack. 112 Mobile Computing Monitoring main battery power To recharge the RTC battery, plug the computer into the computer or AC outlet. NOTE...
... light flashes amber during charging, either a battery pack is malfunctioning, or it charges while the computer is on. Disconnect the AC power cord/cable and remove the battery pack. 112 Mobile Computing Monitoring main battery power To recharge the RTC battery, plug the computer into the computer or AC outlet. NOTE...


