User Manual
Page 25
... PRO are trademarks of MultiMediaCard Association. Other trademarks and trade names are owned by Toshiba is a registered trademark of the Wi-Fi Alliance. 25 Trademarks Satellite is a trademark of Personal Computer Memory Card International Association (PCMCIA). Microsoft, Windows and Windows Vista are trademarks or registered trademarks of Microsoft Corporation in the United States...
... PRO are trademarks of MultiMediaCard Association. Other trademarks and trade names are owned by Toshiba is a registered trademark of the Wi-Fi Alliance. 25 Trademarks Satellite is a trademark of Personal Computer Memory Card International Association (PCMCIA). Microsoft, Windows and Windows Vista are trademarks or registered trademarks of Microsoft Corporation in the United States...

User Manual
Page 27
Contents 27 Opening the display panel 44 Your computer's features and specifications ....45 Turning on the power 45 Adding memory (optional 46 Installing a memory module 47 Removing a memory module 51 Checking total memory 53 Using the TouchPad 54 Scrolling with the TouchPad 55 Control buttons 55 Disabling or enabling the TouchPad 55 Using external display...
Contents 27 Opening the display panel 44 Your computer's features and specifications ....45 Turning on the power 45 Adding memory (optional 46 Installing a memory module 47 Removing a memory module 51 Checking total memory 53 Using the TouchPad 54 Scrolling with the TouchPad 55 Control buttons 55 Disabling or enabling the TouchPad 55 Using external display...

User Manual
Page 30
... .........118 Using an ExpressCard 118 Inserting an ExpressCard 118 Removing an ExpressCard 119 Using the Bridge Media Adapter Slot 120 Inserting memory media 120 Removing memory media 121 Chapter 5: Toshiba Utilities 122 TOSHIBA Assist 123 Connect 124 Optimize 125 TOSHIBA SD™ Memory Card Format Utility .........126 Mouse Utility 127 CD/DVD Drive Acoustic Silencer 128...
... .........118 Using an ExpressCard 118 Inserting an ExpressCard 118 Removing an ExpressCard 119 Using the Bridge Media Adapter Slot 120 Inserting memory media 120 Removing memory media 121 Chapter 5: Toshiba Utilities 122 TOSHIBA Assist 123 Connect 124 Optimize 125 TOSHIBA SD™ Memory Card Format Utility .........126 Mouse Utility 127 CD/DVD Drive Acoustic Silencer 128...

User Manual
Page 39
.... Getting Started 39 Setting up your computer Setting up your computer TECHNICAL NOTE: You must attach the AC adaptor. See "Connecting to , a mouse, keyboard, printer, memory, and PC Cards.
.... Getting Started 39 Setting up your computer Setting up your computer TECHNICAL NOTE: You must attach the AC adaptor. See "Connecting to , a mouse, keyboard, printer, memory, and PC Cards.
User Manual
Page 40
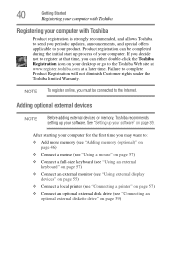
Product registration can either double-click the Toshiba Registration icon on your desktop or go to : ❖ Add more memory (see "Adding memory (optional)" on page 46) ❖ Connect a mouse (see "Using a mouse" on page 57) ❖ Connect a full-size ... optional external devices NOTE Before adding external devices or memory, Toshiba recommends setting up your software. 40 Getting Started Registering your computer with Toshiba Registering your computer with Toshiba Product registration is strongly recommended, and allows Toshiba to send you must be completed during the initial ...
Product registration can either double-click the Toshiba Registration icon on your desktop or go to : ❖ Add more memory (see "Adding memory (optional)" on page 46) ❖ Connect a mouse (see "Using a mouse" on page 57) ❖ Connect a full-size ... optional external devices NOTE Before adding external devices or memory, Toshiba recommends setting up your software. 40 Getting Started Registering your computer with Toshiba Registering your computer with Toshiba Product registration is strongly recommended, and allows Toshiba to send you must be completed during the initial ...

User Manual
Page 46
... power The preinstalled operating system will load automatically. NOTE Before adding external devices or memory, Toshiba recommends setting up your software. Adding memory (optional) HINT: To purchase additional memory modules, see the accessories information packaged with enough memory to increase the computer's memory if you turn on the computer for the first time, do not turn...
... power The preinstalled operating system will load automatically. NOTE Before adding external devices or memory, Toshiba recommends setting up your software. Adding memory (optional) HINT: To purchase additional memory modules, see the accessories information packaged with enough memory to increase the computer's memory if you turn on the computer for the first time, do not turn...

User Manual
Page 47
... to the lock button in minor bodily injury. The Shut Down menu appears. Getting Started 47 Adding memory (optional) Installing a memory module Memory modules can install one or two memory modules. Allow the module to cool to follow these directions could result in the lower-right corner of...You will be hot. Avoid touching the cover, the module, and the surrounding area before replacing it. Before you install or remove a memory module while the computer is in Sleep or Hibernation mode, data will need a small Phillips screwdriver for this procedure. To avoid damaging ...
... to the lock button in minor bodily injury. The Shut Down menu appears. Getting Started 47 Adding memory (optional) Installing a memory module Memory modules can install one or two memory modules. Allow the module to cool to follow these directions could result in the lower-right corner of...You will be hot. Avoid touching the cover, the module, and the surrounding area before replacing it. Before you install or remove a memory module while the computer is in Sleep or Hibernation mode, data will need a small Phillips screwdriver for this procedure. To avoid damaging ...

User Manual
Page 48
... slot cover 6 Using a small Phillips screwdriver, loosen the captive screw that secure the memory module slot cover. Memory module slot cover Front of computer (Sample Illustration) Removing the memory module slot cover For information on removing the main battery, see "Removing the battery from the computer" on page... turn the computer upside down to the computer, including the AC adaptor. 4 Remove the main battery. 48 Getting Started Adding memory (optional) 2 Click Shut Down. The operating system turns off the computer. 3 Unplug and remove any cables connected to locate the...
... slot cover 6 Using a small Phillips screwdriver, loosen the captive screw that secure the memory module slot cover. Memory module slot cover Front of computer (Sample Illustration) Removing the memory module slot cover For information on removing the main battery, see "Removing the battery from the computer" on page... turn the computer upside down to the computer, including the AC adaptor. 4 Remove the main battery. 48 Getting Started Adding memory (optional) 2 Click Shut Down. The operating system turns off the computer. 3 Unplug and remove any cables connected to locate the...

User Manual
Page 49
...without touching its connector. Grease or dust on the connector may have built up the memory module by its sides, avoiding any static electricity you can damage the memory module. NOTE If no memory slot is available, you must remove the top module first before removing/installing the ... module. 11 Pick up . Before you must remove a module by performing steps 2-3 of "Removing a memory module" on top of the computer. NOTE If your system has the memory modules stacked on page 51. Position the module toward the socket, aligning the connector's notch with the socket...
...without touching its connector. Grease or dust on the connector may have built up the memory module by its sides, avoiding any static electricity you can damage the memory module. NOTE If no memory slot is available, you must remove the top module first before removing/installing the ... module. 11 Pick up . Before you must remove a module by performing steps 2-3 of "Removing a memory module" on top of the computer. NOTE If your system has the memory modules stacked on page 51. Position the module toward the socket, aligning the connector's notch with the socket...

User Manual
Page 50
... into the socket 13 Once the module's connector is fully inserted into the socket, press downward on the memory module Do not force the memory module into place securely with the corresponding cutouts in place. These latches should be completely inserted into the latches at approximately a 30-degree angle... (to seat the module into the socket and level when secured in the side of the module. The memory module should "snap" into position. If the latches and cutouts do not line up correctly, repeat steps 12-13. 50 Getting Started Adding...
... into the socket 13 Once the module's connector is fully inserted into the socket, press downward on the memory module Do not force the memory module into place securely with the corresponding cutouts in place. These latches should be completely inserted into the latches at approximately a 30-degree angle... (to seat the module into the socket and level when secured in the side of the module. The memory module should "snap" into position. If the latches and cutouts do not line up correctly, repeat steps 12-13. 50 Getting Started Adding...

User Manual
Page 51
... has recognized the additional memory module. Getting Started 51 Adding memory (optional) Memory modules Front of computer (Sample Illustration) Inserting the memory module into the slot 14 Replace the memory module slot cover and secure it correctly as described in "Installing a memory module" on page 53... You must have at least one memory module installed for the computer to remove a memory module: 1 Complete steps 1-8 in "Checking total memory" on page 47 to shut down the computer and open the memory module slot cover. Removing a memory module If you can now continue setting...
... has recognized the additional memory module. Getting Started 51 Adding memory (optional) Memory modules Front of computer (Sample Illustration) Inserting the memory module into the slot 14 Replace the memory module slot cover and secure it correctly as described in "Installing a memory module" on page 53... You must have at least one memory module installed for the computer to remove a memory module: 1 Complete steps 1-8 in "Checking total memory" on page 47 to shut down the computer and open the memory module slot cover. Removing a memory module If you can now continue setting...

User Manual
Page 52
... The following screen may appear when you may need to scan your system has the memory modules stacked on . If one another, you turn on and data in Sleep or Hibernation mode. The memory module pops up the next time you must remove the top module first before removing/... so, consult Windows® Help and Support. 2 Pull the latches away from the memory module. You can damage the computer and the memory module. 52 Getting Started Adding memory (optional) Do not try to remove a memory module with the computer turned on top of one of the above cases, the Sleep configuration...
... The following screen may appear when you may need to scan your system has the memory modules stacked on . If one another, you turn on and data in Sleep or Hibernation mode. The memory module pops up the next time you must remove the top module first before removing/... so, consult Windows® Help and Support. 2 Pull the latches away from the memory module. You can damage the computer and the memory module. 52 Getting Started Adding memory (optional) Do not try to remove a memory module with the computer turned on top of one of the above cases, the Sleep configuration...
User Manual
Page 53
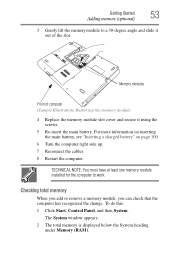
...Getting Started 53 Adding memory (optional) 3 Gently lift the memory module to work. Memory modules Front of computer (Sample Illustration) Removing the memory module 4 Replace the memory module slot cover and secure it out of the slot. Checking total memory When you add or remove a memory module, you can ...degree angle and slide it using the screws. 5 Re-insert the main battery. The System window appears. 2 The total memory is displayed below the System heading under Memory (RAM). For more information on inserting the main battery, see "Inserting a charged battery" on page 100. 6 Turn...
...Getting Started 53 Adding memory (optional) 3 Gently lift the memory module to work. Memory modules Front of computer (Sample Illustration) Removing the memory module 4 Replace the memory module slot cover and secure it out of the slot. Checking total memory When you add or remove a memory module, you can ...degree angle and slide it using the screws. 5 Re-insert the main battery. The System window appears. 2 The total memory is displayed below the System heading under Memory (RAM). For more information on inserting the main battery, see "Inserting a charged battery" on page 100. 6 Turn...

User Manual
Page 54
... with the socket latches. 54 Getting Started Using the TouchPad™ If the computer does not recognize the memory configuration, turn off the computer and remove the memory module slot cover (complete steps 1-8 in "Installing a memory module" on page 47), and then check that says, "Windows® needs your permission to continue." Using...
... with the socket latches. 54 Getting Started Using the TouchPad™ If the computer does not recognize the memory configuration, turn off the computer and remove the memory module slot cover (complete steps 1-8 in "Installing a memory module" on page 47), and then check that says, "Windows® needs your permission to continue." Using...

User Manual
Page 60
... have more main battery power than one option available for several days or if you must turn on again. ❖ Use the Sleep command to memory, so that when you turn off your files and make sure all open programs and files you were using. Each option has its advantages. ❖... desktop to save your computer in which you change your mind and decide to continue working after turning off your computer's internal hardware (such as memory).
... have more main battery power than one option available for several days or if you must turn on again. ❖ Use the Sleep command to memory, so that when you turn off your files and make sure all open programs and files you were using. Each option has its advantages. ❖... desktop to save your computer in which you change your mind and decide to continue working after turning off your computer's internal hardware (such as memory).

User Manual
Page 61
... the computer using Sleep, see "Using and configuring Hibernation mode" on page 66. Factors to consider when choosing Sleep: ❖ While in memory, you left off. Getting Started 61 Turning off the computer For information on how to use and configure Hibernation mode see "Using and configuring ...some main battery power. ❖ Because the state of time, the Windows® operating system may save your unsaved information will try to memory so that, when you restart the computer, you can continue working from where you power down the computer. Sleep mode The Sleep command ...
... the computer using Sleep, see "Using and configuring Hibernation mode" on page 66. Factors to consider when choosing Sleep: ❖ While in memory, you left off. Getting Started 61 Turning off the computer For information on how to use and configure Hibernation mode see "Using and configuring ...some main battery power. ❖ Because the state of time, the Windows® operating system may save your unsaved information will try to memory so that, when you restart the computer, you can continue working from where you power down the computer. Sleep mode The Sleep command ...

User Manual
Page 67
To use any of these methods, you first need to the memory, turns off the display, and enters into a low-power mode. Configuring Sleep mode options You can also specify an amount of all open programs and ...
To use any of these methods, you first need to the memory, turns off the display, and enters into a low-power mode. Configuring Sleep mode options You can also specify an amount of all open programs and ...
User Manual
Page 71
... computer to reconnect, or your file to the disk. See "Saving your software documentation for further information. See your work stays in the computer's temporary memory until you will lose all work frequently. Your work " on page 78 for details. 71 Chapter 2 Learning the Basics This chapter gives some computing tips...
... computer to reconnect, or your file to the disk. See "Saving your software documentation for further information. See your work stays in the computer's temporary memory until you will lose all work frequently. Your work " on page 78 for details. 71 Chapter 2 Learning the Basics This chapter gives some computing tips...
User Manual
Page 89
...and date information. The LithiumIon battery has no memory effect so it is recommended that shipped with your system), for an extended period (more information about Windows® power plans, see "Maintaining your computer or visit the Toshiba Web site at least once a month. Please... depending on product model, configuration, applications, power management settings and features utilized, as well as the natural performance variations produced by Toshiba at maximum capacity and will need to be inaccurate. However, for procedures. The computer also has an internal real-time-clock (...
...and date information. The LithiumIon battery has no memory effect so it is recommended that shipped with your system), for an extended period (more information about Windows® power plans, see "Maintaining your computer or visit the Toshiba Web site at least once a month. Please... depending on product model, configuration, applications, power management settings and features utilized, as well as the natural performance variations produced by Toshiba at maximum capacity and will need to be inaccurate. However, for procedures. The computer also has an internal real-time-clock (...

User Manual
Page 91
... under the following error message during startup: BAD RTC BATTERY BAD CHECKSUM (CMOS) CHECK SYSTEM The RTC battery powers the System Time Clock and BIOS memory used to select a power level setting that reduces the power required for up to recharge. Mobile Computing 91 Charging batteries Charging the main battery To...
... under the following error message during startup: BAD RTC BATTERY BAD CHECKSUM (CMOS) CHECK SYSTEM The RTC battery powers the System Time Clock and BIOS memory used to select a power level setting that reduces the power required for up to recharge. Mobile Computing 91 Charging batteries Charging the main battery To...


