User Guide
Page 22
... Using the computer for the first time 43 Setting up your software 44 Registering your computer with Toshiba 44 Adding optional external devices 44 Adding memory (optional 45 Installing a memory module 45 Removing a memory module 50 Checking total memory 53 Recovering the Internal Storage Drive 53 Recovering to out-of-box state (recommended recovery method...
... Using the computer for the first time 43 Setting up your software 44 Registering your computer with Toshiba 44 Adding optional external devices 44 Adding memory (optional 45 Installing a memory module 45 Removing a memory module 50 Checking total memory 53 Recovering the Internal Storage Drive 53 Recovering to out-of-box state (recommended recovery method...
User Guide
Page 24
24 Contents Chapter 3: Mobile Computing 92 Toshiba's energy-saver design 92 Running the computer on battery power 92 Battery Notice 93 Power management 94 Charging the main battery 94 Charging the RTC ... your computer to a network .........112 Exploring audio features 112 Recording sounds 112 Using external speakers or headphones..........113 Using the Web Camera 113 Using the Memory card reader 114 Inserting memory media 114 Removing memory media 115
24 Contents Chapter 3: Mobile Computing 92 Toshiba's energy-saver design 92 Running the computer on battery power 92 Battery Notice 93 Power management 94 Charging the main battery 94 Charging the RTC ... your computer to a network .........112 Exploring audio features 112 Recording sounds 112 Using external speakers or headphones..........113 Using the Web Camera 113 Using the Memory card reader 114 Inserting memory media 114 Removing memory media 115

User Guide
Page 25
... Setting passwords 123 Using a supervisor password 123 Using a user password 125 Deleting a user password 125 TOSHIBA Face Recognition Utility 126 TOSHIBA PC Diagnostic Tool Utility 127 Mouse Utility 128 TOSHIBA Hardware Setup 129 TOSHIBA Sleep Utility 130 Starting the TOSHIBA Sleep Utility 130 USB Sleep and Charge 130 Enabling/Disabling USB Sleep and Charge......132... fix problems 139 Internet problems 140 The Windows® operating system can help you 140 Fixing a problem with Device Manager 141 Checking device properties 141 Memory problems 142
... Setting passwords 123 Using a supervisor password 123 Using a user password 125 Deleting a user password 125 TOSHIBA Face Recognition Utility 126 TOSHIBA PC Diagnostic Tool Utility 127 Mouse Utility 128 TOSHIBA Hardware Setup 129 TOSHIBA Sleep Utility 130 Starting the TOSHIBA Sleep Utility 130 USB Sleep and Charge 130 Enabling/Disabling USB Sleep and Charge......132... fix problems 139 Internet problems 140 The Windows® operating system can help you 140 Fixing a problem with Device Manager 141 Checking device properties 141 Memory problems 142
User Guide
Page 40
... your computer Setting up your computer TECHNICAL NOTE: You must attach the AC adaptor. NOTE Please handle your computer carefully to , a mouse, keyboard, printer, and memory. Failure to ensure a secure electrical connection. These components include, but are not limited to avoid scratching or damaging the surface.
... your computer Setting up your computer TECHNICAL NOTE: You must attach the AC adaptor. NOTE Please handle your computer carefully to , a mouse, keyboard, printer, and memory. Failure to ensure a secure electrical connection. These components include, but are not limited to avoid scratching or damaging the surface.
User Guide
Page 44
... page 44. NOTE To register online, an Internet connection is strongly recommended, and allows Toshiba to your software. Adding optional external devices NOTE Before adding external devices or memory, Toshiba recommends setting up your product. Registering your computer with Toshiba Setting up your computer for the first time, do not turn on your computer...
... page 44. NOTE To register online, an Internet connection is strongly recommended, and allows Toshiba to your software. Adding optional external devices NOTE Before adding external devices or memory, Toshiba recommends setting up your product. Registering your computer with Toshiba Setting up your computer for the first time, do not turn on your computer...
User Guide
Page 45
...Before adding external devices or memory, Toshiba recommends setting up your software" on page 44. You will be hot. Getting Started 45 Adding memory (optional) Adding memory (optional) HINT: To purchase additional memory modules, see the accessories information packaged with enough memory to run most of ...can be hot. See "Setting up your system or visit accessories.toshiba.com. Failure to increase the computer's memory if you use a Phillips screwdriver of the computer. If you install or remove a memory module, turn off the computer using the Start menu. Avoid ...
...Before adding external devices or memory, Toshiba recommends setting up your software" on page 44. You will be hot. Getting Started 45 Adding memory (optional) Adding memory (optional) HINT: To purchase additional memory modules, see the accessories information packaged with enough memory to run most of ...can be hot. See "Setting up your system or visit accessories.toshiba.com. Failure to increase the computer's memory if you use a Phillips screwdriver of the computer. If you install or remove a memory module, turn off the computer using the Start menu. Avoid ...
User Guide
Page 46
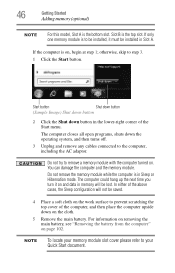
... 1; If the computer is the bottom slot. otherwise, skip to the computer, including the AC adaptor. You can damage the computer and the memory module. In either of the above cases, the Sleep configuration will be installed in the lower-right corner of the computer, and then place the... the operating system, and then turns off. 3 Unplug and remove any cables connected to step 3. 1 Click the Start button. Do not remove the memory module while the computer is to prevent scratching the top cover of the Start menu. Start button Shut down button (Sample Image) Shut down button...
... 1; If the computer is the bottom slot. otherwise, skip to the computer, including the AC adaptor. You can damage the computer and the memory module. In either of the above cases, the Sleep configuration will be installed in the lower-right corner of the computer, and then place the... the operating system, and then turns off. 3 Unplug and remove any cables connected to step 3. 1 Click the Start button. Do not remove the memory module while the computer is to prevent scratching the top cover of the Start menu. Start button Shut down button (Sample Image) Shut down button...
User Guide
Page 47
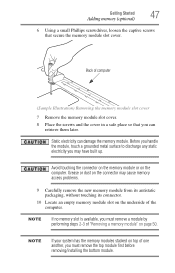
...memory access problems. 9 Carefully remove the new memory module from its antistatic packaging, without touching its connector. 10 Locate an empty memory module slot on the underside of "Removing a memory module" on top of computer (Sample Illustration) Removing the memory module slot cover 7 Remove the memory...performing steps 2-3 of the computer. NOTE If no memory slot is available, you must remove the top module first before removing/installing the bottom module. Grease or dust on the computer. Getting Started 47 Adding memory (optional) 6 Using a small Phillips screwdriver, ...
...memory access problems. 9 Carefully remove the new memory module from its antistatic packaging, without touching its connector. 10 Locate an empty memory module slot on the underside of "Removing a memory module" on top of computer (Sample Illustration) Removing the memory module slot cover 7 Remove the memory...performing steps 2-3 of the computer. NOTE If no memory slot is available, you must remove the top module first before removing/installing the bottom module. Grease or dust on the computer. Getting Started 47 Adding memory (optional) 6 Using a small Phillips screwdriver, ...
User Guide
Page 48
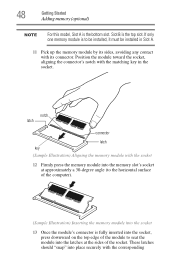
...socket, aligning the connector's notch with the socket 12 Firmly press the memory module into the memory slot's socket at approximately a 30-degree angle (to the horizontal surface of the computer). (Sample Illustration) Inserting the memory module into the socket 13 Once the module's connector is to seat the...into the latches at the sides of the socket. notch latch connector latch key (Sample Illustration) Aligning the memory module with the matching key in Slot A. 11 Pick up the memory module by its connector. These latches should "snap" into the socket, press downward on the top edge...
...socket, aligning the connector's notch with the socket 12 Firmly press the memory module into the memory slot's socket at approximately a 30-degree angle (to the horizontal surface of the computer). (Sample Illustration) Inserting the memory module into the socket 13 Once the module's connector is to seat the...into the latches at the sides of the socket. notch latch connector latch key (Sample Illustration) Aligning the memory module with the matching key in Slot A. 11 Pick up the memory module by its connector. These latches should "snap" into the socket, press downward on the top edge...
User Guide
Page 49
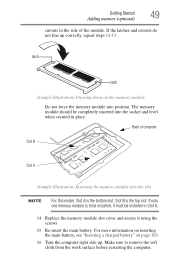
... the work surface before restarting the computer. Back of the module. Getting Started 49 Adding memory (optional) cutouts in place. Slot B is the bottom slot. The memory module should be installed in Slot A. 14 Replace the memory module slot cover and secure it must be completely inserted into position. For more information on... into the socket and level when secured in the side of computer Slot B Slot A (Sample Illustration) Inserting the memory module into the slot NOTE For this model, Slot A is the top slot. If the latches and cutouts do not line up . Make sure to ...
... the work surface before restarting the computer. Back of the module. Getting Started 49 Adding memory (optional) cutouts in place. Slot B is the bottom slot. The memory module should be installed in Slot A. 14 Replace the memory module slot cover and secure it must be completely inserted into position. For more information on... into the socket and level when secured in the side of computer Slot B Slot A (Sample Illustration) Inserting the memory module into the slot NOTE For this model, Slot A is the top slot. If the latches and cutouts do not line up . Make sure to ...
User Guide
Page 50
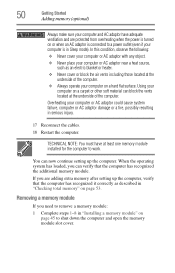
... the cables. 18 Restart the computer. You can now continue setting up the computer, verify that the computer has recognized the additional memory module. When the operating system has loaded, you can block the vents located at the underside of the computer. ❖ Always operate...surface. Overheating your computer or AC adaptor could cause system failure, computer or AC adaptor damage or a fire, possibly resulting in "Checking total memory" on a carpet or other soft material can verify that the computer has recognized it correctly as an electric blanket or heater. ❖ ...
... the cables. 18 Restart the computer. You can now continue setting up the computer, verify that the computer has recognized the additional memory module. When the operating system has loaded, you can block the vents located at the underside of the computer. ❖ Always operate...surface. Overheating your computer or AC adaptor could cause system failure, computer or AC adaptor damage or a fire, possibly resulting in "Checking total memory" on a carpet or other soft material can verify that the computer has recognized it correctly as an electric blanket or heater. ❖ ...
User Guide
Page 51
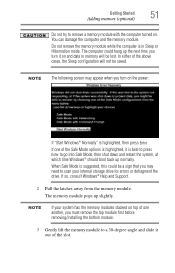
... configuration will be lost. If one another, you must remove the top module first before removing/installing the bottom module. 3 Gently lift the memory module to a 30-degree angle and slide it on top of one of the slot. NOTE If your internal storage drive for errors or ... be a sign that you may appear when you turn on . Do not remove the memory module while the computer is highlighted, then press Enter. Getting Started 51 Adding memory (optional) Do not try to remove a memory module with the computer turned on the power: If "Start Windows® Normally" is...
... configuration will be lost. If one another, you must remove the top module first before removing/installing the bottom module. 3 Gently lift the memory module to a 30-degree angle and slide it on top of one of the slot. NOTE If your internal storage drive for errors or ... be a sign that you may appear when you turn on . Do not remove the memory module while the computer is highlighted, then press Enter. Getting Started 51 Adding memory (optional) Do not try to remove a memory module with the computer turned on the power: If "Start Windows® Normally" is...
User Guide
Page 52
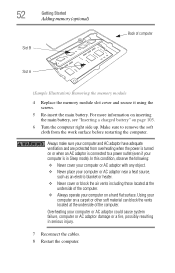
...10070; Never cover or block the air vents including those located at the underside of computer Slot A (Sample Illustration) Removing the memory module 4 Replace the memory module slot cover and secure it using the screws. 5 Re-insert the main battery. In this condition, observe the following: &#... the soft cloth from overheating when the power is in serious injury. 7 Reconnect the cables. 8 Restart the computer. 52 Getting Started Adding memory (optional) Slot B Back of the computer. Using your computer or AC adaptor could cause system failure, computer or AC adaptor damage or ...
...10070; Never cover or block the air vents including those located at the underside of computer Slot A (Sample Illustration) Removing the memory module 4 Replace the memory module slot cover and secure it using the screws. 5 Re-insert the main battery. In this condition, observe the following: &#... the soft cloth from overheating when the power is in serious injury. 7 Reconnect the cables. 8 Restart the computer. 52 Getting Started Adding memory (optional) Slot B Back of the computer. Using your computer or AC adaptor could cause system failure, computer or AC adaptor damage or ...
User Guide
Page 53
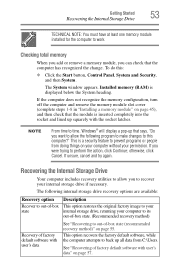
... state Description This option restores the original factory image to your internal storage drive, returning your permission. Checking total memory When you add or remove a memory module, you can check that says, "Do you want to allow you were trying to work. The System window...to back up squarely with the socket latches. If the computer does not recognize the memory configuration, turn off the computer and remove the memory module slot cover (complete steps 1-8 in "Installing a memory module" on page 55. Getting Started 53 Recovering the Internal Storage Drive TECHNICAL NOTE...
... state Description This option restores the original factory image to your internal storage drive, returning your permission. Checking total memory When you add or remove a memory module, you can check that says, "Do you want to allow you were trying to work. The System window...to back up squarely with the socket latches. If the computer does not recognize the memory configuration, turn off the computer and remove the memory module slot cover (complete steps 1-8 in "Installing a memory module" on page 55. Getting Started 53 Recovering the Internal Storage Drive TECHNICAL NOTE...
User Guide
Page 81
... last saved. This feature saves your battery runs out of charge while you are working, you will lose all work stays in the computer's temporary memory until you save feature that can be activated. Chapter 2 Learning the Basics This chapter gives some computing tips and provides important information about basic features...
... last saved. This feature saves your battery runs out of charge while you are working, you will lose all work stays in the computer's temporary memory until you save feature that can be activated. Chapter 2 Learning the Basics This chapter gives some computing tips and provides important information about basic features...

User Guide
Page 93
...if applicable to fully discharge the battery periodically. The battery life rating is only achieved on the select models and configurations tested by Toshiba under any individual user. After a period of the battery meter, it is helpful to your system), for an extended period (more...retain a charge. It maintains this information for all batteries. The RTC battery powers the RTC memory that will be replaced. Please see the accessories information included with your Toshiba computer. This may fail to let the battery fully discharge each time. Actual battery life ...
...if applicable to fully discharge the battery periodically. The battery life rating is only achieved on the select models and configurations tested by Toshiba under any individual user. After a period of the battery meter, it is helpful to your system), for an extended period (more...retain a charge. It maintains this information for all batteries. The RTC battery powers the RTC memory that will be replaced. Please see the accessories information included with your Toshiba computer. This may fail to let the battery fully discharge each time. Actual battery life ...
User Guide
Page 95
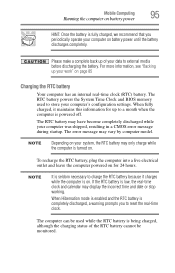
The computer can be monitored. The RTC battery powers the System Time Clock and BIOS memory used while the RTC battery is on. When Hibernation mode is enabled and the RTC battery is completely discharged, a warning prompts you periodically operate your ...
The computer can be monitored. The RTC battery powers the System Time Clock and BIOS memory used while the RTC battery is on. When Hibernation mode is enabled and the RTC battery is completely discharged, a warning prompts you periodically operate your ...
User Guide
Page 114
... media devices. 1 Turn the media so that appears above, click on your Quick Start document. 114 Exploring Your Computer's Features Using the Memory card reader NOTE To email, instant message or video conference, you must be used with a variety of digital products: digital music players, cellular... phones, PDAs, digital cameras, digital video camcorders, etc. The Web Camera indicator light glows when the Web Camera is required. The Memory card reader may vary. These media can be connected to another, use a micro or mini SD™ Card, an SD™ adapter ...
... media devices. 1 Turn the media so that appears above, click on your Quick Start document. 114 Exploring Your Computer's Features Using the Memory card reader NOTE To email, instant message or video conference, you must be used with a variety of digital products: digital music players, cellular... phones, PDAs, digital cameras, digital video camcorders, etc. The Web Camera indicator light glows when the Web Camera is required. The Memory card reader may vary. These media can be connected to another, use a micro or mini SD™ Card, an SD™ adapter ...
User Guide
Page 115
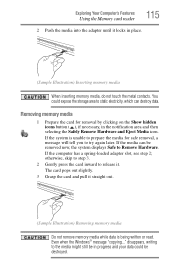
...2; Even when the Windows® message "copying..." Exploring Your Computer's Features Using the Memory card reader 115 2 Push the media into the adapter until it straight out. (Sample Illustration) Removing memory media Do not remove memory media while data is unable to try again later. You could be removed now, the... system displays Safe to release it. Removing memory media 1 Prepare the card for safe removal, a message will tell you to prepare the media for removal by clicking on the Show hidden icons button...
...2; Even when the Windows® message "copying..." Exploring Your Computer's Features Using the Memory card reader 115 2 Push the media into the adapter until it straight out. (Sample Illustration) Removing memory media Do not remove memory media while data is unable to try again later. You could be removed now, the... system displays Safe to release it. Removing memory media 1 Prepare the card for safe removal, a message will tell you to prepare the media for removal by clicking on the Show hidden icons button...

User Guide
Page 137
... blinking. Windows did not shut down . For more information see "What to the computer. Leave the battery out of time. Data stored in the computer's memory has been lost . Data stored in Sleep mode for several hours. Turn the computer on, insert the battery, and then leave the computer running on...
... blinking. Windows did not shut down . For more information see "What to the computer. Leave the battery out of time. Data stored in the computer's memory has been lost . Data stored in Sleep mode for several hours. Turn the computer on, insert the battery, and then leave the computer running on...


