
Toshiba Online User's Guide for Satellite A200/A205
Page 29
... Windows® Explorer ...91 Starting a program using the Start Search field 92 Saving your work 92 Printing your work 94 Backing up your work 95 Restoring your work 95 Using the optical drive 96 Optical drive components 96 Media control buttons 97 Inserting a compact disc 98 Playing an audio CD 99...
... Windows® Explorer ...91 Starting a program using the Start Search field 92 Saving your work 92 Printing your work 94 Backing up your work 95 Restoring your work 95 Using the optical drive 96 Optical drive components 96 Media control buttons 97 Inserting a compact disc 98 Playing an audio CD 99...

Toshiba Online User's Guide for Satellite A200/A205
Page 63
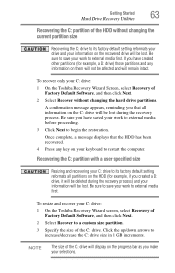
...a D: drive) those partitions and any key on your work to restart the computer. To recover only your C: drive: 1 On the Toshiba Recovery Wizard Screen, select Recovery of Factory Default Software, and then click Next. 2 Select Recover without changing the current partition size Recovering the... proceeding. 3 Click Next to its factory default setting reformats your drive and your C: drive to begin the restoration. If you make your C: drive: 1 On the Toshiba Recovery Wizard screen, select Recovery of Factory Default Software, and then click Next. 2 Select Recover to increase/...
...a D: drive) those partitions and any key on your work to restart the computer. To recover only your C: drive: 1 On the Toshiba Recovery Wizard Screen, select Recovery of Factory Default Software, and then click Next. 2 Select Recover without changing the current partition size Recovering the... proceeding. 3 Click Next to its factory default setting reformats your drive and your C: drive to begin the restoration. If you make your C: drive: 1 On the Toshiba Recovery Wizard screen, select Recovery of Factory Default Software, and then click Next. 2 Select Recover to increase/...
Toshiba Online User's Guide for Satellite A200/A205
Page 64
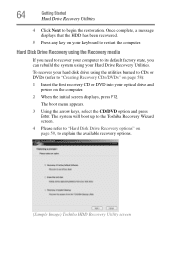
... the CD/DVD option and press Enter. To recover your hard disk drive using the utilities burned to CDs or DVDs (refer to begin the restoration. 64 Getting Started Hard Drive Recovery Utilities 4 Click Next to "Creating Recovery CDs/DVDs" on page 58): 1 Insert the first recovery CD or...2 When the initial screen displays, press F12. Hard Disk Drive Recovery using your Hard Drive Recovery Utilities. The system will boot up to the Toshiba Recovery Wizard screen. 4 Please refer to "Hard Disk Drive Recovery options" on your computer to explain the available recovery options. (Sample Image...
... the CD/DVD option and press Enter. To recover your hard disk drive using the utilities burned to CDs or DVDs (refer to begin the restoration. 64 Getting Started Hard Drive Recovery Utilities 4 Click Next to "Creating Recovery CDs/DVDs" on page 58): 1 Insert the first recovery CD or...2 When the initial screen displays, press F12. Hard Disk Drive Recovery using your Hard Drive Recovery Utilities. The system will boot up to the Toshiba Recovery Wizard screen. 4 Please refer to "Hard Disk Drive Recovery options" on your computer to explain the available recovery options. (Sample Image...
Toshiba Online User's Guide for Satellite A200/A205
Page 65
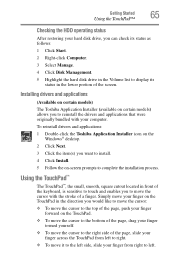
.... 4 Click Disk Management. 5 Highlight the hard disk drive in the Volume list to complete the installation process. To reinstall drivers and applications: 1 Double-click the Toshiba Application Installer icon on the Windows® desktop. 2 Click Next. 3 Click the item(s) you want to install. 4 Click Install. 5 Follow the on certain models... that were originally bundled with the stroke of the screen. Getting Started 65 Using the TouchPad™ Checking the HDD operating status After restoring your hard disk drive, you can check its status in the lower portion of a finger.
.... 4 Click Disk Management. 5 Highlight the hard disk drive in the Volume list to complete the installation process. To reinstall drivers and applications: 1 Double-click the Toshiba Application Installer icon on the Windows® desktop. 2 Click Next. 3 Click the item(s) you want to install. 4 Click Install. 5 Follow the on certain models... that were originally bundled with the stroke of the screen. Getting Started 65 Using the TouchPad™ Checking the HDD operating status After restoring your hard disk drive, you can check its status in the lower portion of a finger.
Toshiba Online User's Guide for Satellite A200/A205
Page 95
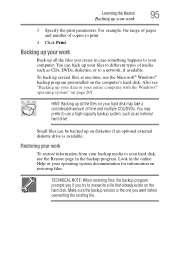
...considerable amount of time and multiple CDs/DVDs. Look in the backup program. Small files can back up your work To restore information from your backup media to use the Restore page in the online Help or your work 3 Specify the print parameters. Backing up your hard disk may prefer to ...174; operating system" on your files to different types of copies to a network, if available. Also see "Backing up all the files on page 201. Restoring your work Back up your data or your hard disk, use a high-capacity backup system, such as CDs, DVDs, diskettes, or to print. 4 Click...
...considerable amount of time and multiple CDs/DVDs. Look in the backup program. Small files can back up your work To restore information from your backup media to use the Restore page in the online Help or your work 3 Specify the print parameters. Backing up your hard disk may prefer to ...174; operating system" on your files to different types of copies to a network, if available. Also see "Backing up all the files on page 201. Restoring your work Back up your data or your hard disk, use a high-capacity backup system, such as CDs, DVDs, diskettes, or to print. 4 Click...

Toshiba Online User's Guide for Satellite A200/A205
Page 179
... of the address with Command Prompt ❖ Enable Boot Logging ❖ Enable low-resolution video (640x480) ❖ Last Known Good Configuration (advanced) ❖ Directory Services Restore Mode ❖ Debugging Mode ❖ Disable automatic restart on system failure ❖ Disable Driver Signature Enforcement ❖ Start Windows® normally When you bookmarked yesterday...
... of the address with Command Prompt ❖ Enable Boot Logging ❖ Enable low-resolution video (640x480) ❖ Last Known Good Configuration (advanced) ❖ Directory Services Restore Mode ❖ Debugging Mode ❖ Disable automatic restart on system failure ❖ Disable Driver Signature Enforcement ❖ Start Windows® normally When you bookmarked yesterday...
Toshiba Online User's Guide for Satellite A200/A205
Page 199
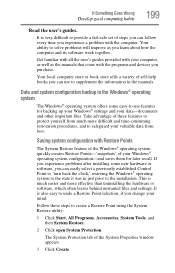
...with the programs and devices you can easily select a previously established Control Point to 'turn back the clock,' restoring the Windows® operating system to undo a Restore Point selection, if you learn about how the computer and its software work together. Follow these features to safeguard ...your Windows® settings and your mind. Take advantage of your valuable data from much easier and more difficult and time-consuming restoration procedures, and to protect yourself from loss. The System Protection tab of steps you can follow every time you can use features...
...with the programs and devices you can easily select a previously established Control Point to 'turn back the clock,' restoring the Windows® operating system to undo a Restore Point selection, if you learn about how the computer and its software work together. Follow these features to safeguard ...your Windows® settings and your mind. Take advantage of your valuable data from much easier and more difficult and time-consuming restoration procedures, and to protect yourself from loss. The System Protection tab of steps you can follow every time you can use features...

Toshiba Online User's Guide for Satellite A200/A205
Page 200
...this: 1 Click Start, All Programs, Accessories, System Tools, and then System Restore. 2 Click Next. 3 A list of previously created Restore Points displays, showing the timestamp and description of the selected Restore Point. 5 Verify that the Restore Point you want to use, and then click Next. 200 If Something Goes ... 4. 6 Close all programs and save all open files. 7 Click Finish, and then Yes to begin the system restore. 8 Your Windows® operating system configuration will now be restored to the state it was in the future, such as "Before installing Brand X Accounting app." Other...
...this: 1 Click Start, All Programs, Accessories, System Tools, and then System Restore. 2 Click Next. 3 A list of previously created Restore Points displays, showing the timestamp and description of the selected Restore Point. 5 Verify that the Restore Point you want to use, and then click Next. 200 If Something Goes ... 4. 6 Close all programs and save all open files. 7 Click Finish, and then Yes to begin the system restore. 8 Your Windows® operating system configuration will now be restored to the state it was in the future, such as "Before installing Brand X Accounting app." Other...

Toshiba Online User's Guide for Satellite A200/A205
Page 201
... up computer. An external hard drive is recommended in the drive. 2 Click Start. 3 Click Control Panel. 4 Click System and Maintenance. 5 Click Backup and Restore Center. 6 You can write to (or 'burn') as well as read from CDs. Most of your data. NOTE If you choose to back up your... before continuing. 1 Prepare your backup target by connecting it , the next most valuable component of the CD and DVD drives built into recent Toshiba portable computer models can choose to back up some files or the entire computer. For more help to complete your backup. If Something Goes Wrong...
... up computer. An external hard drive is recommended in the drive. 2 Click Start. 3 Click Control Panel. 4 Click System and Maintenance. 5 Click Backup and Restore Center. 6 You can write to (or 'burn') as well as read from CDs. Most of your data. NOTE If you choose to back up your... before continuing. 1 Prepare your backup target by connecting it , the next most valuable component of the CD and DVD drives built into recent Toshiba portable computer models can choose to back up some files or the entire computer. For more help to complete your backup. If Something Goes Wrong...

Toshiba Online User's Guide for Satellite A200/A205
Page 202
... instructions that the installation process introduced. ❖ Back up your critical data (see the section titled Restore Points). It is connected first, it may be able to easily restore the Windows® operating system to the state it much easier to determine the origin of any new... problems. For best results, follow this sequence: 1 Back up anything , use the System Restore utility to set a Restore Point (see "Backing up your data or your computer system, install just one item of hardware or software. 4 Restart the Windows®...
... instructions that the installation process introduced. ❖ Back up your critical data (see the section titled Restore Points). It is connected first, it may be able to easily restore the Windows® operating system to the state it much easier to determine the origin of any new... problems. For best results, follow this sequence: 1 Back up anything , use the System Restore utility to set a Restore Point (see "Backing up your data or your computer system, install just one item of hardware or software. 4 Restart the Windows®...
Toshiba Online User's Guide for Satellite A200/A205
Page 240
... drive connecting 73 external display, adjusting 71 F FAT (File Allocation Table) 187 file extensions 94 file, backing up 86 files backing up 95 printing 94 restoring 95 saving 92 fingerprint authentication 160 enrollment 160 Fn keys 88 function keys 88 H hardware conflicts 180 resolving 181 headphones using 132 Help and Support...
... drive connecting 73 external display, adjusting 71 F FAT (File Allocation Table) 187 file extensions 94 file, backing up 86 files backing up 95 printing 94 restoring 95 saving 92 fingerprint authentication 160 enrollment 160 Fn keys 88 function keys 88 H hardware conflicts 180 resolving 181 headphones using 132 Help and Support...
Toshiba Online User's Guide for Tecra A9
Page 29
... Windows® Explorer ...92 Starting a program using the Start Search field 93 Saving your work 93 Printing your work 95 Backing up your work 96 Restoring your work 96 Using the optical drive 97 Optical drive components 97 Media control buttons 98 Inserting a compact disc 99 Playing an audio CD 100...
... Windows® Explorer ...92 Starting a program using the Start Search field 93 Saving your work 93 Printing your work 95 Backing up your work 96 Restoring your work 96 Using the optical drive 97 Optical drive components 97 Media control buttons 98 Inserting a compact disc 99 Playing an audio CD 100...
Toshiba Online User's Guide for Tecra A9
Page 63
...Be sure you have created other partitions (for example, if you have saved your selections. To resize and recover your C: drive: 1 On the Toshiba Recovery Wizard screen, select Recovery of Factory Default Software, and then click Next. 2 Select Recover to a custom size partition. 3 Specify the size... of the HDD without changing the hard drive partitions. To recover only your work to begin the restoration. Be sure to save your information will be affected and will not be lost during the recovery process) and your work to restart...
...Be sure you have created other partitions (for example, if you have saved your selections. To resize and recover your C: drive: 1 On the Toshiba Recovery Wizard screen, select Recovery of Factory Default Software, and then click Next. 2 Select Recover to a custom size partition. 3 Specify the size... of the HDD without changing the hard drive partitions. To recover only your work to begin the restoration. Be sure to save your information will be affected and will not be lost during the recovery process) and your work to restart...

Toshiba Online User's Guide for Tecra A9
Page 64
The system will boot up to the Toshiba Recovery Wizard screen. 4 Please refer to "Hard Disk Drive Recovery options" on page 59, to restart the computer. Once... Getting Started Hard Drive Recovery Utilities 4 Click Next to its default factory state, you need to recover your computer to begin the restoration. To recover your hard disk drive using the utilities burned to CDs or DVDs (refer to "Creating Recovery CDs/DVDs" on page...or DVD into your optical drive and power on your keyboard to explain the available recovery options. (Sample Image) Toshiba HDD Recovery Utility screen
The system will boot up to the Toshiba Recovery Wizard screen. 4 Please refer to "Hard Disk Drive Recovery options" on page 59, to restart the computer. Once... Getting Started Hard Drive Recovery Utilities 4 Click Next to its default factory state, you need to recover your computer to begin the restoration. To recover your hard disk drive using the utilities burned to CDs or DVDs (refer to "Creating Recovery CDs/DVDs" on page...or DVD into your optical drive and power on your keyboard to explain the available recovery options. (Sample Image) Toshiba HDD Recovery Utility screen

Toshiba Online User's Guide for Tecra A9
Page 65
Getting Started 65 Using the TouchPad™ Checking the HDD operating status After restoring your hard disk drive, you can check its status as follows: 1 Click Start. 2 Right-click Computer. 3 Select Manage. 4 Click Disk Management. 5 Highlight the hard ...you to reinstall the drivers and applications that were originally bundled with the stroke of a finger. Installing drivers and applications (Available on certain models) The TOSHIBA Application Installer (available on the TouchPad. ❖ To move the cursor to the top of the page, push your finger forward on certain models) allows...
Getting Started 65 Using the TouchPad™ Checking the HDD operating status After restoring your hard disk drive, you can check its status as follows: 1 Click Start. 2 Right-click Computer. 3 Select Manage. 4 Click Disk Management. 5 Highlight the hard ...you to reinstall the drivers and applications that were originally bundled with the stroke of a finger. Installing drivers and applications (Available on certain models) The TOSHIBA Application Installer (available on the TouchPad. ❖ To move the cursor to the top of the page, push your finger forward on certain models) allows...

Toshiba Online User's Guide for Tecra A9
Page 96
... drive is the one time, use a high-capacity backup system, such as CDs, DVDs, diskettes, or to a network, if available. Backing up your work To restore information from your backup media to your hard disk may prefer to different types of media such as an external hard drive. HINT: Backing up... all the files on your hard disk, use the Restore page in the backup program. Look in case something happens to your files to use the Microsoft® Windows® backup program preinstalled on the...
... drive is the one time, use a high-capacity backup system, such as CDs, DVDs, diskettes, or to a network, if available. Backing up your work To restore information from your backup media to your hard disk may prefer to different types of media such as an external hard drive. HINT: Backing up... all the files on your hard disk, use the Restore page in the backup program. Look in case something happens to your files to use the Microsoft® Windows® backup program preinstalled on the...

Toshiba Online User's Guide for Tecra A9
Page 179
... of the address with Command Prompt ❖ Enable Boot Logging ❖ Enable low-resolution video (640x480) ❖ Last Known Good Configuration (advanced) ❖ Directory Services Restore Mode ❖ Debugging Mode ❖ Disable automatic restart on system failure ❖ Disable Driver Signature Enforcement ❖ Start Windows® normally When you bookmarked yesterday...
... of the address with Command Prompt ❖ Enable Boot Logging ❖ Enable low-resolution video (640x480) ❖ Last Known Good Configuration (advanced) ❖ Directory Services Restore Mode ❖ Debugging Mode ❖ Disable automatic restart on system failure ❖ Disable Driver Signature Enforcement ❖ Start Windows® normally When you bookmarked yesterday...

Toshiba Online User's Guide for Tecra A9
Page 200
...leaves behind unwanted files and settings. Get familiar with all the user's guides provided with Restore Points The System Restore feature of the Windows® operating system quickly creates Restore Points-'snapshots' of the System Properties window appears. 3 Click Create. This is very ... installation. Your ability to supplement the information in just prior to create a Restore Point using the System Restore utility: 1 Click Start, All Programs, Accessories, System Tools, and then System Restore. 2 Click open System Protection. Data and system configuration backup in the Windows...
...leaves behind unwanted files and settings. Get familiar with all the user's guides provided with Restore Points The System Restore feature of the Windows® operating system quickly creates Restore Points-'snapshots' of the System Properties window appears. 3 Click Create. This is very ... installation. Your ability to supplement the information in just prior to create a Restore Point using the System Restore utility: 1 Click Start, All Programs, Accessories, System Tools, and then System Restore. 2 Click open System Protection. Data and system configuration backup in the Windows...

Toshiba Online User's Guide for Tecra A9
Page 201
...this: 1 Click Start, All Programs, Accessories, System Tools, and then System Restore. 2 Click Next. 3 A list of previously created Restore Points displays, showing the timestamp and description of the selected Restore Point. 5 Verify that the restore point was created, and then the computer will be easily understood in when the ... was successfully created. 6 Click OK. If it is the correct one. The utility displays the timestamp and description of each Restore Point. Then, at a later time, you selected is not, click Back to return to step 4. 6 Close all programs and save all open...
...this: 1 Click Start, All Programs, Accessories, System Tools, and then System Restore. 2 Click Next. 3 A list of previously created Restore Points displays, showing the timestamp and description of the selected Restore Point. 5 Verify that the restore point was created, and then the computer will be easily understood in when the ... was successfully created. 6 Click OK. If it is the correct one. The utility displays the timestamp and description of each Restore Point. Then, at a later time, you selected is not, click Back to return to step 4. 6 Close all programs and save all open...
Toshiba Online User's Guide for Tecra A9
Page 202
...your data. No additional software is recommended in the drive. 2 Click Start. 3 Click Control Panel. 4 Click System and Maintenance. 5 Click Backup and Restore Center. 6 You can choose to back up your computer or just your computer or files to CDs, DVDs, or a hard drive: NOTE You can ...adaptor before continuing. 1 Prepare your backup target by connecting it , the next most valuable component of the CD and DVD drives built into recent Toshiba portable computer models can not back up ." Fortunately, the Windows® operating system offers a convenient way to (or 'burn') as well as...
...your data. No additional software is recommended in the drive. 2 Click Start. 3 Click Control Panel. 4 Click System and Maintenance. 5 Click Backup and Restore Center. 6 You can choose to back up your computer or just your computer or files to CDs, DVDs, or a hard drive: NOTE You can ...adaptor before continuing. 1 Prepare your backup target by connecting it , the next most valuable component of the CD and DVD drives built into recent Toshiba portable computer models can not back up ." Fortunately, the Windows® operating system offers a convenient way to (or 'burn') as well as...


