

User Manual
Page 48
... operating system turns off the computer using the Start menu. You can be hot. The Shut Down menu appears. otherwise, skip to step 3. 1 Click Start, and then click the arrow next to room temperature before they have cooled. Allow the module to cool to the lock button in the memory module slots on , begin at step 1; 48 Getting Started Adding memory (optional) Installing a memory module Additional memory modules can install one or two memory modules...
... operating system turns off the computer using the Start menu. You can be hot. The Shut Down menu appears. otherwise, skip to step 3. 1 Click Start, and then click the arrow next to room temperature before they have cooled. Allow the module to cool to the lock button in the memory module slots on , begin at step 1; 48 Getting Started Adding memory (optional) Installing a memory module Additional memory modules can install one or two memory modules...

User Manual
Page 54
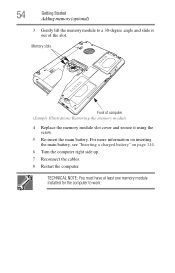
Memory slots Front of the slot. TECHNICAL NOTE: You must have at least one memory module installed for the computer to a 30-degree angle and slide it out of computer (Sample Illustration) Removing the memory module 4 Replace the memory module slot cover and secure it using the screw. 5 Re-insert the main battery. 54 Getting Started Adding memory (optional) 3 Gently lift the memory module to work. For more information on inserting the main battery, see "Inserting a charged battery" on page 106. 6 Turn the computer right side up. 7 Reconnect the cables. 8 Restart the computer.
Memory slots Front of the slot. TECHNICAL NOTE: You must have at least one memory module installed for the computer to a 30-degree angle and slide it out of computer (Sample Illustration) Removing the memory module 4 Replace the memory module slot cover and secure it using the screw. 5 Re-insert the main battery. 54 Getting Started Adding memory (optional) 3 Gently lift the memory module to work. For more information on inserting the main battery, see "Inserting a charged battery" on page 106. 6 Turn the computer right side up. 7 Reconnect the cables. 8 Restart the computer.
User Manual
Page 59
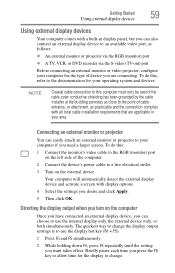
... time for your computer if you need a larger screen. To do this : 1 Connect the monitor's video cable to the RGB (monitor) port on the left side of device you are applicable in display panel, but you can also connect an external display device to an available video port, as practicable and the connection complies with display options. 4 Select the settings you press the F5 key to use the display hot key (Fn + F5): 1 Press Fn and...
... time for your computer if you need a larger screen. To do this : 1 Connect the monitor's video cable to the RGB (monitor) port on the left side of device you are applicable in display panel, but you can also connect an external display device to an available video port, as practicable and the connection complies with display options. 4 Select the settings you press the F5 key to use the display hot key (Fn + F5): 1 Press Fn and...

User Manual
Page 136
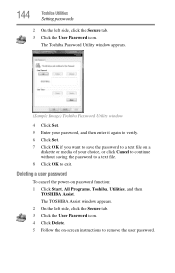
... the Secure tab. 3 Click the User Password icon. Deleting a user password To cancel the power-on password function: 1 Click Start, All Programs, Toshiba, Utilities, and then TOSHIBA Assist. The Toshiba Password Utility window appears. (Sample Image) Toshiba Password Utility window 4 Click Set. 5 Enter your password, and then enter it again to verify. 6 Click Set. 7 Click OK if you want to save the password to a text file on a diskette or media of your choice, or click Cancel...
... the Secure tab. 3 Click the User Password icon. Deleting a user password To cancel the power-on password function: 1 Click Start, All Programs, Toshiba, Utilities, and then TOSHIBA Assist. The Toshiba Password Utility window appears. (Sample Image) Toshiba Password Utility window 4 Click Set. 5 Enter your password, and then enter it again to verify. 6 Click Set. 7 Click OK if you want to save the password to a text file on a diskette or media of your choice, or click Cancel...
User Manual
Page 162
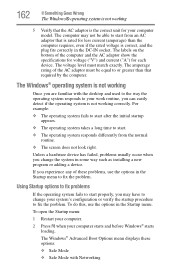
... installing a new program or adding a device. To open the Startup menu: 1 Restart your computer. 2 Press F8 when your computer model. The voltage level must be able to or greater than the computer requires, even if the rated voltage is not working correctly. The Windows® operating system is not working Once you are familiar with Networking Using Startup options to fix problems If the operating system fails to start...
... installing a new program or adding a device. To open the Startup menu: 1 Restart your computer. 2 Press F8 when your computer model. The voltage level must be able to or greater than the computer requires, even if the rated voltage is not working correctly. The Windows® operating system is not working Once you are familiar with Networking Using Startup options to fix problems If the operating system fails to start...
User Manual
Page 166
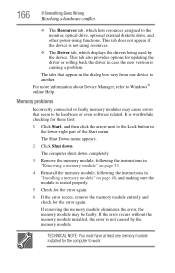
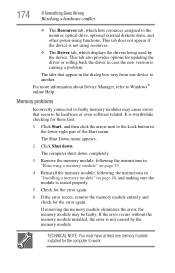
... more information about Device Manager, refer to the Lock button in the lower-right part of the Start menu. 166 If Something Goes Wrong Resolving a hardware conflict ❖ The Resources tab, which lists resources assigned to the monitor, optical drive, optional external diskette drive, and other power-using resources. ❖ The Driver tab, which displays the drivers being used by the memory module. This tab also provides options for the error again. The computer...
... more information about Device Manager, refer to the Lock button in the lower-right part of the Start menu. 166 If Something Goes Wrong Resolving a hardware conflict ❖ The Resources tab, which lists resources assigned to the monitor, optical drive, optional external diskette drive, and other power-using resources. ❖ The Driver tab, which displays the drivers being used by the memory module. This tab also provides options for the error again. The computer...
User Manual
Page 214
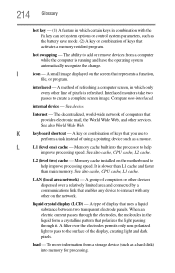
hot swapping - Memory cache installed on the motherboard to interact with the Fn key can set system options or control system parameters, such as the battery save mode. (2) A key or combination of using a pointing device such as a hard disk) into the processor to the surface of the display, creating light and dark pixels. It is slower than L1 cache and faster than main memory. liquid crystal display (LCD) - I icon - A key or combination of...
hot swapping - Memory cache installed on the motherboard to interact with the Fn key can set system options or control system parameters, such as the battery save mode. (2) A key or combination of using a pointing device such as a hard disk) into the processor to the surface of the display, creating light and dark pixels. It is slower than L1 cache and faster than main memory. liquid crystal display (LCD) - I icon - A key or combination of...

User Manual
Page 221
... files/trouble accessing a disk 171 running slow 171 diskette drive cannot insert a diskette 172 cannot read a diskette 172 connecting 62 external, connecting 62 display does not look normal/flickers 169 external monitor not working 170 screen is blank 169 display device external 59 display output settings 59 display, external adjusting 60 disposal information 25 disposing of used batteries 109 double-click 56 DVD creating 91 DVD player general problems 179 DVD, using 86 E environment computer-friendly 37 error messages device driver...
... files/trouble accessing a disk 171 running slow 171 diskette drive cannot insert a diskette 172 cannot read a diskette 172 connecting 62 external, connecting 62 display does not look normal/flickers 169 external monitor not working 170 screen is blank 169 display device external 59 display output settings 59 display, external adjusting 60 disposal information 25 disposing of used batteries 109 double-click 56 DVD creating 91 DVD player general problems 179 DVD, using 86 E environment computer-friendly 37 error messages device driver...

User Manual
Page 223
..., external 60 keyboard, full-size 77 L lock computer, using 74 M main battery removing 104 memory adding 47 problem solving 166 removing expansion slot cover 49 memory module inserting 50 installation 48 removing 54 microphone 121 modem connecting to telephone line 115 determining COM port 114 resetting port to default settings 114 upgrading 114 monitor 59 connecting 59 not working 169 mouse installing 60 serial 60 mouse utility 138 N network accessing 116 Dial-Up Networking Wizard 116 networking wireless 118 Notification Area 113 O opening the display panel 45 optical drive troubleshooting...
..., external 60 keyboard, full-size 77 L lock computer, using 74 M main battery removing 104 memory adding 47 problem solving 166 removing expansion slot cover 49 memory module inserting 50 installation 48 removing 54 microphone 121 modem connecting to telephone line 115 determining COM port 114 resetting port to default settings 114 upgrading 114 monitor 59 connecting 59 not working 169 mouse installing 60 serial 60 mouse utility 138 N network accessing 116 Dial-Up Networking Wizard 116 networking wireless 118 Notification Area 113 O opening the display panel 45 optical drive troubleshooting...
User Manual
Page 224
... Device Manager 165 disk drive is slow 171 display is blank 169 external display not working 170 external monitor 169 faulty memory 166 hardware conflict 164 high-pitched noise 174 Internet bookmarked site not found 163 Internet connection is slow 163 keyboard not responding 160 missing files/trouble accessing a disk 171 no sound 173 non-system disk or disk error 161 PC Card 174 checklist 174 error occurs 175 hot swapping fails 175 not recognized 175 slot...
... Device Manager 165 disk drive is slow 171 display is blank 169 external display not working 170 external monitor 169 faulty memory 166 hardware conflict 164 high-pitched noise 174 Internet bookmarked site not found 163 Internet connection is slow 163 keyboard not responding 160 missing files/trouble accessing a disk 171 no sound 173 non-system disk or disk error 161 PC Card 174 checklist 174 error occurs 175 hot swapping fails 175 not recognized 175 slot...

User Guide 3
Page 48
... has two memory slots-Slot A and Slot B. The surrounding area may be hot. The Shut Down menu appears. If you install or remove a memory module, turn off the computer. The operating system turns off the computer using the Start menu. 48 Getting Started Adding memory (optional) Installing a memory module Additional memory modules can install one or two memory modules. Allow the module to cool to follow these directions could result in good condition. Installing a memory module with the computer's power on , begin...
... has two memory slots-Slot A and Slot B. The surrounding area may be hot. The Shut Down menu appears. If you install or remove a memory module, turn off the computer. The operating system turns off the computer using the Start menu. 48 Getting Started Adding memory (optional) Installing a memory module Additional memory modules can install one or two memory modules. Allow the module to cool to follow these directions could result in good condition. Installing a memory module with the computer's power on , begin...
User Guide 3
Page 54
Memory slots Front of computer (Sample Illustration) Removing the memory module 4 Replace the memory module slot cover and secure it out of the slot. TECHNICAL NOTE: You must have at least one memory module installed for the computer to a 30-degree angle and slide it using the screw. 5 Re-insert the main battery. For more information on inserting the main battery, see "Inserting a charged battery" on page 114. 6 Turn the computer right side up. 7 Reconnect the cables. 8 Restart the computer. 54 Getting Started Adding memory (optional) 3 Gently lift the memory module to work.
Memory slots Front of computer (Sample Illustration) Removing the memory module 4 Replace the memory module slot cover and secure it out of the slot. TECHNICAL NOTE: You must have at least one memory module installed for the computer to a 30-degree angle and slide it using the screw. 5 Re-insert the main battery. For more information on inserting the main battery, see "Inserting a charged battery" on page 114. 6 Turn the computer right side up. 7 Reconnect the cables. 8 Restart the computer. 54 Getting Started Adding memory (optional) 3 Gently lift the memory module to work.
User Guide 3
Page 55
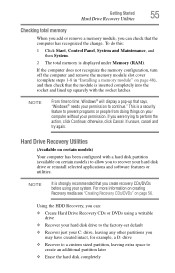
... creating Recovery media see "Creating Recovery CDs/DVDs" on certain models) Your computer has been configured with the socket latches. If the computer does not recognize the memory configuration, turn off the computer and remove the memory module slot cover (complete steps 1-8 in "Installing a memory module" on page 48), and then check that you create recovery CDs/DVDs before using a writable drive ❖ Recover your hard disk drive to the factory-set default ❖ Recover just your system. To do this: 1 Click Start, Control Panel...
... creating Recovery media see "Creating Recovery CDs/DVDs" on certain models) Your computer has been configured with the socket latches. If the computer does not recognize the memory configuration, turn off the computer and remove the memory module slot cover (complete steps 1-8 in "Installing a memory module" on page 48), and then check that you create recovery CDs/DVDs before using a writable drive ❖ Recover your hard disk drive to the factory-set default ❖ Recover just your system. To do this: 1 Click Start, Control Panel...
User Guide 3
Page 67
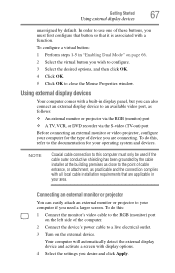
... in "Enabling Dual Mode" on page 66. 2 Select the virtual button you wish to configure. 3 Select the desired options, and then click OK. 4 Click OK. 5 Click OK to the point of these buttons, you desire and click Apply. Connecting an external monitor or projector You can also connect an external display device to an available video port, as close to close the Mouse Properties window. Getting Started Using external display devices 67...
... in "Enabling Dual Mode" on page 66. 2 Select the virtual button you wish to configure. 3 Select the desired options, and then click OK. 4 Click OK. 5 Click OK to the point of these buttons, you desire and click Apply. Connecting an external monitor or projector You can also connect an external display device to an available video port, as close to close the Mouse Properties window. Getting Started Using external display devices 67...
User Guide 3
Page 144
... on-screen instructions to exit. Deleting a user password To cancel the power-on a diskette or media of your choice, or click Cancel to continue without saving the password to a text file. 8 Click OK to remove the user password. The TOSHIBA Assist window appears. 2 On the left side, click the Secure tab. 3 Click the User Password icon. The Toshiba Password Utility window appears. (Sample Image) Toshiba Password Utility window 4 Click Set. 5 Enter your password, and then enter...
... on-screen instructions to exit. Deleting a user password To cancel the power-on a diskette or media of your choice, or click Cancel to continue without saving the password to a text file. 8 Click OK to remove the user password. The TOSHIBA Assist window appears. 2 On the left side, click the Secure tab. 3 Click the User Password icon. The Toshiba Password Utility window appears. (Sample Image) Toshiba Password Utility window 4 Click Set. 5 Enter your password, and then enter...
User Guide 3
Page 174
... error again. 6 If the error recurs, remove the memory module entirely and check for the error again. For more information about Device Manager, refer to the monitor, optical drive, optional external diskette drive, and other power-using resources. ❖ The Driver tab, which lists resources assigned to Windows® online Help. It is causing a problem. The computer shuts down . The tabs that seem to work. Memory problems Incorrectly connected or faulty memory modules may be hardware...
... error again. 6 If the error recurs, remove the memory module entirely and check for the error again. For more information about Device Manager, refer to the monitor, optical drive, optional external diskette drive, and other power-using resources. ❖ The Driver tab, which lists resources assigned to Windows® online Help. It is causing a problem. The computer shuts down . The tabs that seem to work. Memory problems Incorrectly connected or faulty memory modules may be hardware...

User Guide 3
Page 222
... instead of keys that uses a liquid substance between two transparent electrode panels. hot swapping - Interlaced monitors take two passes to interact with the Fn key can set system options or control system parameters, such as the battery save mode. (2) A key or combination of using a pointing device such as a hard disk) into the processor to help improve processing speed. L2 (level two) cache - A group of display that activates a memory resident...
... instead of keys that uses a liquid substance between two transparent electrode panels. hot swapping - Interlaced monitors take two passes to interact with the Fn key can set system options or control system parameters, such as the battery save mode. (2) A key or combination of using a pointing device such as a hard disk) into the processor to help improve processing speed. L2 (level two) cache - A group of display that activates a memory resident...
User Guide 3
Page 229
... files/trouble accessing a disk 179 running slow 179 diskette drive cannot insert a diskette 180 cannot read a diskette 180 connecting 71 external, connecting 71 display does not look normal/flickers 177 external monitor not working 178 screen is blank 177 display device external 67 display output settings 68 display, external adjusting 68 disposal information 25 disposing of used batteries 117 double-click 64 DVD creating 99 DVD player general problems 187 DVD, using 94 E environment computer-friendly 37 error messages device driver...
... files/trouble accessing a disk 179 running slow 179 diskette drive cannot insert a diskette 180 cannot read a diskette 180 connecting 71 external, connecting 71 display does not look normal/flickers 177 external monitor not working 178 screen is blank 177 display device external 67 display output settings 68 display, external adjusting 68 disposal information 25 disposing of used batteries 117 double-click 64 DVD creating 99 DVD player general problems 187 DVD, using 94 E environment computer-friendly 37 error messages device driver...
User Guide 3
Page 231
..., external 69 keyboard, full-size 85 L lock computer, using 82 M main battery removing 112 memory adding 47 problem solving 174 removing expansion slot cover 49 memory module inserting 50 installation 48 removing 54 microphone 129 modem connecting to telephone line 123 determining COM port 122 resetting port to default settings 122 upgrading 122 monitor 67 connecting 67 not working 177 mouse installing 69 serial 69 mouse utility 146 N network accessing 124 Dial-Up Networking Wizard 124 networking wireless 126 Notification Area 121 O opening the display panel 45 optical drive troubleshooting...
..., external 69 keyboard, full-size 85 L lock computer, using 82 M main battery removing 112 memory adding 47 problem solving 174 removing expansion slot cover 49 memory module inserting 50 installation 48 removing 54 microphone 129 modem connecting to telephone line 123 determining COM port 122 resetting port to default settings 122 upgrading 122 monitor 67 connecting 67 not working 177 mouse installing 69 serial 69 mouse utility 146 N network accessing 124 Dial-Up Networking Wizard 124 networking wireless 126 Notification Area 121 O opening the display panel 45 optical drive troubleshooting...
User Guide 3
Page 232
... Device Manager 173 disk drive is slow 179 display is blank 177 external display not working 178 external monitor 177 faulty memory 174 hardware conflict 172 high-pitched noise 182 Internet bookmarked site not found 171 Internet connection is slow 171 keyboard not responding 168 missing files/trouble accessing a disk 179 no sound 181 non-system disk or disk error 169 PC Card 182 checklist 182 error occurs 183 hot swapping fails 183 not recognized 183 slot...
... Device Manager 173 disk drive is slow 179 display is blank 177 external display not working 178 external monitor 177 faulty memory 174 hardware conflict 172 high-pitched noise 182 Internet bookmarked site not found 171 Internet connection is slow 171 keyboard not responding 168 missing files/trouble accessing a disk 179 no sound 181 non-system disk or disk error 169 PC Card 182 checklist 182 error occurs 183 hot swapping fails 183 not recognized 183 slot...


