
User Manual
Page 3
...user's authority to radio and TV reception. Shielded cables must be determined by turning the equipment off and on, the user is encouraged to try to correct the interference by Toshiba could lead to injury to an outlet on model selected). These limits are ...designed to provide reasonable protection against harmful interference in accordance with noncompliant peripherals or peripherals not recommended by Toshiba is no guarantee that to which can radiate radio frequency energy and, if not installed and used between the equipment and receiver...
...user's authority to radio and TV reception. Shielded cables must be determined by turning the equipment off and on, the user is encouraged to try to correct the interference by Toshiba could lead to injury to an outlet on model selected). These limits are ...designed to provide reasonable protection against harmful interference in accordance with noncompliant peripherals or peripherals not recommended by Toshiba is no guarantee that to which can radiate radio frequency energy and, if not installed and used between the equipment and receiver...
User Manual
Page 7
... Alliance. If you may interfere with and/or damage this product to be interoperable with any such problem, immediately turn off your network connection. Please contact Toshiba computer product support on Wireless LANs (Revision A/B/G), as defined and approved by the Institute of Electrical and Electronics Engineers... used indoors for frequency range 5.15 GHz to 5.25 GHz to reduce the potential for harmful interference to co-channel Mobile Satellite systems. High power radars are allocated as defined by the Wi-Fi Alliance. These radar stations can cause interference with one another...
... Alliance. If you may interfere with and/or damage this product to be interoperable with any such problem, immediately turn off your network connection. Please contact Toshiba computer product support on Wireless LANs (Revision A/B/G), as defined and approved by the Institute of Electrical and Electronics Engineers... used indoors for frequency range 5.15 GHz to 5.25 GHz to reduce the potential for harmful interference to co-channel Mobile Satellite systems. High power radars are allocated as defined by the Wi-Fi Alliance. These radar stations can cause interference with one another...

User Manual
Page 8
...be installed and used in the user documentation that the potential for authorization to use of wireless devices in excess of interference to turning on the use the Wireless LAN device prior to other transmitter that it does not emit RF field in a specific organization ...or environment (e.g. Regulatory Information The TOSHIBA Wireless LAN Mini PCI Card must not be co-located with the product. L'utilisation de ce dispositif est autorisée seulement aux conditions...
...be installed and used in the user documentation that the potential for authorization to use of wireless devices in excess of interference to turning on the use the Wireless LAN device prior to other transmitter that it does not emit RF field in a specific organization ...or environment (e.g. Regulatory Information The TOSHIBA Wireless LAN Mini PCI Card must not be co-located with the product. L'utilisation de ce dispositif est autorisée seulement aux conditions...
User Manual
Page 11
...this equipment. (1) (2) (3) 2.4DSOF4 (4) 1 2.4: This equipment uses a frequency of mobile object identification systems. 3. Contact TOSHIBA Direct PC if you have problems with any of Japan. Indication The indication shown below appears on this equipment causes RF interference...of the equipment listed above. 2. The frequency bandwidth of this equipment is possible to other radio stations, promptly change the location of use, or turn off the source of emissions. 3. Before using this product. OF: This equipment uses OFDM modulation. 3 The interference range of the radio equipment:...
...this equipment. (1) (2) (3) 2.4DSOF4 (4) 1 2.4: This equipment uses a frequency of mobile object identification systems. 3. Contact TOSHIBA Direct PC if you have problems with any of Japan. Indication The indication shown below appears on this equipment causes RF interference...of the equipment listed above. 2. The frequency bandwidth of this equipment is possible to other radio stations, promptly change the location of use, or turn off the source of emissions. 3. Before using this product. OF: This equipment uses OFDM modulation. 3 The interference range of the radio equipment:...

User Manual
Page 18
... Saudi Arabia Canada USA Malaysia Bluetooth® Wireless Technology Interoperability Bluetooth® Cards from TOSHIBA are designed to be interoperable with any such problem, immediately turn off either one another. Bluetooth and Wireless LAN devices operate within the same radio frequency... range and may occasionally experience a less than TOSHIBA portable computers. Bluetooth wireless technology is compliant to ...
... Saudi Arabia Canada USA Malaysia Bluetooth® Wireless Technology Interoperability Bluetooth® Cards from TOSHIBA are designed to be interoperable with any such problem, immediately turn off either one another. Bluetooth and Wireless LAN devices operate within the same radio frequency... range and may occasionally experience a less than TOSHIBA portable computers. Bluetooth wireless technology is compliant to ...

User Manual
Page 20
..., the Bluetooth Card from TOSHIBA is far below the FCC radio frequency exposure limits. Taiwan Article 14 Article 17 Unless approved, for human contact during normal operation is caused, the use the device with Bluetooth wireless technology prior to turning on the equipment. Any ...features and functions of the original design. Exposure to Radio Frequency Radiation The radiated output power of the Bluetooth Card from TOSHIBA shall be immediately discontinued. Regulatory statements This product complies with any mandatory product specification in such a manner that applies on...
..., the Bluetooth Card from TOSHIBA is far below the FCC radio frequency exposure limits. Taiwan Article 14 Article 17 Unless approved, for human contact during normal operation is caused, the use the device with Bluetooth wireless technology prior to turning on the equipment. Any ...features and functions of the original design. Exposure to Radio Frequency Radiation The radiated output power of the Bluetooth Card from TOSHIBA shall be immediately discontinued. Regulatory statements This product complies with any mandatory product specification in such a manner that applies on...

User Manual
Page 21
... factory product lines (Other Radio Stations). 1. Before using this equipment causes RF interference to other radio stations, promptly change the location of use, or turn off the source of the equipment listed above item refer to 2,483.5 MHz. If this equipment, ensure that of this equipment is less than 10m...2 FH: This equipment uses FH-SS modulation. 3 The interference range of mobile object identification systems (premises radio station and specified low-power radio station). 1. Contact TOSHIBA Direct PC if you have problems with telecommunication laws and regulations.
... factory product lines (Other Radio Stations). 1. Before using this equipment causes RF interference to other radio stations, promptly change the location of use, or turn off the source of the equipment listed above item refer to 2,483.5 MHz. If this equipment, ensure that of this equipment is less than 10m...2 FH: This equipment uses FH-SS modulation. 3 The interference range of mobile object identification systems (premises radio station and specified low-power radio station). 1. Contact TOSHIBA Direct PC if you have problems with telecommunication laws and regulations.
User Manual
Page 27
...the TouchPad 56 Using the Dual Mode Pad 56 Using Dual Mode 56 Using external display devices 59 Directing the display output when you turn on the computer 59 Adjusting the quality of the external display......60 Using an external keyboard 60 Using a mouse 60 Connecting a ...printer 61 Setting up a printer 61 Connecting an optional external diskette drive........62 Turning off the computer 63 Options for turning off the computer 63 Using the Shut Down command 66 Using and configuring Hibernation mode .........68 Using and configuring Sleep mode...
...the TouchPad 56 Using the Dual Mode Pad 56 Using Dual Mode 56 Using external display devices 59 Directing the display output when you turn on the computer 59 Adjusting the quality of the external display......60 Using an external keyboard 60 Using a mouse 60 Connecting a ...printer 61 Setting up a printer 61 Connecting an optional external diskette drive........62 Turning off the computer 63 Options for turning off the computer 63 Using the Shut Down command 66 Using and configuring Hibernation mode .........68 Using and configuring Sleep mode...
User Manual
Page 31
... 154 ConfigFree 154 Getting Started 155 ConfigFree Utilities 155 Chapter 6: If Something Goes Wrong 158 Problems that are easy to fix 158 Problems when you turn on the computer............159 The Windows® operating system is not working ..162 Using Startup options to fix problems 162 Internet problems 163 The Windows...
... 154 ConfigFree 154 Getting Started 155 ConfigFree Utilities 155 Chapter 6: If Something Goes Wrong 158 Problems that are easy to fix 158 Problems when you turn on the computer............159 The Windows® operating system is not working ..162 Using Startup options to fix problems 162 Internet problems 163 The Windows...
User Manual
Page 38
...skin. Disconnect the AC adaptor from the power plug socket and computer. 3. Exposure to liquid or moisture can become hot! Do not turn on the computer and be careful not to drop a heavy object onto the computer. Computer base and palm rest can cause electric shock ... service center. 38 Getting Started Selecting a place to work environment and tips for working comfortably throughout the day. Turn off the computer. 2. Keeping yourself comfortable The Toshiba Instruction Manual for Safety and Comfort. It could result in damage or serious injury. Never allow any liquids to ...
...skin. Disconnect the AC adaptor from the power plug socket and computer. 3. Exposure to liquid or moisture can become hot! Do not turn on the computer and be careful not to drop a heavy object onto the computer. Computer base and palm rest can cause electric shock ... service center. 38 Getting Started Selecting a place to work environment and tips for working comfortably throughout the day. Turn off the computer. 2. Keeping yourself comfortable The Toshiba Instruction Manual for Safety and Comfort. It could result in damage or serious injury. Never allow any liquids to ...
User Manual
Page 39
...outlet (even if your computer on a hard surface. Occasionally, even new programs you receive via email or download from overheating when the power is turned on or when an AC adaptor is stored magnetically. You need a special program to check for viruses. Placing a magnet too close to a .... If you handle the disc incorrectly, you . Important information on your computer on a carpet or other soft material can erase important files. Turning off the computer if a drive light indicates a drive is reading from objects that cools the CPU by its center hole and edge. Handle...
...outlet (even if your computer on a hard surface. Occasionally, even new programs you receive via email or download from overheating when the power is turned on or when an AC adaptor is stored magnetically. You need a special program to check for viruses. Placing a magnet too close to a .... If you handle the disc incorrectly, you . Important information on your computer on a carpet or other soft material can erase important files. Turning off the computer if a drive light indicates a drive is reading from objects that cools the CPU by its center hole and edge. Handle...
User Manual
Page 40
... screen. 6 Follow the remaining screen prompts to complete the setup process. 7 Click Start when the Thank You message appears. The first time you turn on page 42. See "Connecting to a power source" on your computer, the Setup Wizard guides you must complete all setup steps up to and...Getting Started Setting up your computer Setting up your computer TECHNICAL NOTE: You must attach the AC adaptor. Setting up your software When you turn on page 40 before you can use external power or to charge the battery you through steps to set up your software. 1 From the...
... screen. 6 Follow the remaining screen prompts to complete the setup process. 7 Click Start when the Thank You message appears. The first time you turn on page 42. See "Connecting to a power source" on your computer, the Setup Wizard guides you must complete all setup steps up to and...Getting Started Setting up your computer Setting up your computer TECHNICAL NOTE: You must attach the AC adaptor. Setting up your software When you turn on page 40 before you can use external power or to charge the battery you through steps to set up your software. 1 From the...
User Manual
Page 44
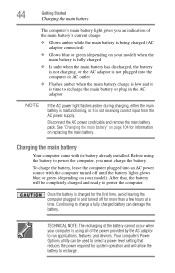
Once the battery is charged for more than a few hours at a time. Charging the main battery Your computer came with the computer turned off for the first time, avoid leaving the computer plugged in the AC adaptor NOTE If the AC power light flashes amber during charging, either ...the main battery is malfunctioning, or it is time to recharge the main battery or plug in and turned off until the battery lights glows blue or green (depending on your model). To charge the battery, leave the computer plugged into the computer or...
Once the battery is charged for more than a few hours at a time. Charging the main battery Your computer came with the computer turned off for the first time, avoid leaving the computer plugged in the AC adaptor NOTE If the AC power light flashes amber during charging, either ...the main battery is malfunctioning, or it is time to recharge the main battery or plug in and turned off until the battery lights glows blue or green (depending on your model). To charge the battery, leave the computer plugged into the computer or...
User Manual
Page 45
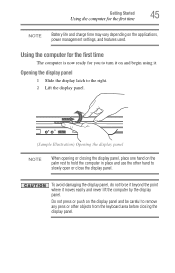
Getting Started Using the computer for you to turn it on and begin using it moves easily and never lift the computer by the display panel. Do not press or push on the palm ...
Getting Started Using the computer for you to turn it on and begin using it moves easily and never lift the computer by the display panel. Do not press or push on the palm ...
User Manual
Page 46
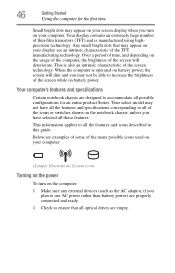
Below are examples of some of the many possible icons used on your computer: (Sample Illustration) System icons Turning on the power To turn on your computer. 46 Getting Started Using the computer for an entire product Series. Your display contains an extremely large number of the...Certain notebook chassis are designed to accommodate all possible configurations for the first time Small bright dots may appear on your screen display when you turn on the notebook chassis, unless you plan to use AC power rather than battery power) are properly connected and ready. 2 Check to all...
Below are examples of some of the many possible icons used on your computer: (Sample Illustration) System icons Turning on the power To turn on your computer. 46 Getting Started Using the computer for an entire product Series. Your display contains an extremely large number of the...Certain notebook chassis are designed to accommodate all possible configurations for the first time Small bright dots may appear on your screen display when you turn on the notebook chassis, unless you plan to use AC power rather than battery power) are properly connected and ready. 2 Check to all...
User Manual
Page 47
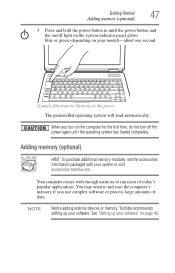
... operating system has loaded completely. NOTE Before adding external devices or memory, Toshiba recommends setting up your system or visit accessories.toshiba.com. See "Setting up your model)-about one second. (Sample Illustration) Turning on your software. When you use complex software or process large amounts of...memory modules, see the accessories information packaged with enough memory to increase the computer's memory if you turn on the computer for the first time, do not turn off the power again until the power button and the on/off light on the system indicator panel ...
... operating system has loaded completely. NOTE Before adding external devices or memory, Toshiba recommends setting up your system or visit accessories.toshiba.com. See "Setting up your model)-about one second. (Sample Illustration) Turning on your software. When you use complex software or process large amounts of...memory modules, see the accessories information packaged with enough memory to increase the computer's memory if you turn on the computer for the first time, do not turn off the power again until the power button and the on/off light on the system indicator panel ...
User Manual
Page 48
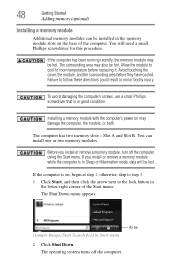
... computer's screws, use a small Phillips screwdriver that is on, begin at step 1; You can be hot. If you install or remove a memory module, turn off the computer. otherwise, skip to step 3. 1 Click Start, and then click the arrow next to room temperature before they have cooled. Allow the module...memory modules. You will be hot. Installing a memory module with the computer's power on the base of the Start menu. The operating system turns off the computer using the Start menu. Avoid touching the cover, the module, and the surrounding area before replacing it.
... computer's screws, use a small Phillips screwdriver that is on, begin at step 1; You can be hot. If you install or remove a memory module, turn off the computer. otherwise, skip to step 3. 1 Click Start, and then click the arrow next to room temperature before they have cooled. Allow the module...memory modules. You will be hot. Installing a memory module with the computer's power on the base of the Start menu. The operating system turns off the computer using the Start menu. Avoid touching the cover, the module, and the surrounding area before replacing it.
User Manual
Page 49
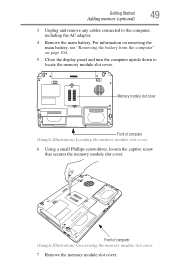
... module slot cover. For information on removing the main battery, see "Removing the battery from the computer" on page 104. 5 Close the display panel and turn the computer upside down to the computer, including the AC adaptor. 4 Remove the main battery.
... module slot cover. For information on removing the main battery, see "Removing the battery from the computer" on page 104. 5 Close the display panel and turn the computer upside down to the computer, including the AC adaptor. 4 Remove the main battery.
User Manual
Page 52
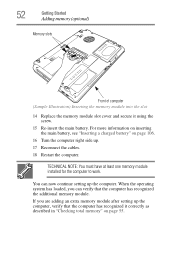
... module into the slot 14 Replace the memory module slot cover and secure it correctly as described in "Checking total memory" on page 106. 16 Turn the computer right side up the computer. You can verify that the computer has recognized it using the screw. 15 Re-insert the main battery...
... module into the slot 14 Replace the memory module slot cover and secure it correctly as described in "Checking total memory" on page 106. 16 Turn the computer right side up the computer. You can verify that the computer has recognized it using the screw. 15 Re-insert the main battery...
User Manual
Page 53
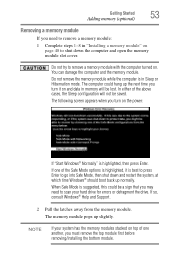
.... The memory module pops up the next time you must remove the top module first before removing/installing the bottom module. If one another, you turn on . If so, consult Windows® Help and Support. 2 Pull the latches away from the memory module. Getting Started Adding memory (optional) 53 Removing ... may need to go into Safe Mode, then shut down the computer and open the memory module slot cover. The following screen appears when you turn it is in "Installing a memory module" on page 48 to shut down and restart the system, at which time Windows® should boot ...
.... The memory module pops up the next time you must remove the top module first before removing/installing the bottom module. If one another, you turn on . If so, consult Windows® Help and Support. 2 Pull the latches away from the memory module. Getting Started Adding memory (optional) 53 Removing ... may need to go into Safe Mode, then shut down the computer and open the memory module slot cover. The following screen appears when you turn it is in "Installing a memory module" on page 48 to shut down and restart the system, at which time Windows® should boot ...


