
Printable Spec Sheet
Page 1
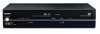
... ADVANTAGE Combines the picture and sound advantages of a progressive scan DVD player with today's finest analog and digital televisions for watching a DVD while recording a TV program. JPEG Viewer3 enables a user to display digital photographs on a television set to make a recording. SD-V296 DVD/VCR Combo Player SD-V296 DVD/VCR Combo Player Fitting more entertainment value into less shelf space just...
... ADVANTAGE Combines the picture and sound advantages of a progressive scan DVD player with today's finest analog and digital televisions for watching a DVD while recording a TV program. JPEG Viewer3 enables a user to display digital photographs on a television set to make a recording. SD-V296 DVD/VCR Combo Player SD-V296 DVD/VCR Combo Player Fitting more entertainment value into less shelf space just...
Printable Spec Sheet
Page 2
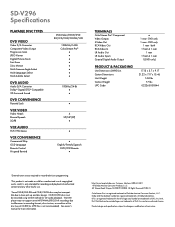
...it is not recommended). http://www.tacp.toshiba.com Customer Solutions: 800.631.3811 © Toshiba America Consumer Products, L.L.C. 82 Totowa Road, Wayne, NJ 07470 (2008). SD-V296 Specifications PLAYABLE DISC TYPES DVD VIDEO Video D/A Converter Component Video Output ...DVD CONVENIENCE Parental Lock VCR VIDEO Video Heads Record Speeds SQPB VCR AUDIO Hi-Fi VHS Stereo VCR CONVENIENCE Commercial Skip OSD Language Remote Control Hi-speed Rewind DVD-Video/DVD-R/DVD RW/CD/CD-R/CD-RW/VCD 108MHz/14-Bit ColorStream Pro® 192kHz/24-Bit 4 SP/SLP (EP) English/French/Spanish DVD/VCR...
...it is not recommended). http://www.tacp.toshiba.com Customer Solutions: 800.631.3811 © Toshiba America Consumer Products, L.L.C. 82 Totowa Road, Wayne, NJ 07470 (2008). SD-V296 Specifications PLAYABLE DISC TYPES DVD VIDEO Video D/A Converter Component Video Output ...DVD CONVENIENCE Parental Lock VCR VIDEO Video Heads Record Speeds SQPB VCR AUDIO Hi-Fi VHS Stereo VCR CONVENIENCE Commercial Skip OSD Language Remote Control Hi-speed Rewind DVD-Video/DVD-R/DVD RW/CD/CD-R/CD-RW/VCD 108MHz/14-Bit ColorStream Pro® 192kHz/24-Bit 4 SP/SLP (EP) English/French/Spanish DVD/VCR...
Owner's Manual - English
Page 1
Model number: Serial number: 2008/07/14 10:36:07 Precautions Setup VCR Functions DVD Functions Information DVD VIDEO PLAYER / VIDEO CASSETTE RECORDER SD-V296KU Español © 2008 Toshiba Corporation E8EB5UD_SD-V296KU_EN_ES_v1.indd 1 Owner's Record The model number and serial number are on the back of your Toshiba dealer about this product. Refer to these numbers in the spaces below. Record these numbers whenever you communicate with your product.
Model number: Serial number: 2008/07/14 10:36:07 Precautions Setup VCR Functions DVD Functions Information DVD VIDEO PLAYER / VIDEO CASSETTE RECORDER SD-V296KU Español © 2008 Toshiba Corporation E8EB5UD_SD-V296KU_EN_ES_v1.indd 1 Owner's Record The model number and serial number are on the back of your Toshiba dealer about this product. Refer to these numbers in the spaces below. Record these numbers whenever you communicate with your product.
Owner's Manual - English
Page 4
...to civil and/or criminal liability. Use of this unit at least for 2 hours until its inside the unit when it is moved from DVD to VCR mode automatically. EN 2008/07/14 10:36:14 Do not place anything directly on the sides of the unit. Do not block the ... in some headings in a horizontal and stable position. Auto Power Off and Screen Saver Function (DVD Only) If the player is spilled on this unit: • Install the unit in this 480p DVD recorder, please contact Toshiba Customer Service. Dolby and the double-D symbol are fully compatible with this product and may occur...
...to civil and/or criminal liability. Use of this unit at least for 2 hours until its inside the unit when it is moved from DVD to VCR mode automatically. EN 2008/07/14 10:36:14 Do not place anything directly on the sides of the unit. Do not block the ... in some headings in a horizontal and stable position. Auto Power Off and Screen Saver Function (DVD Only) If the player is spilled on this unit: • Install the unit in this 480p DVD recorder, please contact Toshiba Customer Service. Dolby and the double-D symbol are fully compatible with this product and may occur...
Owner's Manual - English
Page 5
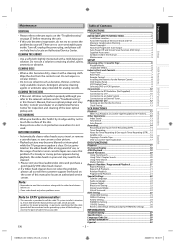
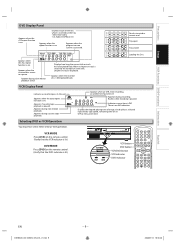
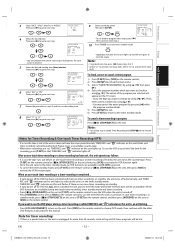
... and Controls 7 Front Panel ...7 Rear Panel...7 Remote Control ...8 Installing the Batteries for the Remote Control 8 DVD Display Panel 9 VCR Display Panel 9 Selecting DVD or VCR Operation 9 Connections 10 Connection to RF Modulator (Not Supplied 10 Connection to a TV 10 Connection to an Audio... ...13 Auto Repeat...14 Recording 14 Recording & One-touch Timer Recording (OTR 14 Timer Recording 14 Notes for Timer Recording & One-touch Timer Recording (OTR).....15 Satellite Link ...16 Copying a Cassette Tape 16 DVD to Cassette Tape Duplication 17 DVD FUNCTIONS Playback 17 On-Screen...
... and Controls 7 Front Panel ...7 Rear Panel...7 Remote Control ...8 Installing the Batteries for the Remote Control 8 DVD Display Panel 9 VCR Display Panel 9 Selecting DVD or VCR Operation 9 Connections 10 Connection to RF Modulator (Not Supplied 10 Connection to a TV 10 Connection to an Audio... ...13 Auto Repeat...14 Recording 14 Recording & One-touch Timer Recording (OTR 14 Timer Recording 14 Notes for Timer Recording & One-touch Timer Recording (OTR).....15 Satellite Link ...16 Copying a Cassette Tape 16 DVD to Cassette Tape Duplication 17 DVD FUNCTIONS Playback 17 On-Screen...
Owner's Manual - English
Page 6
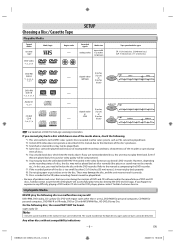
...above . Refer to the manual accompanying the DVD recorder. *7: If the recorded portion of the disc is a trademark of DVD Format/Logo Licensing Corporation. super audio CD Note: • Only the sound recorded on this DVD player, please contact Toshiba Customer Service. Choosing a Disc / Cassette... of the disc's producers. *3: Scratched or stained discs may not be played back because of incompatible recording conditions, characteristics of DVD and CD discs, Toshiba cannot assure that this manual due to the NTSC color system. If you happen to the disc. However...
...above . Refer to the manual accompanying the DVD recorder. *7: If the recorded portion of the disc is a trademark of DVD Format/Logo Licensing Corporation. super audio CD Note: • Only the sound recorded on this DVD player, please contact Toshiba Customer Service. Choosing a Disc / Cassette... of the disc's producers. *3: Scratched or stained discs may not be played back because of incompatible recording conditions, characteristics of DVD and CD discs, Toshiba cannot assure that this manual due to the NTSC color system. If you happen to the disc. However...
Owner's Manual - English
Page 7
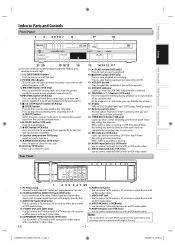
..., or to adjust the tracking during a recording, OTR (One-touch Timer Recording) or timer recording. Cassette compartment (VCR only) Insert a cassette tape here. 9. VCR/DVD button Press to select the component you can stabilize the picture. 16. Español DIGITAL AUDIO OUT DVD AUDIO OUT S-VIDEO OUT COMPONENT VIDEO OUT Y DVD/VCR VCR AUDIO OUT AUDIO IN L L L COAXIAL R CB...
..., or to adjust the tracking during a recording, OTR (One-touch Timer Recording) or timer recording. Cassette compartment (VCR only) Insert a cassette tape here. 9. VCR/DVD button Press to select the component you can stabilize the picture. 16. Español DIGITAL AUDIO OUT DVD AUDIO OUT S-VIDEO OUT COMPONENT VIDEO OUT Y DVD/VCR VCR AUDIO OUT AUDIO IN L L L COAXIAL R CB...
Owner's Manual - English
Page 8
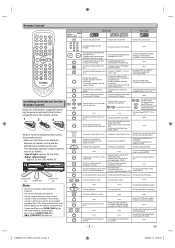
... Always remove batteries from the unit are as follows. - SPEED • To select the recording speed. STOP SUBTITLE T-SET • To stop playback or recording. • To put the VCR into standby mode for a timer recording. • To adjust the tracking manually during clock and timer programming. • To select...into the battery compartment. • If you turn the unit on/off. 123 456 789 0 +10 A-B ANGLE AUDIO CLEAR/ C.RESET DISPLAY DVD ENTER INPUT SELECT MENU MODE OPEN/CLOSE PAUSE PLAY REC/OTR REPEAT RETURN SEARCH MODE SETUP • To select chapter or title directly. •...
... Always remove batteries from the unit are as follows. - SPEED • To select the recording speed. STOP SUBTITLE T-SET • To stop playback or recording. • To put the VCR into standby mode for a timer recording. • To adjust the tracking manually during clock and timer programming. • To select...into the battery compartment. • If you turn the unit on/off. 123 456 789 0 +10 A-B ANGLE AUDIO CLEAR/ C.RESET DISPLAY DVD ENTER INPUT SELECT MENU MODE OPEN/CLOSE PAUSE PLAY REC/OTR REPEAT RETURN SEARCH MODE SETUP • To select chapter or title directly. •...
Owner's Manual - English
Page 9
...cassette tape playback. There is activated. Appears during recording; PM Indicates current time is in the unit. VCR MODE Press [VCR] on the remote control. (Verify that the DVD indicator is lit.) VCR button DVD button VCR/DVD button VCR indicator DVD indicator Español EN E8EB5UD_SD-V296KU_EN_ES_v1.indd ... on . Appears when the auto repeat function is displayed. flashes when recording is being played back. Selecting DVD or VCR Operation You must first select either DVD or VCR operation. No disc inserted or cannot read Tray open Tray closed Appears ...
...cassette tape playback. There is activated. Appears during recording; PM Indicates current time is in the unit. VCR MODE Press [VCR] on the remote control. (Verify that the DVD indicator is lit.) VCR button DVD button VCR/DVD button VCR indicator DVD indicator Español EN E8EB5UD_SD-V296KU_EN_ES_v1.indd ... on . Appears when the auto repeat function is displayed. flashes when recording is being played back. Selecting DVD or VCR Operation You must first select either DVD or VCR operation. No disc inserted or cannot read Tray open Tray closed Appears ...
Owner's Manual - English
Page 11
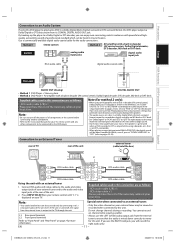
... unit. You cannot record on your TV, stereo system and any other components to be heard in movie theaters. Connection to an External Tuner rear of TV rear of the unit external tuner (cable/satellite box) DIGITAL AUDIO OUT DVD AUDIO OUT S-VIDEO OUT COMPONENT VIDEO OUT Y DVD/VCR AUDIO OUT L VCR AUDIO IN L L AUDIO...
... unit. You cannot record on your TV, stereo system and any other components to be heard in movie theaters. Connection to an External Tuner rear of TV rear of the unit external tuner (cable/satellite box) DIGITAL AUDIO OUT DVD AUDIO OUT S-VIDEO OUT COMPONENT VIDEO OUT Y DVD/VCR AUDIO OUT L VCR AUDIO IN L L AUDIO...
Owner's Manual - English
Page 13
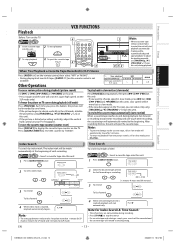
...stop playback STOP 2 To start playback PLAY 4 To eject the cassette tape OPEN/CLOSE 2 1 Note: • When a cassette tape without a record tab is inserted, the unit will start automatically. TIME SEARCH 2 : 5 0 or 0:01~ 9:59 (1 minute~9 hours and 59 minutes) ...in slow motion (slow mode) Press [PAUSE F] during playback. VCR • Insert a cassette tape into this unit. 1 Press [SEARCH MODE] twice. Precautions Setup VCR Functions DVD Functions Information Playback VCR FUNCTIONS Before: Turn on the TV. 4 VCR 1 Insert a cassette tape into this unit. 3 To stop ...
...stop playback STOP 2 To start playback PLAY 4 To eject the cassette tape OPEN/CLOSE 2 1 Note: • When a cassette tape without a record tab is inserted, the unit will start automatically. TIME SEARCH 2 : 5 0 or 0:01~ 9:59 (1 minute~9 hours and 59 minutes) ...in slow motion (slow mode) Press [PAUSE F] during playback. VCR • Insert a cassette tape into this unit. 1 Press [SEARCH MODE] twice. Precautions Setup VCR Functions DVD Functions Information Playback VCR FUNCTIONS Before: Turn on the TV. 4 VCR 1 Insert a cassette tape into this unit. 3 To stop ...
Owner's Manual - English
Page 14
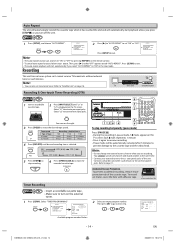
... to prevent damage to activate rear input jacks. Refer to external tuner. TV this unit external tuner Recording & One-touch Timer Recording (OTR) VCR 1 Insert a recordable cassette tape. 2 Press [INPUT SELECT] until desired recording time is displayed on the TV screen. OPEN/CLOSE 6 3 2 5 1 56 4 4 To... at the same time. • Connect your external tuner to turn off the unit. erase-protection tab Timer Recording VCR • Insert a recordable cassette tape. • Make sure to the L1 (rear panel) jacks of the cassette tape. REC SPEED - - - 14 - M E ...
... to prevent damage to activate rear input jacks. Refer to external tuner. TV this unit external tuner Recording & One-touch Timer Recording (OTR) VCR 1 Insert a recordable cassette tape. 2 Press [INPUT SELECT] until desired recording time is displayed on the TV screen. OPEN/CLOSE 6 3 2 5 1 56 4 4 To... at the same time. • Connect your external tuner to turn off the unit. erase-protection tab Timer Recording VCR • Insert a recordable cassette tape. • Make sure to the L1 (rear panel) jacks of the cassette tape. REC SPEED - - - 14 - M E ...
Owner's Manual - English
Page 15
... indicator on the unit. After an one-touch timer recording or a timer recording has been set, this unit blinks and timer recording cannot be performed. In case timer recording is finished, the unit ejects the cassette tape. Precautions Setup VCR Functions DVD Functions Information 3 Select "ONCE", "DAILY" (Mon-Fri.... Then press [B] to go back one -touch timer recording or a timer recording is in standby mode, press [ C/A (STOP/EJECT)] on this unit or [T-SET] on the remote control, and then press [VCR/DVD] on this unit or [VCR] on this unit operates as follows: • If...
... indicator on the unit. After an one-touch timer recording or a timer recording has been set, this unit blinks and timer recording cannot be performed. In case timer recording is finished, the unit ejects the cassette tape. Precautions Setup VCR Functions DVD Functions Information 3 Select "ONCE", "DAILY" (Mon-Fri.... Then press [B] to go back one -touch timer recording or a timer recording is in standby mode, press [ C/A (STOP/EJECT)] on this unit or [T-SET] on the remote control, and then press [VCR/DVD] on this unit or [VCR] on this unit operates as follows: • If...
Owner's Manual - English
Page 16
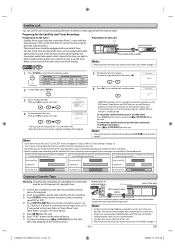
Preparing for the Satellite Link Timer Recording: Preparation on this unit L1 DIGITAL AUDIO OUT DVD AUDIO OUT S-VIDEO OUT COMPONENT VIDEO OUT Y DVD/VCR VCR AUDIO OUT AUDIO IN L L L COAXIAL R CB/ PB R R VIDEO OUT VIDEO IN CR/ PR external tuner RCA audio/video cables Note: • Please purchase the ...OFF] CLOCK SET LANGUAGE SELECT 4 Set the desired start minutes. output jacks of external device AUDIO OUT L or R VIDEO OUT L1 RCA audio/video cables DVD/VCR VCR AUDIO OUT AUDIO IN L L R R VIDEO OUT VIDEO IN rear of the satellite link timer recording satellite link timer...
Preparing for the Satellite Link Timer Recording: Preparation on this unit L1 DIGITAL AUDIO OUT DVD AUDIO OUT S-VIDEO OUT COMPONENT VIDEO OUT Y DVD/VCR VCR AUDIO OUT AUDIO IN L L L COAXIAL R CB/ PB R R VIDEO OUT VIDEO IN CR/ PR external tuner RCA audio/video cables Note: • Please purchase the ...OFF] CLOCK SET LANGUAGE SELECT 4 Set the desired start minutes. output jacks of external device AUDIO OUT L or R VIDEO OUT L1 RCA audio/video cables DVD/VCR VCR AUDIO OUT AUDIO IN L L R R VIDEO OUT VIDEO IN rear of the satellite link timer recording satellite link timer...
Owner's Manual - English
Page 17
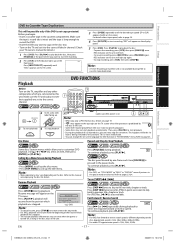
...Make sure the TV and audio receiver (not supplied) are blurred. Then, press [PLAY B] to start the recording. 2 Press [VCR] so VCR indicator lights up again. • To stop playback STOP PLAY Disc Menu DVD DVD FUNCTIONS 1 1 3 4 Lights up when power is on. 1 243 Note: • When you want ...(once for a moment. Press [PLAY B] to play back the disc. • To pause the recording, press [VCR], then press [PAUSE F] once. "REC" will light up on the display panel. 5 Press [DVD]. REC indicator on this unit will resume from here. Paused and Step-by one more time in the...
...Make sure the TV and audio receiver (not supplied) are blurred. Then, press [PLAY B] to start the recording. 2 Press [VCR] so VCR indicator lights up again. • To stop playback STOP PLAY Disc Menu DVD DVD FUNCTIONS 1 1 3 4 Lights up when power is on. 1 243 Note: • When you want ...(once for a moment. Press [PLAY B] to play back the disc. • To pause the recording, press [VCR], then press [PAUSE F] once. "REC" will light up on the display panel. 5 Press [DVD]. REC indicator on this unit will resume from here. Paused and Step-by one more time in the...


